Platform Engineering Workshop in a Single Page
Platform Engineering Workshop
Introduction
Many organizations today are grappling with serious challenges that hinder their development teams’ productivity. High cognitive load, lack of standardization, and fragmented domain knowledge are common issues that lead to inefficiencies, increased maintenance costs, and even security vulnerabilities.
Red Hat provides the tools and know-how to help "The Providers" (Platform Engineers) to create "The Product" (their internal developer portal) based on the needs of "The Customers" (all Development Teams within the organization).
Primary Audience
This workshop is designed for Platform Engineers who are in charge of:
-
Creating standards for technologies that are used across environments (Development, Testing, Production)
-
Defining processes that maximize Development Teams' efficiency, by unburdening them from platform details.
This workshop is built in a learn-by-example style, where we show you how to create, set up, and manage an IDP using Red Hat Developer Hub. The workshop is opinionated and should be viewed as an example of how to approach things. As always, make sure you, as a Platform Engineer, build what your customers (Development Teams) need by soliciting early feedback to ensure you’re on the right track.
Secondary Audience
This workshop can also help Development Teams who are in charge of creating a software solution, and empower (traditionally speaking) in picking their own tools for coding, building, deploying, running, monitoring and documentation.
Key Takeways
After completing this workshop you’ll:
-
Understand the need to implement Platform Engineering disciplines within your organization.
-
See clear benefits from improving Developer Productivity.
-
Be ready to deploy a Thinnest Viable Platform (TVP) based on the needs of the development teams in your organization, and focus on increasing their productivity.
-
Assess the investments into your own IDP and understand how it can be enhanced, and convince development teams to start adopting it.
-
View Red Hat as a partner in your Platform Engineering journey.
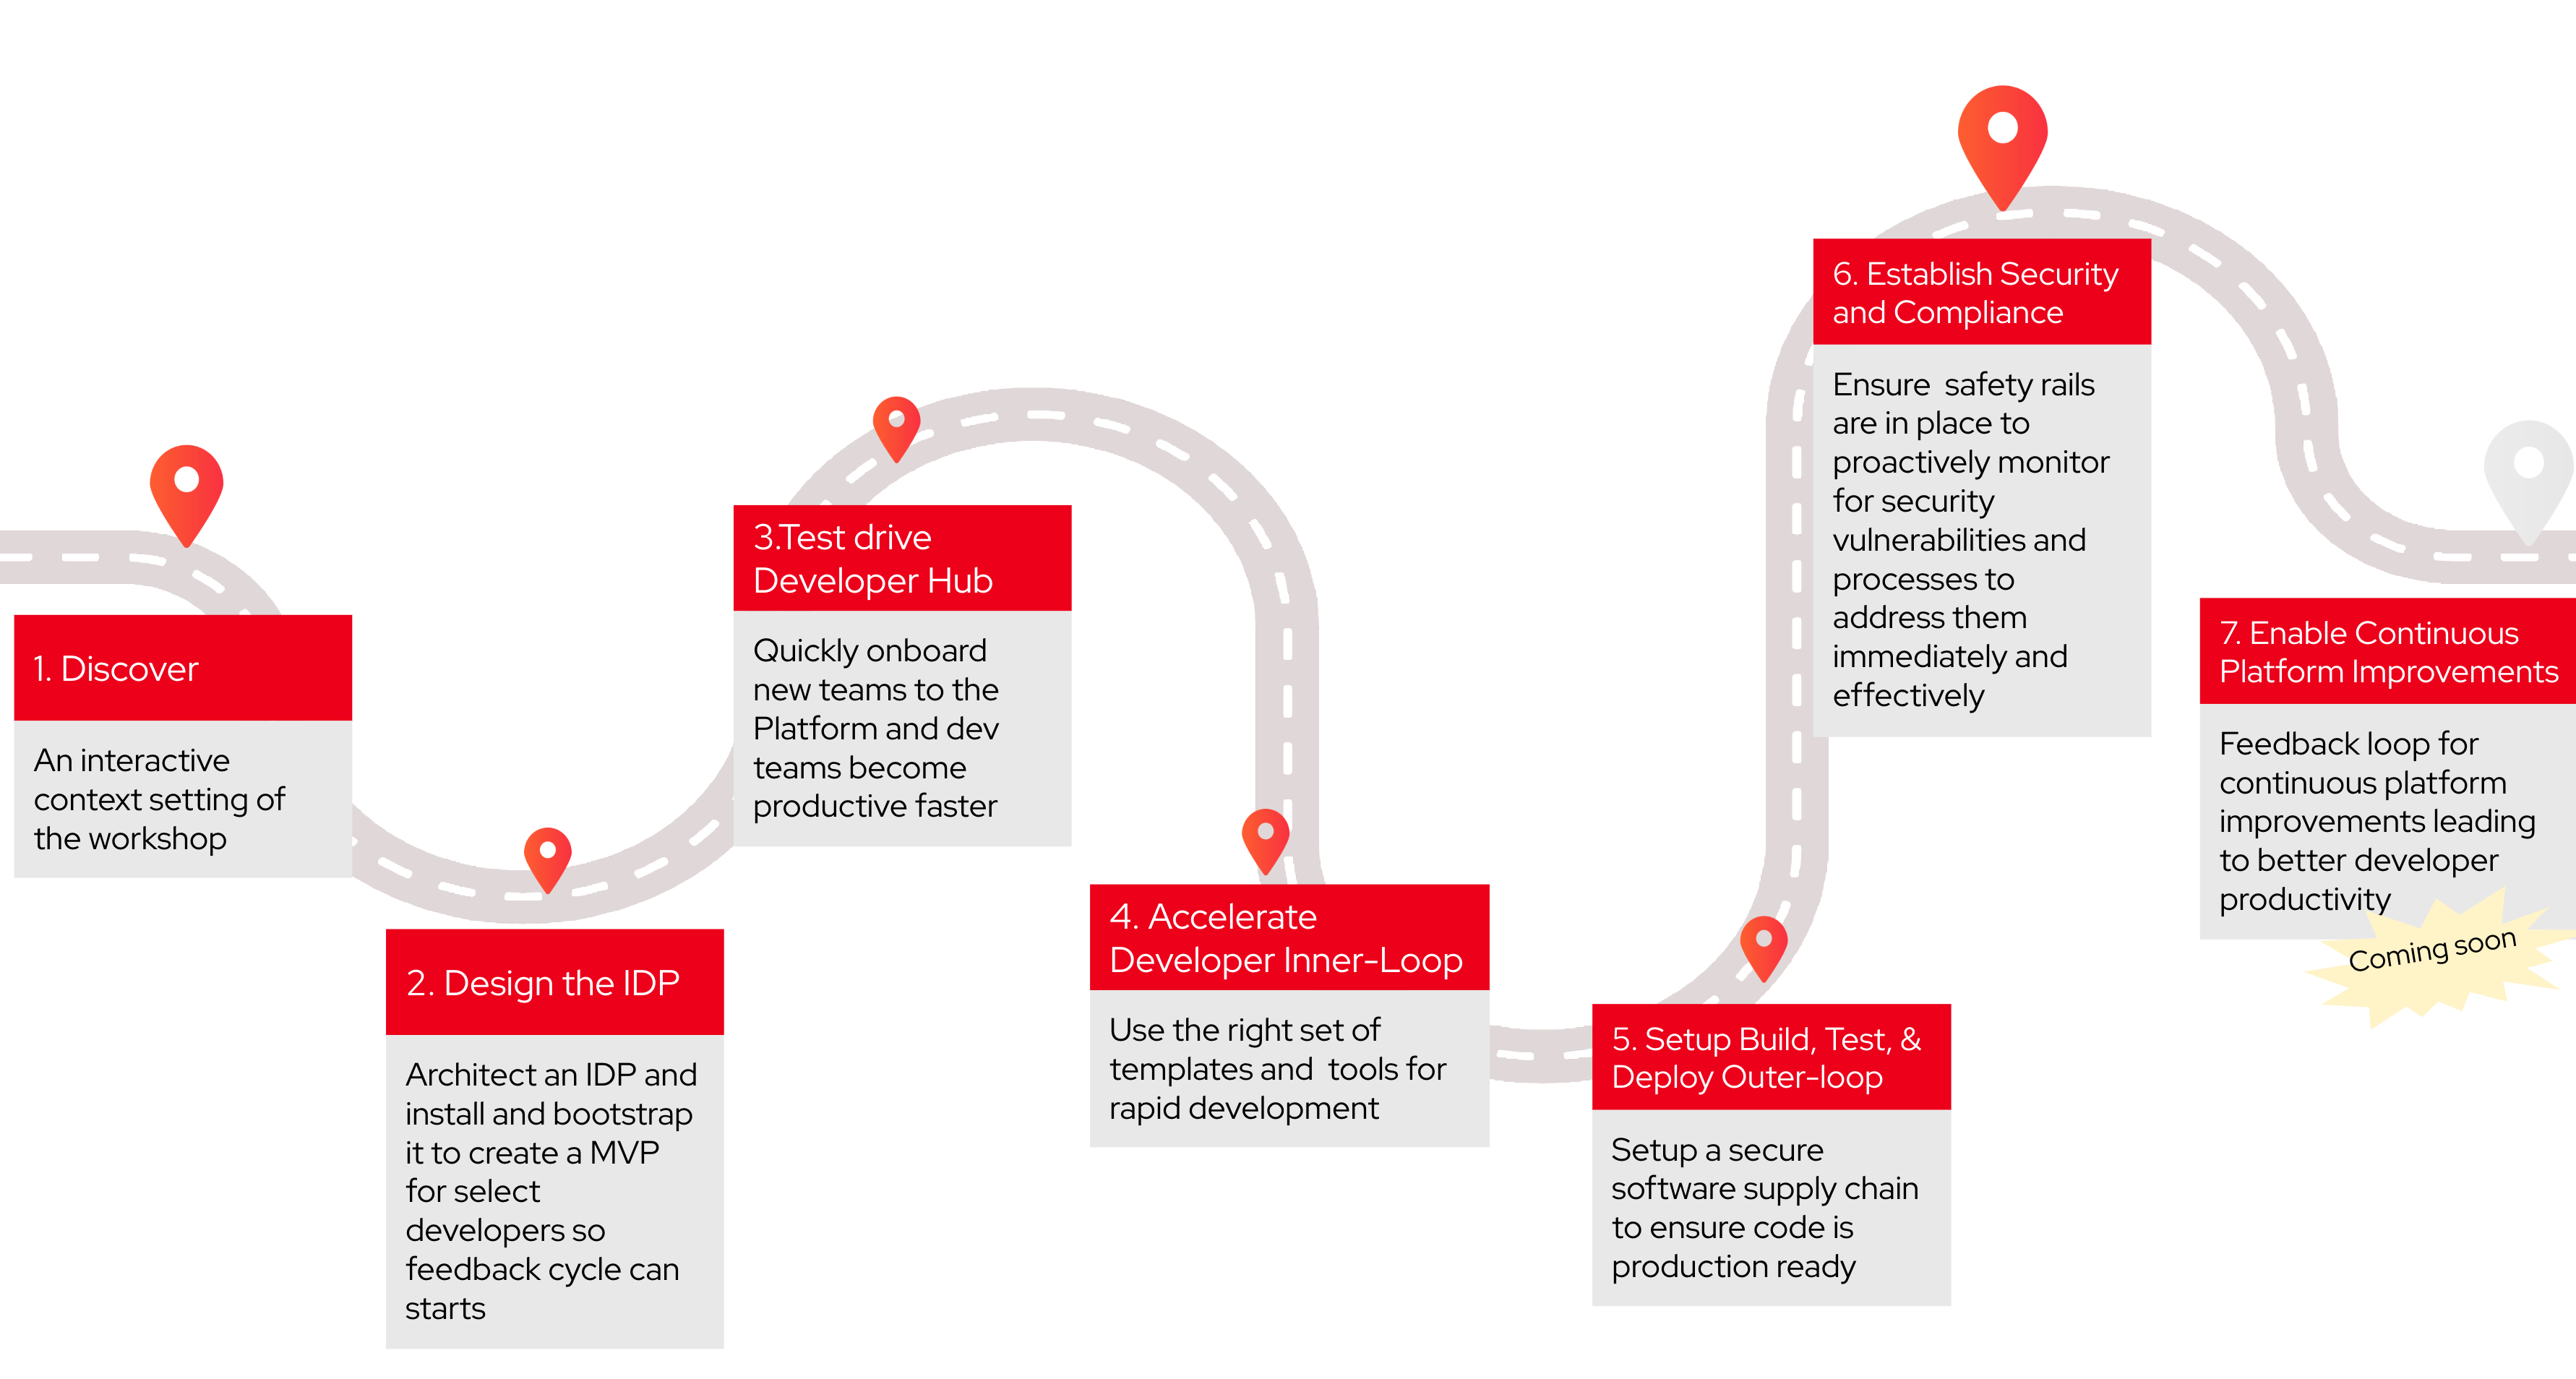
The following image is a journey map of the workshop modules. The modules must be executed sequentially.
Module 1: Discovery
Objectives
-
Discuss the challenges currently faced by developers and the need for an Internal Developer Platform
-
Learn why a developer platform is necessary for rapid innovation
Hello Parasol!
Parasol is an Insurance company but looking at rapidly expanding into different other verticals such as retail etc. With business booming, and their online presence increasing, the teams also grow in numbers. But the team, while being quite technically proficient, is quite siloed in their way of working especially because they are widespread and this results in difficulties in collaborating with each other.
With a rapidly evolving and expanding team, it is getting harder and harder for the team to keep up with
-
knowing who is doing what
-
onboarding new team members and get them to be effective ASAP
-
identifying existing reusable artifacts - reuse please!
-
providing self-service for developers without need to be listening to a please-wait music tone
-
offering choices of features, and easy ways to hit the road running
The team hears about the magic words - Internal Developer Platform (IDP), and some research shows that Red Hat Developer Hub would be perfect because of how customizable it is and especially the fact that it can run on on-prem to air gap sensitive content.
Hello Red Hat Developer Hub!
Red Hat Developer Hub streamlines development through a unified and open platform that reduces cognitive load and frustration for developers. It provides pre-architected and supported approaches that can help Parasol get their applications into production faster and more securely—without sacrificing code quality.
Red Hat Developer Hub and its associated plugins extend the popular upstream Backstage project by providing additional features such as integration with OpenShift, enterprise role-based access control (RBAC), and dynamic plugins - while including all the nice goodies that come with Backstage project itself.
Hello Workshop!
In this workshop, you will walk through in the steps of the platform engineers
-
discover what this Internal Developer Platform (IDP) is all about
-
how to design, architect and roll out a TVP (Thinnest Viable Product)
-
gain feedback from developers through a test-drive
-
onboard existing applications for a single-pane-of-glass approach
-
setup workflows - from laptop to Production
All of this boiling down to how to setup Development Teams up for success in a cloud native, AI infused world!
Module 2: Design the Internal Developer Portal
Overview
Red Hat Developer Hub is based on the Backstage project for building internal developer portals. This project was donated to the CNCF by Spotify in 2020. Platform engineers can use Red Hat Developer Hub to build internal developer portals. Doing so involves integrating Red Hat Developer Hub with various data sources, cataloging existing software components, infrastructure, and resources, configuring single sign-on, and more.
In this module you’ll learn how to architect, install, and bootstrap an instance of Red Hat Developer Hub to create a minimum viable internal developer portal for a select group of developers within your organization.
The initial use cases for your developer portal are:
-
Self-service discovery of software components and dependencies.
-
Visibility into CI/CD pipelines.
-
Hosting documentation.
-
Scaffolding projects that adhere to organizational best practices.
Module Objectives
Satisfying the previously defined use cases involves configuring Red Hat Developer Hub to integrate with your existing platforms, tools, and infrastructure. For example, if your organization uses OpenShift Pipelines for continuous integration, you’ll need to configure the Red Hat Developer Hub instance with the appropriate integration to fetch and display data from an OpenShift cluster used to perform Pipeline Runs.
It could be said that the value of an internal developer portal is proportional to the thought and energy invested into it by the platform engineer(s), and developers using it.
In this module you’ll:
-
Identify the platform requirements and dependencies, such as single sign-on (SSO), source code management (SCM), RBAC, resources, existing assets
-
Integrate Red Hat Developer Hub with the dependant services, such as GitLab and Keycloak
-
Learn about Backstage Entities, e.g. Components, APIs, and Docs
-
Ready the platform for developer onboarding
Workshop Environment
Your workshop environment has been preconfigured with the following software and platform components:
-
Red Hat Build of Keycloak
-
OpenShift GitOps
-
OpenShift Pipelines
-
GitLab
For the purposes of this workshop, we’ll assume that your organization has standardized on these tools, and it’s your objective as the platform engineer to integrate them with Red Hat Developer Hub. :imagesdir: ../../assets/images
Introduction to Concepts
Red Hat Developer Hub, and internal developer portals in general, can be thought of as a modular system where you aggregate and display data related to the software within an organization.
The core features of Red Hat Developer Hub are the:
-
Software Catalog
-
Software Templates
-
TechDocs
-
Kubernetes Integration
-
Dynamic Plugins
-
Role-Based Access Control (RBAC)
Software Templates
Software Templates have been referred to as "Golden Paths" in the past. These templates are designed and curated by platform engineers to provide a starting point for new software components that adhere to best practices within an organization. Templates can also be used to patch and update existing source code repositories, and provide general automation and self-service for developer chores.
We’ll dive deeper into Software Templates in another module!
Software Catalog
The Software Catalog is a centralised asset tracker for all of the software in your organization. It stores and tracks Entities:
-
Components: Units of software, e.g. microservices, websites, libraries.
-
Resources: Databases, S3 buckets, brokers.
-
APIs: Represent interfaces such as REST, gRPC, and GraphQL APIs.
-
Systems: Collections of Components that make up an application or platform.
-
Domains: A higher-level grouping of Systems and Entities.
-
User: Individual users that are part of your organization.
-
Group: Groups of Users.
| Custom Entity types can be defined and added to the Software Catalog using plugins. We’ll talk more about on plugins in subsequent sections. |
Entities are typically imported and synchronized in one of three ways:
-
Using plugins that automatically find and import them.
-
Manually registering entities via the UI by providing a link to a repository containing them.
-
Declaring them in the Backstage configuration.
In all cases, the Entities will be synchronized on a regular schedule to ensure the information in the Software Catalog remains up to date. You’ll utilize all three methods throughout this workshop.
If Entity information is stored in a Git repository, the convention is to place them in a catalog-info.yaml. This file will look similar to the following example:
apiVersion: backstage.io/v1alpha1
kind: Component
metadata:
  name: my-amazing-microservice
  description: A microservice written to do amazing things

  # Annotations are typically used to provide extra context to plugins, e.g TechDocs
  annotations:
    # Tells the TechDocs plugin where to find documentation sources. In this case
    # "dir:." means in the root of the repo containing this catalog-info.yaml
    backstage.io/techdocs-ref: dir:.

  # Arbitrary list of string that can be used to filter Entities in the Software Catalog
  tags:
    - docs

spec:
  type: Documentation
  lifecycle: development

  # Reference to the User or Group Entity that is responsible this Component
  owner: "pe1"
Users and Groups can be specified as owners of other Entities. If this seems abstract, don’t worry, you’ll see it in definitive terms shortly. A well curated Software Catalog will enable your developers to find API documentation and teams that are responsible for the Components powering those APIs, for example.
Plugins
Backstage - and by extension Red Hat Developer Hub - supports the concept of plugins. Utilizing plugins is a critical part of enabling the desired functionality for your IDP.
Currently, running an instance of Backstage and adding plugins to upstream Backstage requires a platform engineer to:
-
Create a Backstage project using Node.js and npm.
-
Manage new releases and updates via Backstage CLI.
-
Install plugin(s) from npm.
-
Edit the Backstage React and Node.js source code to load plugins, and add customizations.
-
Test their changes.
-
Build a container image and deploy it.
The ability to load plugins dynamically is a value added feature included in Red Hat Developer Hub that’s currently unavailable in upstream Backstage - you can read more about it in the Red Hat Developer Hub documentation. The dynamic plugin support in Red Hat Developer Hub means that new plugins can be installed without the need to edit code and rebuild the Red Hat Developer Hub container image.
You’ll see dynamic plugins in action shortly.
Understanding the Red Hat Developer Hub Configuration
Upstream Backstage uses an app-config.yaml file to define configuration values. Red Hat Developer Hub is no different.
A simple Backstage configuration file looks similar to the following example:
# Define authentication configuration (this example is for testing only!)
auth:
  providers:
    guest:
      dangerouslyAllowOutsideDevelopment: true

# Static configuration for the Software Catalog. Can be used to import
# entities on startup, and restrict the entity types that can be imported.
catalog:
  rules:
    - allow: [Component, System, API, Resource, Location, Template]
  locations:
    - type: file
      target: https://github.com/org-name/repo-name/entities.yaml

# A configuration for the TechDocs plugin. This example instructs the plugin to
# build documentation at runtime, instead of pulling prebuilt HTML from S3
techdocs:
  builder: 'local'
  publisher:
    type: 'local'
  generator:
    runIn: local
Since you’ll be using the Red Hat Developer Hub Helm Chart to install and manage your internal developer portal, your configuration is nested under an upstream.backstage.appConfig property in a Helm Values file. View your configuration by visiting your rhdh/developer-hub-config repository on GitLab.
Your workshop environment has been pre-configured such that this repository in GitLab is continuously monitored and deployed using OpenShift GitOps. We’ll cover this in more detail shortly.
With that out of the way, let’s get to work on configuring your instance of Red Hat Developer Hub! :imagesdir: ../../assets/images
Activity: Access Red Hat Developer Hub
Red Hat Developer Hub has been pre-deployed with a base configuration in your workshop environment. You can find and access your instance in the backstage project on OpenShift.
Login to Red Hat Developer Hub:
-
Visit the backstage project in your OpenShift cluster. You can login as admin/{common_password}
-
Select the backstage-developer-hub Deployment in the Topology View.
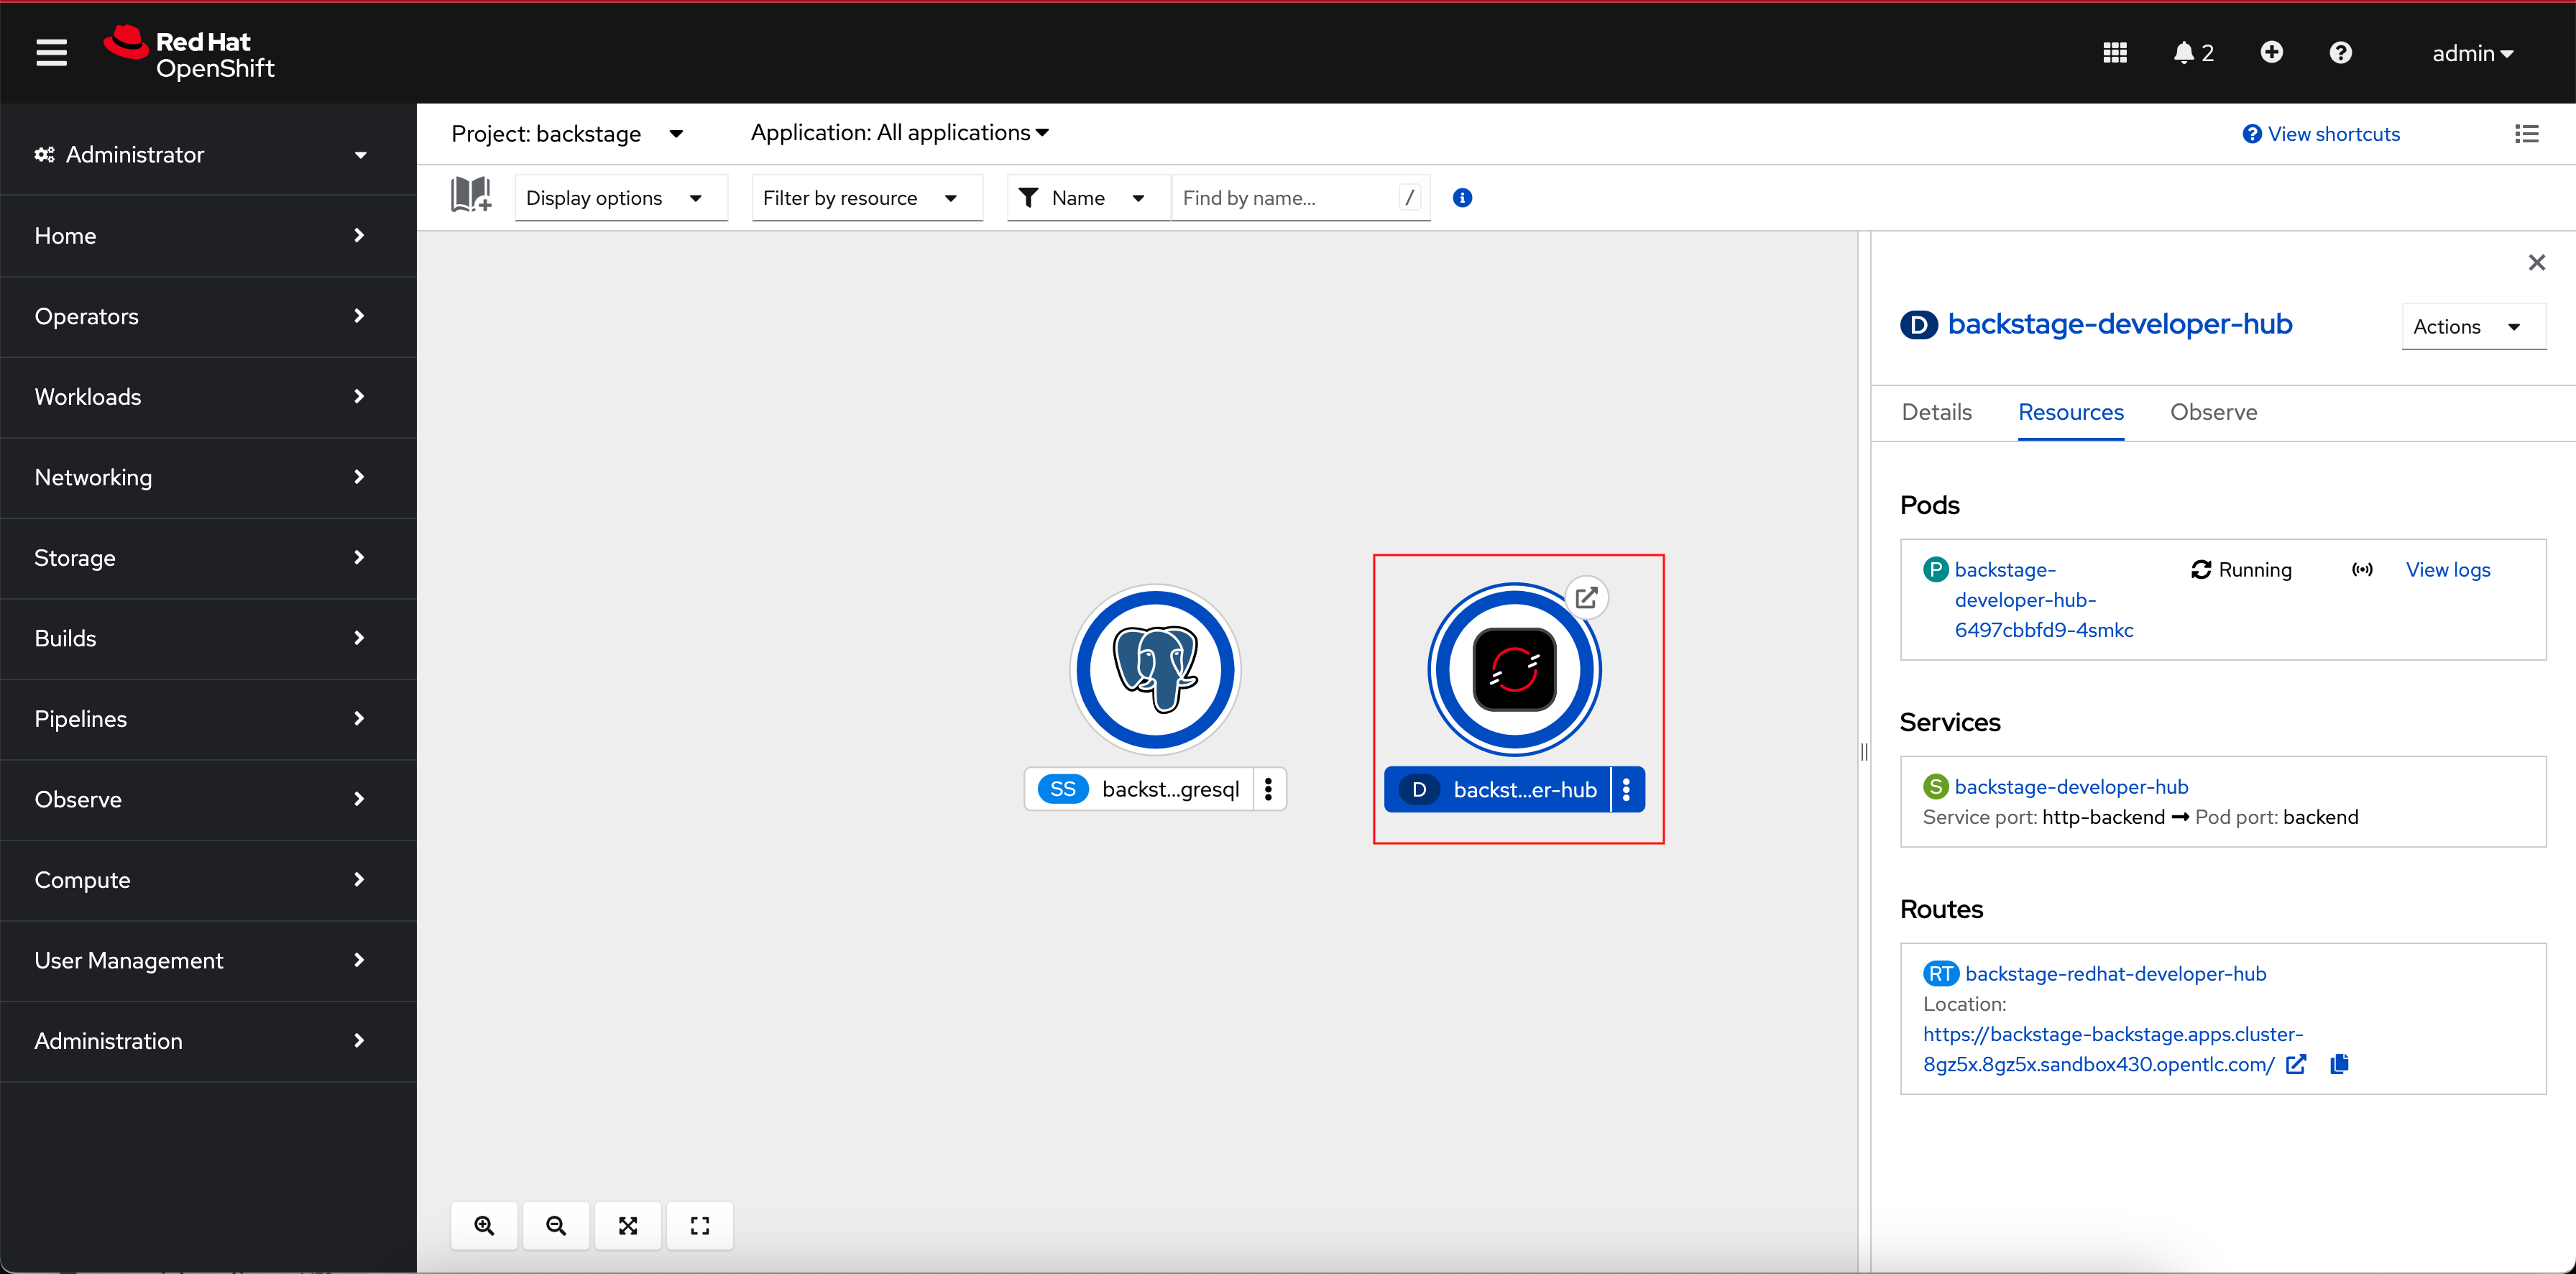
-
Click the URL listed under the Resources tab; it will be similar to https://backstage-backstage.{openshift_cluster_ingress_domain}
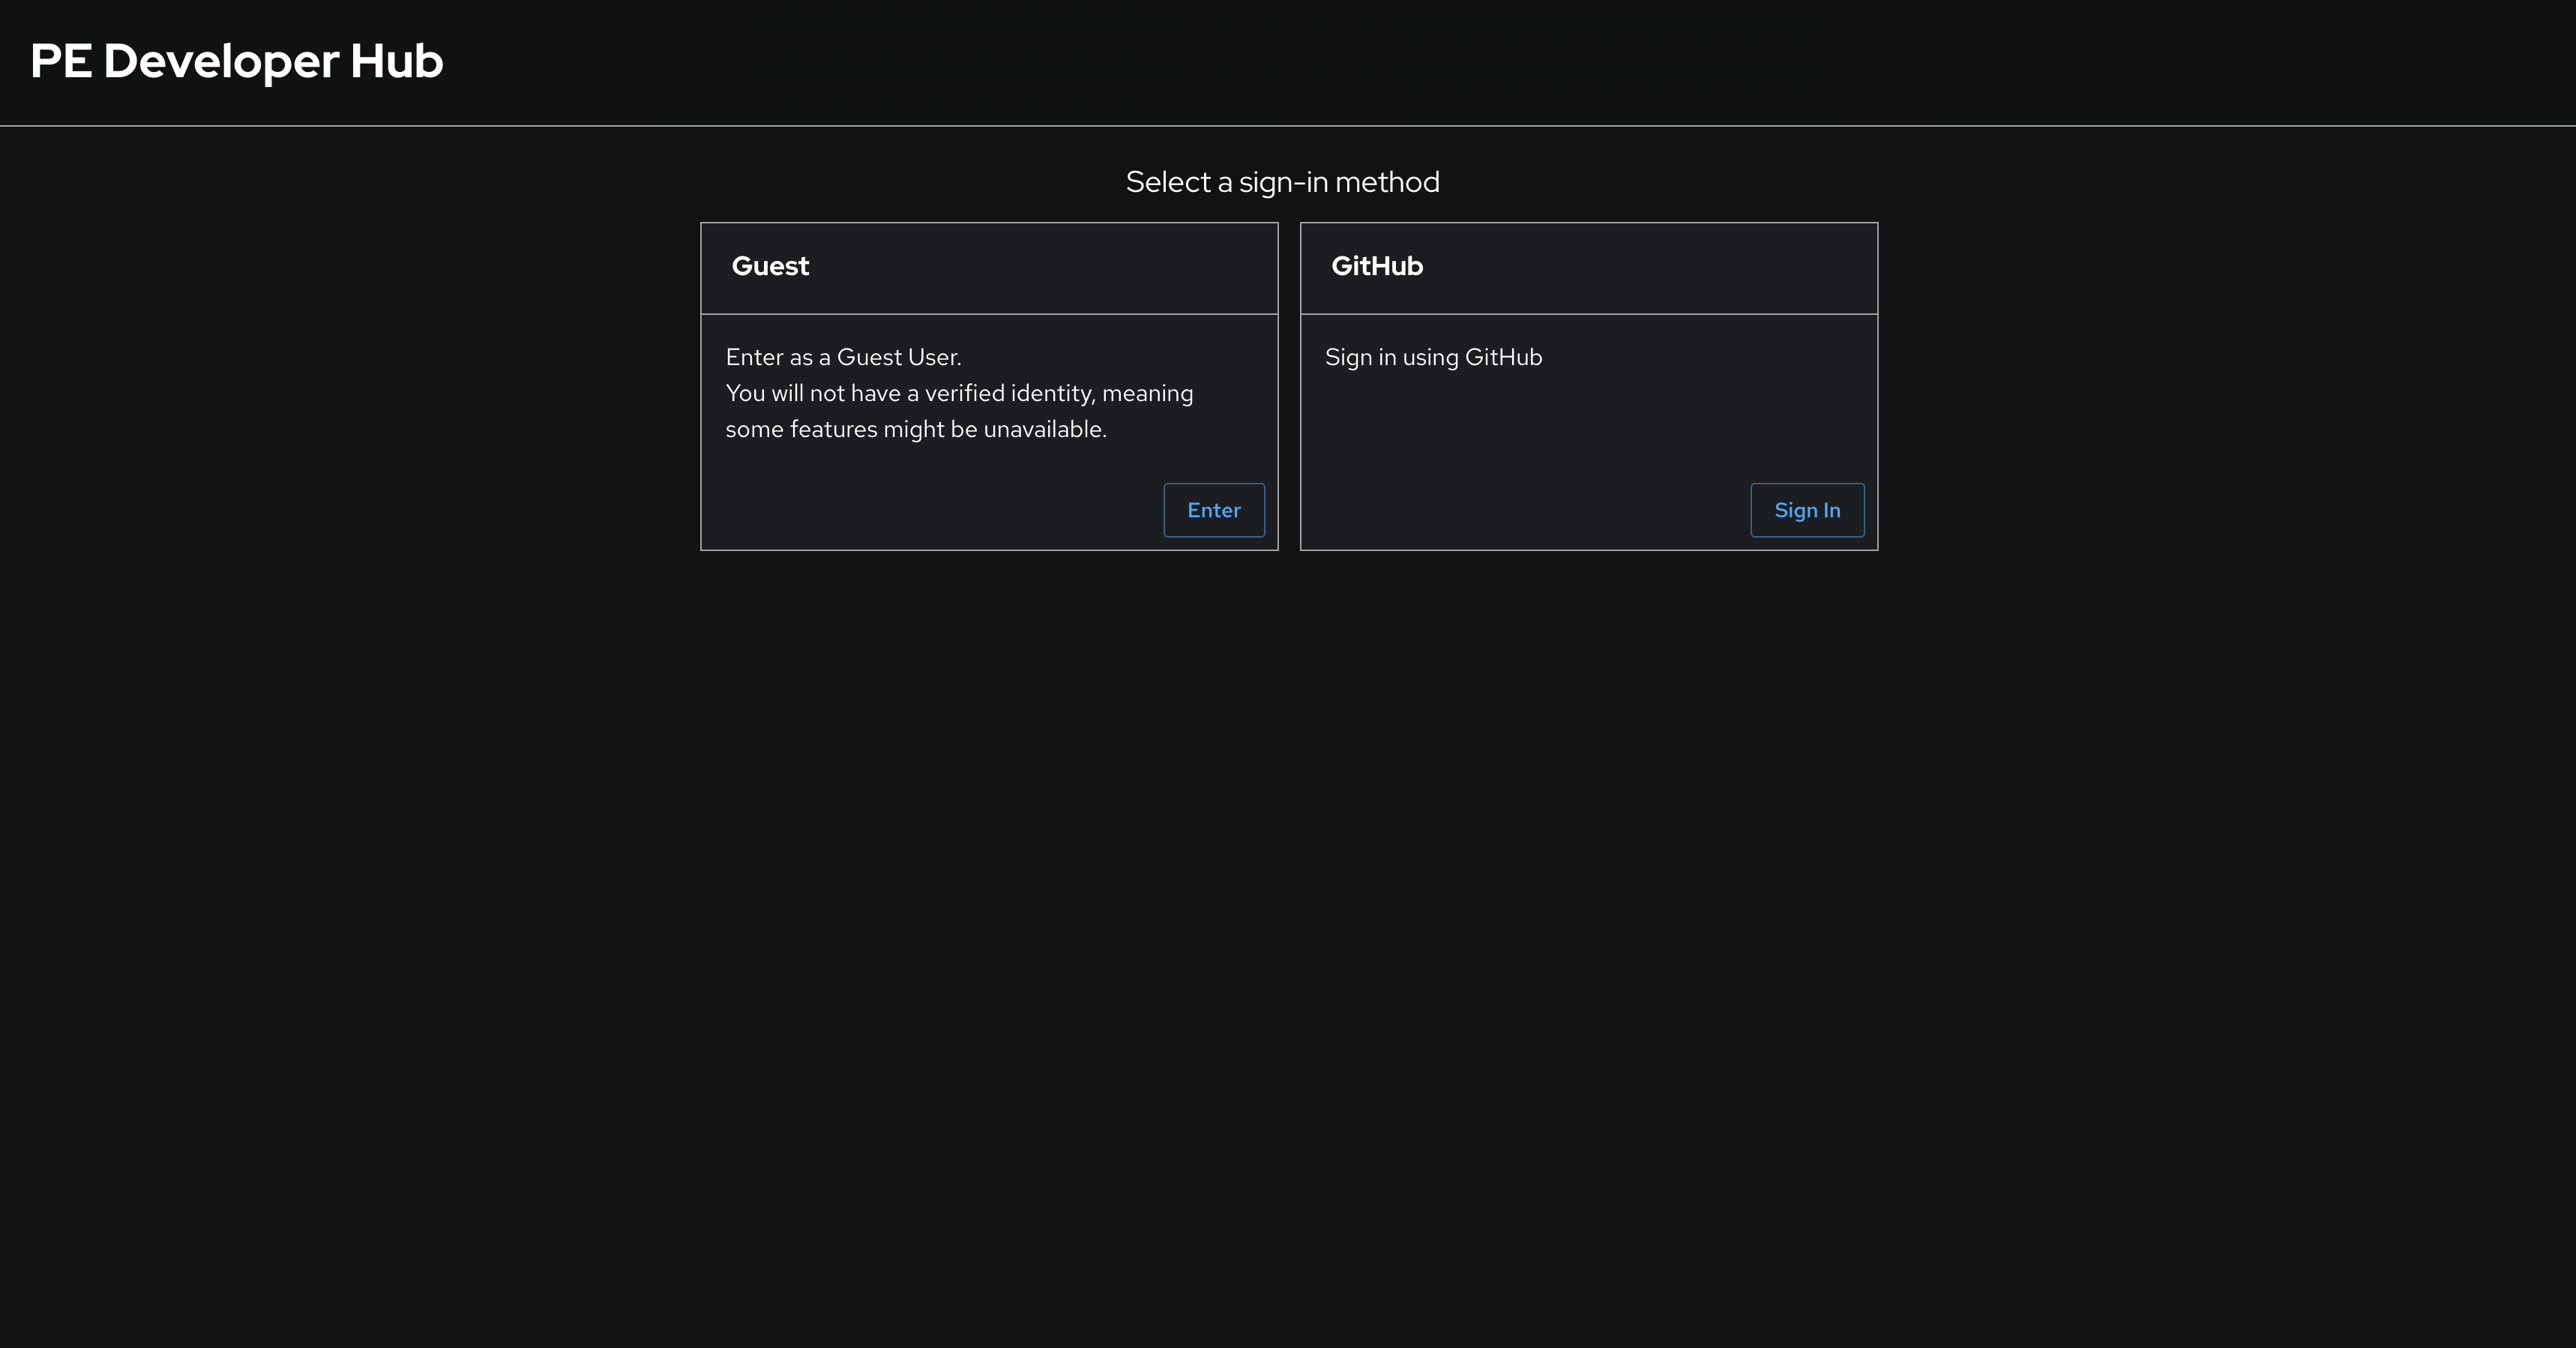
The sign-in page will be displayed, with the option to login as a Guest. Click the Enter button to use the Guest sign-in.
| Ignore the GitHub sign-in method if it’s displayed. It is not configured and will not work. |
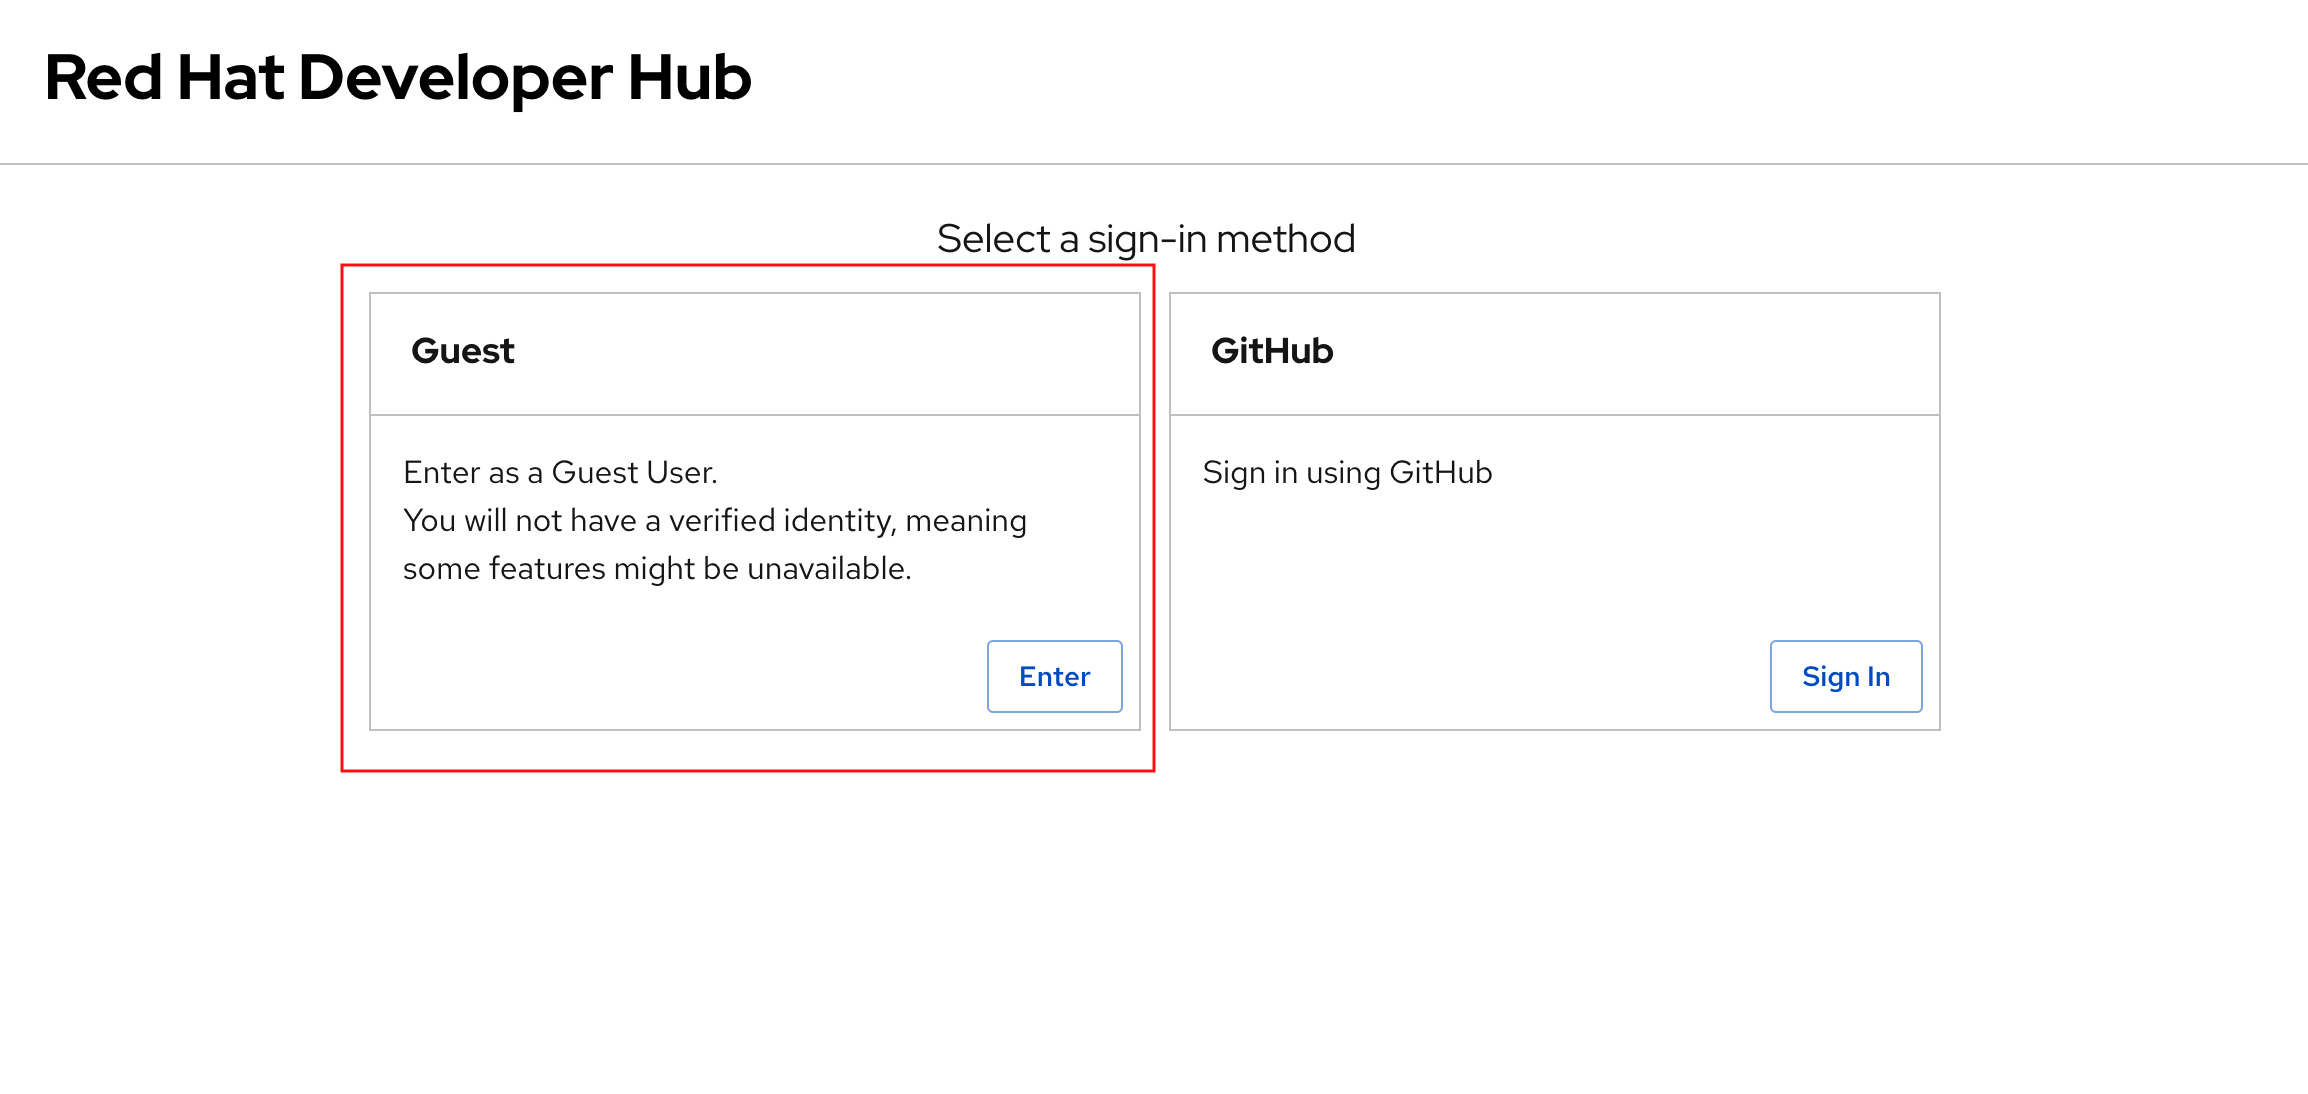
| The Guest sign-in option is currently enabled, but you’ll configure a production-ready sign-in option based on OpenID Connect shortly. The Guest sign-in option is only meant for development and testing purposes. |
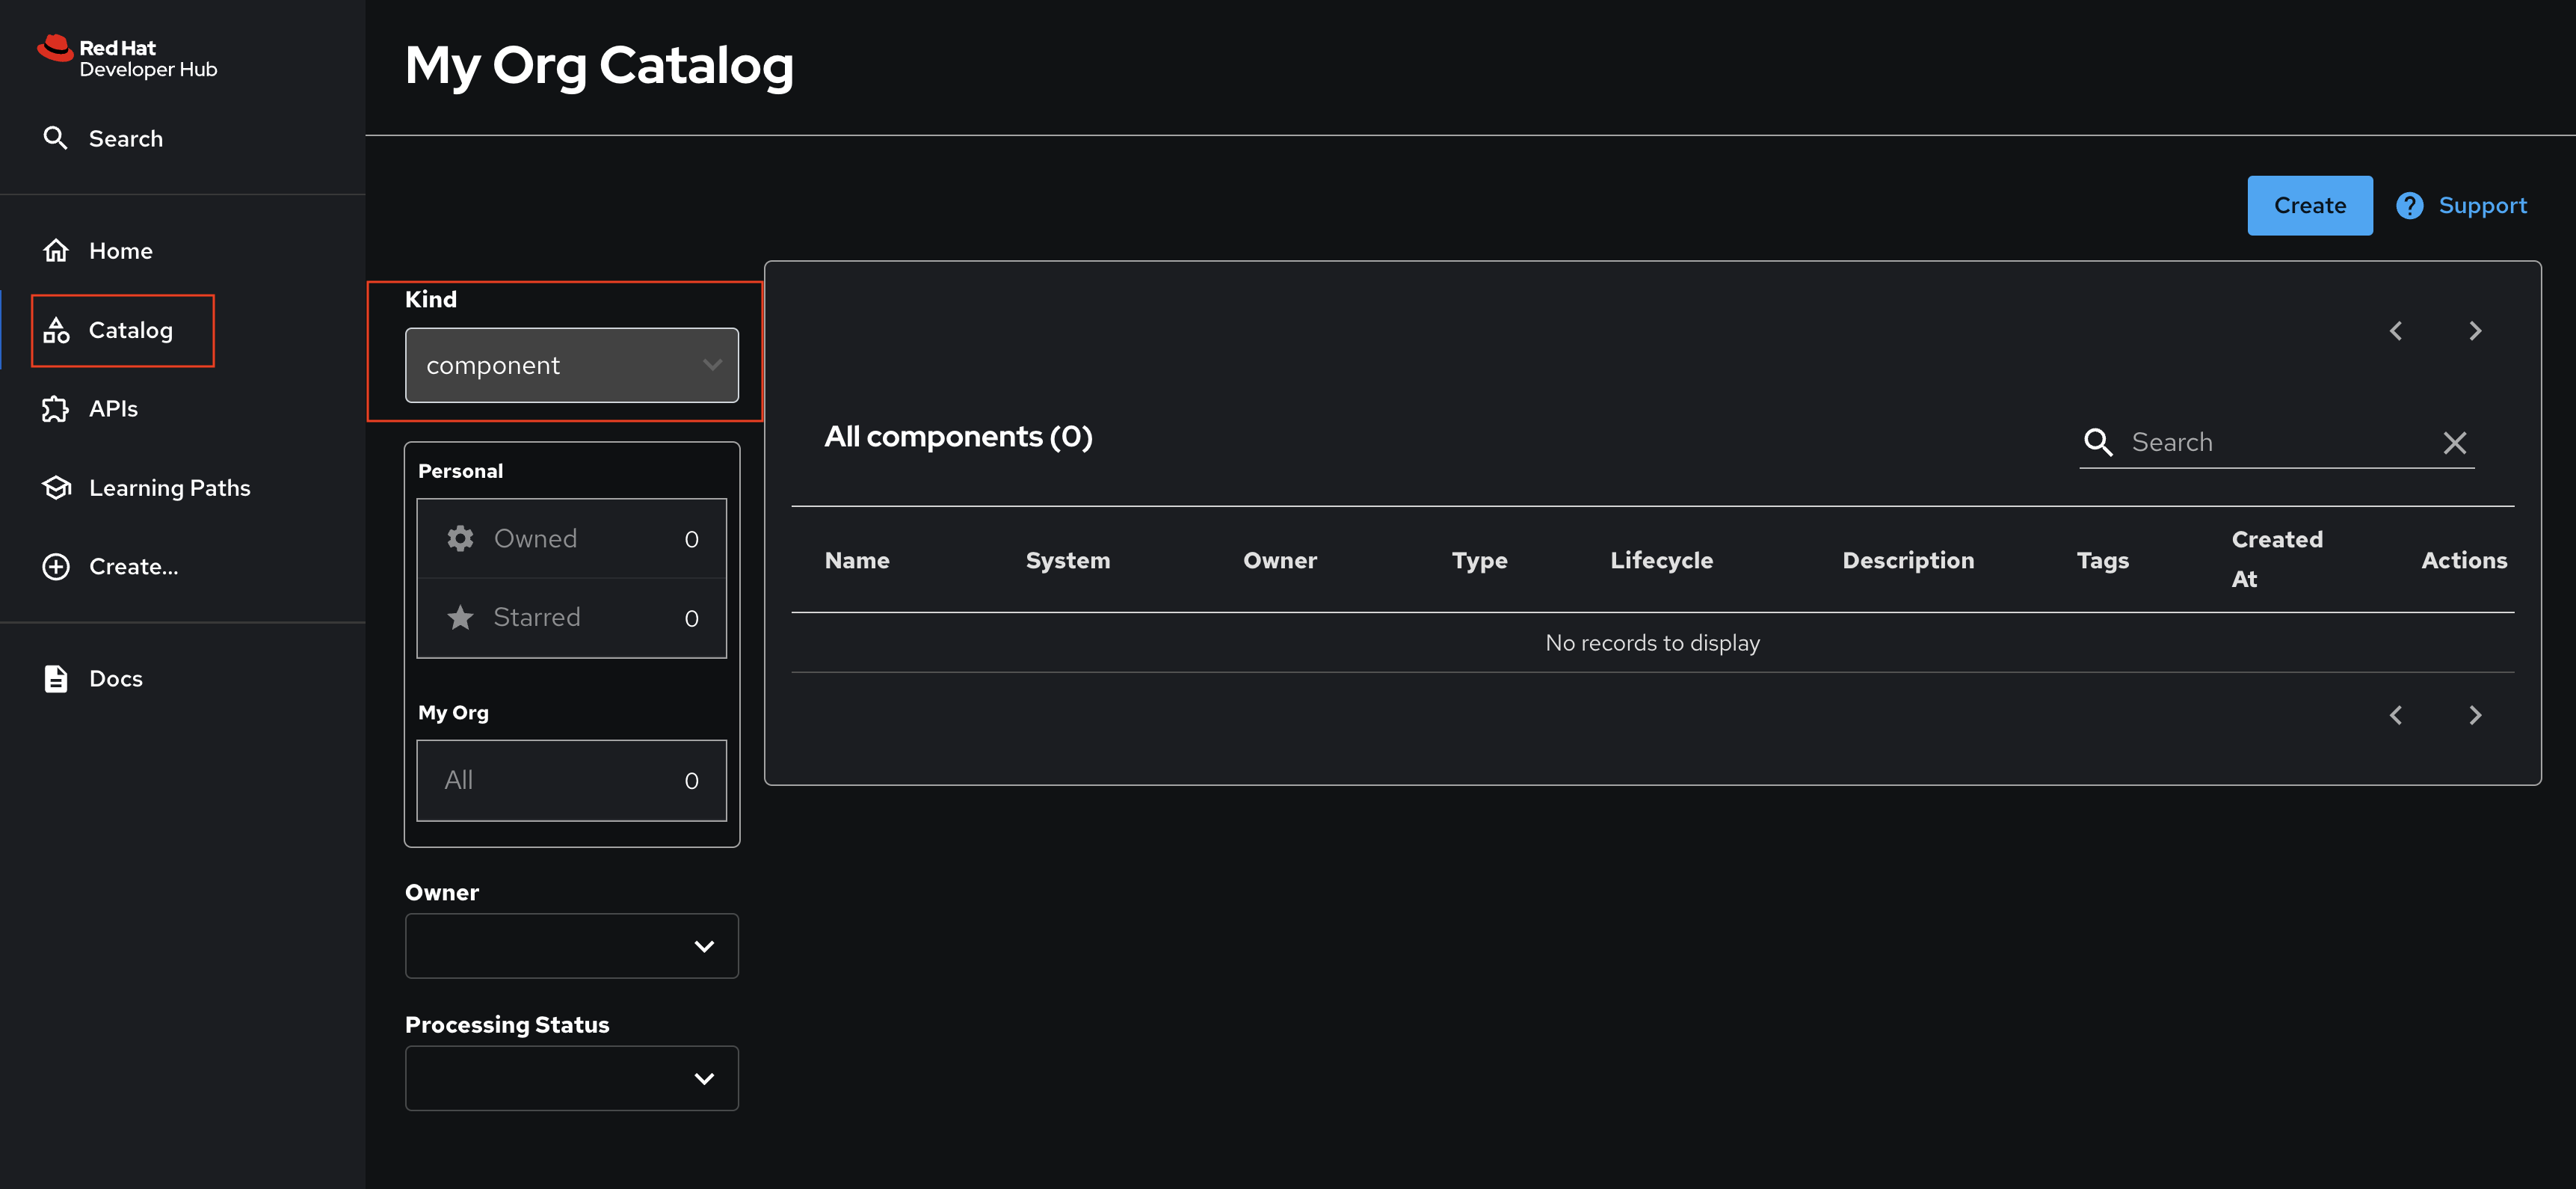
Visit the Catalog using the link in the menu on the left-hand side of the Red Hat Developer Hub UI. You’ll find that the Kind dropdown provides only Plugin and Package options. These represent plugins that can be installed in Red Hat Developer Hub, but these don’t represent any of the software components deployed by Parasol. An empty catalog is no good to your developers - you’ll address that soon!
Red Hat Developer Hub Deployment
Deploying Red Hat Developer Hub
Platform Engineers can deploy Red Hat Developer Hub on OpenShift using the Operator or Helm Chart. Both of these installation methods are outlined in the Red Hat Developer Hub documentation. In this lab you’ll use the Helm Chart to deploy and manage your instance of Red Hat Developer Hub. The source code for this Helm Chart can be found at openshift-helm-charts repository on GitHub.
Using GitOps to Manage Red Hat Developer Hub
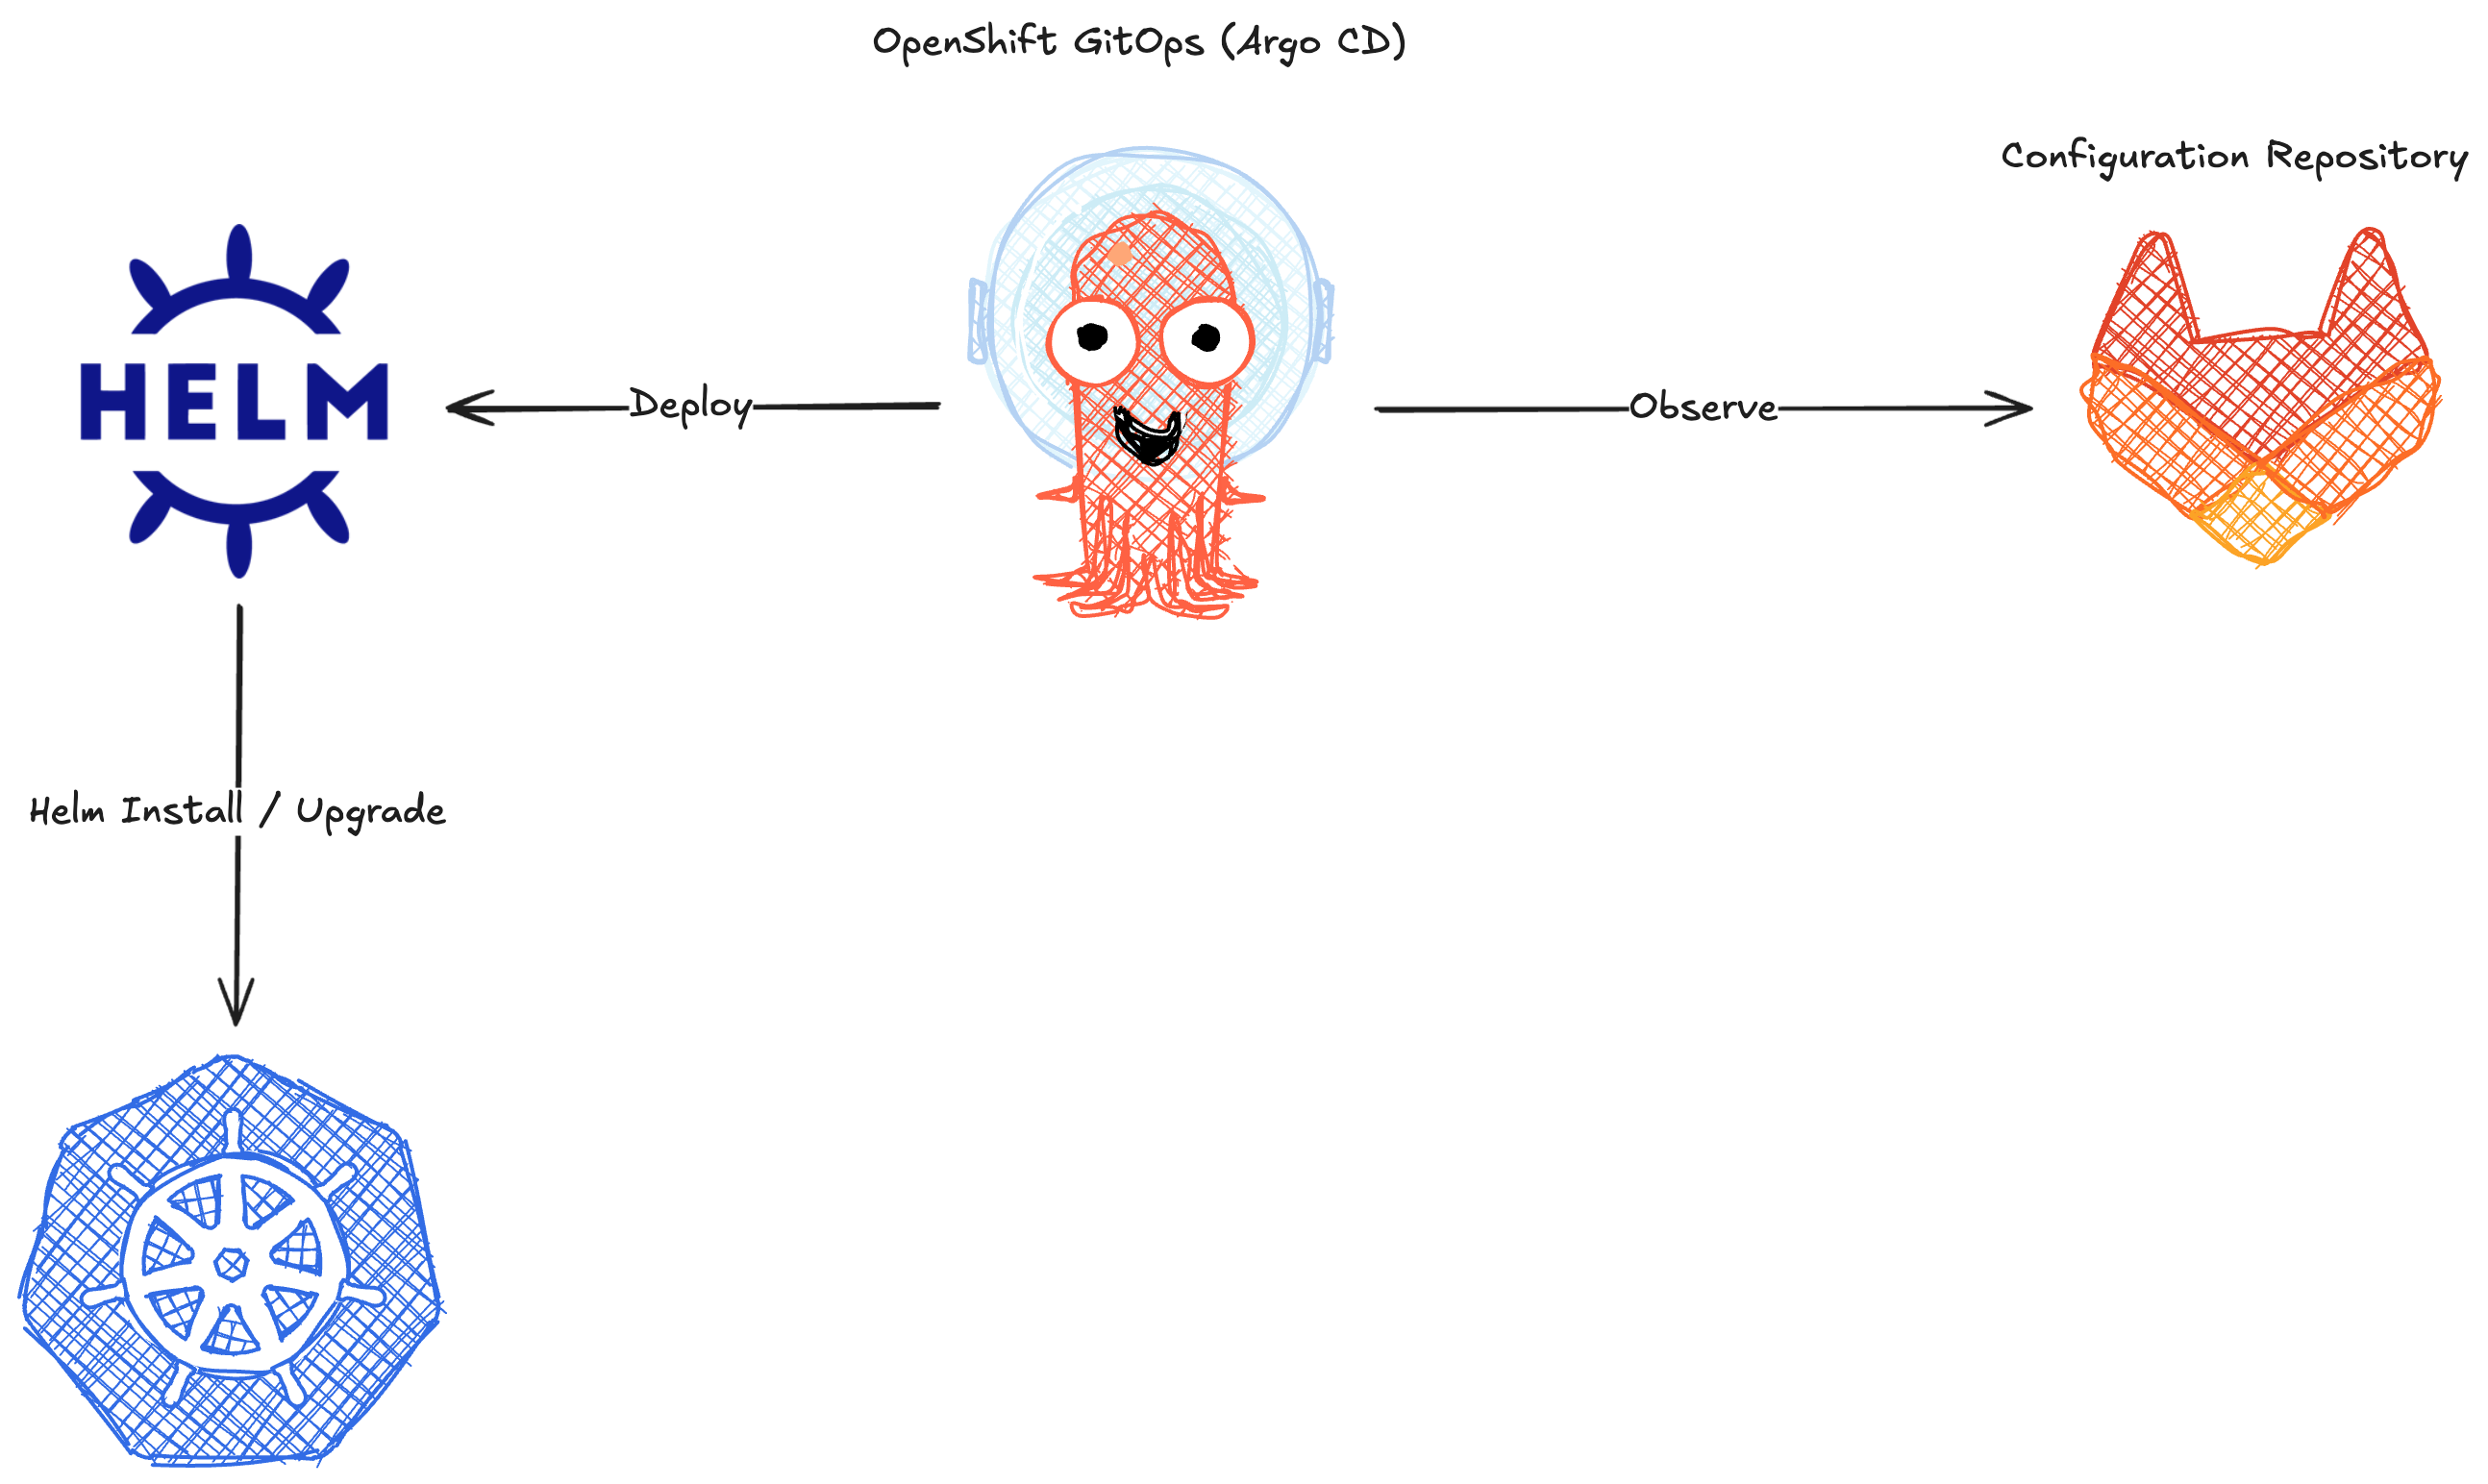
The instance of OpenShift Container Platform used in this workshop environment has been preconfigured with OpenShift GitOps (Argo CD). Your deployment of Red Hat Developer Hub is kept up to date using a GitOps workflow, as illustrated below.
| GitOps is the practice of automating application deployment using Git repositories as the "source of truth" for an infrastructure as code (IaC) for the deployment configuration. The Git repository contains declaritive configuration, typically in YAML format, that describes the desired deployment state and a GitOps tool such as OpenShift GitOps ensures the application is deployed according to the configuration. Drifts from configuration can automatically be patched. |
Since this isn’t a GitOps-focused workshop, we’ve setup the basic GitOps workflow ahead of time. Specifically we’ve pre-created a backstage-bootstrap Application in OpenShift GitOps. Login by clicking that link, ignoring the Login with OpenShift button, and entering the username admin and password {openshift_gitops_password}.
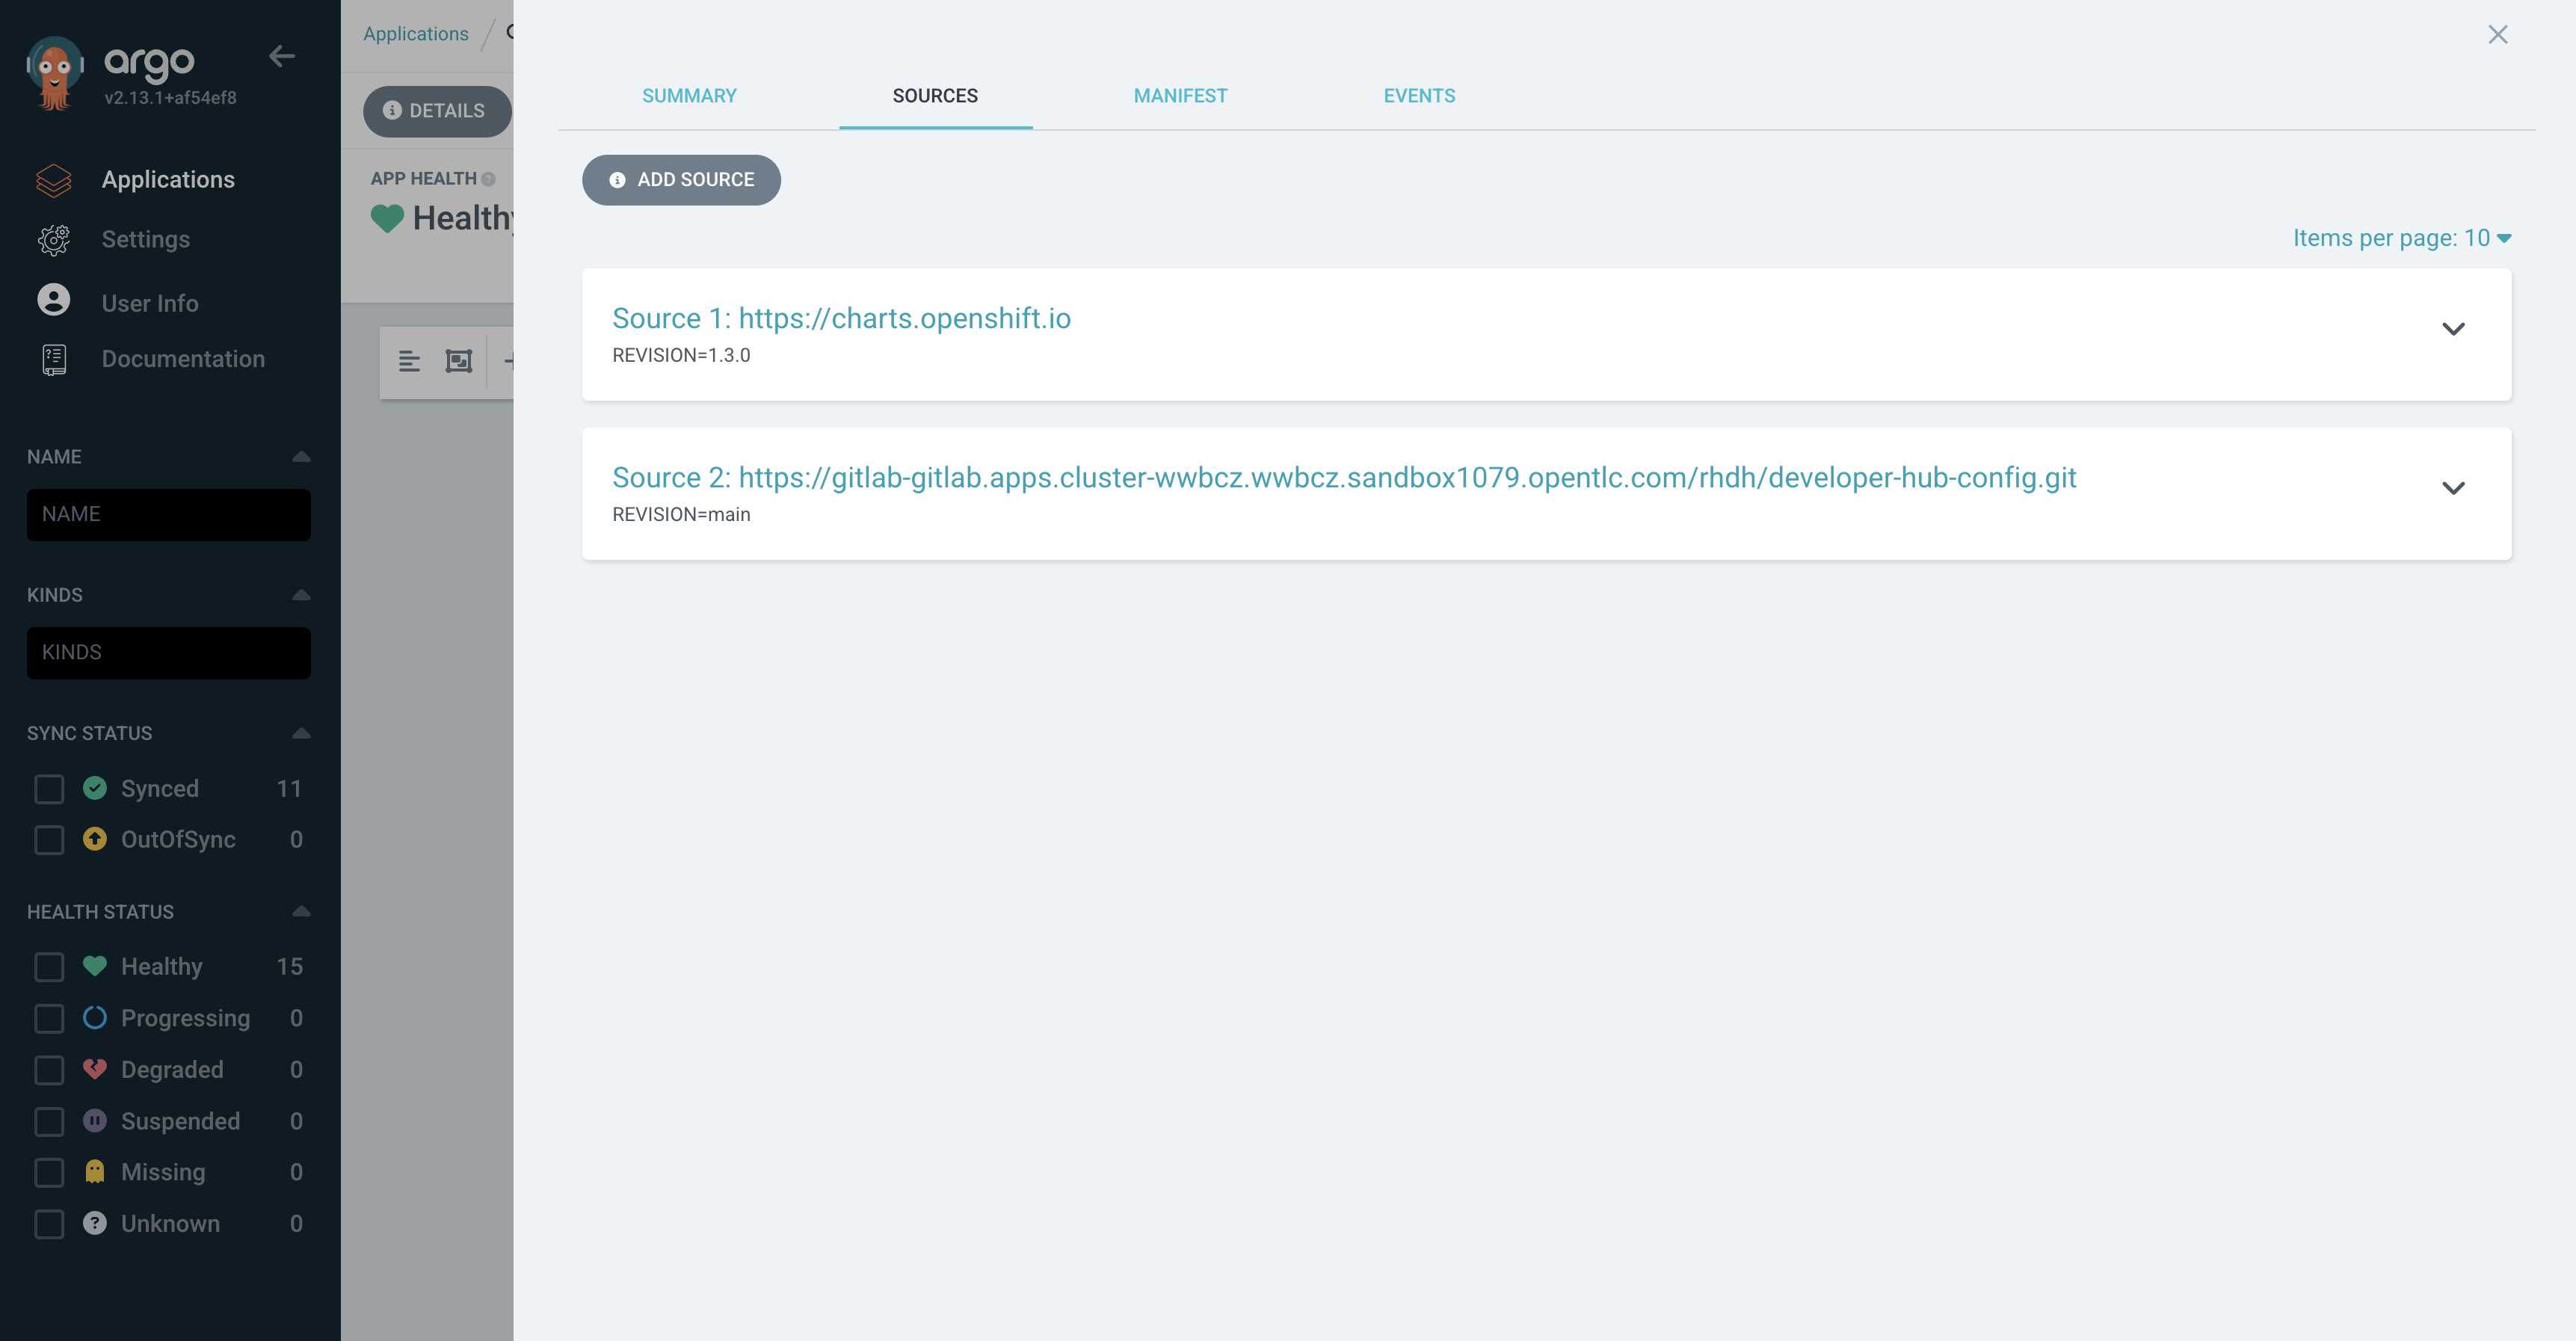
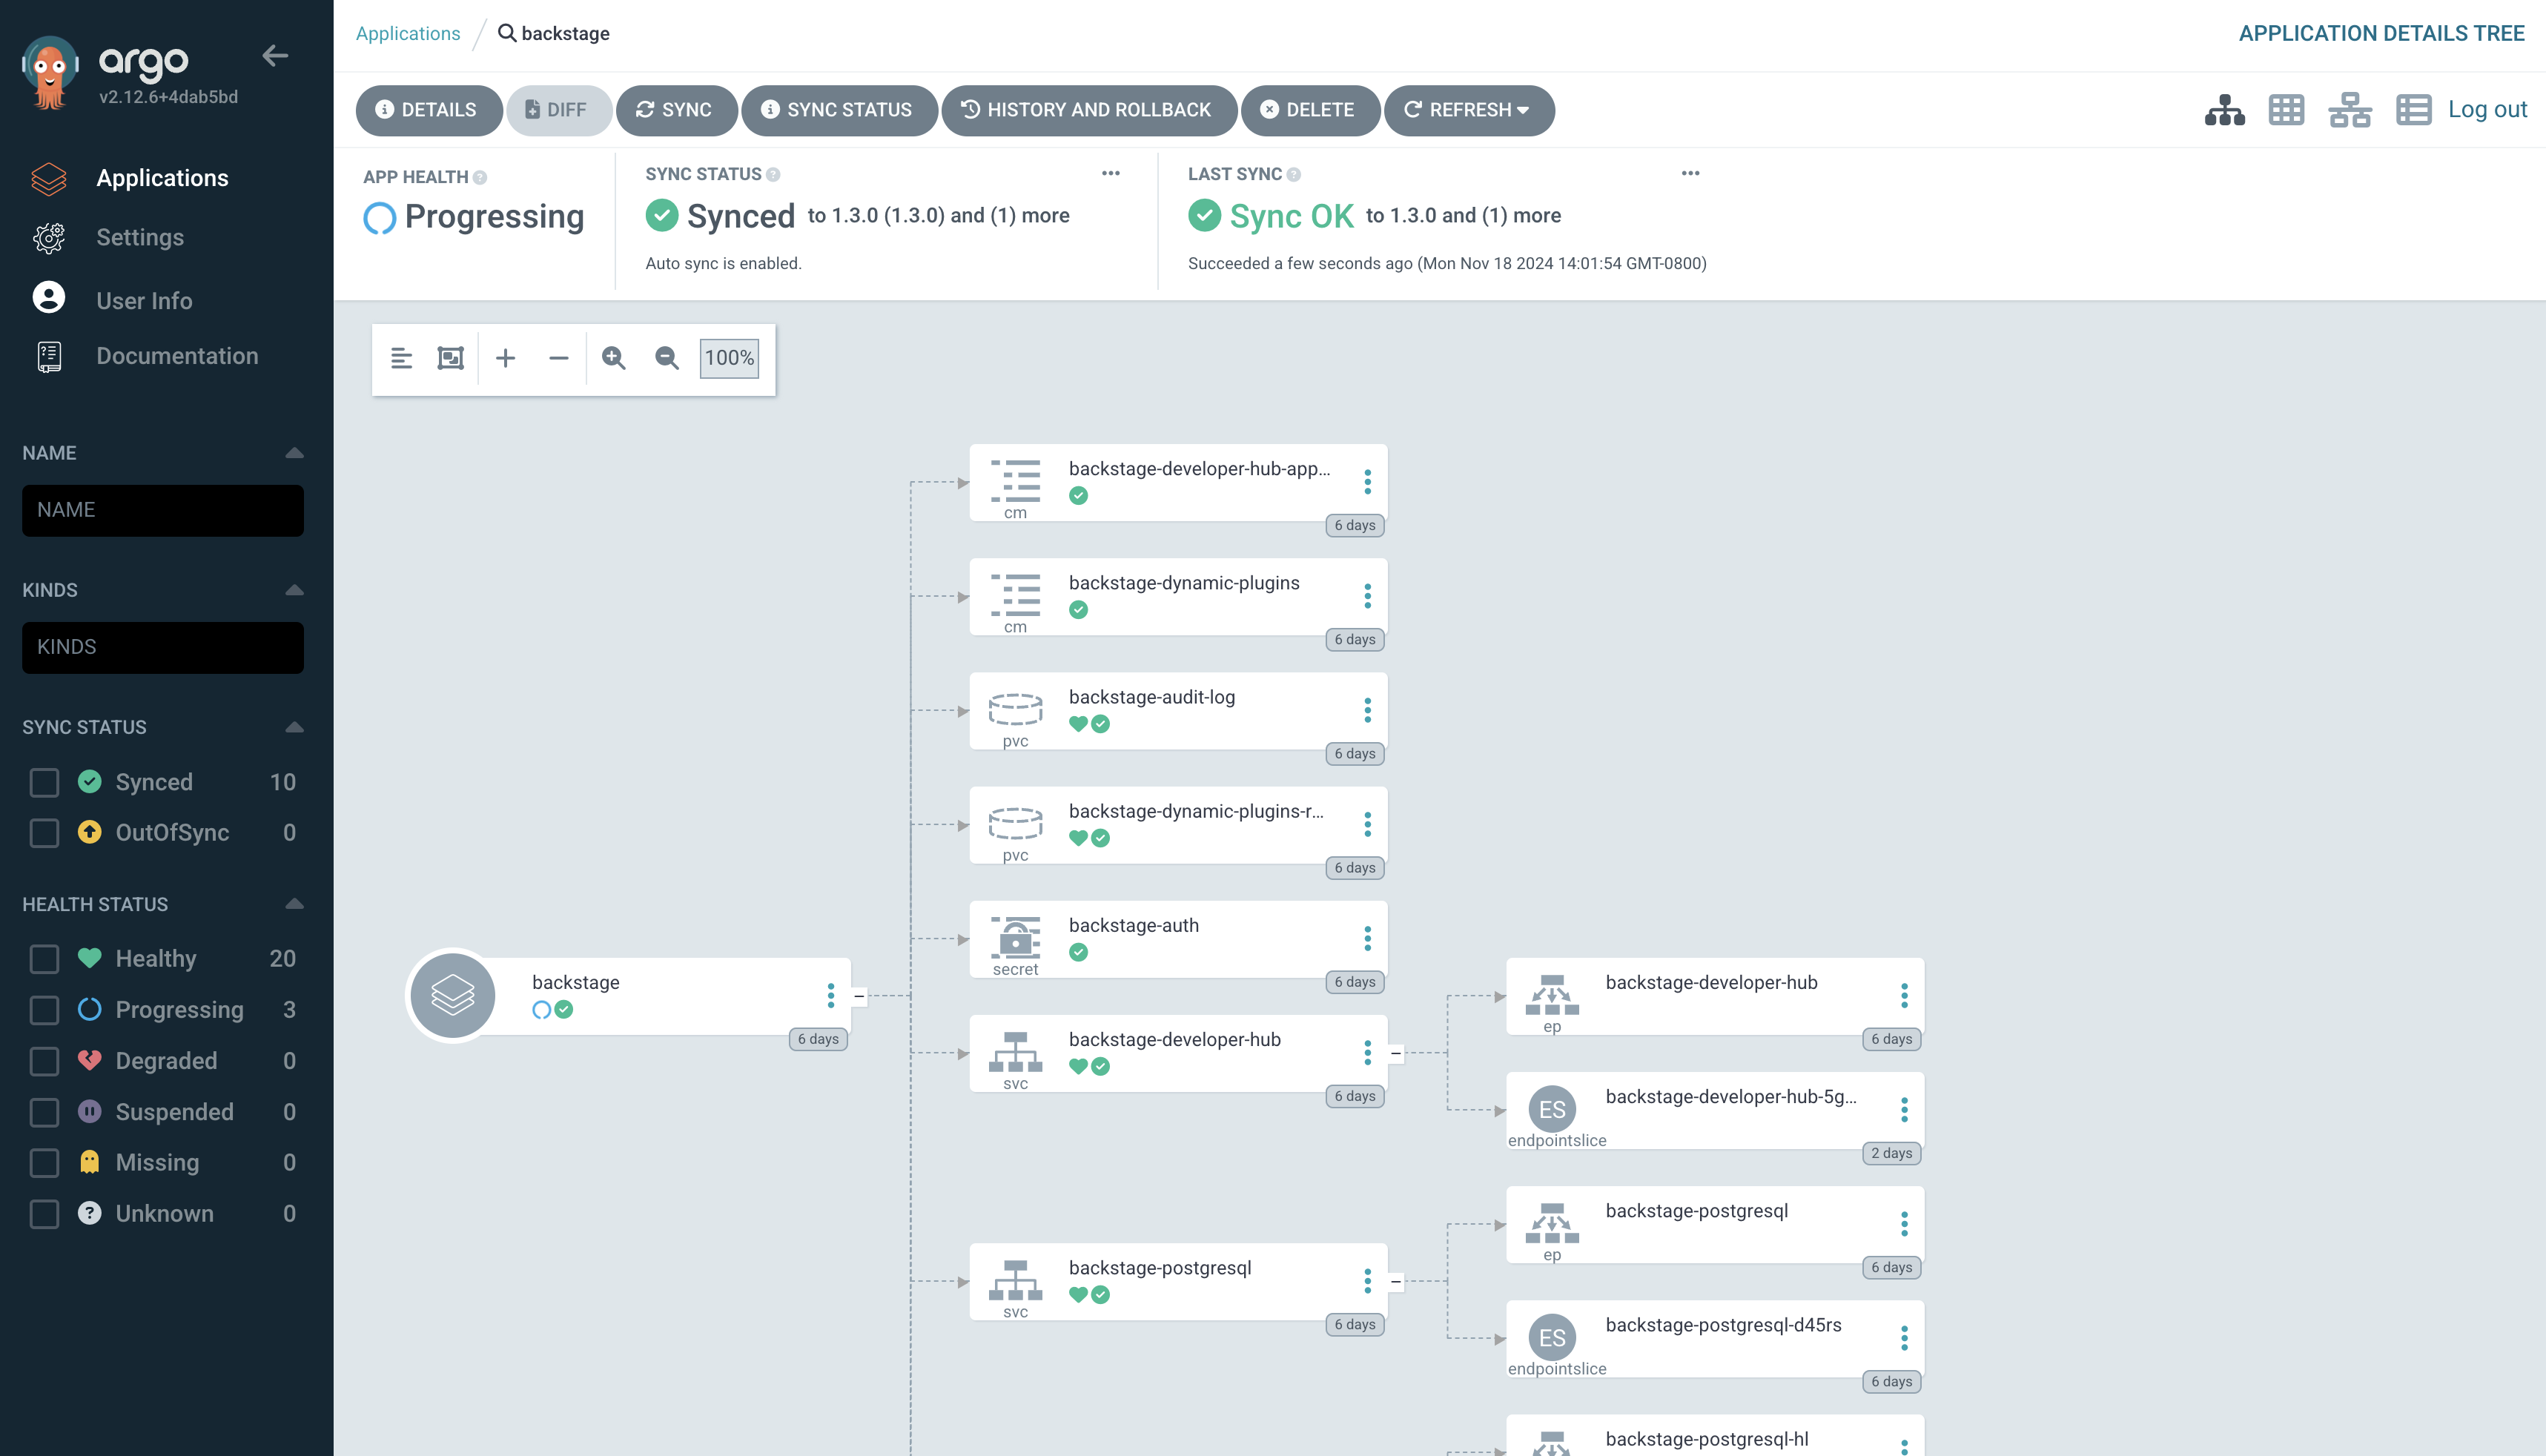
The backstage-bootstrap Argo CD Application creates Secrets, ConfigMaps, and another Argo CD Application named backstage. The backstage Argo CD Application deploys Red Hat Developer Hub using the Helm Chart. The configuration values passed to the Helm Chart are sourced from the rhdh/developer-hub-config/values.yaml file in GitLab. OpenShift GitOps will detect changes to this file and redeploy Red Hat Developer Hub in response. You can see these two sources in the Details tab of the backstage Application as shown.
Platform Engineer Activity: Verify GitOps is Working
Update the App Title of Red Hat Developer Hub
Let’s verify that changes to the values.yaml file in GitLab actually get rolled out by OpenShift GitOps.
-
Open your values.yaml file.
-
Select Edit > Edit single file. When prompted, login as a Platform Engineer with
pe1/{common_password} -
Find the YAML surrounded by
--- APP TITLE ---and uncomment it by highlighting it and pressingCMD + /orCTRL + /.If
CMD + /orCTRL + /doesn’t work, you can uncomment the lines by highlighting the appropriate code, choose the function F1 from your keyboard, and select the option Remove Line Comment as shown below.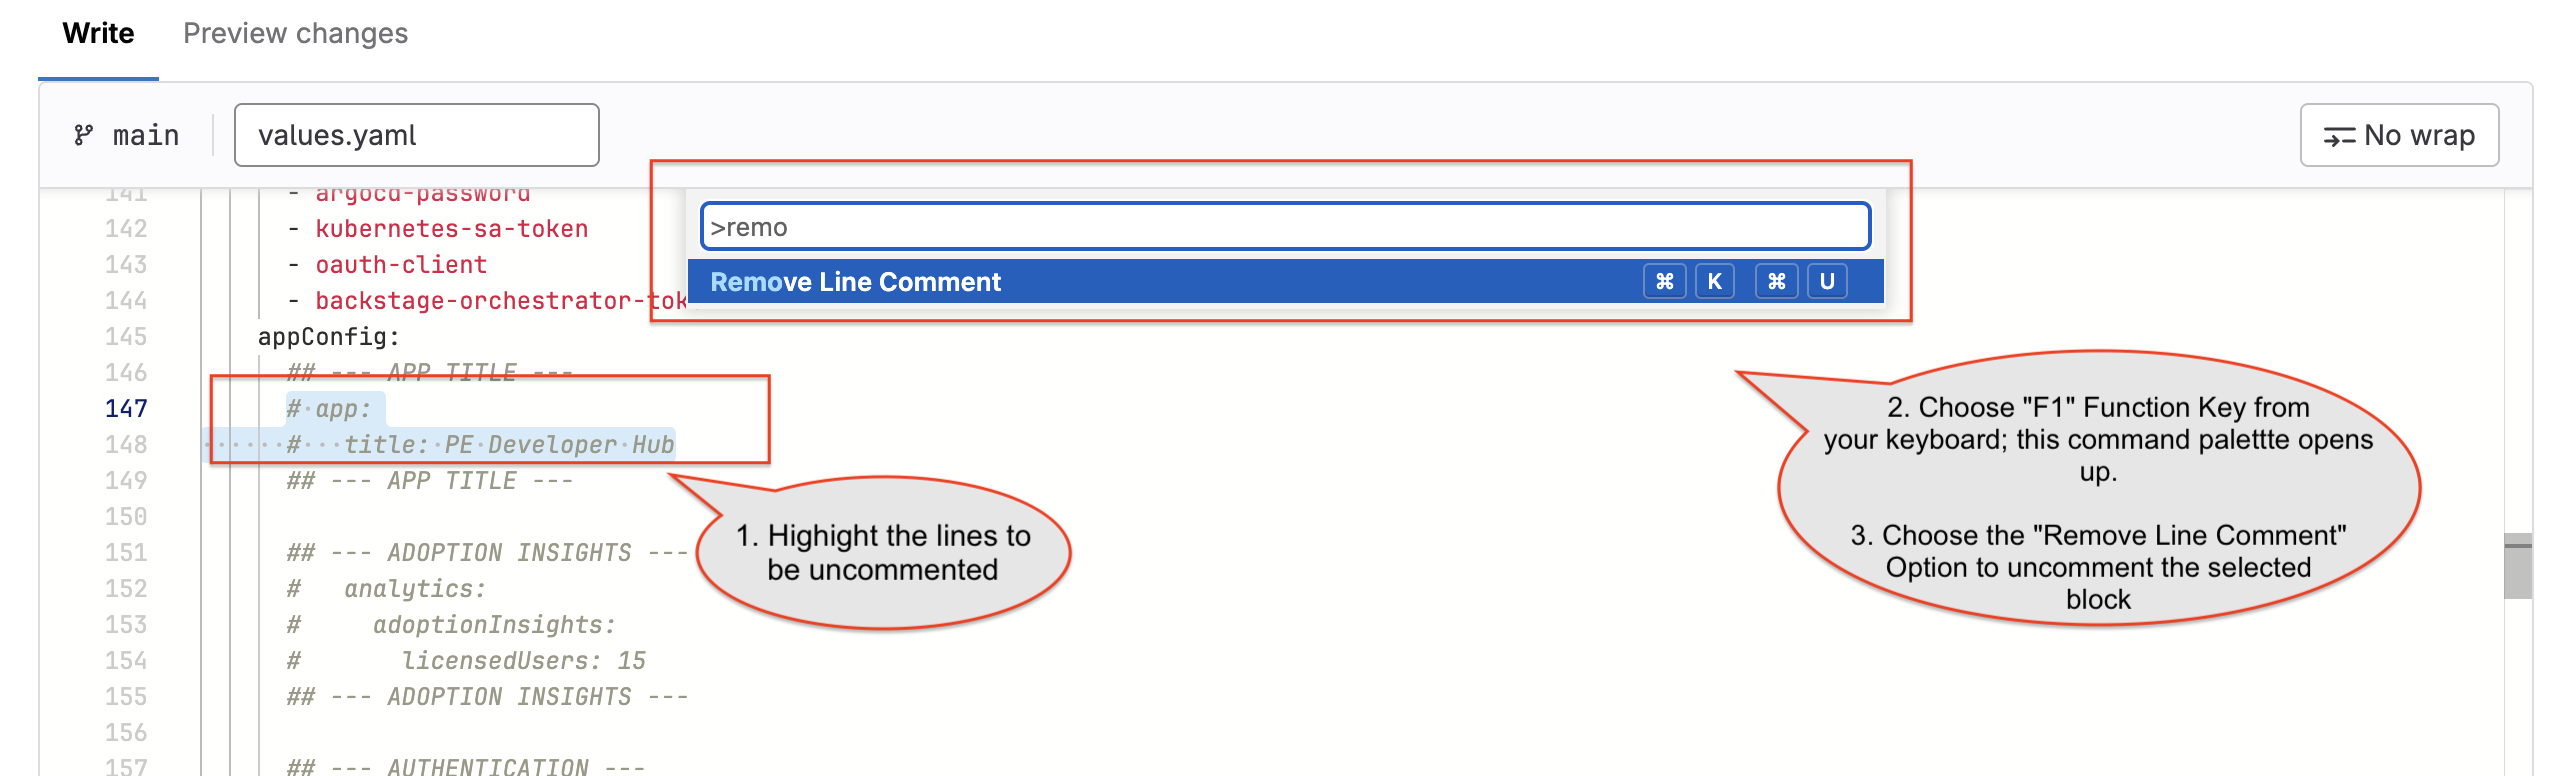
-
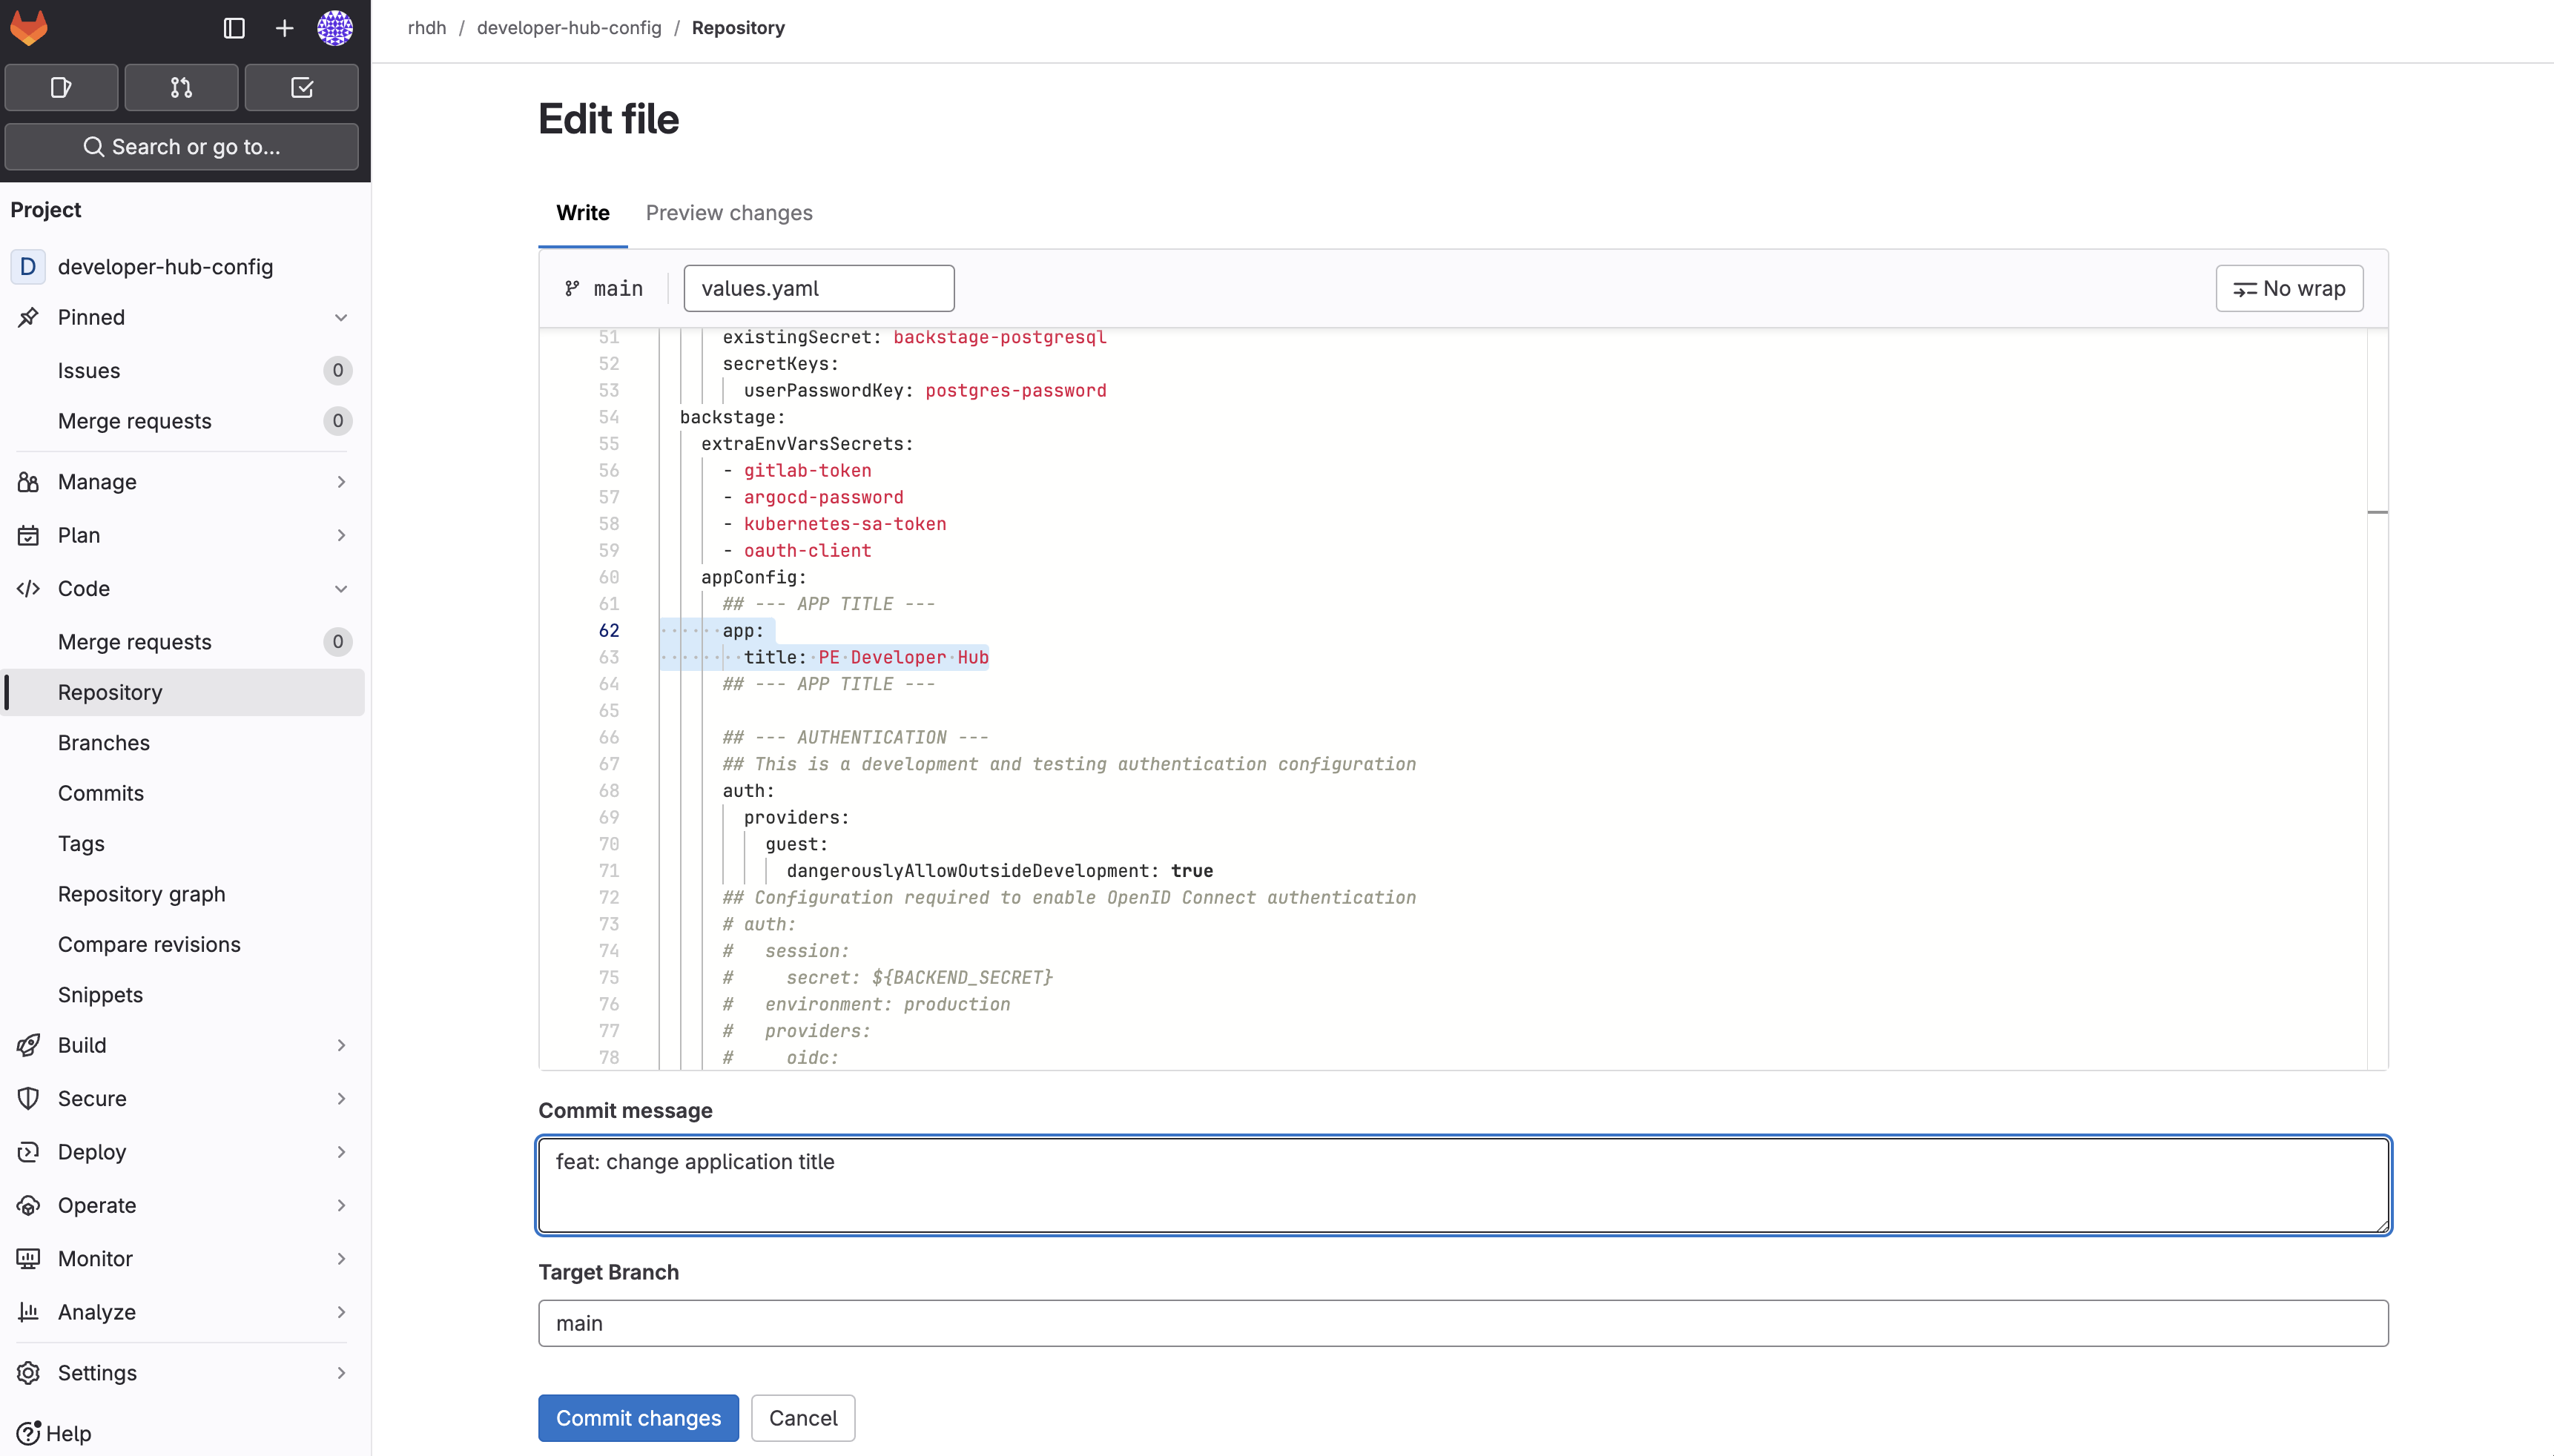
The file should now look like this after uncommenting:
-
Scroll down and enter a commit message
feat: change application title. -
Click the Commit changes button.
Verify update to Red Hat Developer Hub’s Custom Title
Let’s ensure that a new deployment of Red Hat Developer Hub is triggered and your new title is applied.
-
Return to the backstage Application in Argo CD. Depending on your timing, it might already be progressing the latest sync, but if not, click the Refresh button. When the sync is in progress, you’ll see a new Pod starting - this Pod will run the latest version of your configuration.
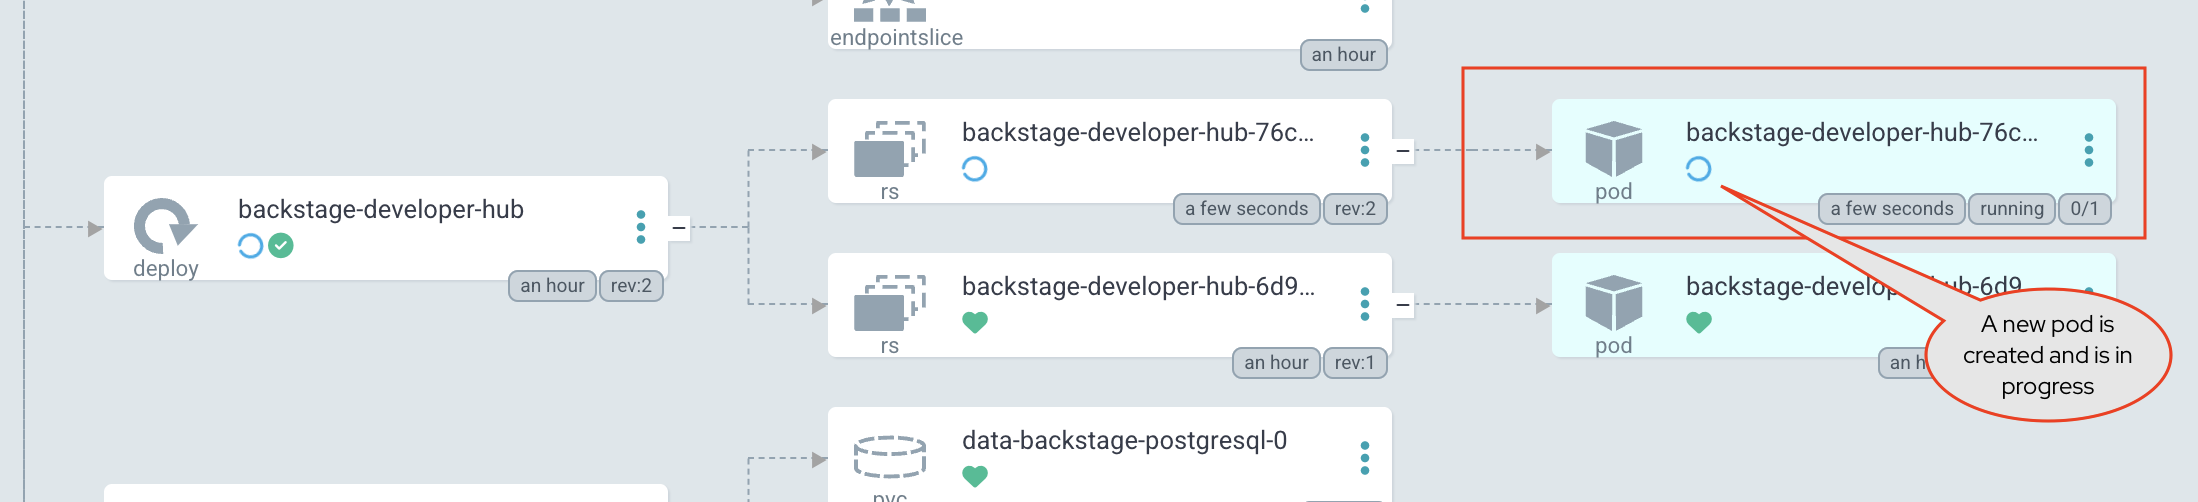
-
Once the new Pod has started, visit your Red Hat Developer Hub instance. You should see the new title PE Developer Hub in the page header.
|
You may need to logout to see the title change. Click the Guest user icon in the top right corner and select Sign out. Then log back in to the Red Hat Developer Hub instance as a Platform Engineer with
|

Activity: Synchronize User & Group Entities
In module 2.1 you learned that the Software Catalog contains Entities, and saw a sample appConfig that contained a catalog.locations configuration. That example configuration imported entities from a file located in a hardcoded Git repository. This pattern is known as a static configuration. Red Hat Developer Hub will occasionally poll for updates to the specified file locations and update the Entities in the Software Catalog accordingly.
An option for dynamically importing and synchronizing Entities is via providers. Providers are added to Red Hat Developer Hub using plugins, and are configured using the catalog.providers entry in the appConfig. Let’s use the Keycloak plugin to synchronize Users and Groups to your Software Catalog.
| Synchronizing Users and Groups to your Software Catalog is important for two reasons. Doing so will enable developers and platform engineers to associate Users and Groups with other Entities in the Software Catalog - very useful for finding out which individual or team is responsible for a particular microservice or database, for example. Secondly, only users that have a corresponding User Entity in the Software Catalog can successfully login to Red Hat Developer Hub. |
-
View your values.yaml file in the developer-hub-config repository.
-
Select Edit > Edit single file. When prompted, login as
pe1/{common_password}. -
You will find the
backstage-community-plugin-catalog-backend-module-keycloak-dynamicpackage under thedynamic.pluginsfield that is set todisabled: false. This means that, this plugin has been enabled in your installation.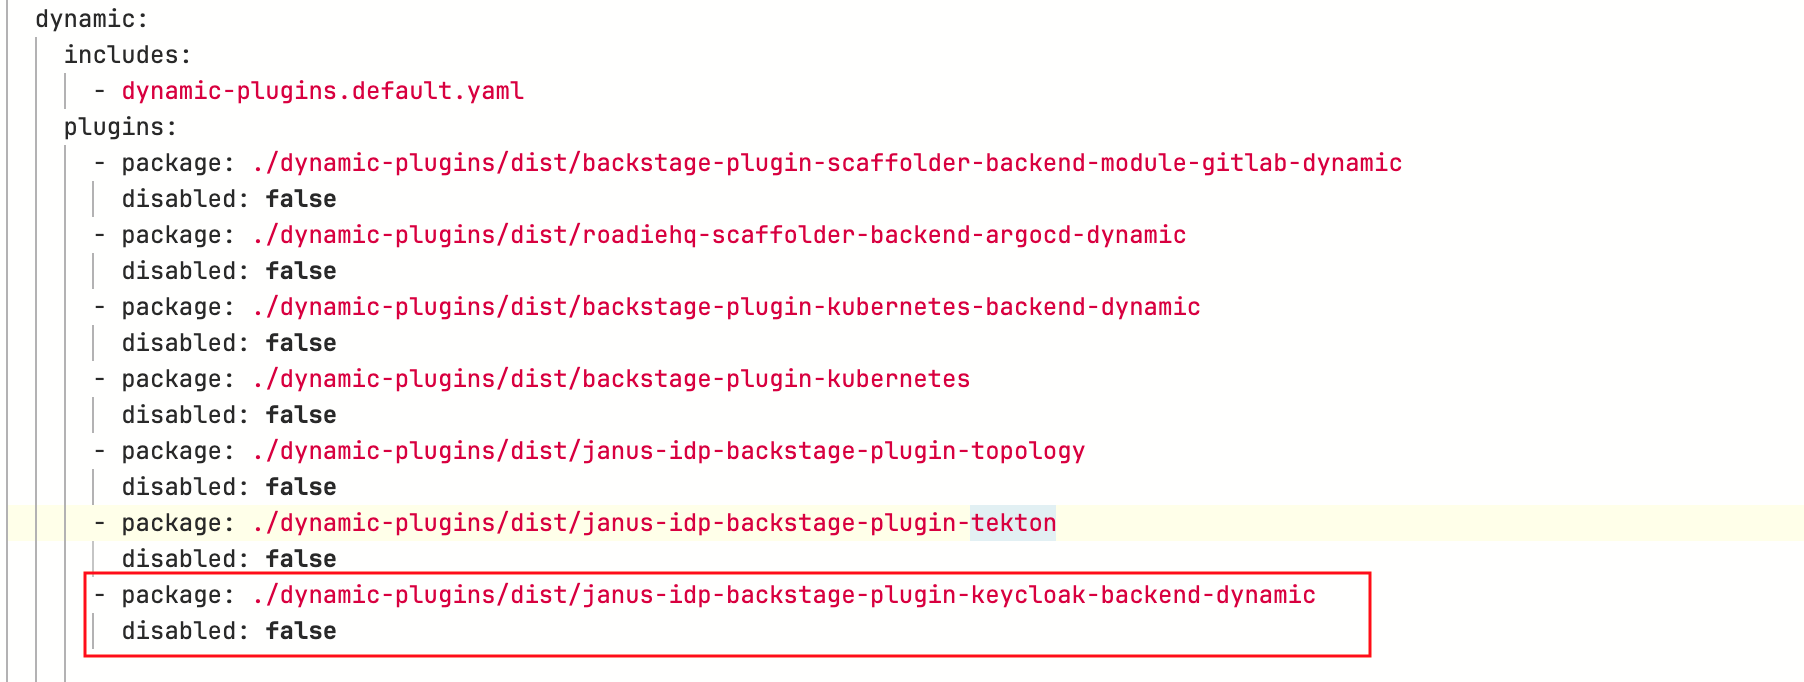
-
Uncomment the
keycloakOrgconfiguration within theappConfig.catalog.providersblock (look for--- KEYCLOAK_CATALOG_PROVIDERS ---, highlight the block, then pressCMD + /orCTRL + /).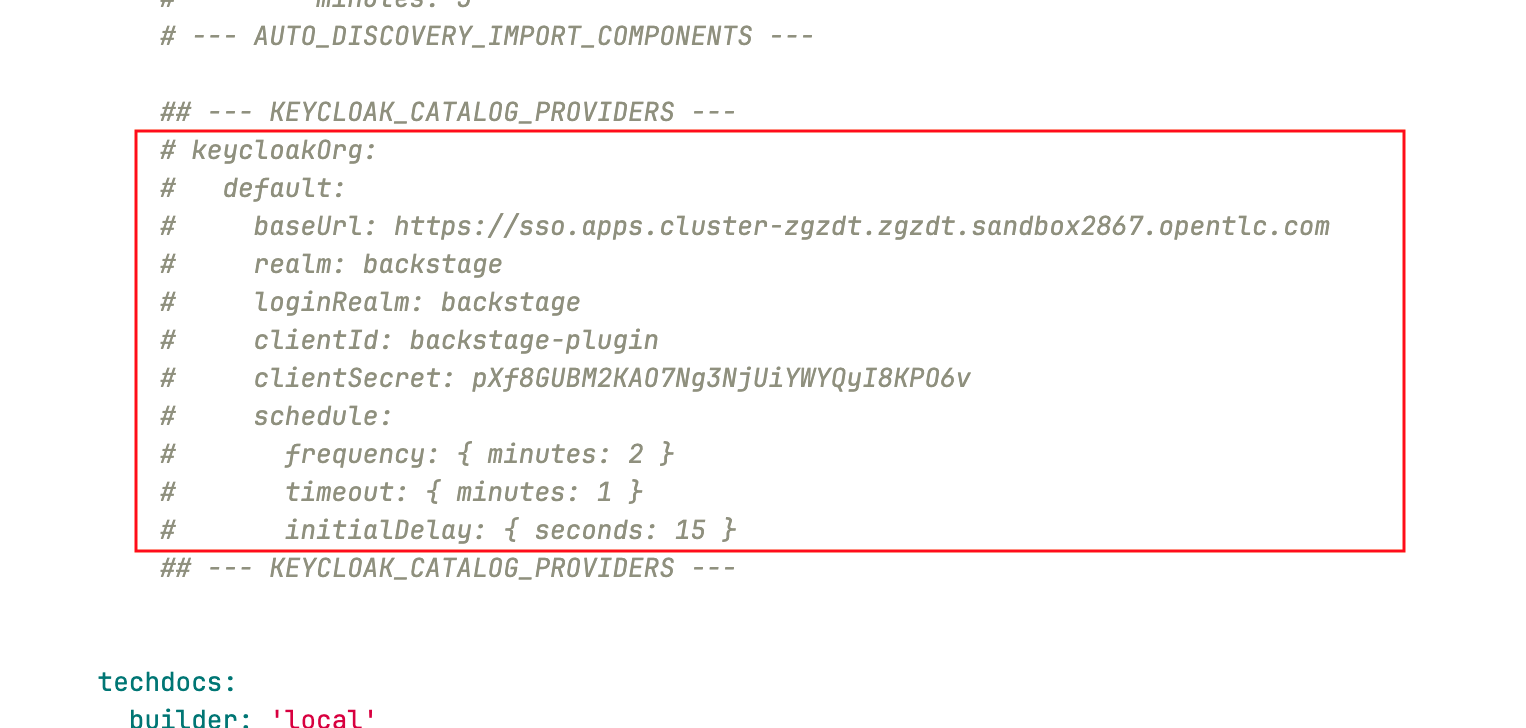
This block of configuration instructs the Keycloak provider to synchronize Users and Groups from the specified Keycloak Realm to the Software Catalog.
-
Scroll down and enter a commit message:
feat: enable the keycloak catalog provider -
Click the Commit button.
-
Visit the
backstageApplication in OpenShift GitOps and click Refresh.If needed, login using
admin/{openshift_gitops_password}.Argo CD has been setup to auto-sync every two minutes. Instead of having to wait for auto-sync to kick in, you are instructed to manually sync the Argo CD application.
Your changes will start to rollout. Confirm this by visiting the backstage project on OpenShift and checking that a new Pod is being started, or waiting until the Application in OpenShift GitOps reports Healthy instead of Progressing.
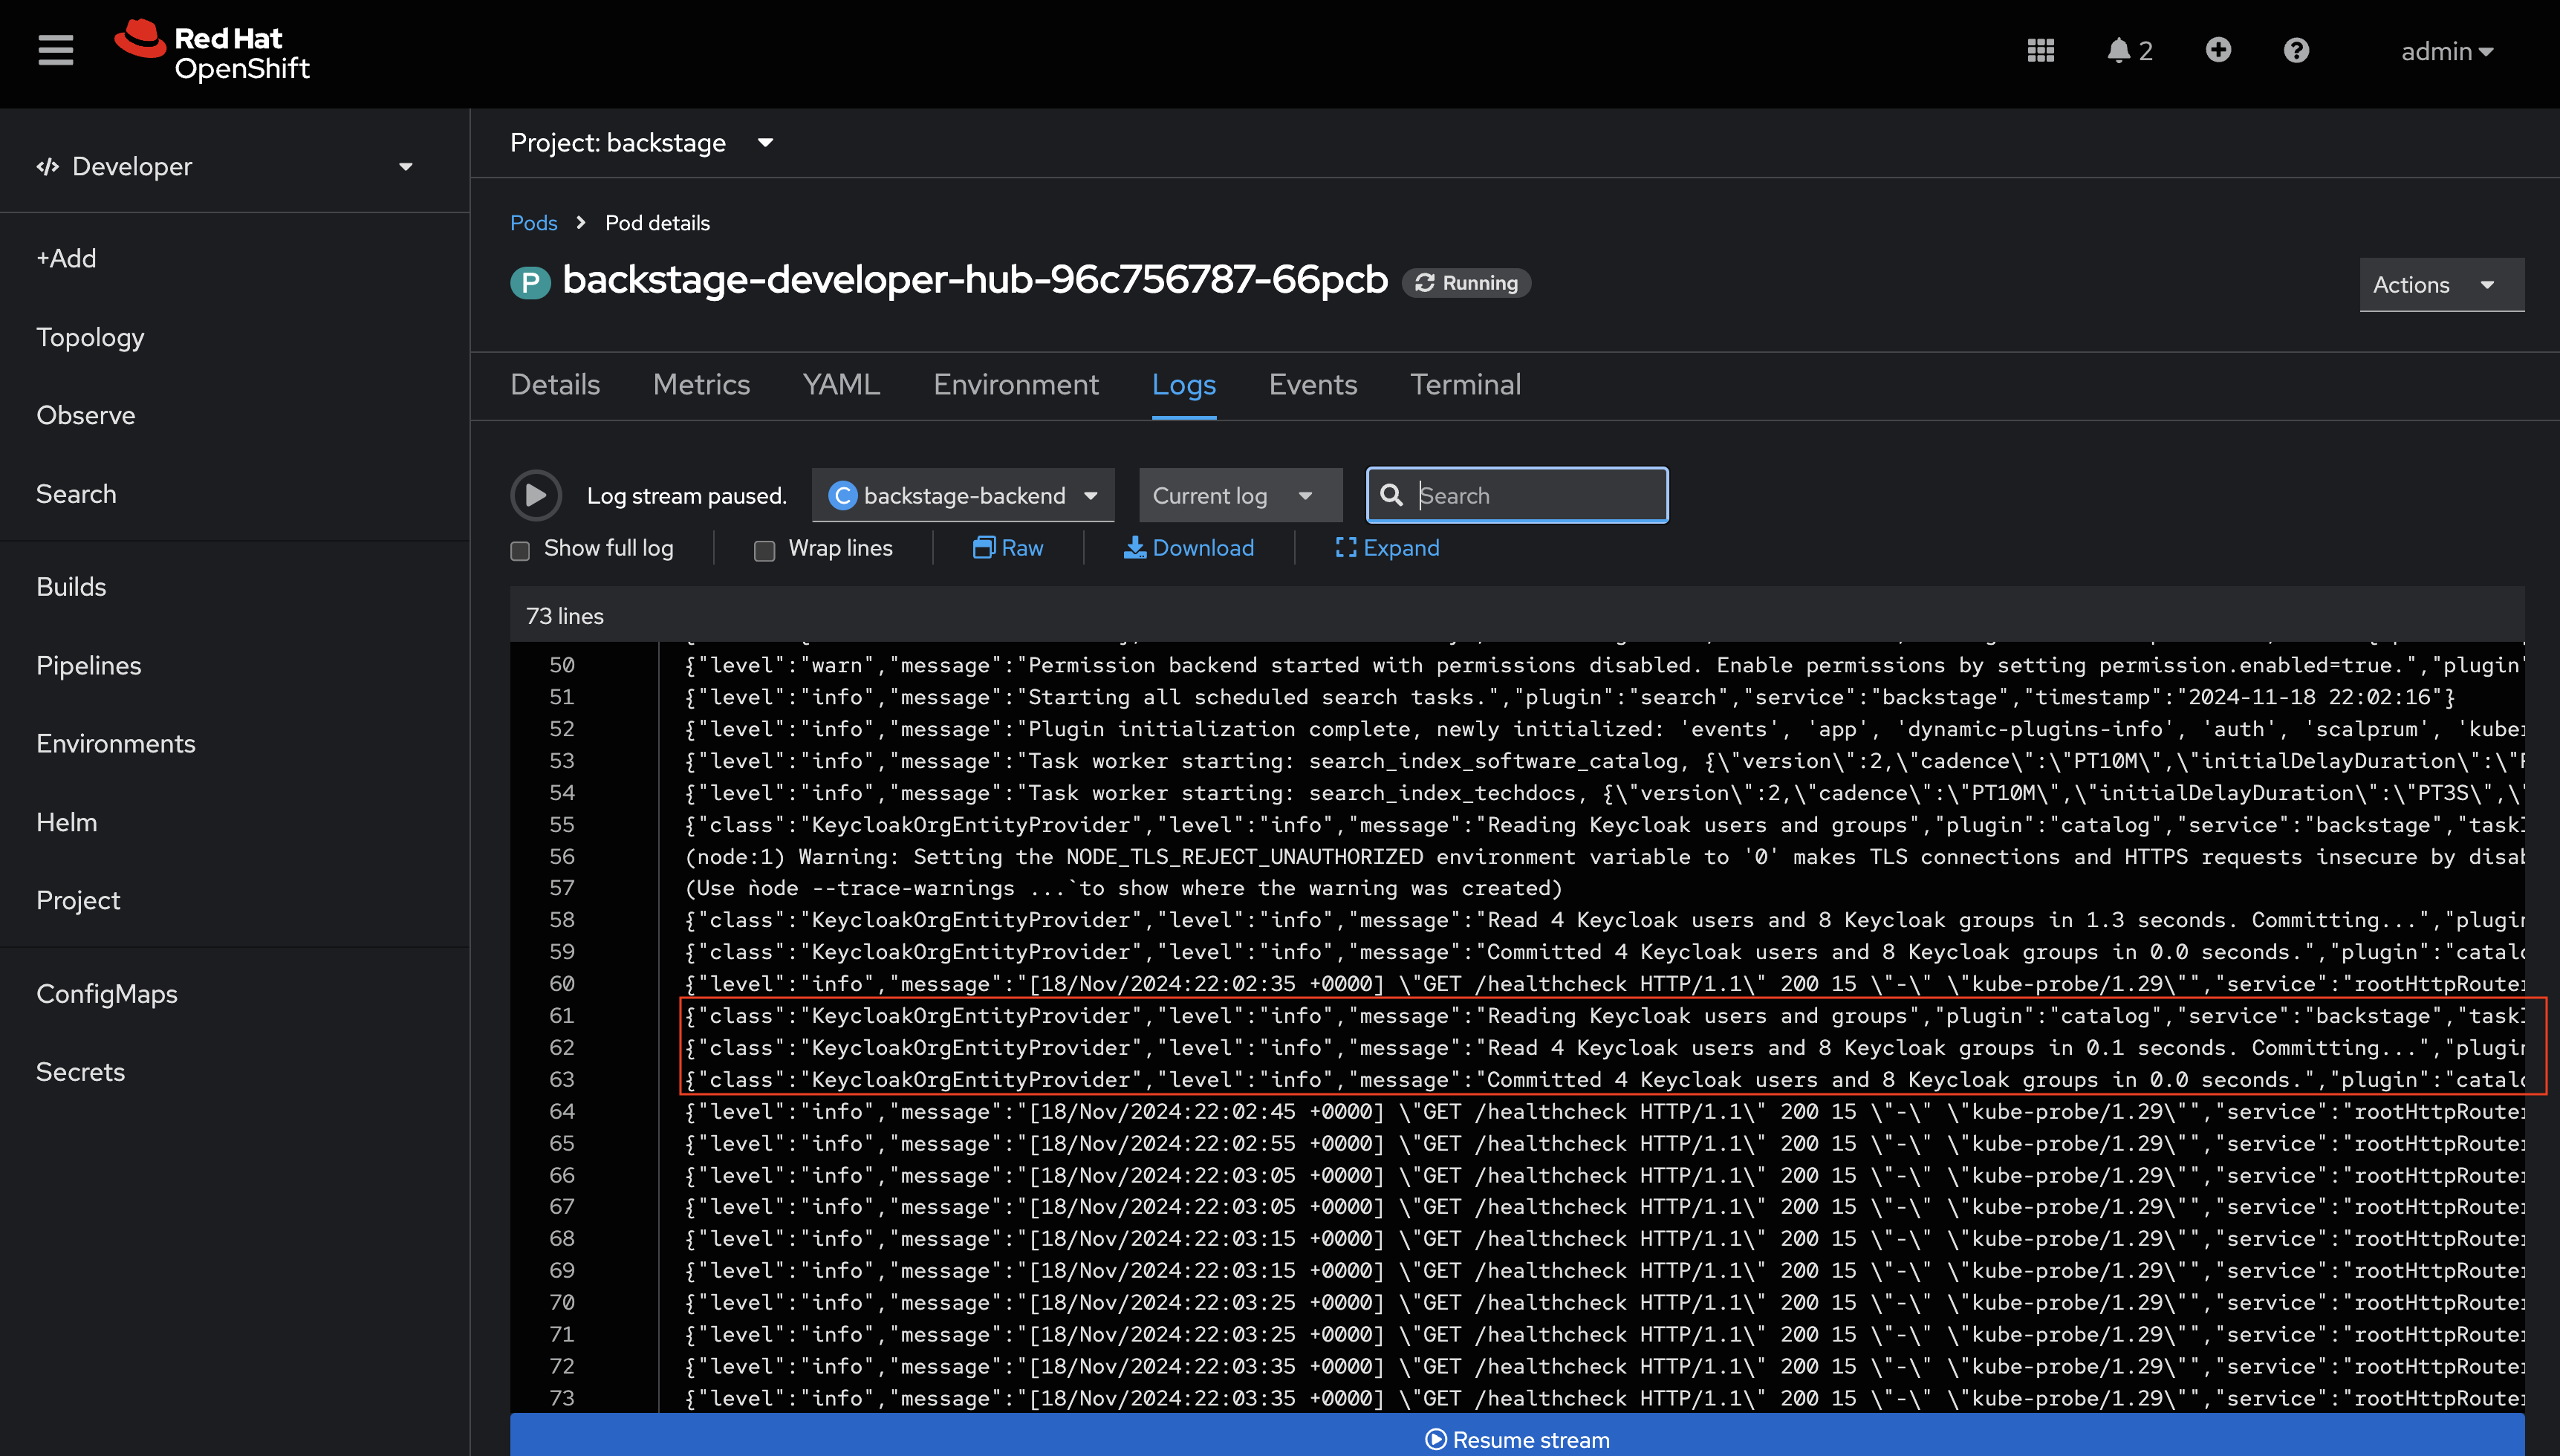
Once the new Pod has started, navigate to OpenShift. If needed, login as admin/{common_password}. Check the logs for lines that reference the KeycloakOrgEntityProvider. You should see a line stating that a number of Users and Groups have been read from Keycloak.
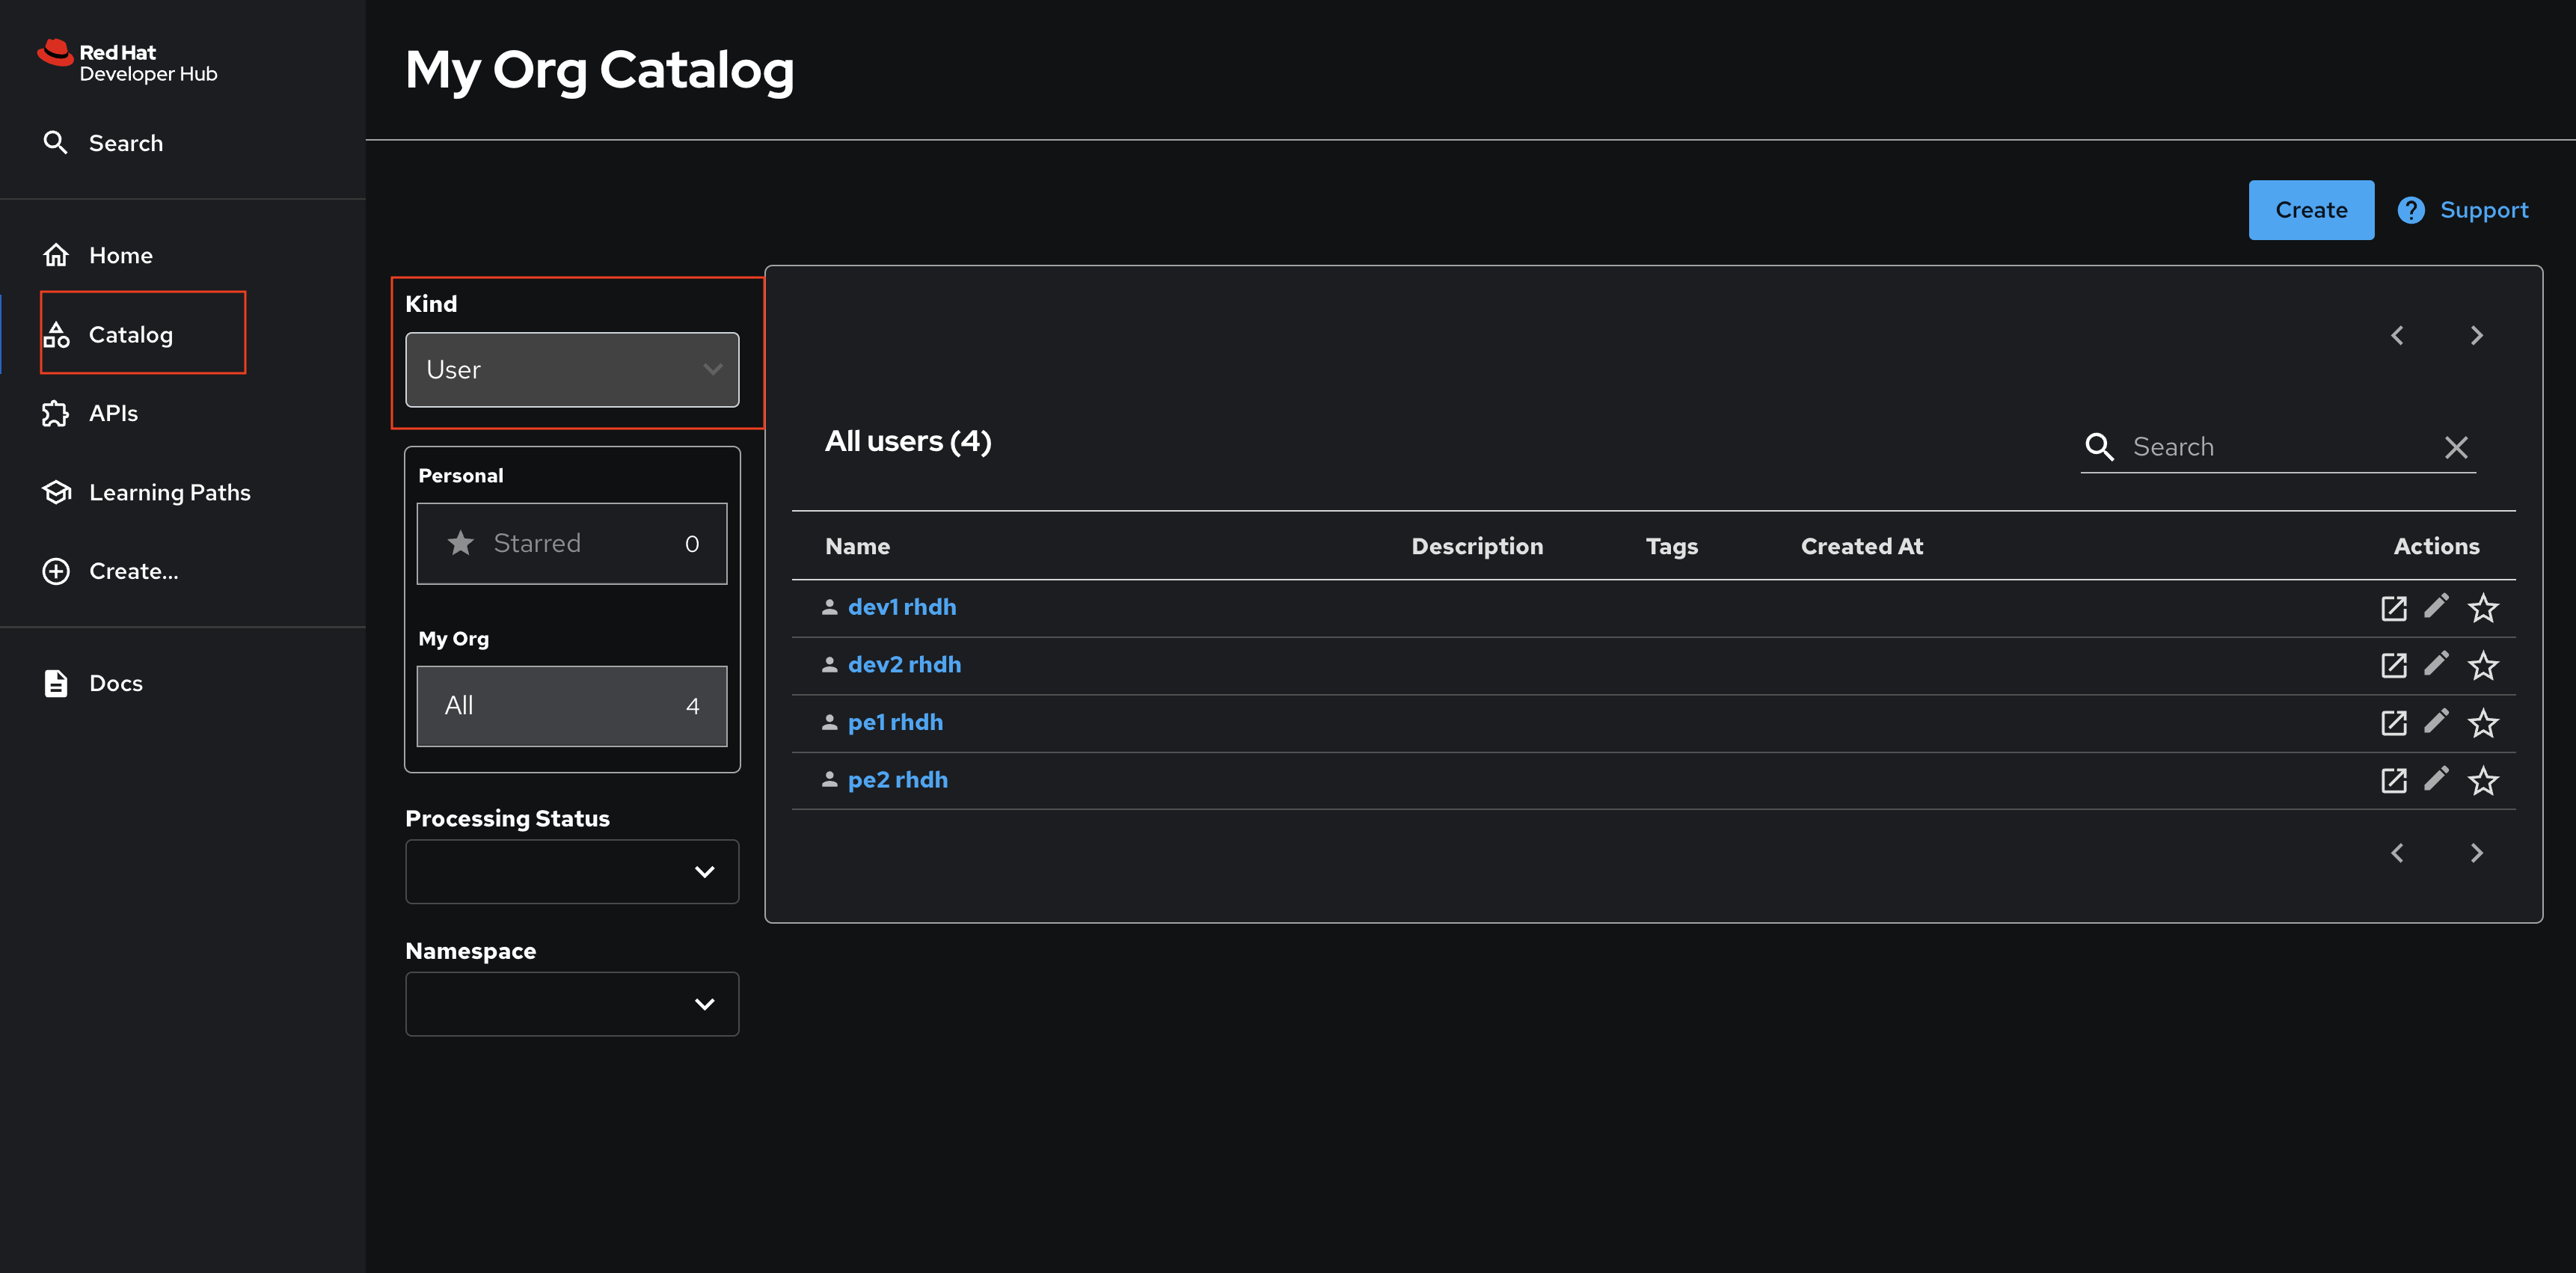
You can further confirm that the Users and Groups have been synchronized by visiting the Software Catalog in Red Hat Developer Hub and setting the Kind dropdown to User.
Nice work! You enabled a dynamic plugin and configured a catalog provider based on it! :imagesdir: ../../assets/images
Activity: Configure OpenID Connect Authentication
Red Hat Developer Hub supports four authentication providers:
-
Guest (suitable for experimentation and demos only)
-
OpenID Connect
-
GitHub
-
Microsoft Azure
In this activity you’ll configure an OpenID Connect authentication provider - this will enable developers within your organization to login using their single sign-on (SSO) credentials.
High-Level Workflow
A complete set of documentation for configuring OpenID Connect authentication using Red Hat Single Sign-On is available in the Red Hat Developer Hub documentation.
| Don’t worry if some of the following bullet points are hard to understand upon first reading them. You’ll be guided through each piece step-by-step. |
The high-level steps involve:
-
Creating a Realm and Client in Red Hat Single Sign-On. These have been pre-configured for you. View the
backstageRealm using the following URL and credentials:-
Credentials: View on OpenShift. (If needed, login to OpenShift as
admin/{common_password})
-
Configuring the Red Hat Developer Hub Keycloak plugin to synchronize users from Red Hat Single Sign-On to Red Hat Developer Hub.
-
Configuring the
oidcRed Hat Developer Hub authentication provider with the Realm details. -
Setting
oidcassignInPagepage type for Red Hat Developer Hub. -
Enabling session support in Red Hat Developer Hub.
Configure the OpenID Connect Authentication Provider
-
Visit your rhdh/developer-hub-config repository on GitLab.
-
Open the values.yaml file, then select Edit > Edit single file.
-
Locate the
appConfig.authobject in the YAML. You can search for--- AUTHENTICATION ---in this file to locate this section. -
Delete the existing
authconfiguration that contains theguestprovider. -
Uncomment the entire
authconfiguration containing theoidcprovider, and thesignInPagesetting below it.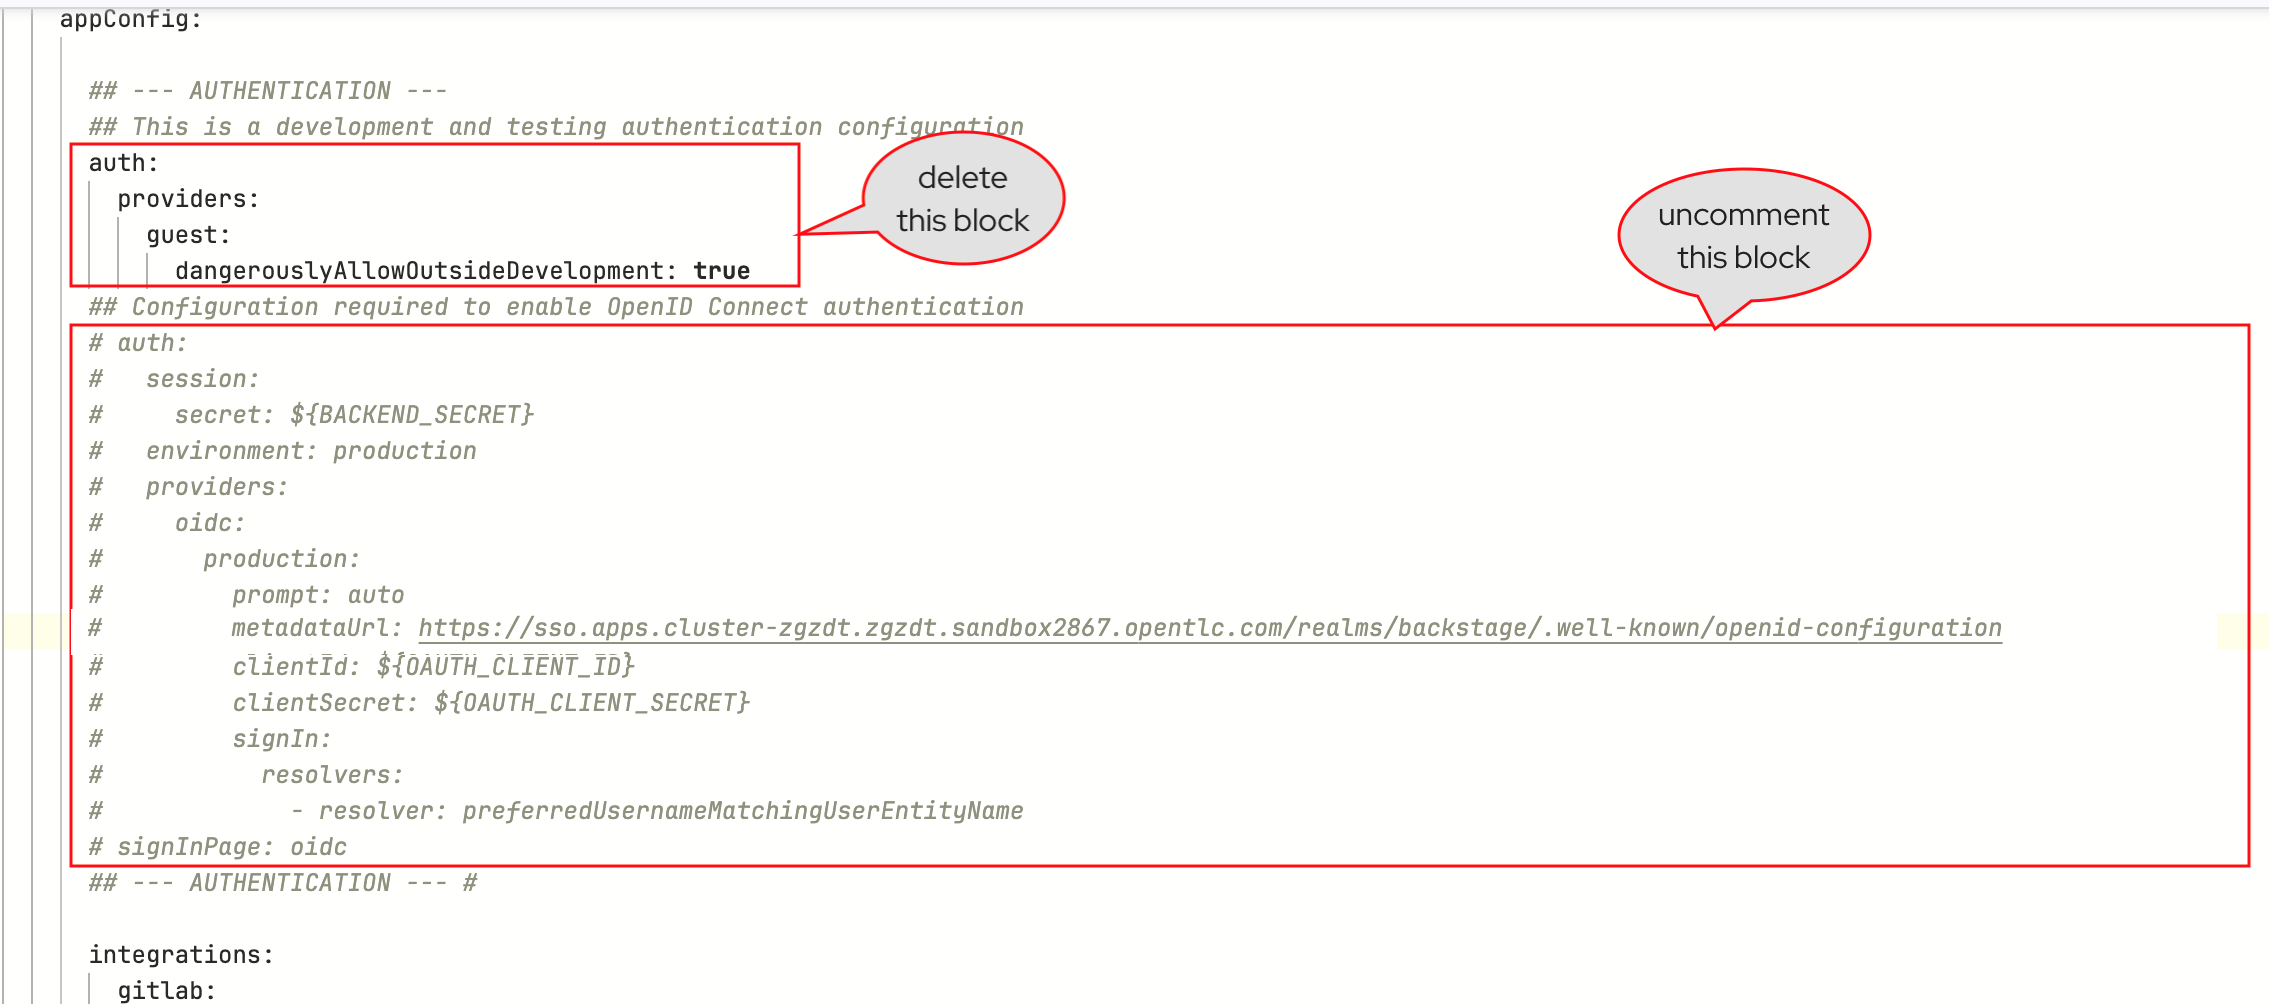
-
The end result will look similar to:
auth: session: secret: ${BACKEND_SECRET} environment: production providers: oidc: production: prompt: auto metadataUrl: https://sso.{openshift_cluster_ingress_domain}/realms/backstage/.well-known/openid-configuration clientId: ${OAUTH_CLIENT_ID} clientSecret: ${OAUTH_CLIENT_SECRET} signIn: resolvers: - resolver: preferredUsernameMatchingUserEntityName signInPage: oidc -
This is an example standard Backstage
authconfiguration. Below is a summary of what this configuration specifies:-
Enable sessions, and use the
BACKEND_SECRETenvironment variable to sign sessions. -
Set the authentication
environmenttoproduction. Environments can have any arbitrary name. -
Enable the OpenID Connect provider (
providers.oidc) with the following configuration:-
Provide a
productionconfiguration (corresponding to theenvironmentdefined previously). -
Use the
backstageRealm (metadataUrl). -
Load the
clientIdandclientSecretfrom environment variables (loaded from the precreated oauth-client Secret, specified inextraEnvVarsSecretsin the values.yaml) -
Map any signing in user identity to a User Entity in Red Hat Developer Hub using the specified resolver. These Users and Groups have already been synchronised to the catalog due to your work in the prior module.
-
-
The
signInPageproperty is specific to Red Hat Developer Hub. It ensures the correct sign-in UI is rendered. In upstream Backstage this requires React code changes.
-
-
Commit the changes with a message similar to
feat: enable openid connect -
Click Refresh on the
backstageApplication in OpenShift GitOps. If prompted, login asadmin/{openshift_gitops_password}. -
Wait until the Application reports being in a Healthy state.
Login using OpenID Connect Authentication
-
Once the latest version of your
appConfighas been synchronized and rolled out, visit your Red Hat Developer Hub instance. You will be prompted to sign-in using OpenID Connect.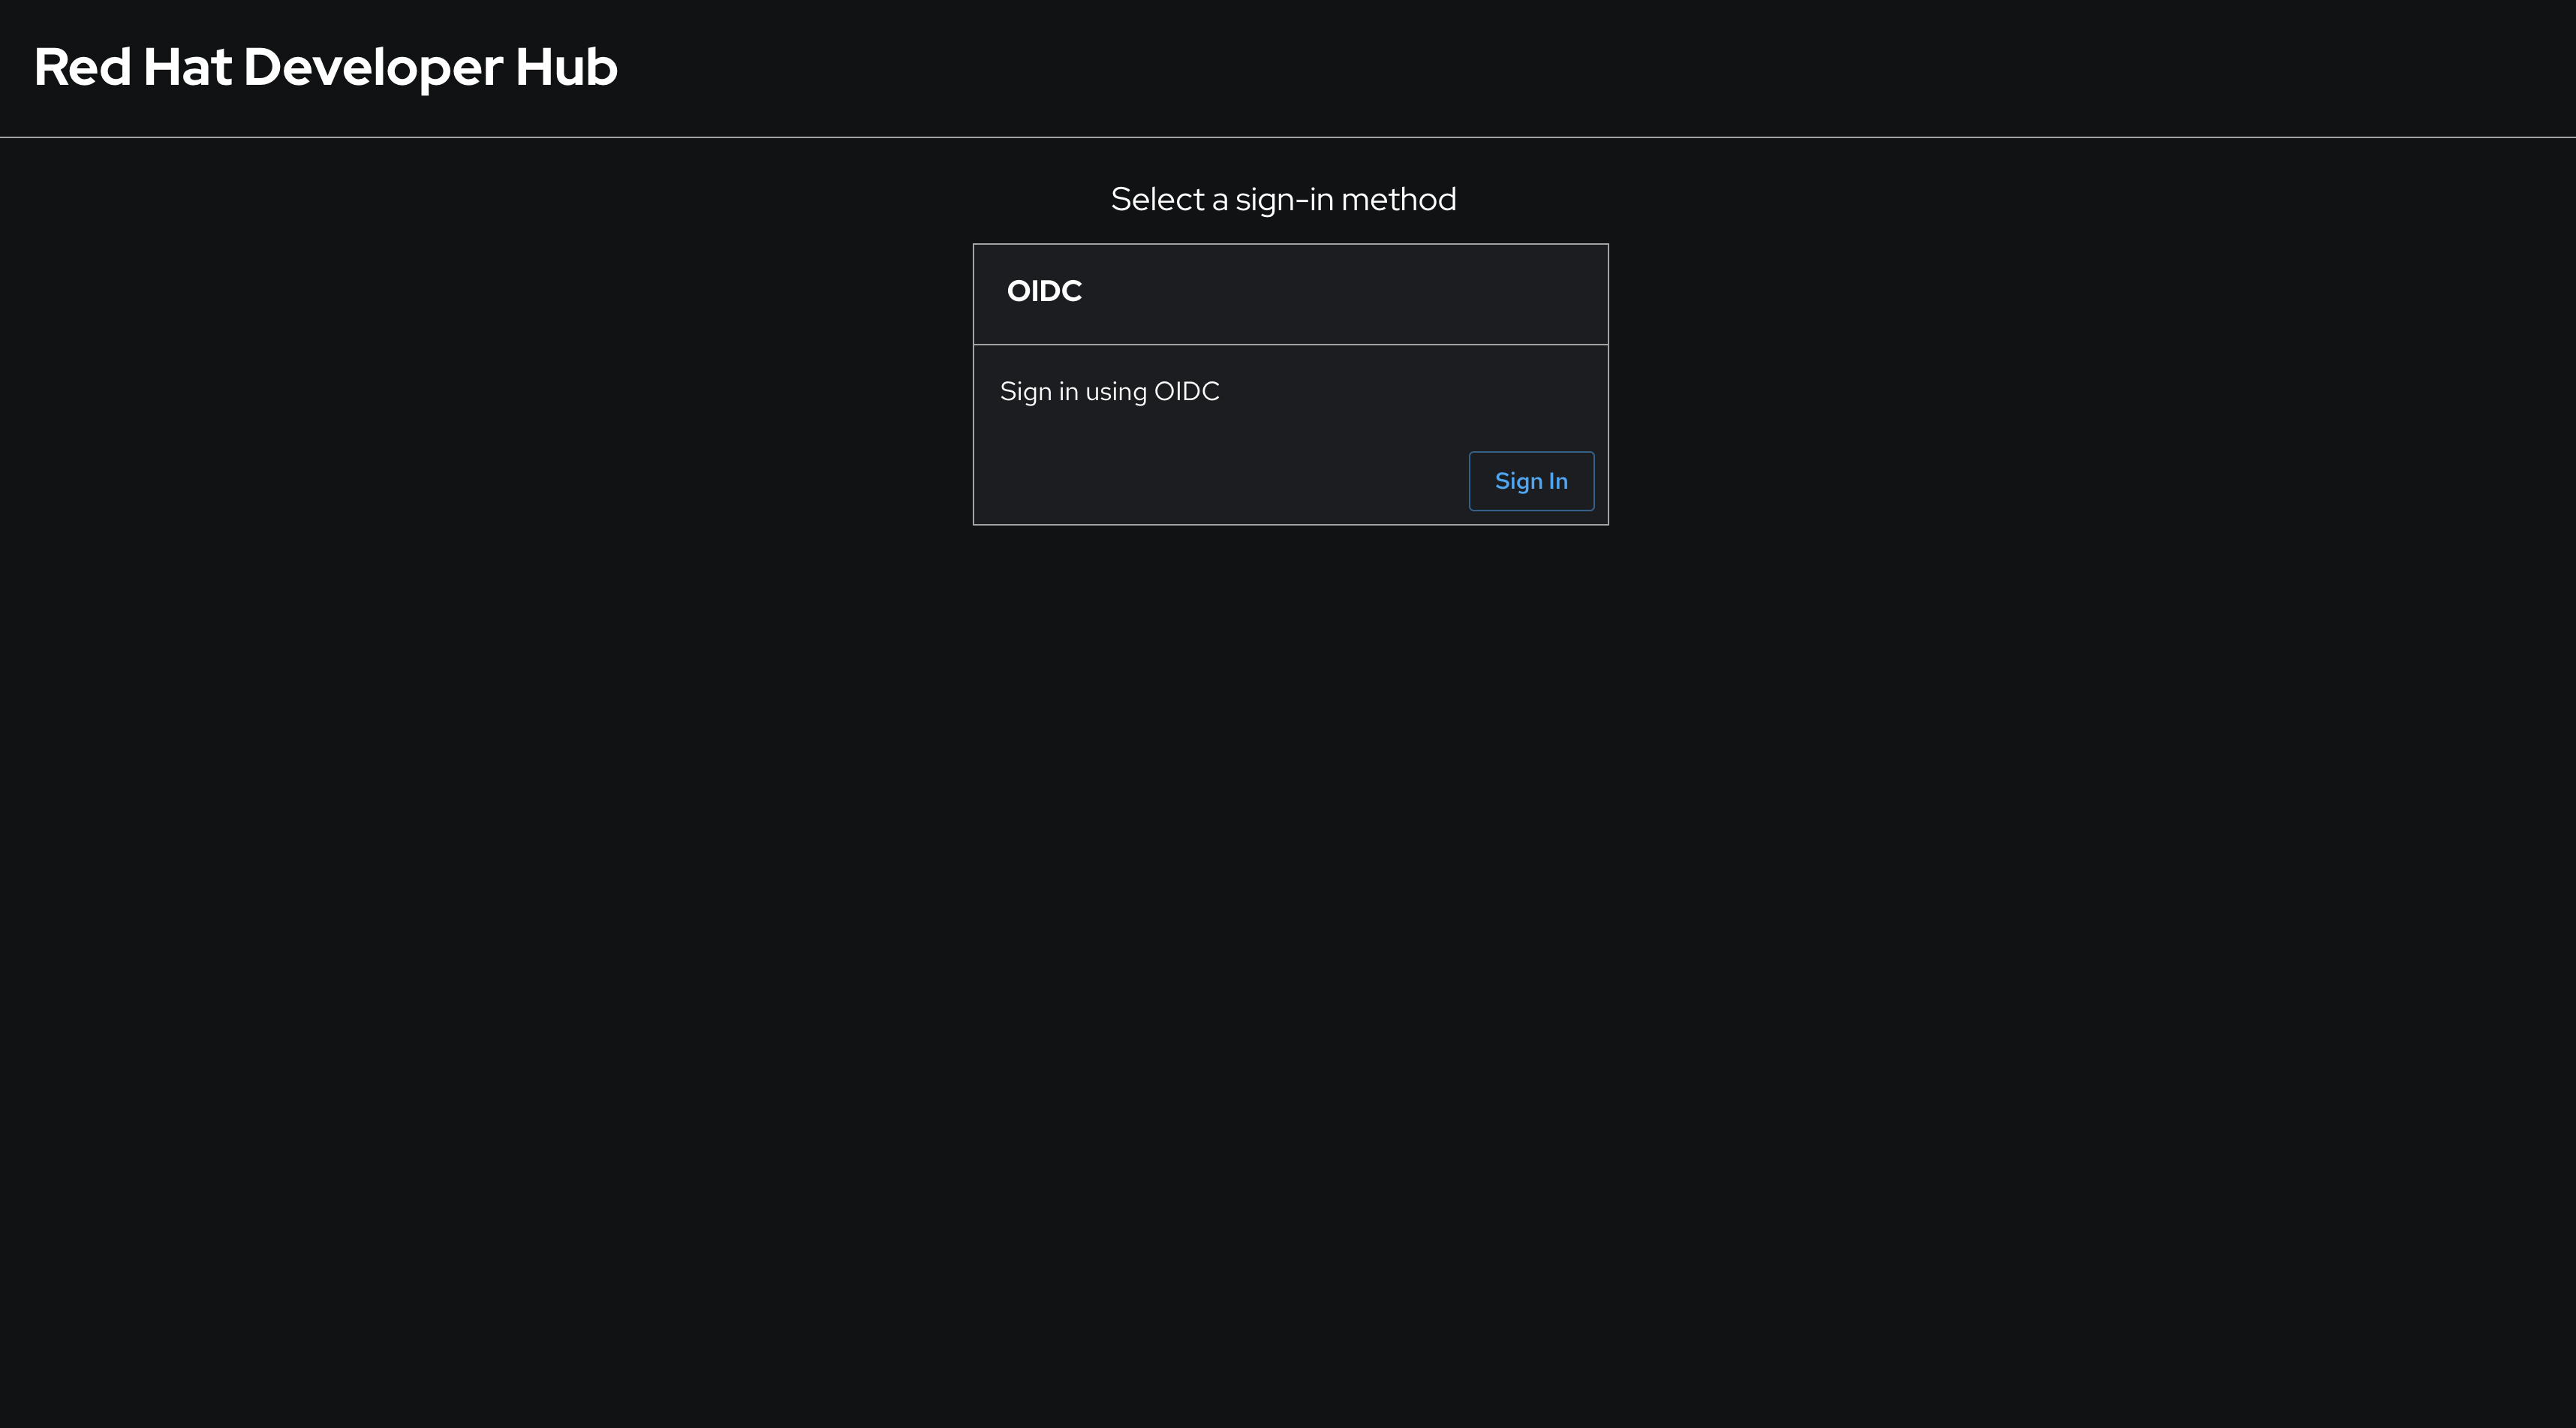
-
Login using the username
pe1and password{common_password}in the popup that appears. After logging in, visit the Settings page in Red Hat Developer Hub to confirm you’re logged in as thepe1user.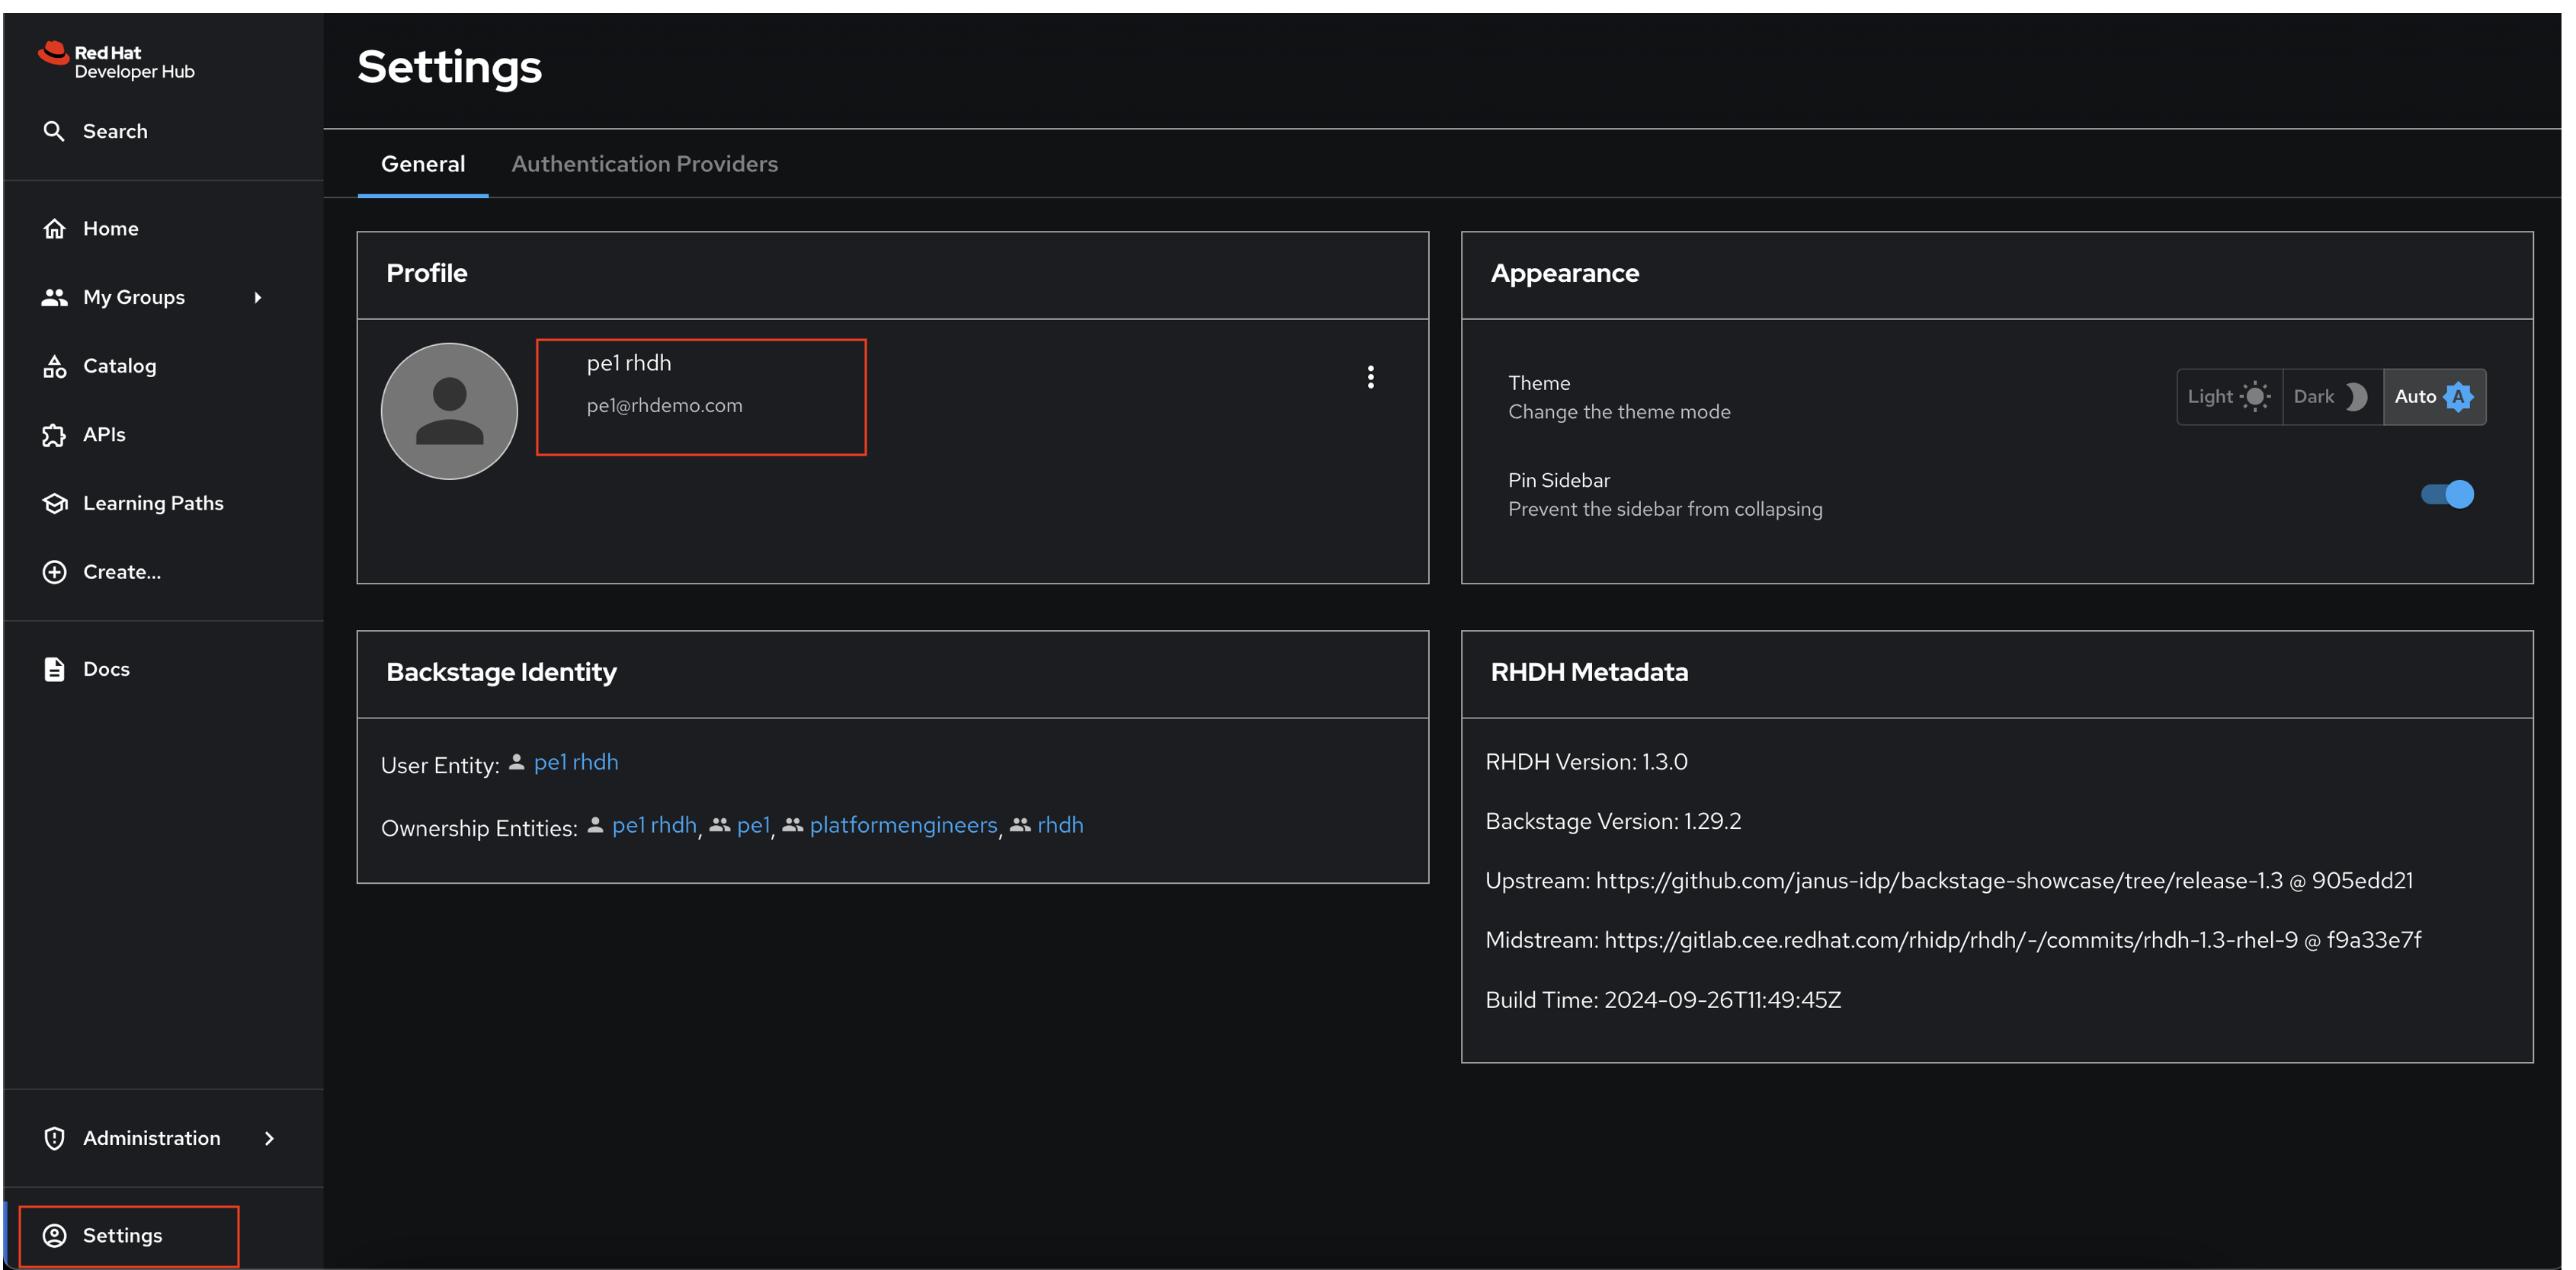 :imagesdir: ../../assets/images
Activity: Enabling GitLab Entity Discovery & TechDocs
Now that the import of User and Group entities and authentication is enabled for those same users, let’s focus on importing more Entities from your Git repositories. Having a rich and complete Software Catalog increases the value of the your IDP.
Enable GitLab Entity Discovery and TechDocs
Much like the Keycloak provider, you can use a GitLab provider to discover and import Entities from repositories in GitLab. This functionality is provided by the @backstage/plugin-catalog-backend-module-gitlab plugin. You can see that this is a supported dynamic plugin in the Red Hat Developer Hub documentation.
To install and configure this plugin:
-
Visit the rhdh/developer-hub-config repository in your GitLab instance.
-
Select Edit > Edit single file.
-
Uncomment the
--- TECHDOCS_PLUGIN ---section indynamic.pluginssection of the YAML, to enable the TechDocs and GitLab dynamic plugins.To uncomment multiple lines of code, highlight the lines and press
CMD + /(on macOS) orCTRL + /(on Linux/Windows).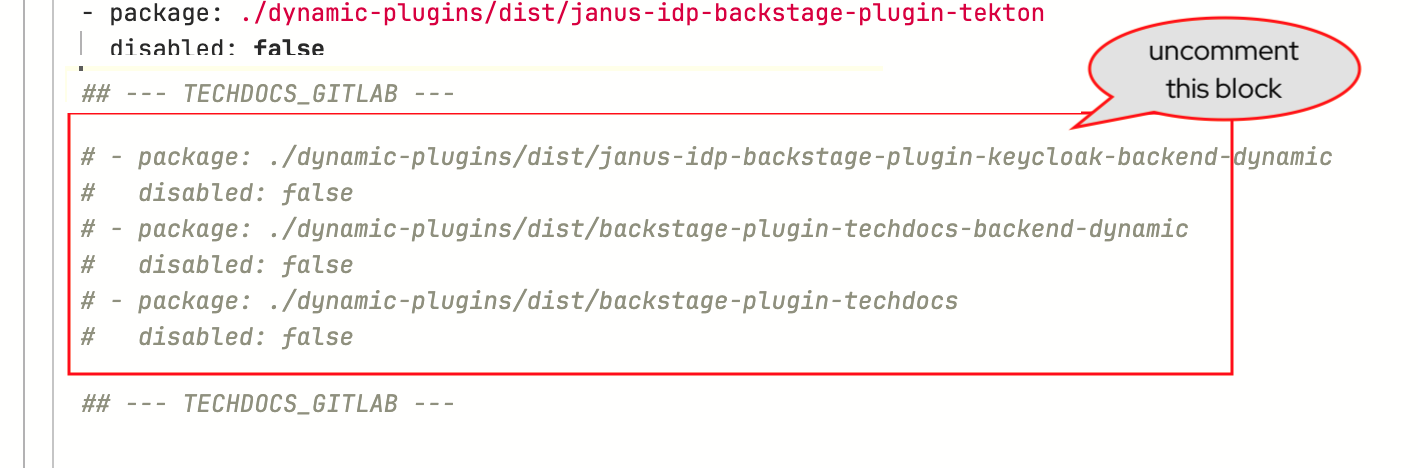
-
Look for the YAML between the
--- TECHDOCS_CONFIG ---block and uncomment it.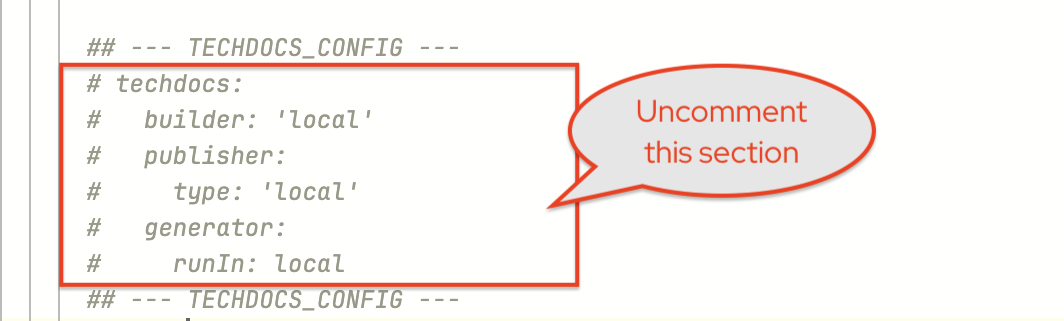
-
Find the
appConfig.catalog.providersconfiguration and uncomment the--- GITLAB_CATALOG_PROVIDER ---block as shown below.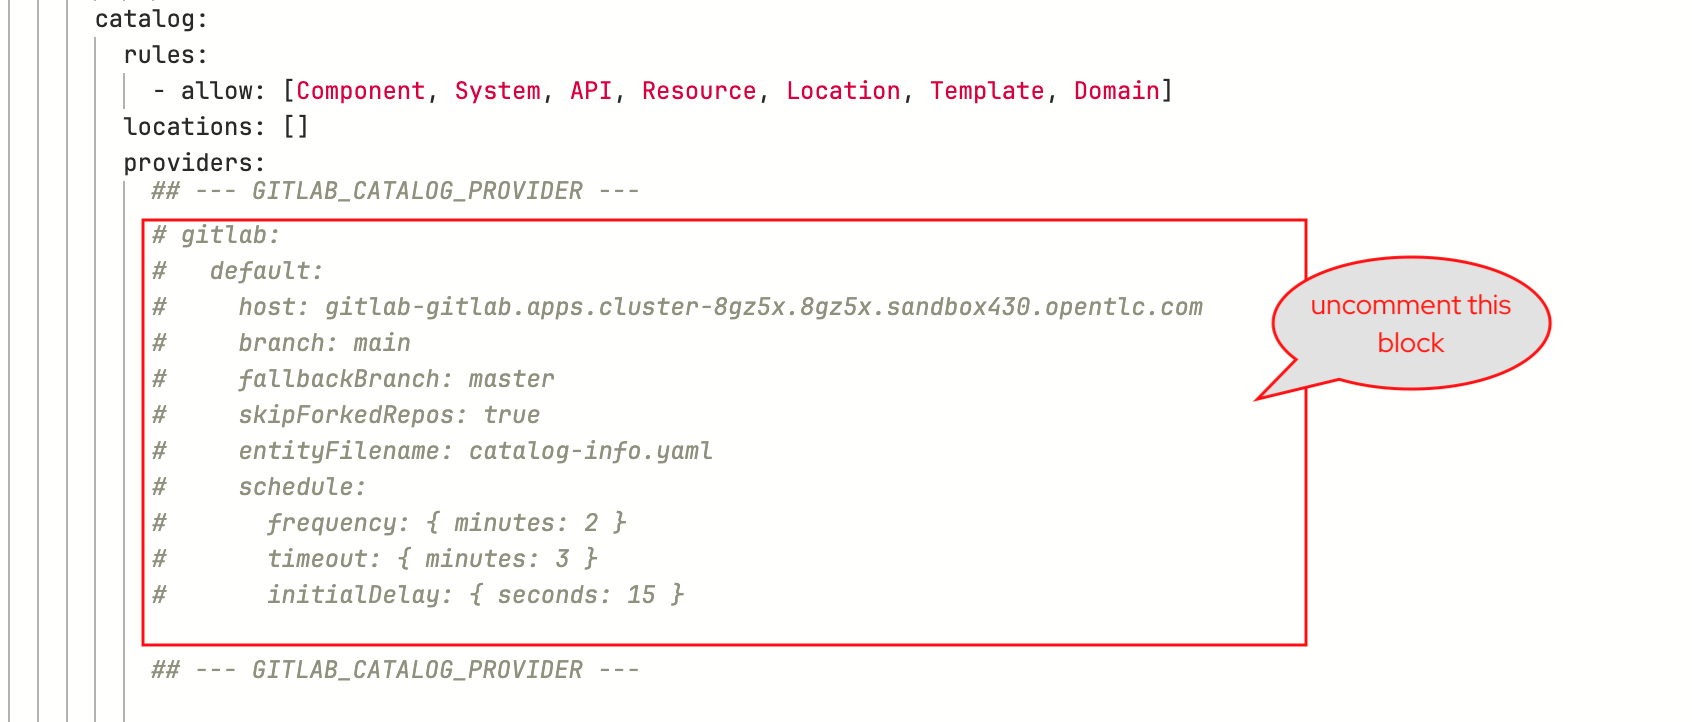
-
Commit your changes with the message
feat: add gitlab autodiscovery. -
Click the Refresh button on the
backstageApplication in OpenShift GitOps (login asadmin/{openshift_gitops_password}).
Verify GitLab Entity Discovery is Active
-
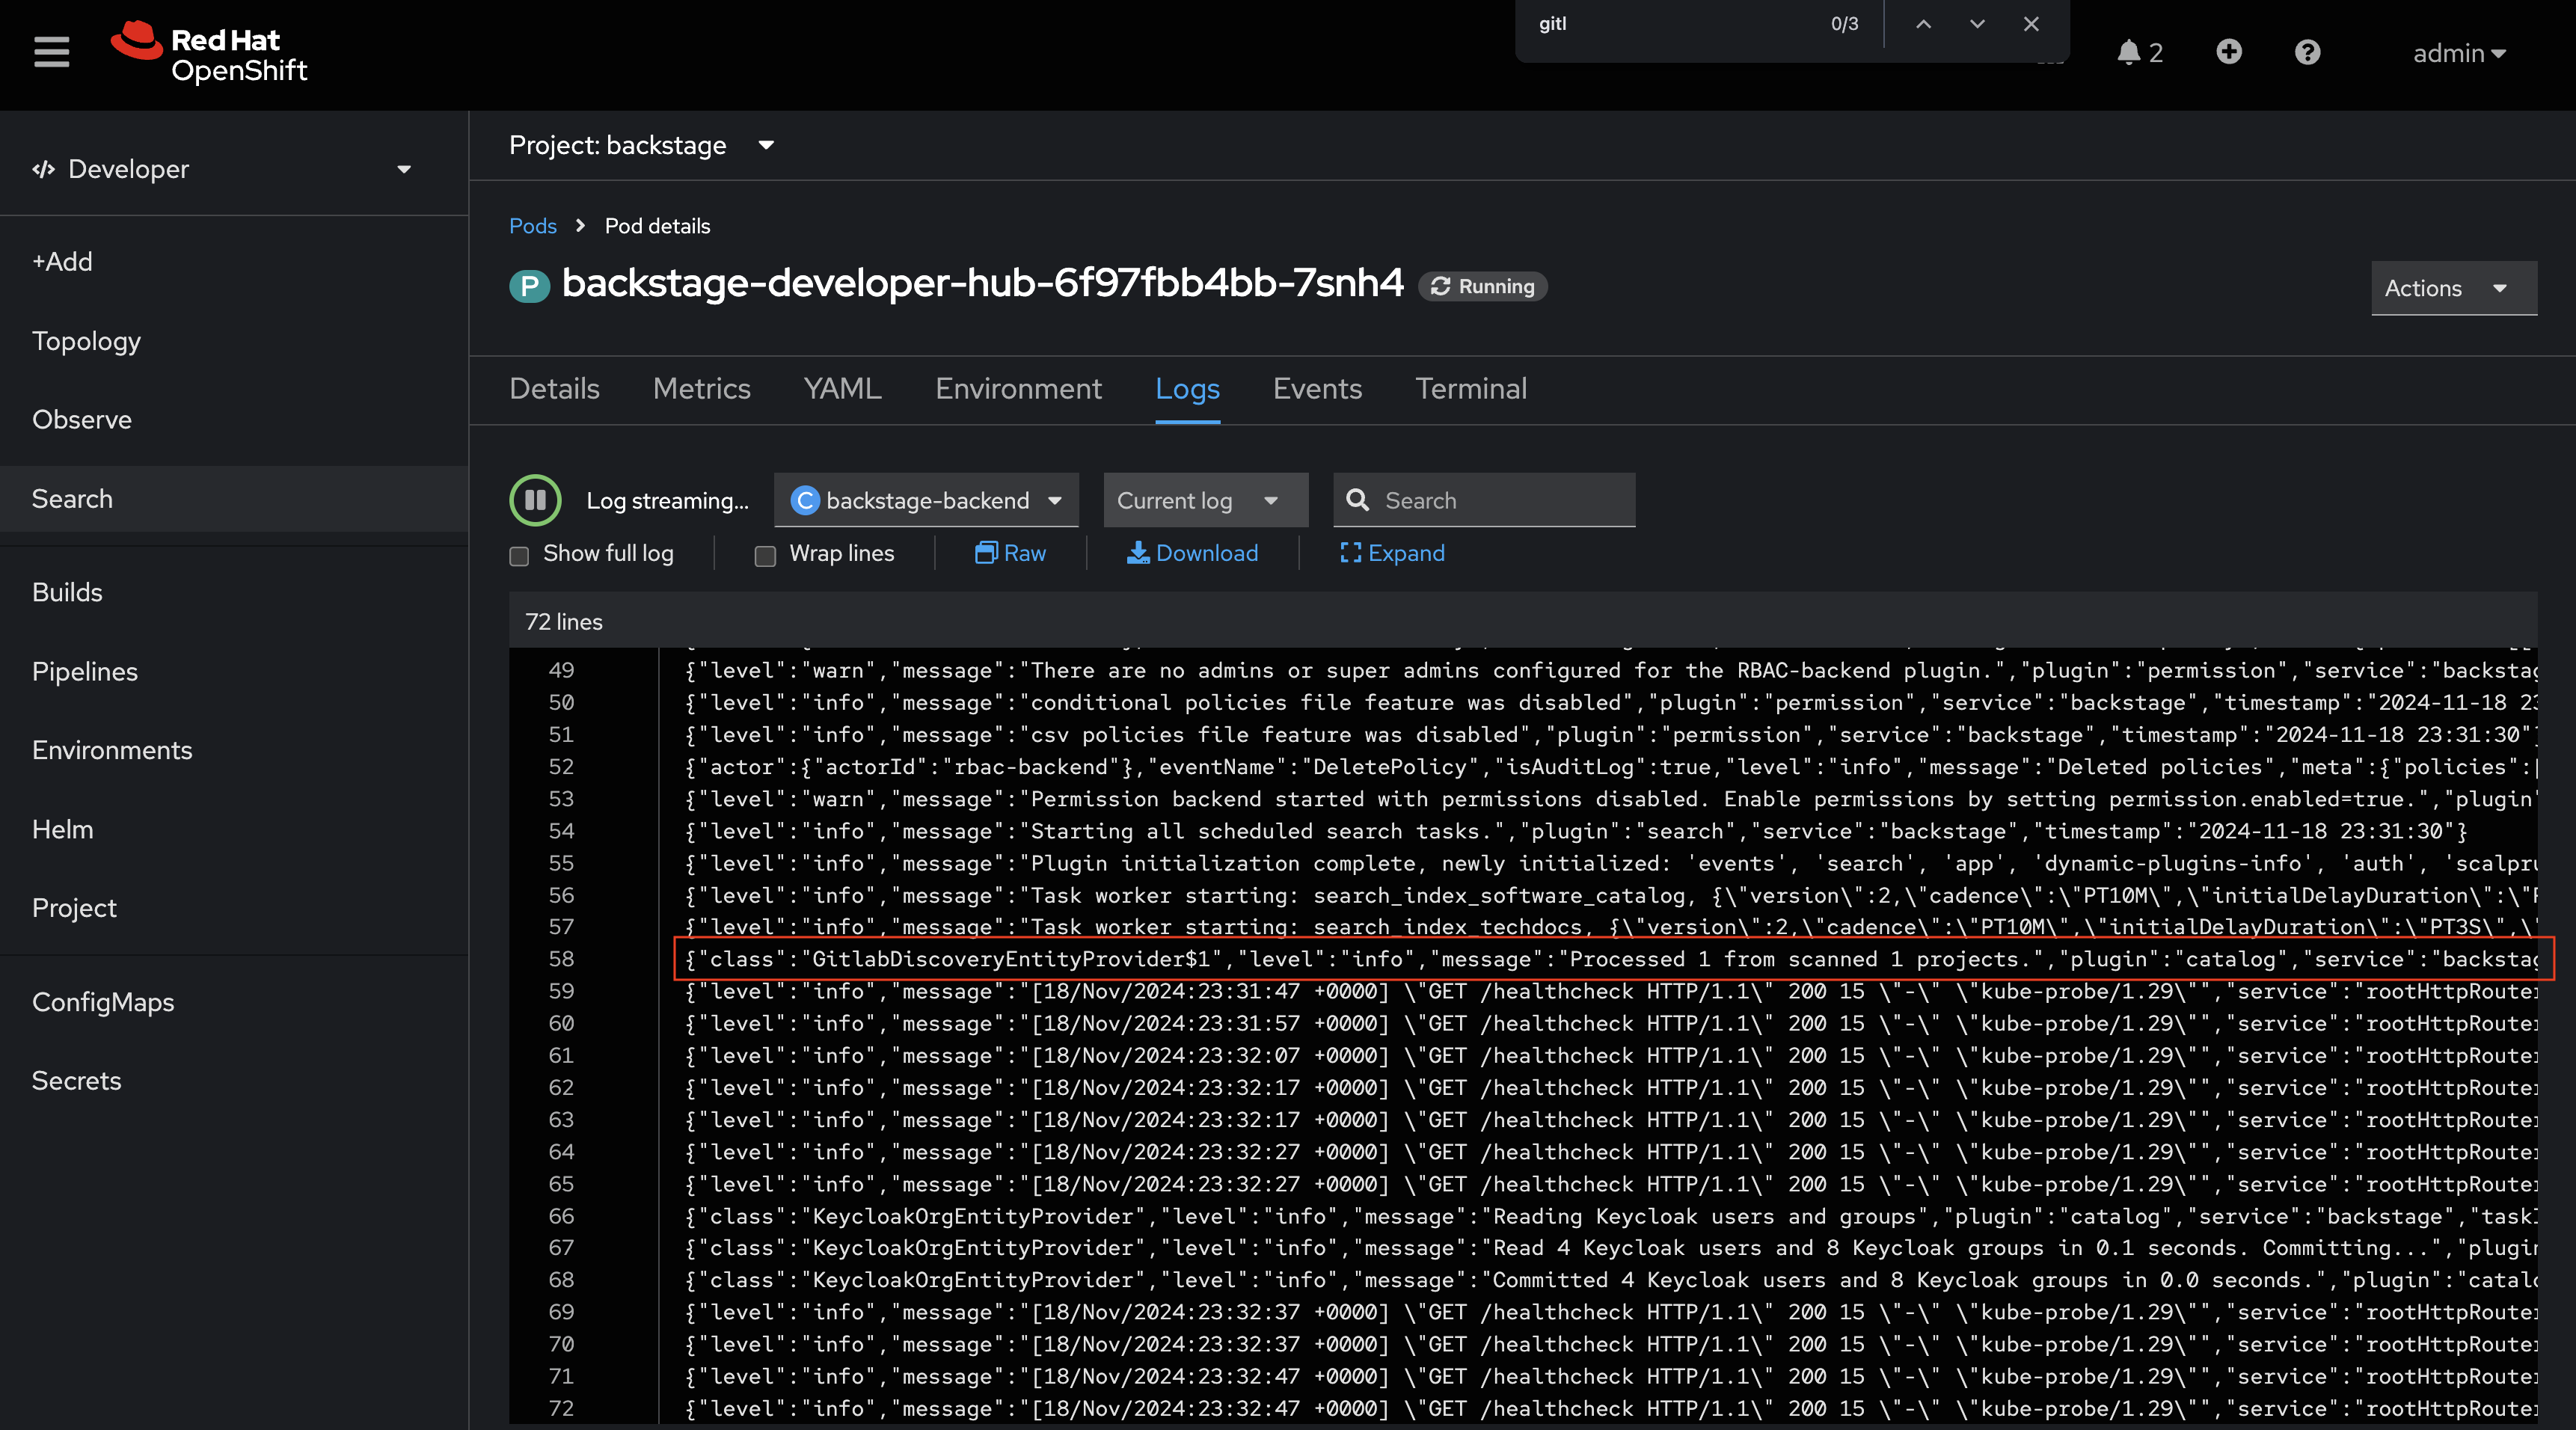
After a few moments your new Red Hat Developer Hub configuration will finish rolling out. Check the logs for the new Red Hat Developer Hub Pod. You should see that a repository was discovered - that means the repository contains catalog-info.yaml file.
-
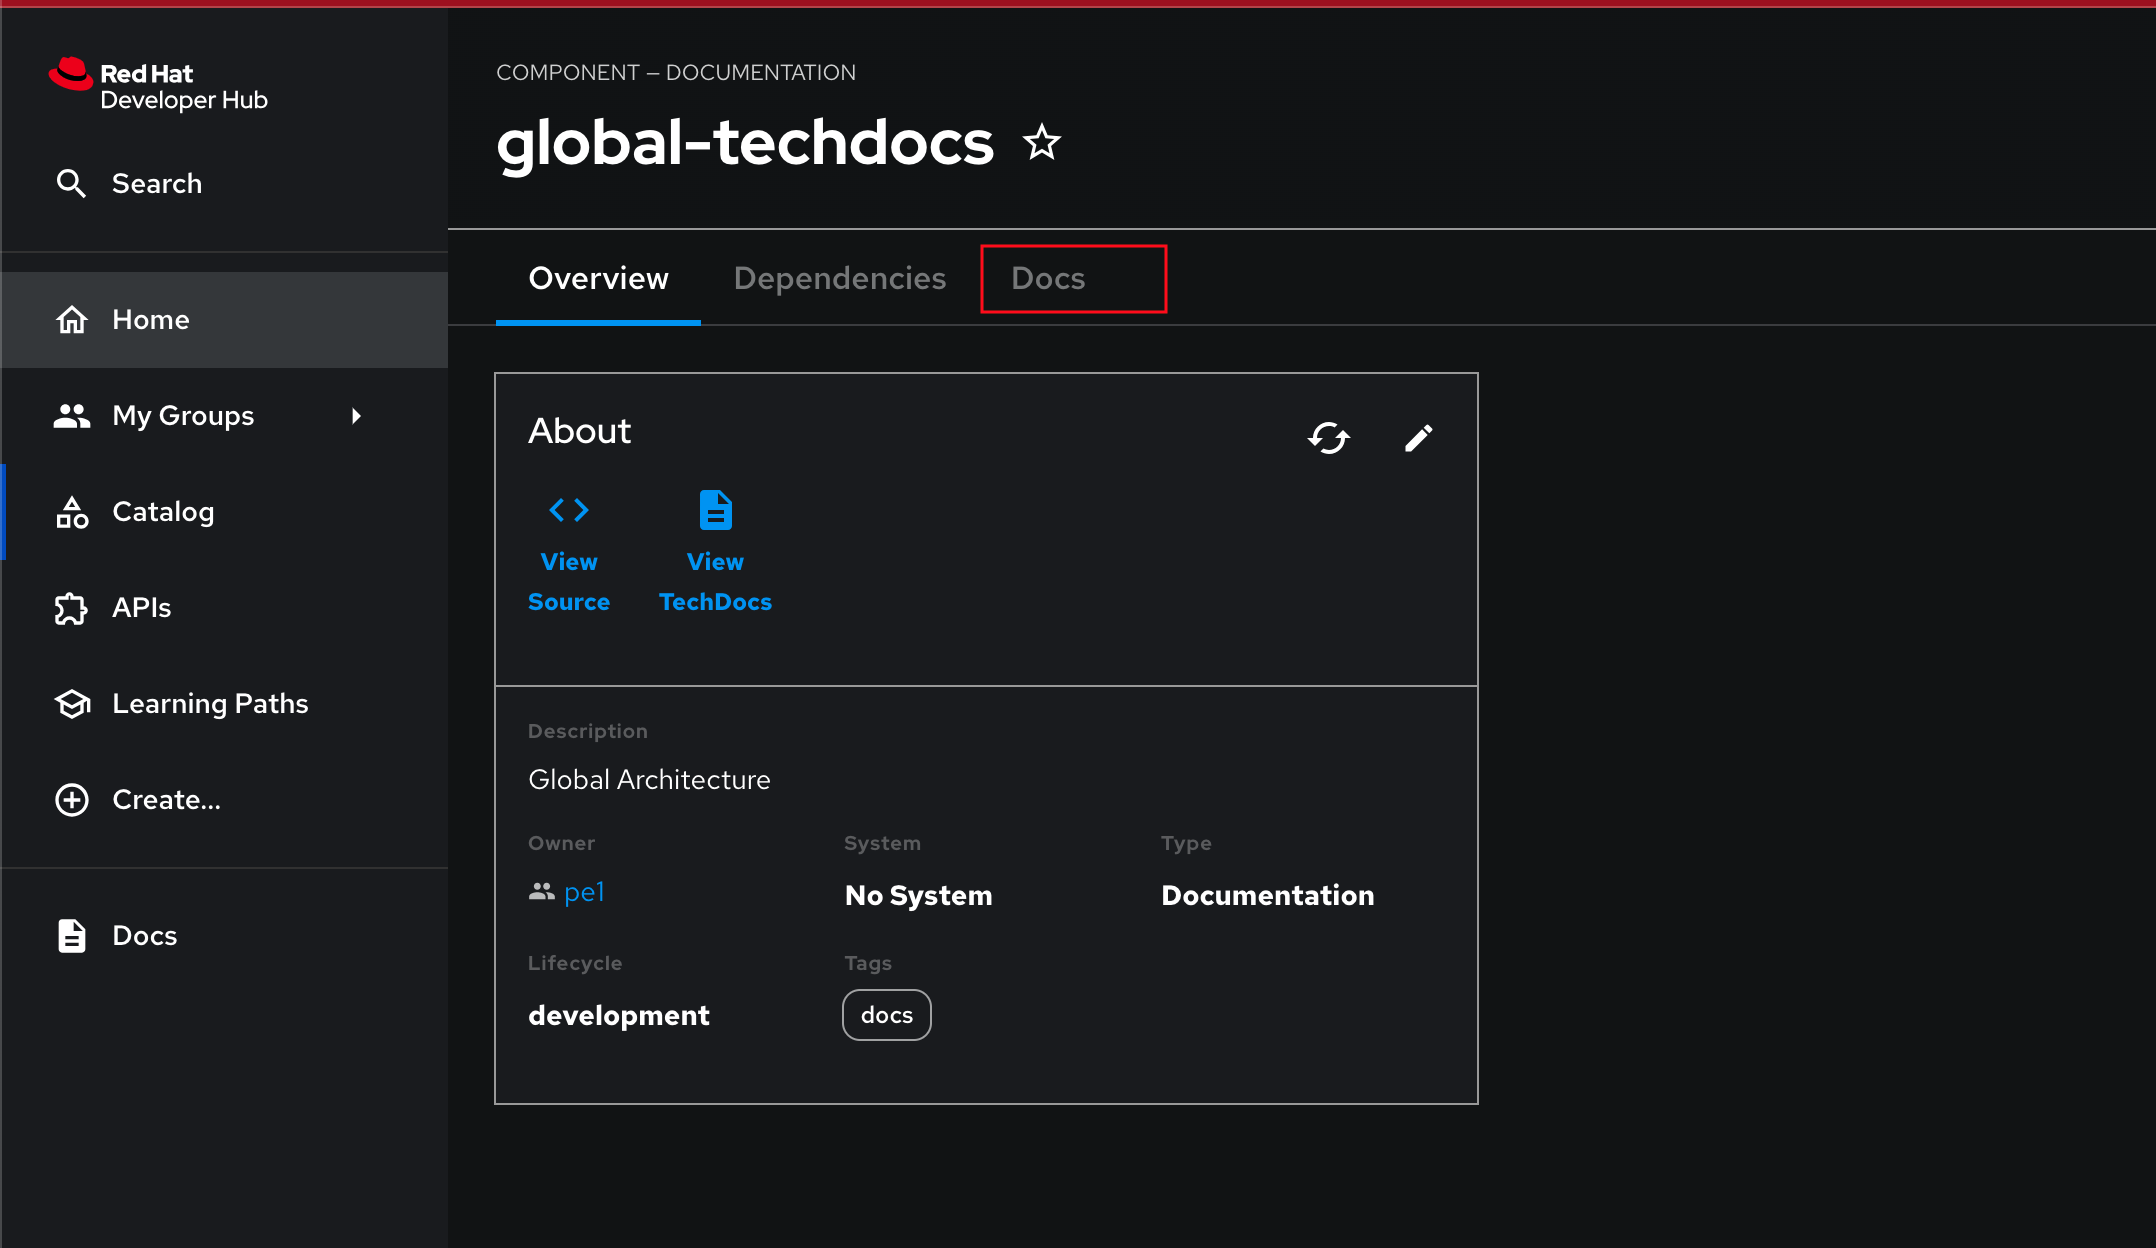
The repository in question is the global/global-techdocs. This repository contains a catalog-info.yaml that defines a Component, and an annotation
backstage.io/techdocs-refthat tells the TechDocs plugin where to find the source for documentation builds for the Component.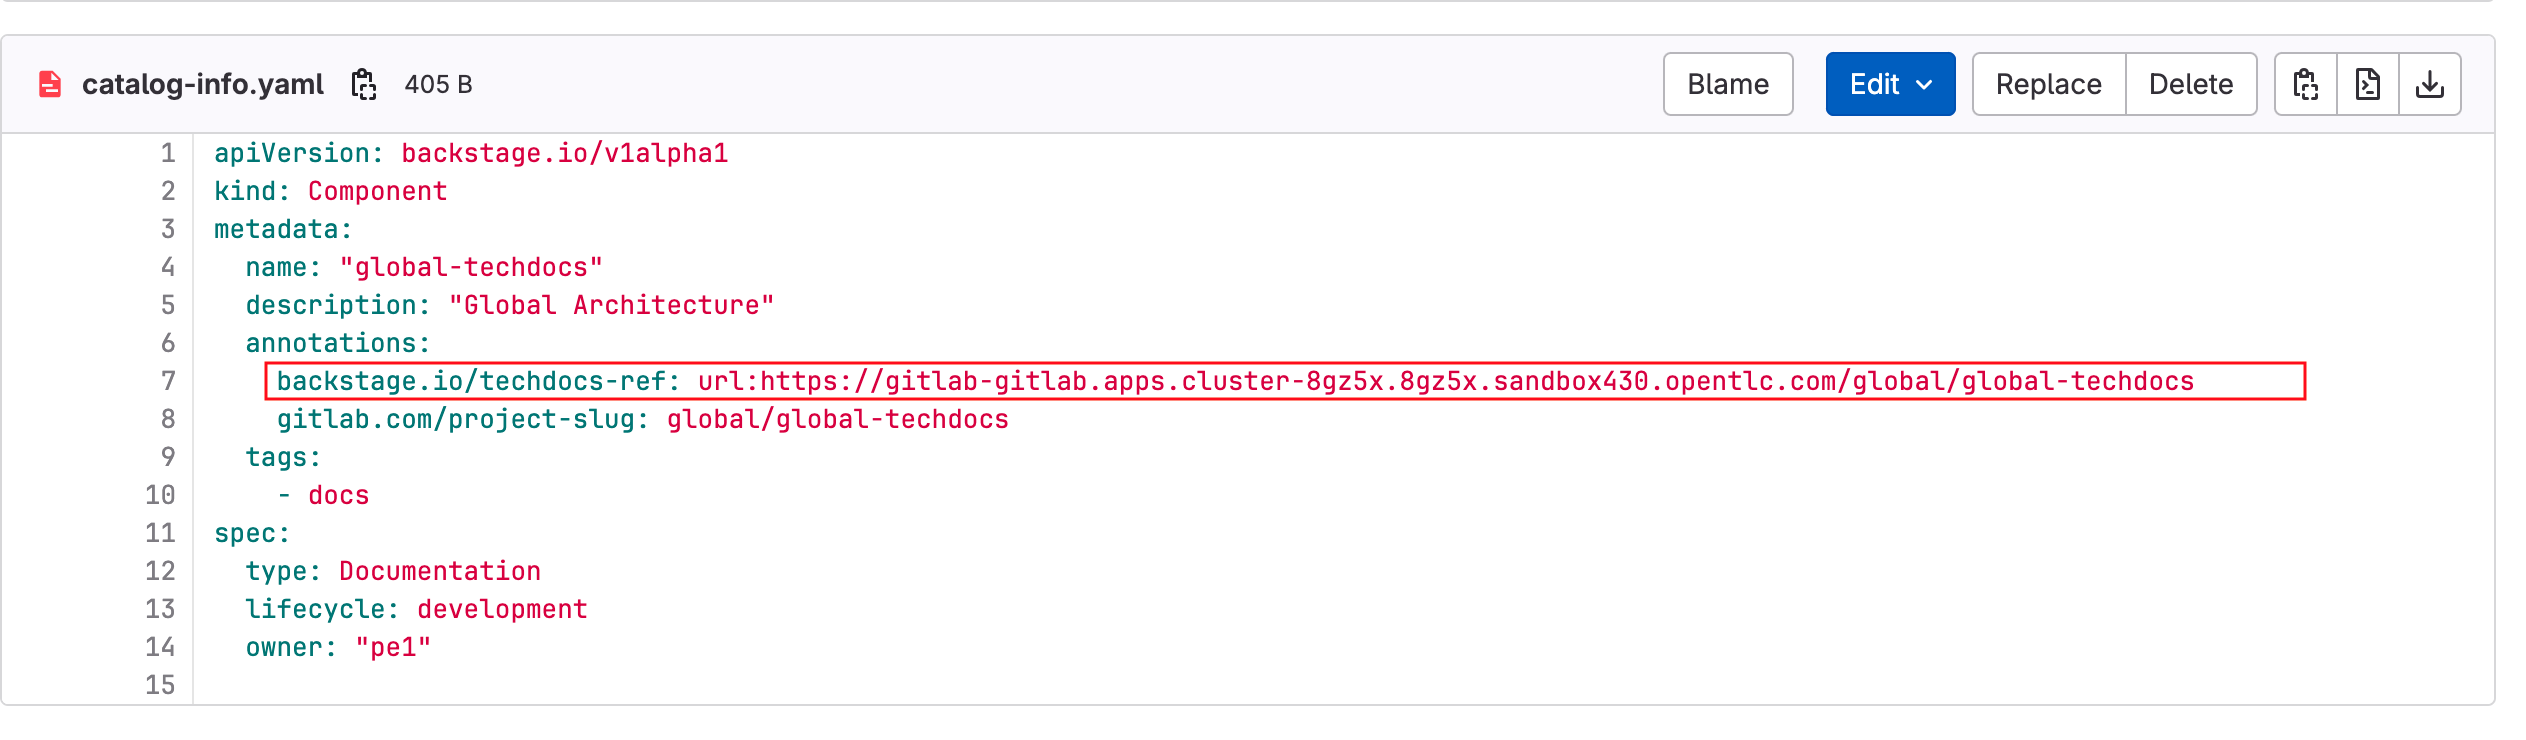
-
Visit your instance of Red Hat Developer Hub and view the Software Catalog. Make sure that the
Kinddropdown is set to Component. You should see the global-techdocs Component.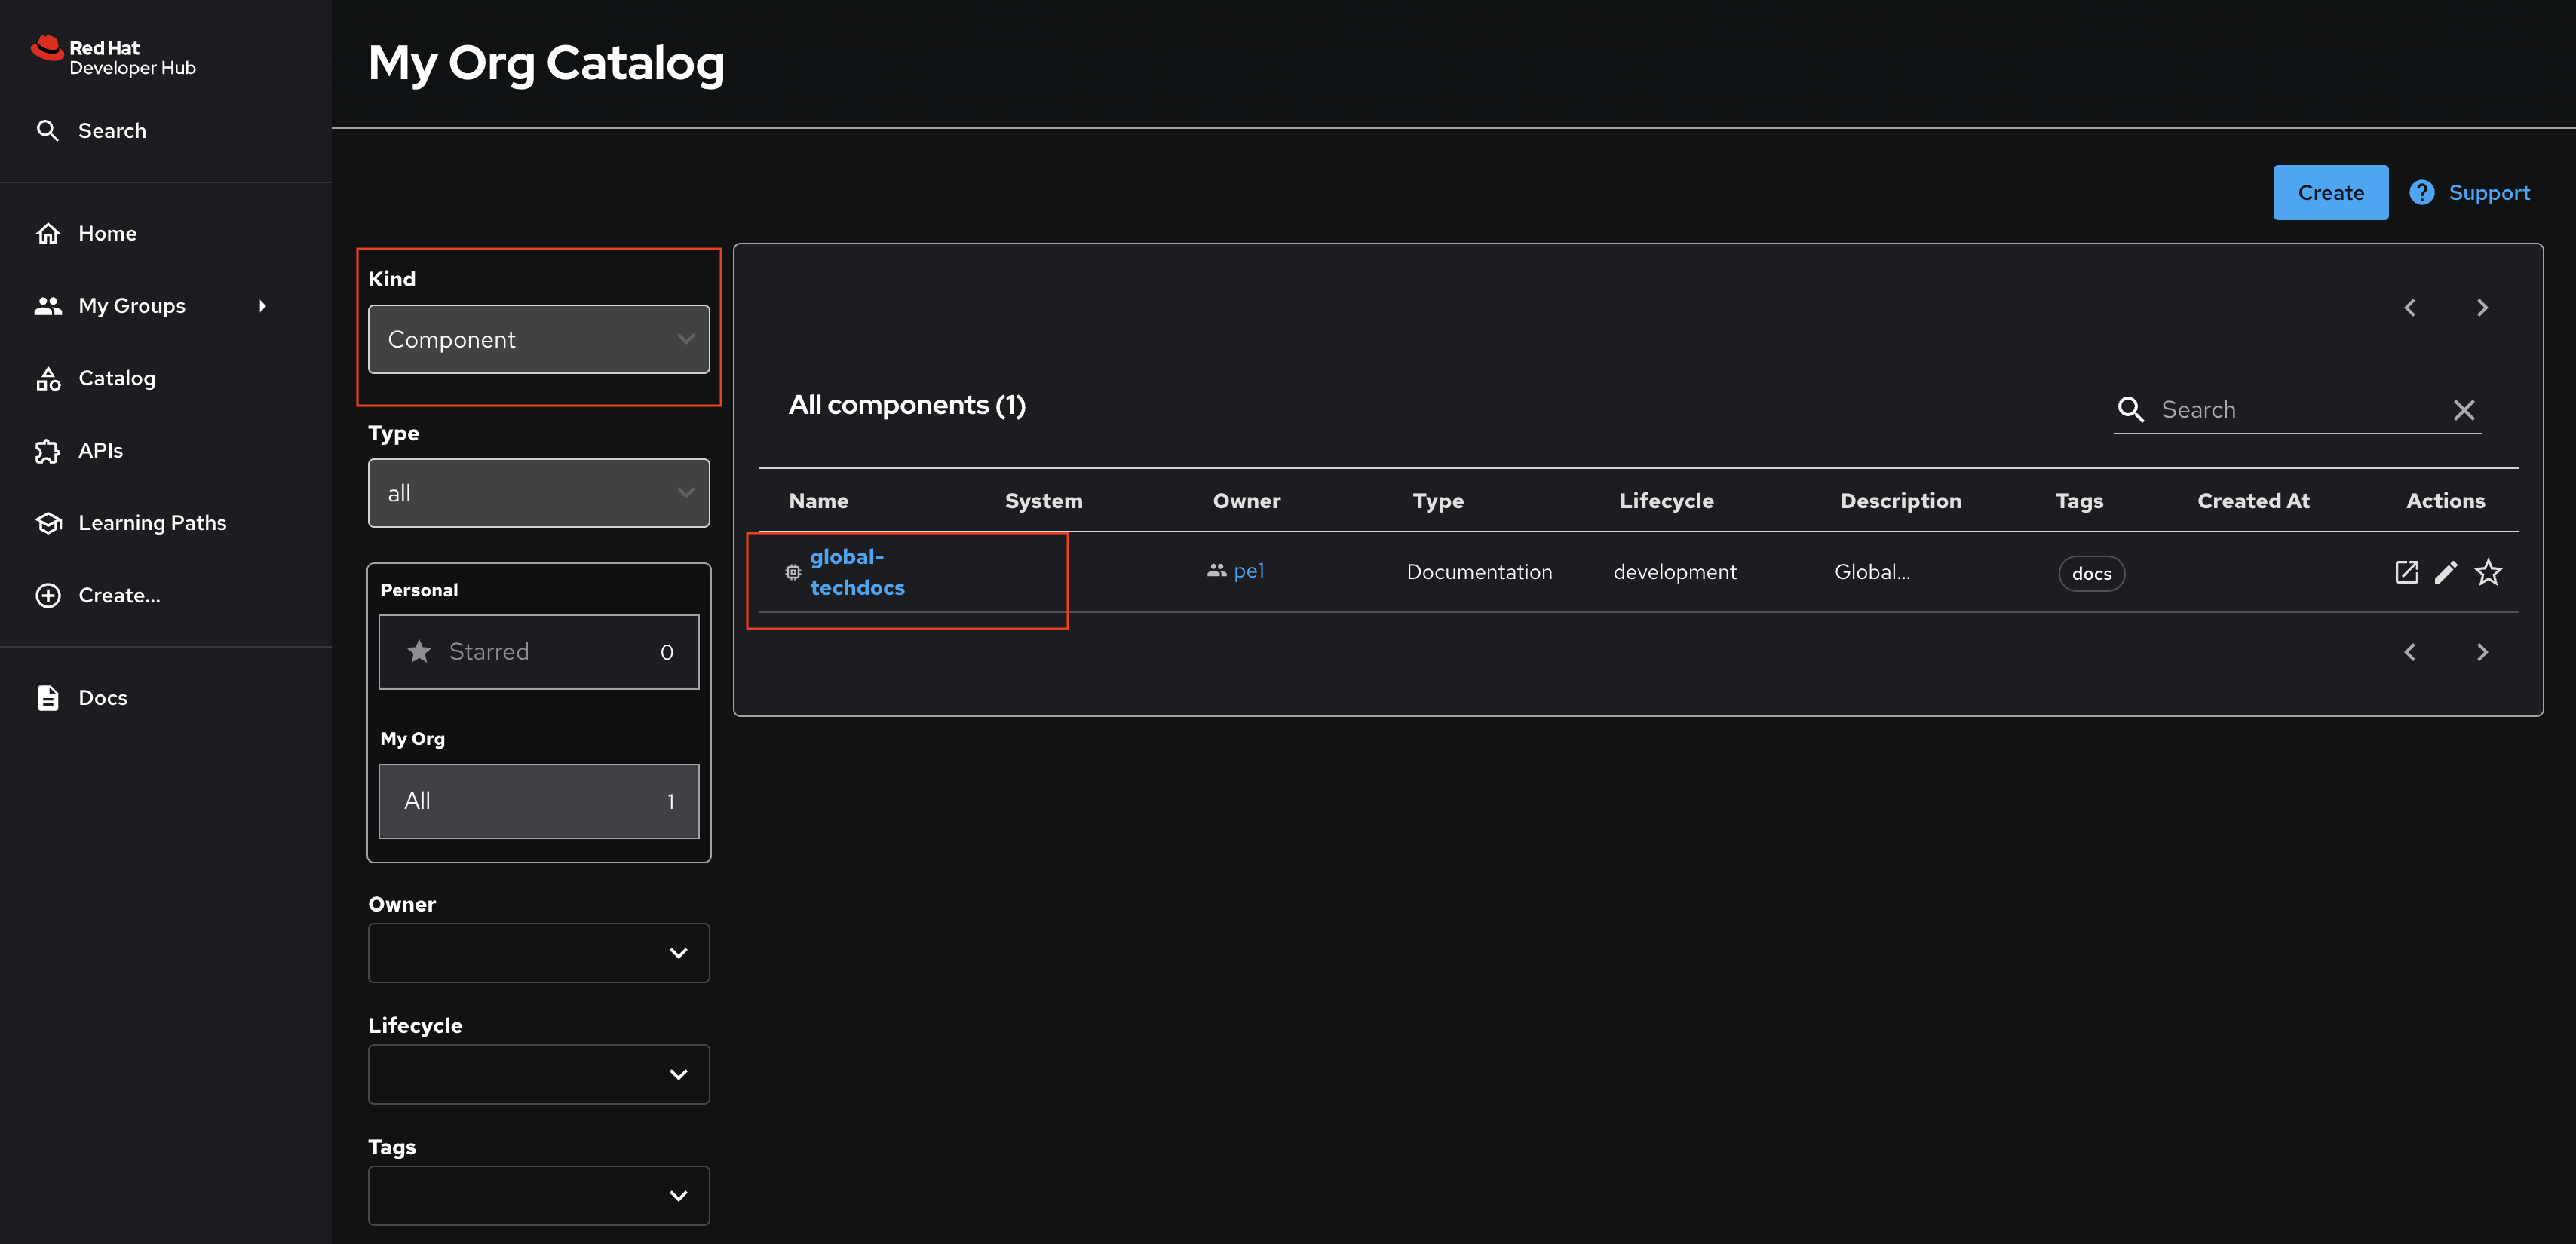

TechDocs Generation and Storage Configuration
Recall the techdocs configuration from your values.yaml file in GitLab. It should resemble the following example:
techdocs:
  builder: 'local'
  publisher:
    type: 'local'
  generator:
    runIn: local
This particular configuration is instructing TechDocs to build (builder) and store documentation locally (publisher.type), in the running Red Hat Developer Hub container.
The generator: local option instructs TechDocs to build the documentation on-demand. This requires the underlying container to have the necessary dependencies installed - Red Hat Developer Hub has these dependencies in place.
It’s possible to offload the TechDocs build process to a CI/CD pipeline that uses the TechDocs CLI. In this scenario, the pipeline builds and publishes the TechDocs to S3 or other storage solution. The platform engineer must configure a builder of type external and the publisher to read from the same storage system to load the desired TechDocs for a given Entity if an alternative storage solution is used.
Using the external builder strategy reduces load on the Red Hat Developer Hub instance, but places the burden of building and publishing the TechDocs on authors. Repository owners and authors can build their TechDocs using the TechDocs CLI.
Conclusion
Congratulations! You’ve learned the core concepts of Backstage and Red Hat Developer Hub. You also learned how to deploy and manage an instance of Red Hat Developer Hub using the official Helm Chart via OpenShift GitOps.
Module 3: Software Templates and Developer Experience
Overview
Software Templates in Red Hat Developer Hub enable your team(s) to create Entities, such as new Components, and - through the use of "actions" provided by plugins - create resources in other systems such as your GitLab and OpenShift GitOps instances. Templates themselves are Entities, meaning you can import them similar to any other Entity!
Platform Engineers will often be the authors of Templates, and use them to create "golden paths" that follow best-practices and use approved processes and tooling. Development teams will be the consumers of Templates to create new software and automate their tasks. Using Templates reduces cognitive load on the development teams by allowing them to focus on development tasks, while platform concerns are addressed by the template.
Templates are defined using YAML, but are rendered as a rich form in the Red Hat Developer Hub UI when used by development teams.
Module Objectives
-
Create a Template (as the Platform Engineer)
-
Register the Template in the Software (as the Platform Engineer)
-
Create a new Component, GitLab Repository, and GitOps Application from the Template (as a Developer) :imagesdir: ../../assets/images
Introduction to Concepts
As mentioned earlier, Templates are defined using YAML and rendered as a rich form in the Red Hat Developer Hub UI when used by development teams.
Let’s explore the Template structure using a sample Template in the rhdh/template-quarkus-simple repository in GitLab.
Template YAML Structure
At a basic level, the Template Entity is similar to the Component Entity you encountered in the catalog-info.yaml in the prior module; resembling a Kubernetes Custom Resource.
apiVersion: scaffolder.backstage.io/v1beta3
kind: Template
metadata:
  name: quarkus-web-template
  title: Quarkus Service
  description: Create a simple microservice using Quarkus with Argo CD
  tags:
    - recommended
    - java
    - quarkus
    - maven
spec:
  owner: rhdh
  type: service
  # other fields removed for brevity
Where the Template Entity differs is that it contains additional fields. Let’s examine each in more detail:
-
spec.parameters(Parameters) -
spec.steps(Steps) -
spec.output(Output)
Parameters
The spec.parameters field is used by platform engineers to enable developers to pass values (parameters) to the Template. Typically this will be parameters such as the name of the Component, a Java package name, repository name, etc.
Here’s an example of the parameters:
spec:
  parameters:
    # Parameters can be spread across multiple forms/pages, each
    # with their own titles and set of parameters
    - title: Provide Information for Application
      required:
        - component_id
        - java_package_name
      properties:
        component_id:
          title: Name
          type: string
          description: Unique name of the component
          default: my-quarkus-app
          ui:field: EntityNamePicker
          ui:autofocus: true
          maxLength: 18
        group_id:
          title: Group Id
          type: string
          default: com.redhat.rhdh
          description: Maven Group Id
You might have recognized this as a JSON Schema structure. By using JSON Schema you can define the parameters that are supported by the template, and, more importantly, enforce validation on those parameters. The rendering of the form in the Red Hat Developer Hub UI is managed by the react-jsonschema-form library.
|
|
The properties that have a ui prefix might have piqued your interest. These are special properties that provide instructions to the form, for example, to enable autocomplete or autofocus certain form fields when it is displayed in the Red Hat Developer Hub UI.
Steps
Once a developer has entered and confirmed their parameters, the Template is executed by the scaffolder - a service within the Red Hat Developer Hub backend.
The scaffolder executes the actions defined in spec.steps, for example, to publish code to a Git repository and register it in the Software Catalog:
spec:
  steps:
  - id: publish
    name: Publish
    # Use the publish action provided by the GitLab plugin
    action: publish:gitlab
    input:
      # Construct a URL to the repository using the provided hostname, logged in
      # username, and provided component_id
      repoUrl: "${{ parameters.repo.host }}?owner=${{ user.entity.metadata.name }}&repo=${{parameters.component_id}}"
      repoVisibility: public
      defaultBranch: main
      sourcePath: ./${{ user.entity.metadata.name }}-${{parameters.component_id}}
  - id: register
    name: Register
    # Register a new component using the built-in register action
    action: catalog:register
    input:
      repoContentsUrl: ${{ steps.publish.output.repoContentsUrl }}
      catalogInfoPath: "/catalog-info.yaml"
Notice how the parameters are referenced in the steps? Another point of note is that a user variable is available to access data related to the user that’s using the Template, and subsequent steps can access output from prior steps.
The output values are documented on a per plugin basis. You can find the values for the specific version of your installed plugins by accessing the /create/actions endpoint on your Red Hat Developer Hub instance.
Output
The spec.output can use of the outputs from the steps to do display useful information such as:
-
Links to newly created Components
-
Source Code Repository links
-
Links to Git Merge Requests that are needed etc
-
Markdown text blobs
  output:
    links:
      - title: Source Code Repository
        url: {{ '${{ steps.publish.output.remoteUrl }}' }}
      - title: Open Component in catalog
        icon: catalog
        entityRef: {{ '${{ steps.register.output.entityRef }}' }}
Platform Engineer Activity: Import the Software Template
The Software Template you’ll be using in this activity is stored in the template.yaml file in the rhdh/template-quarkus-simple repository in GitLab.
Register this template using the Red Hat Developer Hub UI:
-
Login to your instance of Red Hat Developer Hub as the
pe1user with password{common_password}. -
Select the
 icon on the top navigation bar to access the Self-service menu.
 -
Click the Import an existing Git repository button.
-
Enter the following URL in the Select URL field and click Analyze:
https://gitlab-gitlab.{openshift_cluster_ingress_domain}/rhdh/template-quarkus-simple/-/blob/main/template.yaml?ref_type=heads -
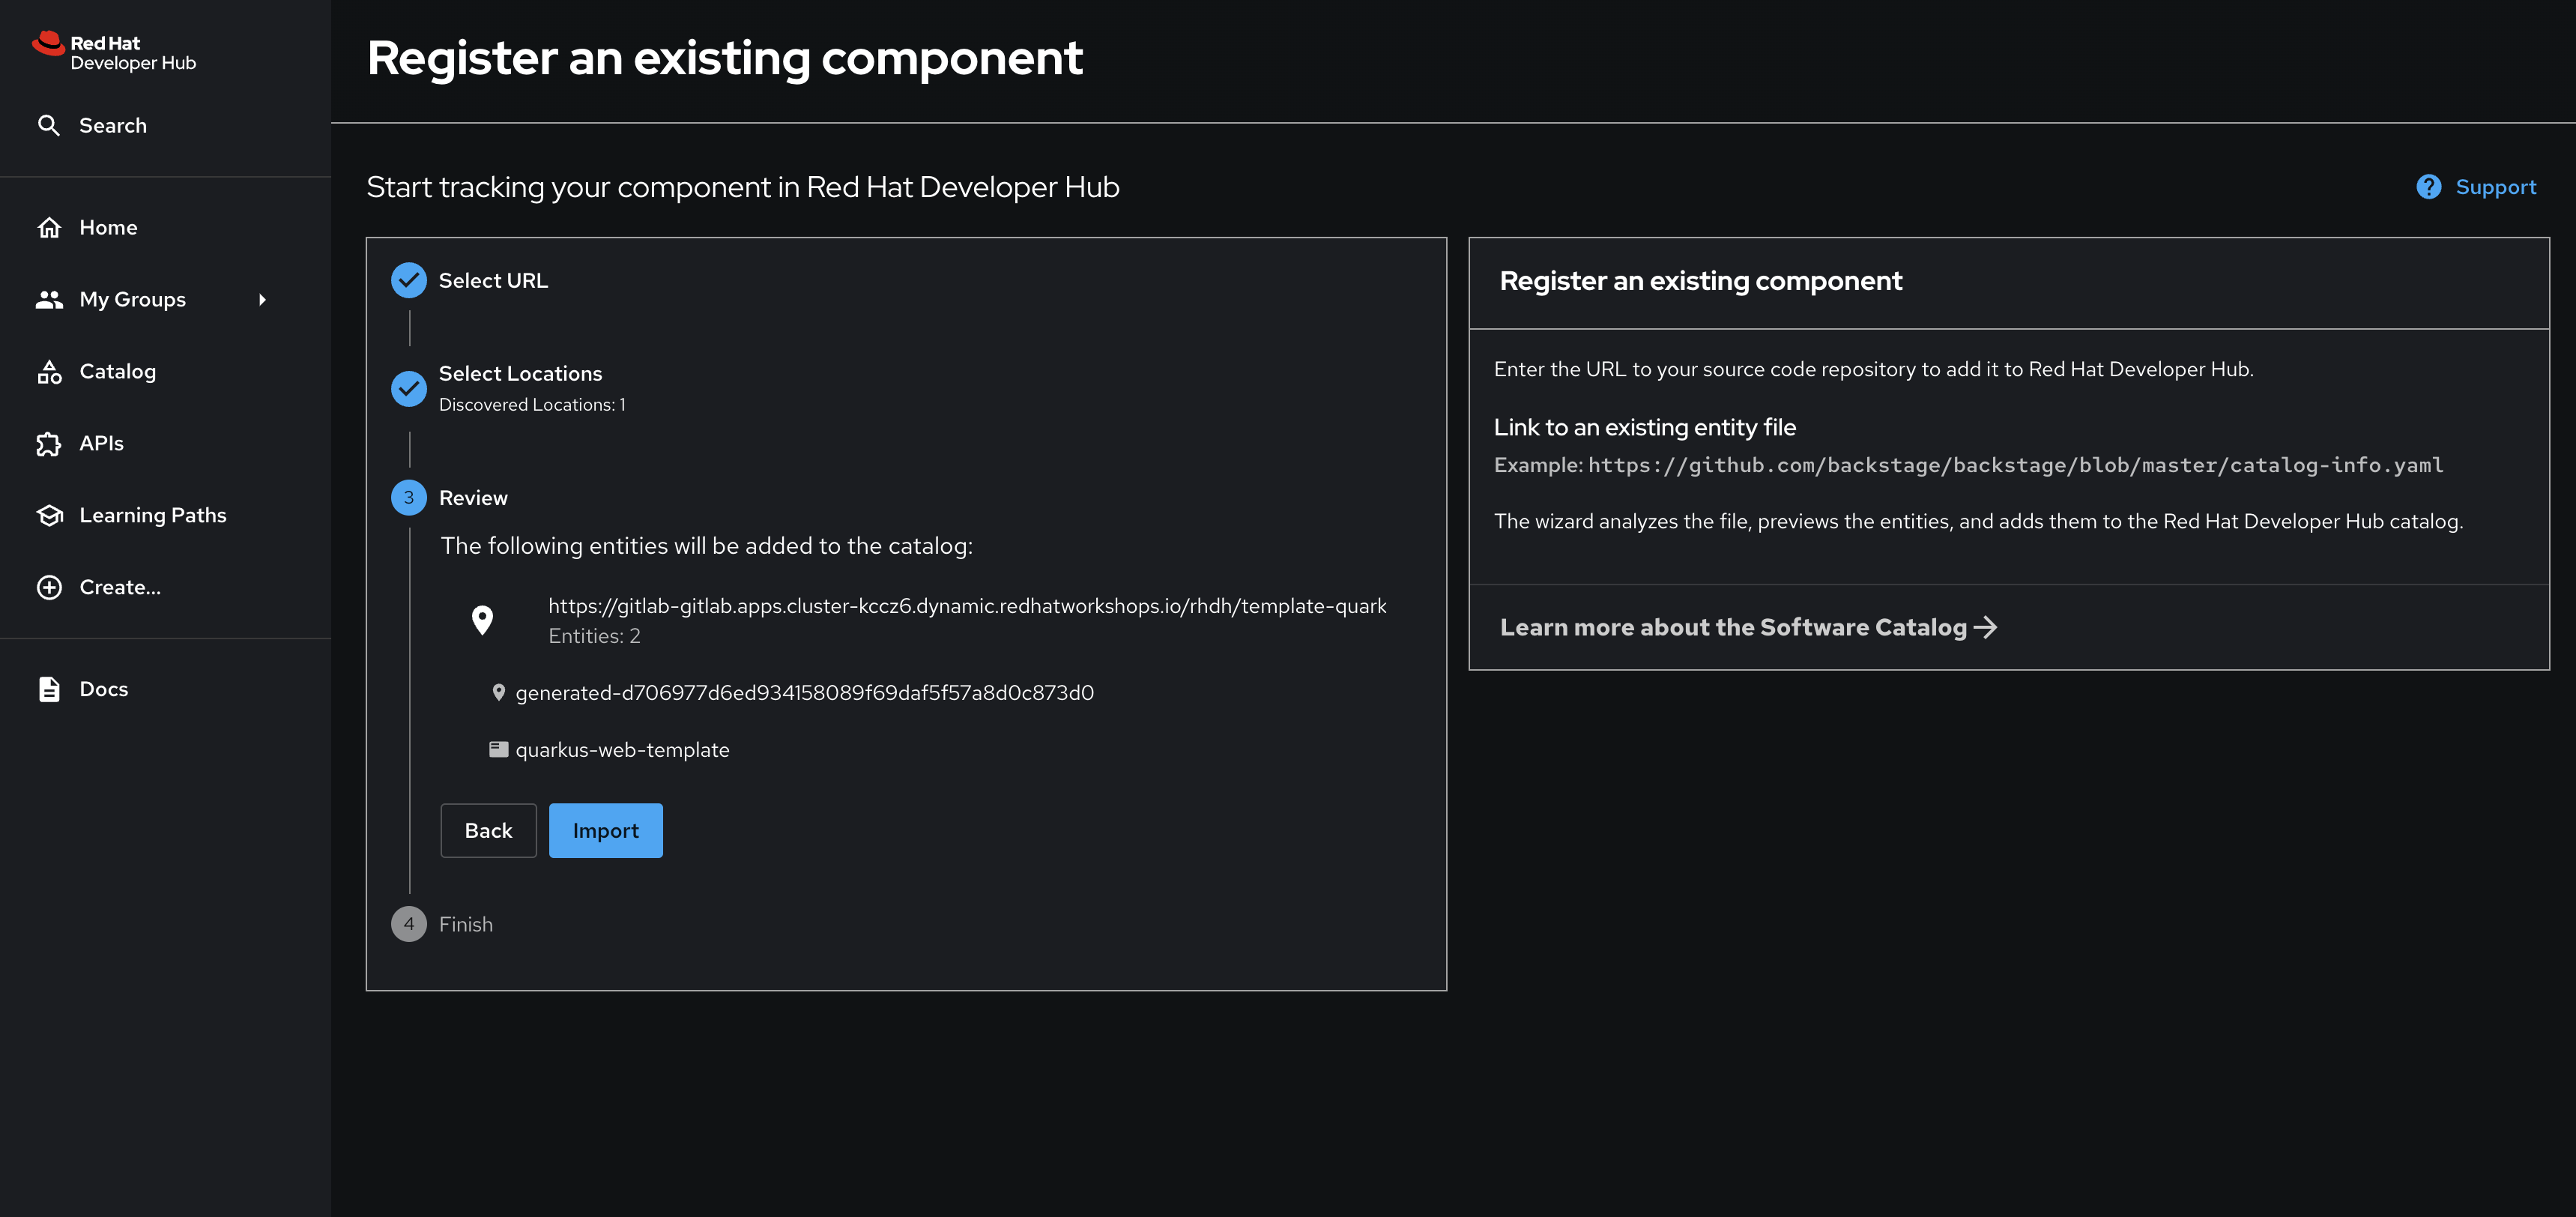
You’ll be asked to review the entities being imported, as shown:
-
Click Import when prompted.
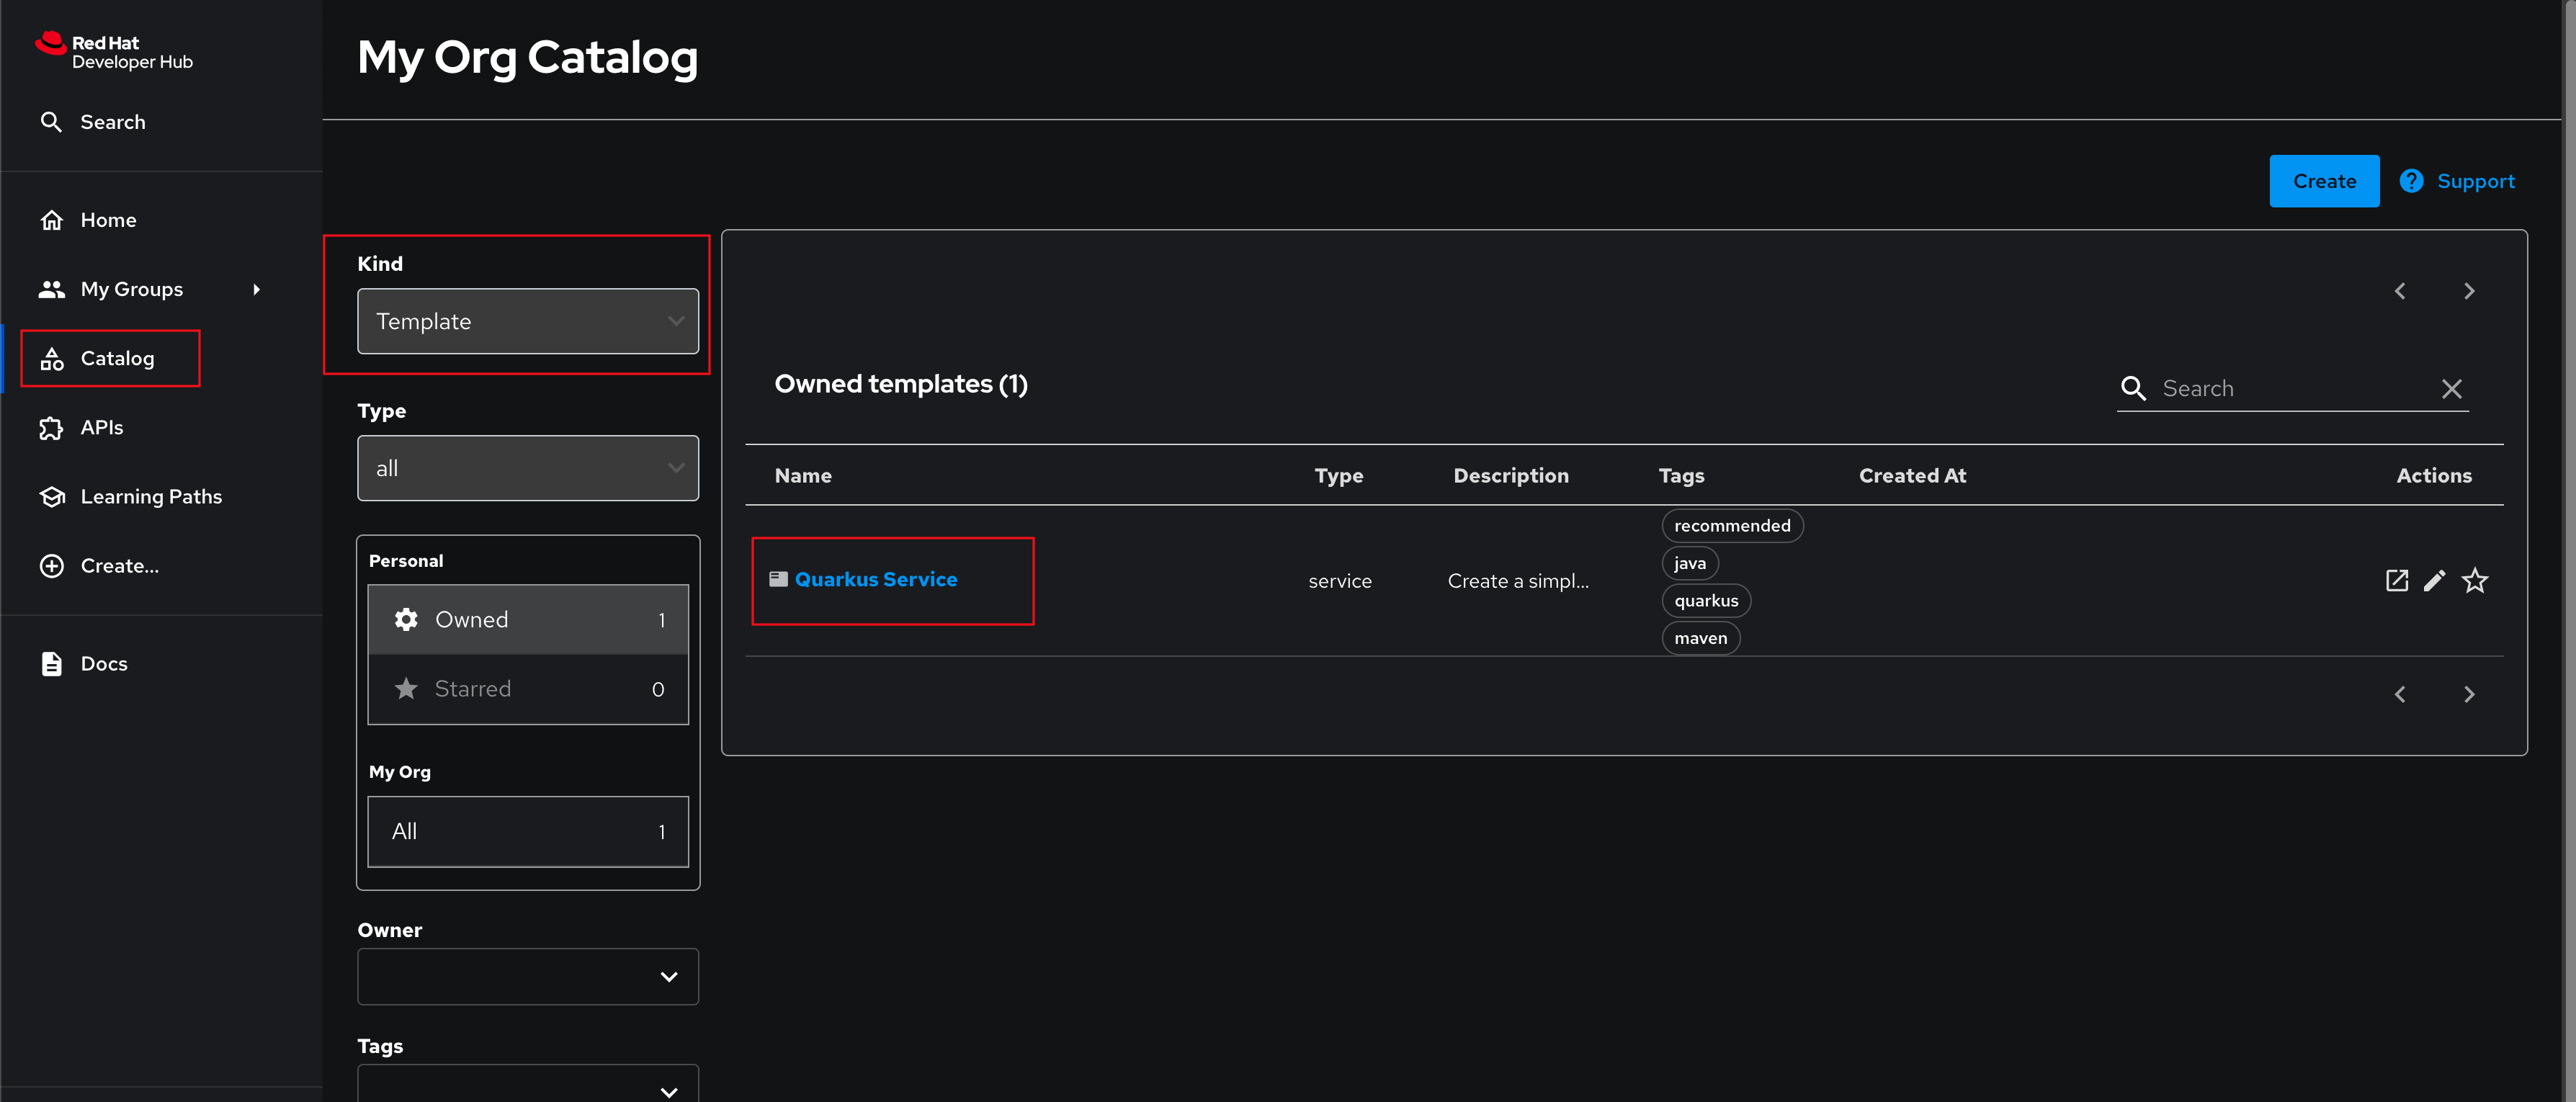
Return to the Catalog section, and set the Kind filter to Template. Your new Quarkus Service template will be listed. Clicking on the template reveals that it looks a lot like the Component Entity you imported in the previous module.
Before using the Template, we’ll need to onboard a developer. Continue to the next section to complete a developer-focused task. :imagesdir: ../../assets/images
Developer Activity: Developer On-Boarding Example
Until now, you’ve been acting in the role of a platform engineer. Let’s switch persona to that of a developer: dev1.
Let’s assume that this developer needs to create a development environment to work on a new feature - we can use a Software Template to assist with this task. A prerequisite to using this template is that the developer has a Quay account, so their code can be built into a container image and pushed to an image registry for storage and scanning.
While OpenShift has a built-in image registry, there are various reasons we’re using Quay as our image registry:
-
Security scanning for container images via Clair.
-
Support for image signing and trust policies.
-
Vulnerability detection with detailed reports.
-
RBAC and repository/organisation permissions.
-
Better suited for multi-tenant and multi-cluster environments.
| Please make sure to log in to Red Hat Developer Hub as a Developer with dev1/{common_password} as described in the next step to avoid errors. |
Login as Developer
-
You will perform this activity as a Developer.
-
Logout from Red Hat Developer Hub
-
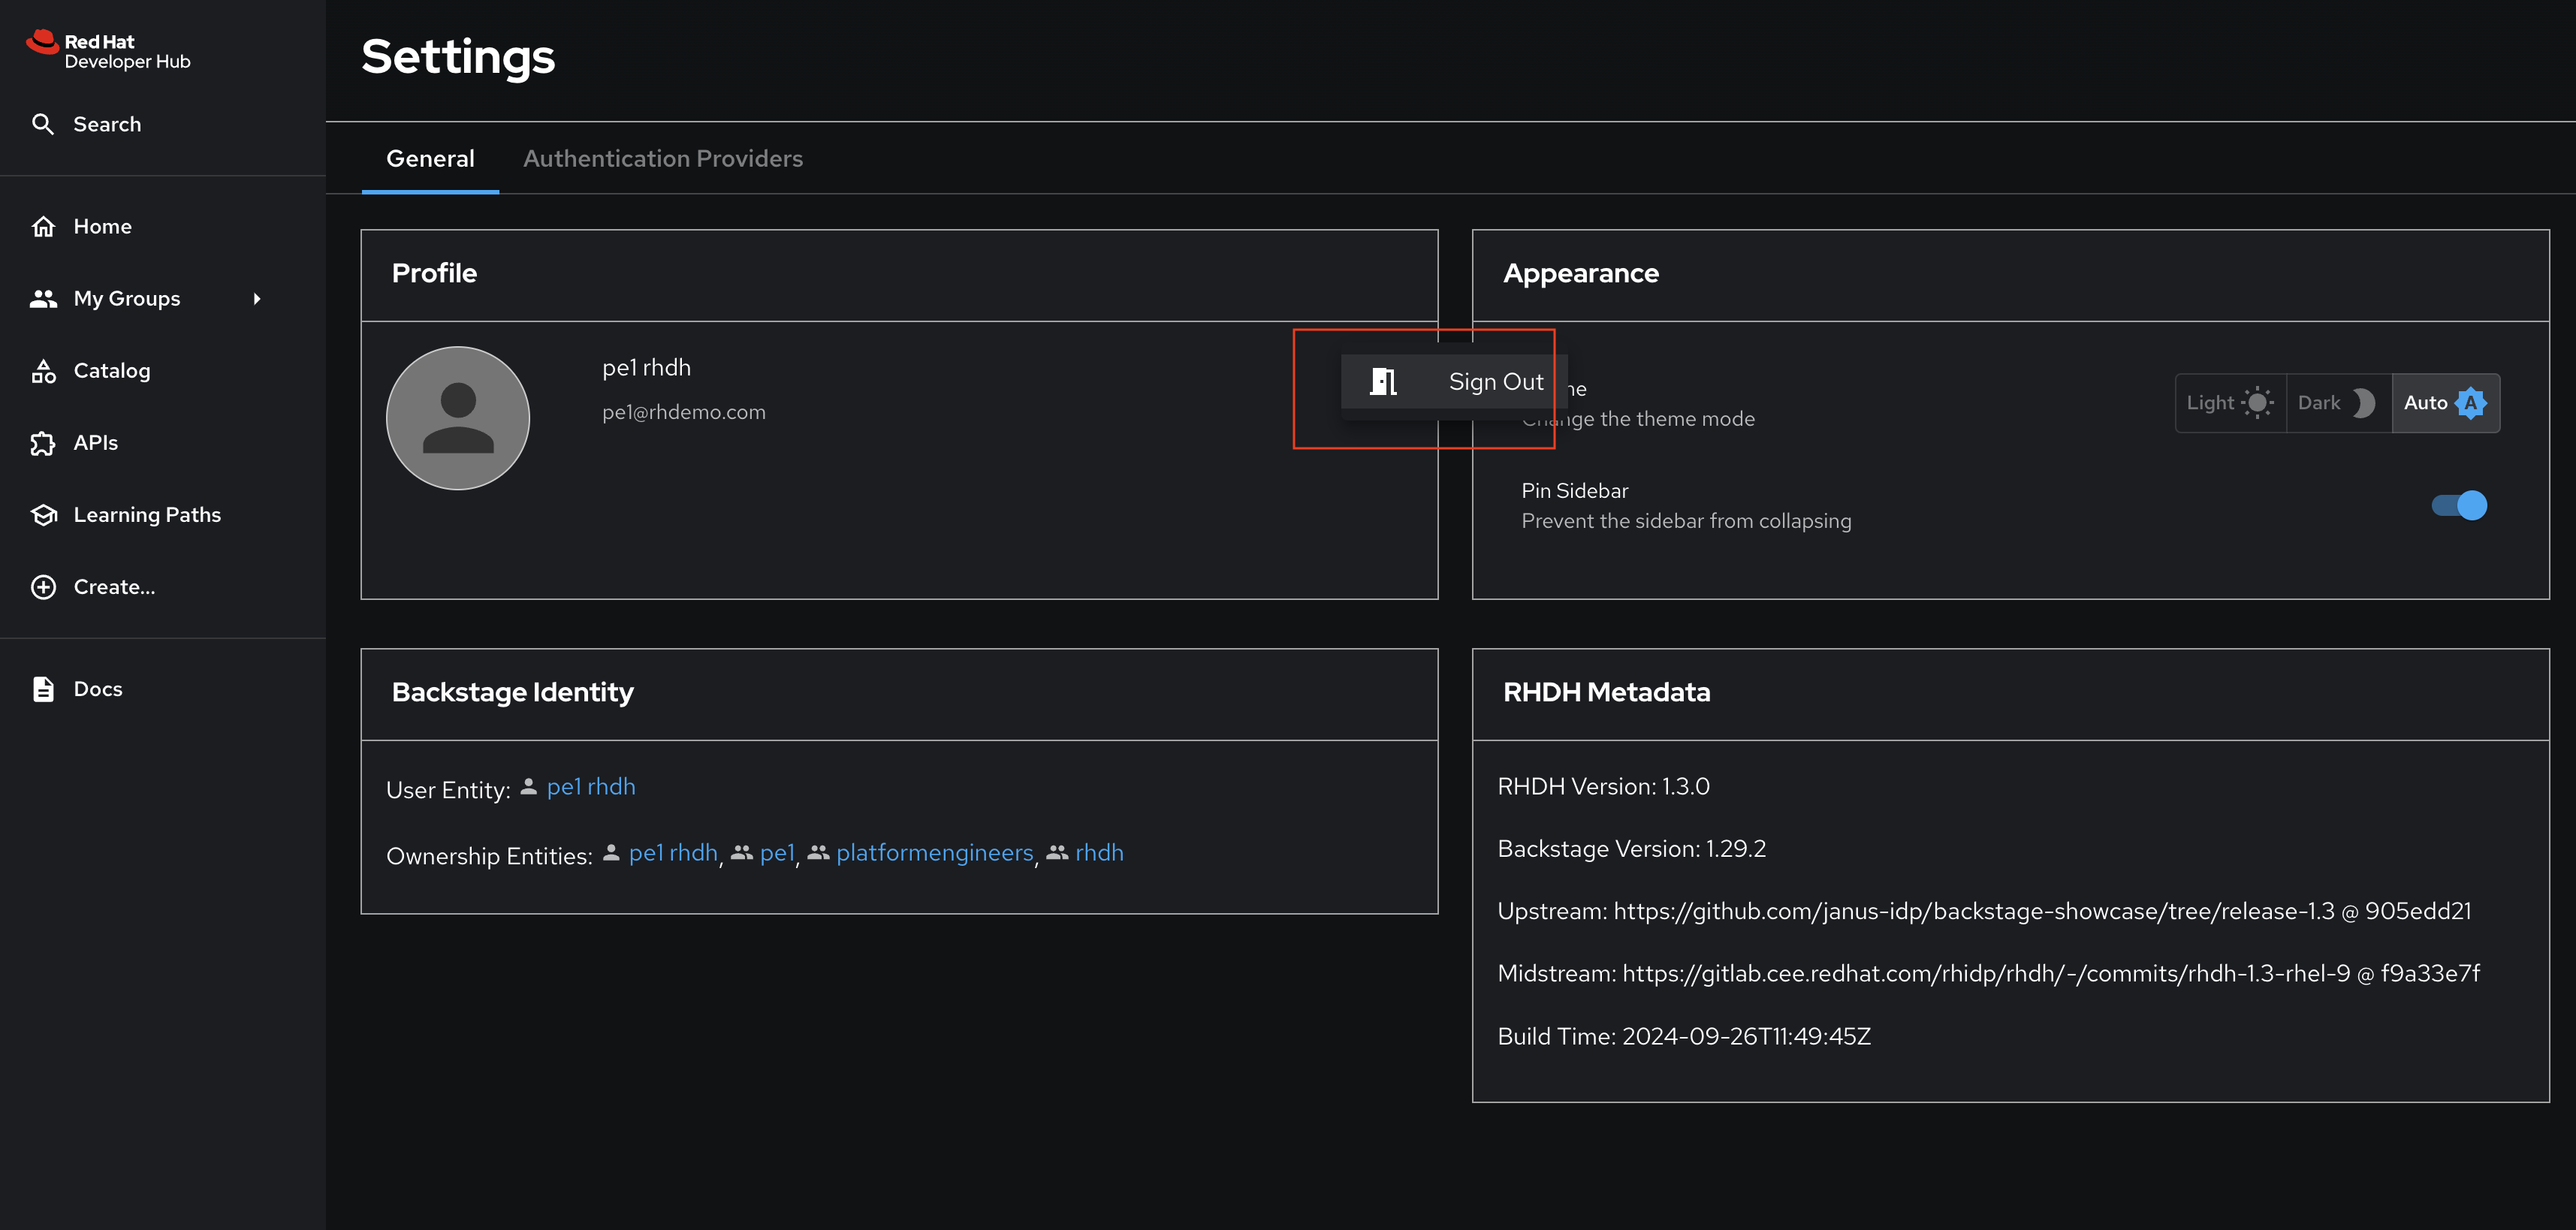
Click the dropdown in the top-right of Red Hat Developer Hub, then click on the Logout link.
-
-
Logout from GitLab
-
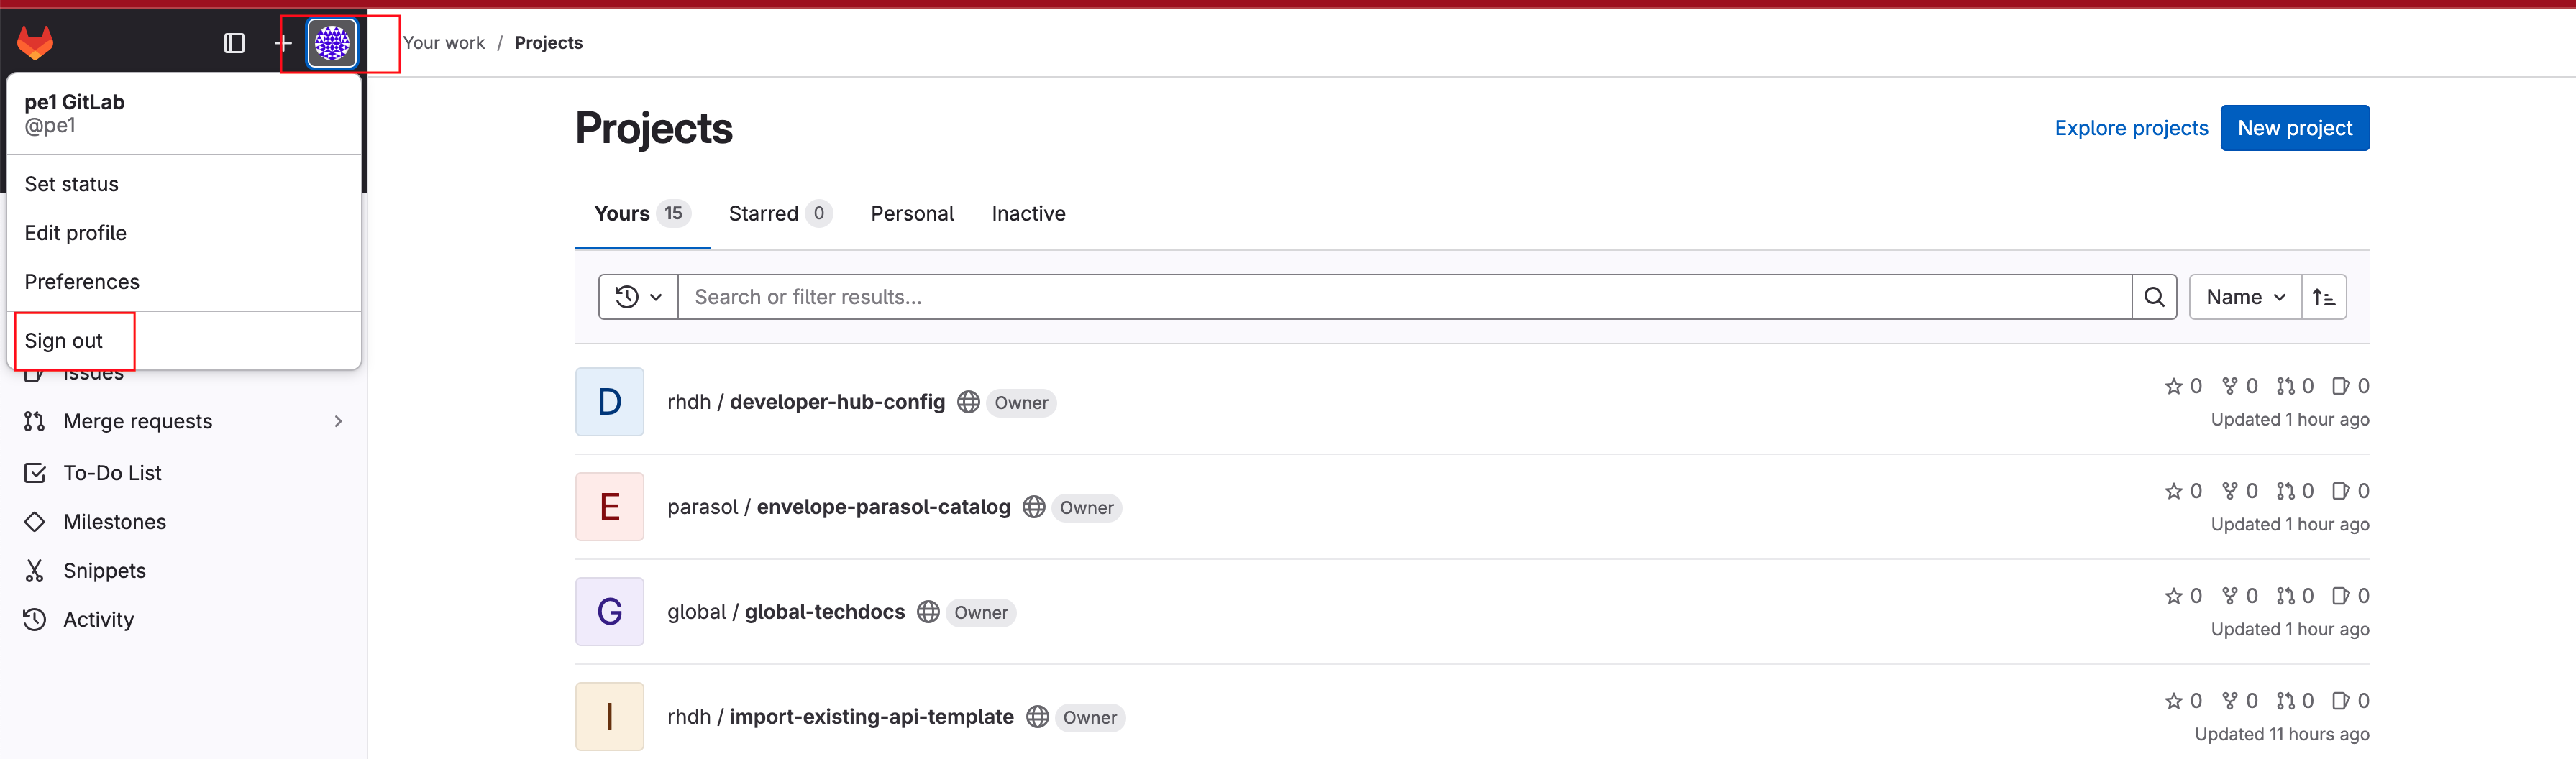
Click on the Profile icon, and Sign out from the dropdown as shown in the screenshot below.
-
-
Login back as a Developer to to Red Hat Developer Hub and GitLab using the credentials
dev1/{common_password}
Create an Account in Quay
You’ll need an account in Quay to push your developer’s container images for scanning and deployment.
-
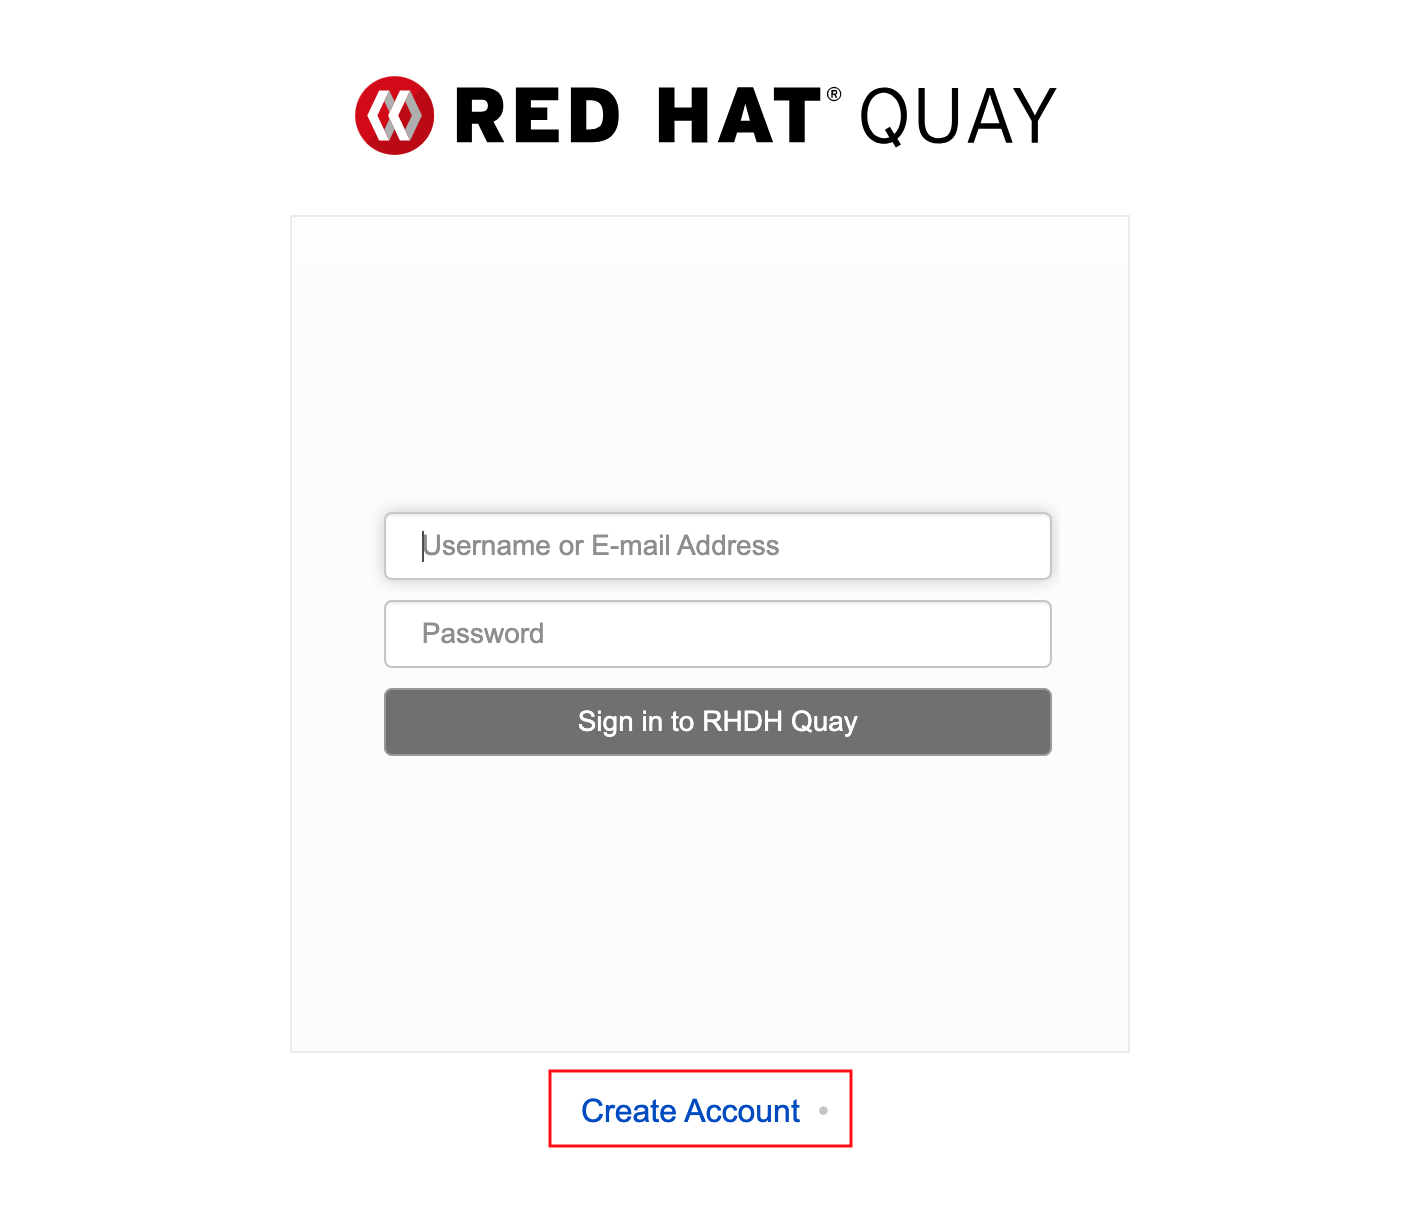
Visit the Quay Registry deployed in your workshop environment.
-
Click the Create Account link.
-
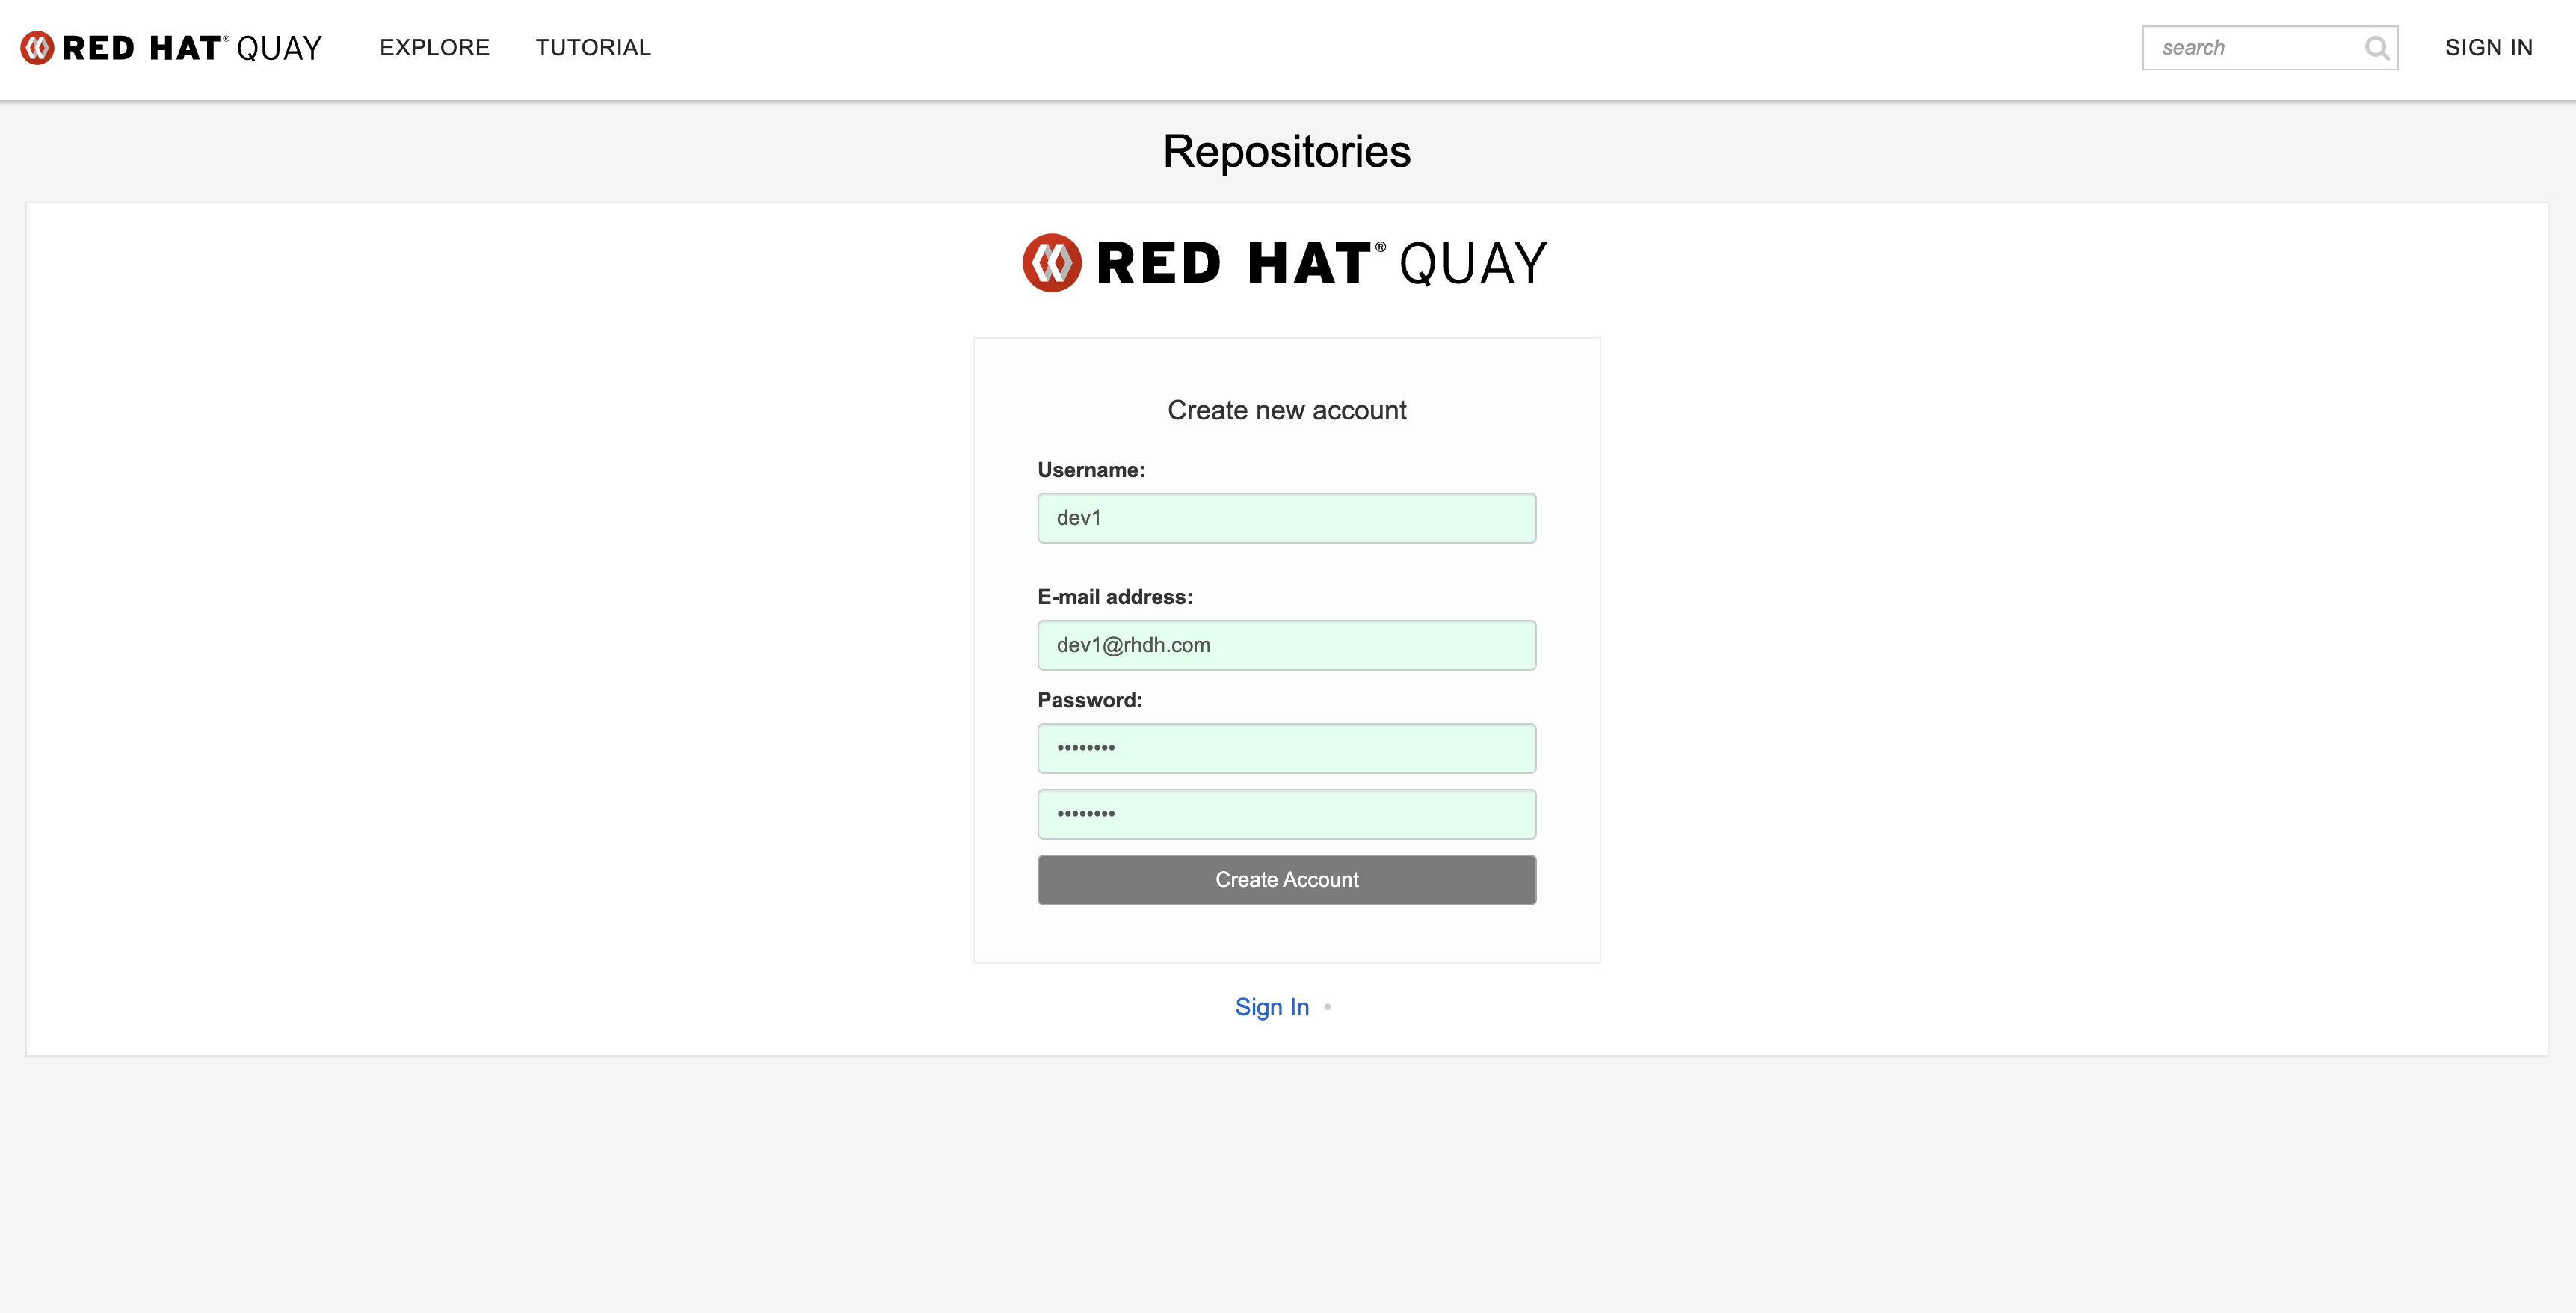
Enter the following information.
-
Username:
dev1 -
Email:
dev1@rhdh.com -
Password:
{common_password}
-
-
Click Create Account.
You’re almost ready to create an application from a Template! :imagesdir: ../../assets/images
Developer Activity: Create a new Component from the Template
Please make sure you are logged in as a Developer with dev1 / {common_password} as you were guided to in the previous step.
|
Create a new software Component and supporting infrastructure using the Quarkus Service template that was created by the platform engineer:
Run the Template
-
Access Red Hat Developer Hub.
-
Click the Create icon (plus symbol) in the top menu.
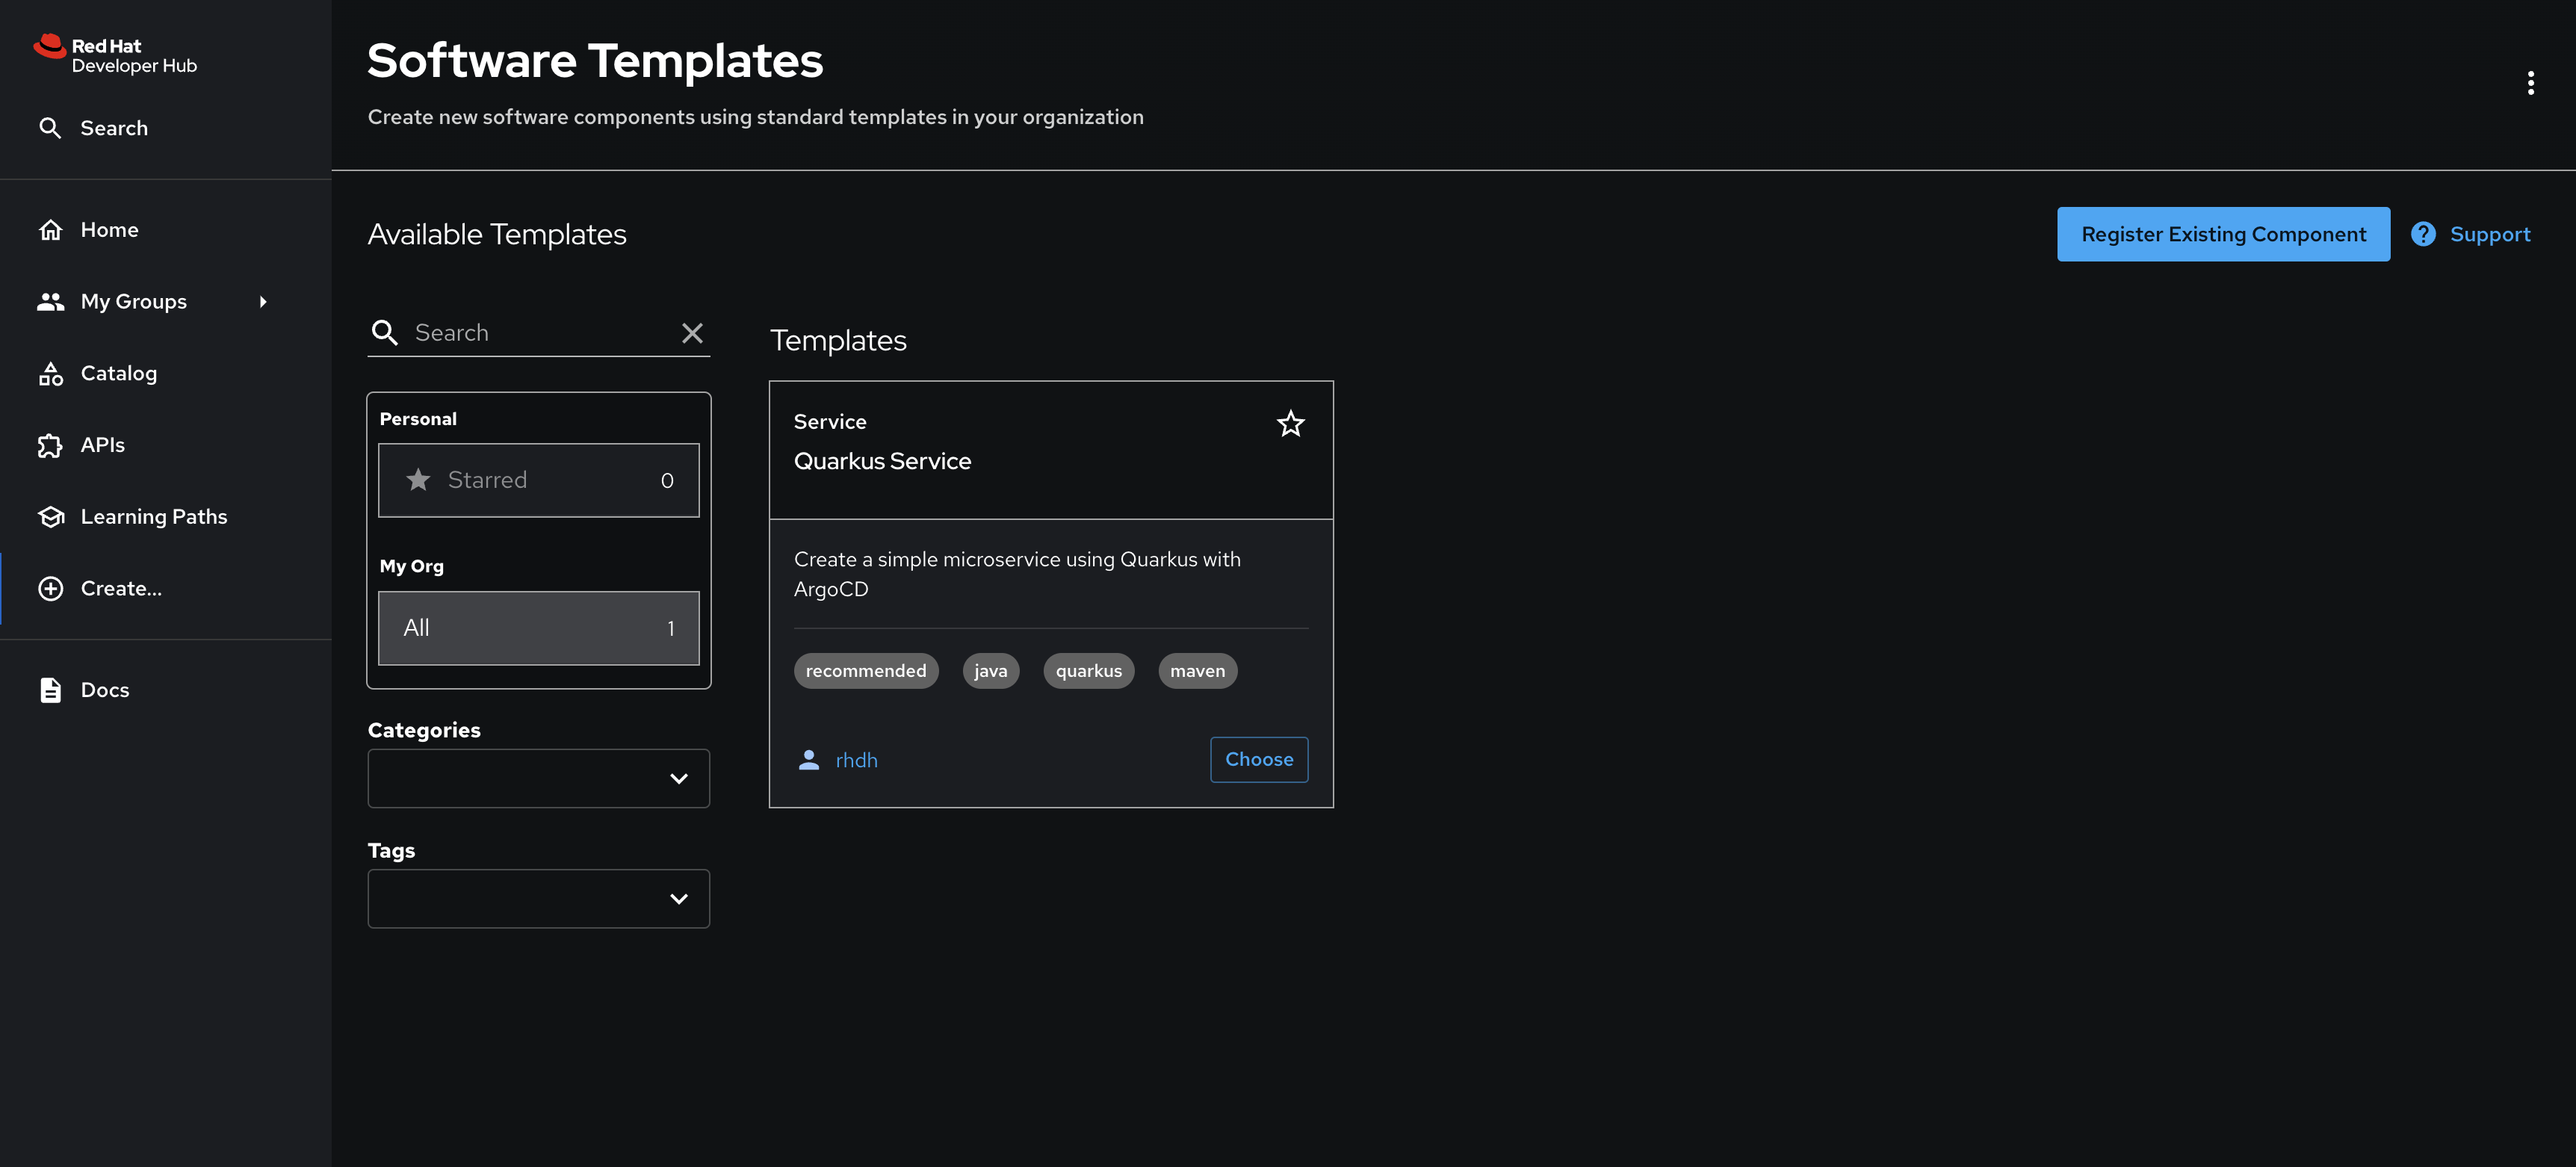
-
Click the Choose button on the Quarkus Service. The Template parameters collection screen will be displayed.
-
In Step 1, you’ll be prompted to enter a set of application parameters. Thankfully, defaults are provided by the template, so you can simply click Next.
-
In Step 2, when prompted to Provide Image Registry Information:
-
Select the Quay image registry.
-
Enter your Quay password:
{common_password} -
Click Next.
Your username is automatically determined by the Template using your current session. 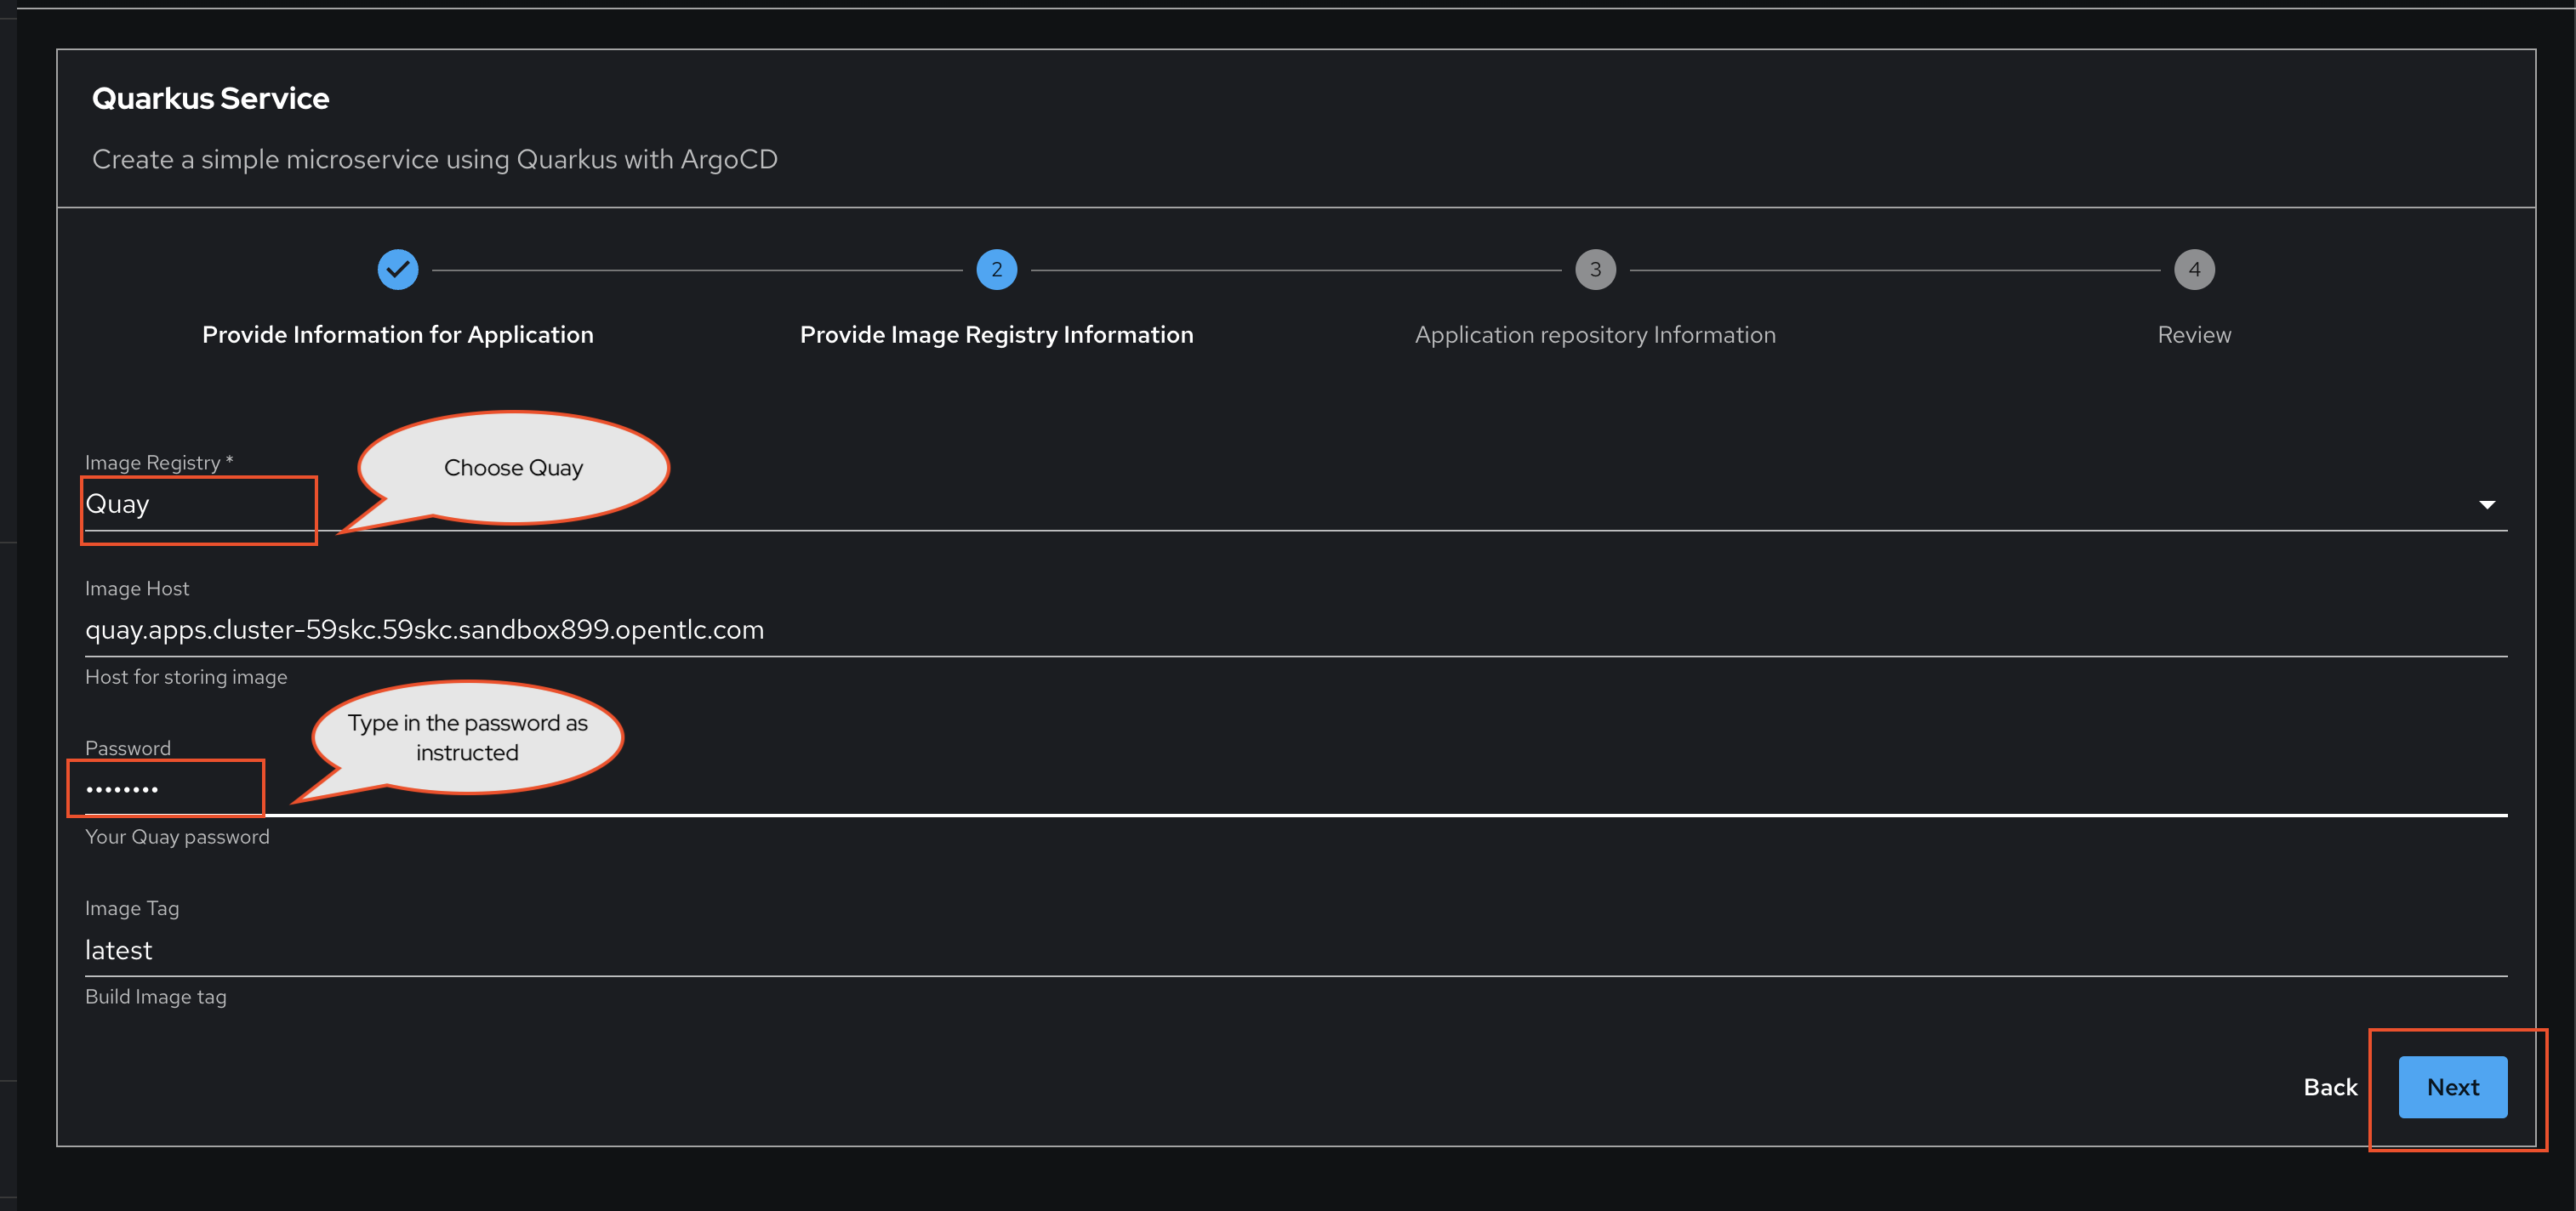
-
-
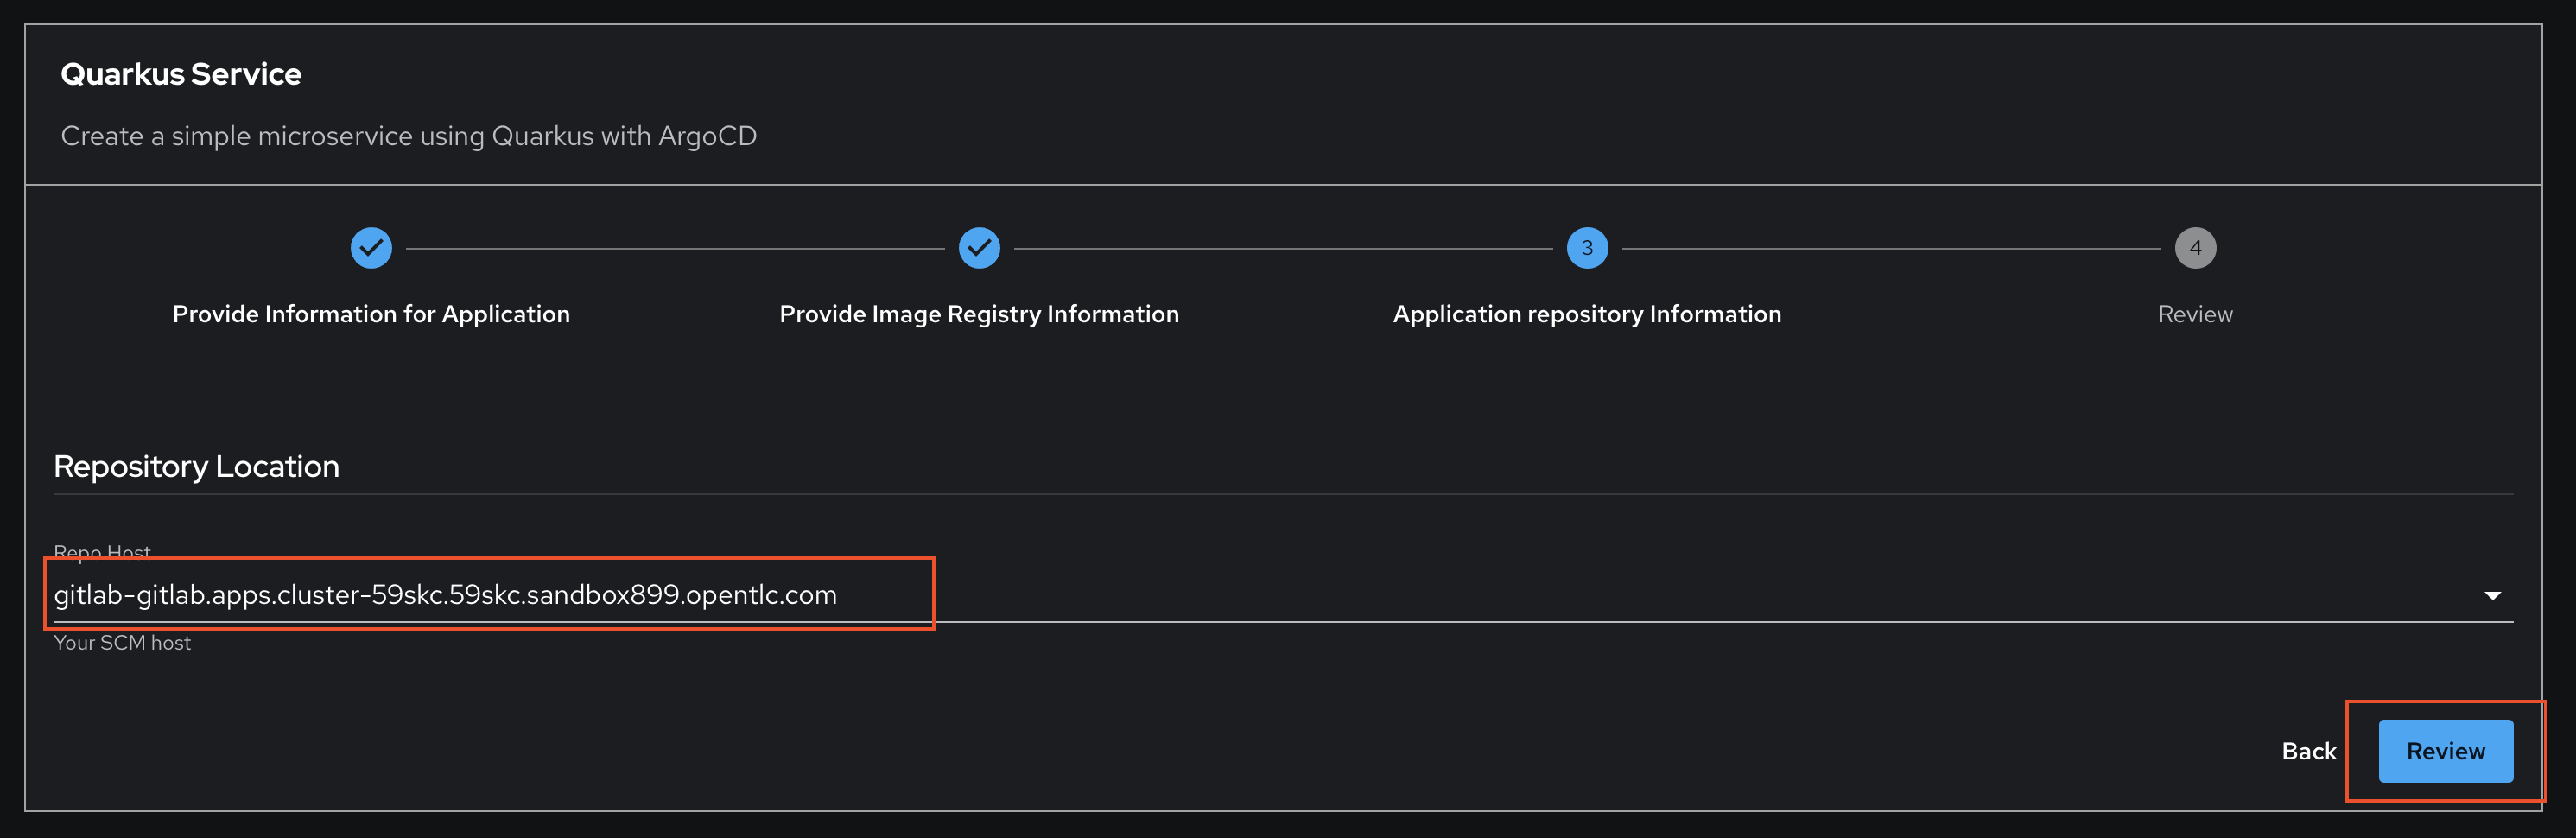
In Step 3, select the default Repository Location. In this case we just have GitLab available so you can’t change this.
-
Click Review.
-
Confirm you’re satisfied with your parameters and click Create. These will be passed to the scaffolder when it runs the steps defined in the template.
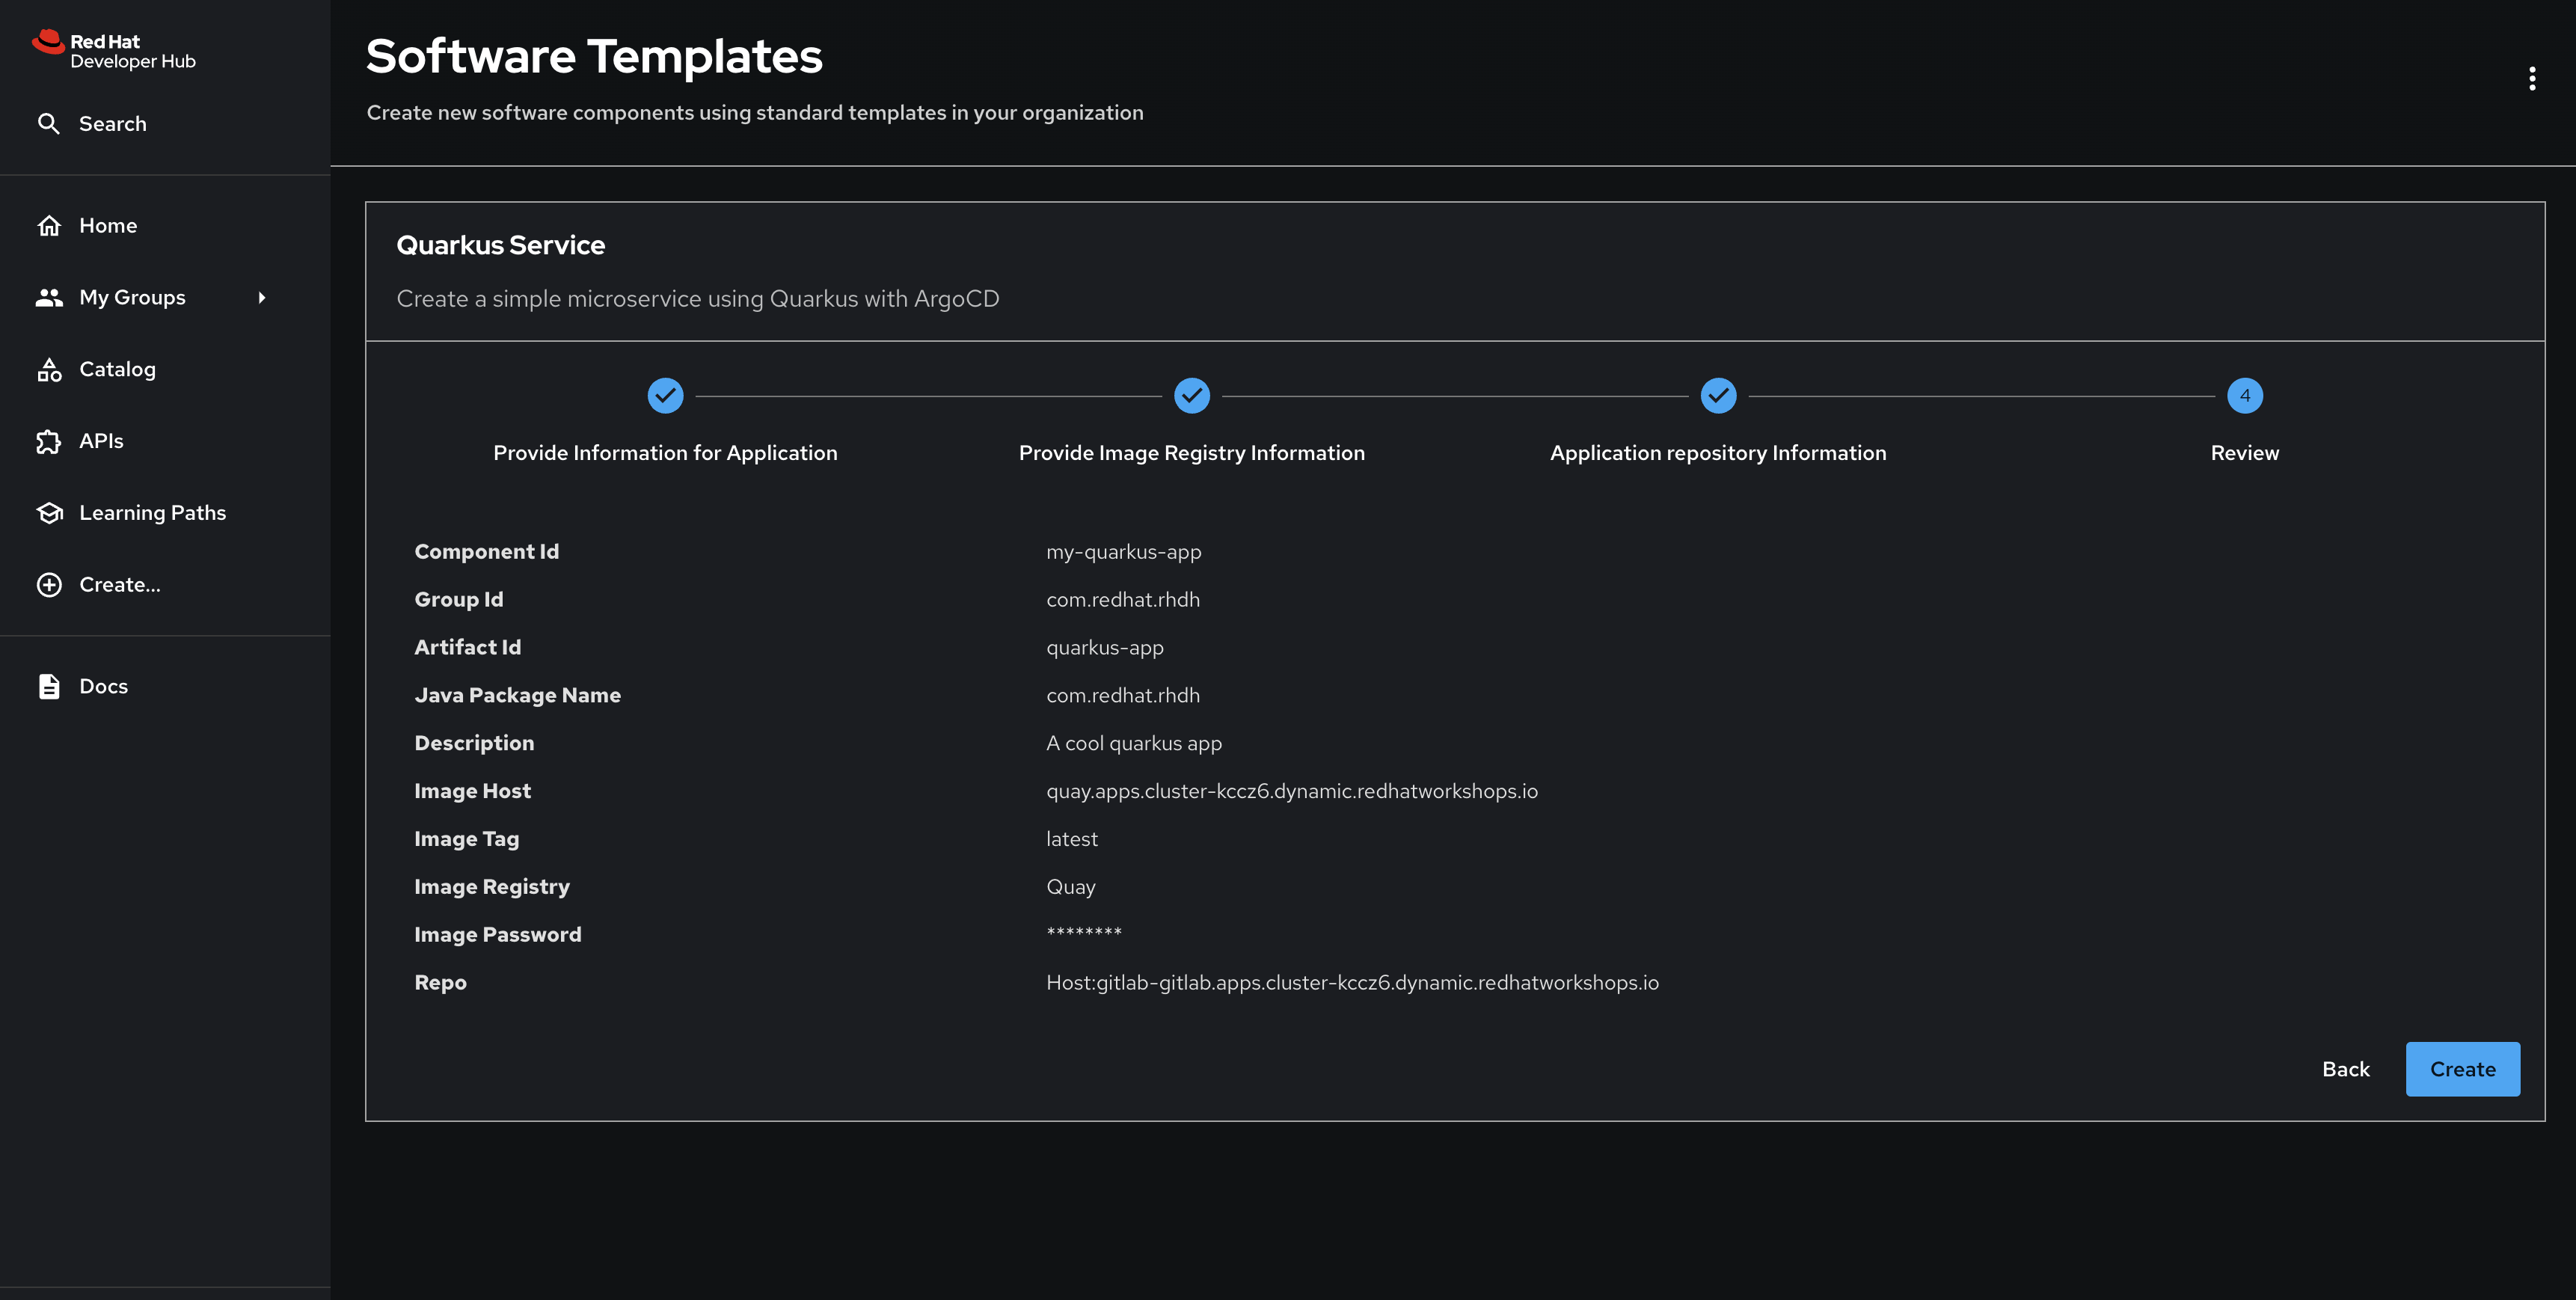
After a few moments the process should be finished, and you’ll see a screen with a series of green checkmarks.
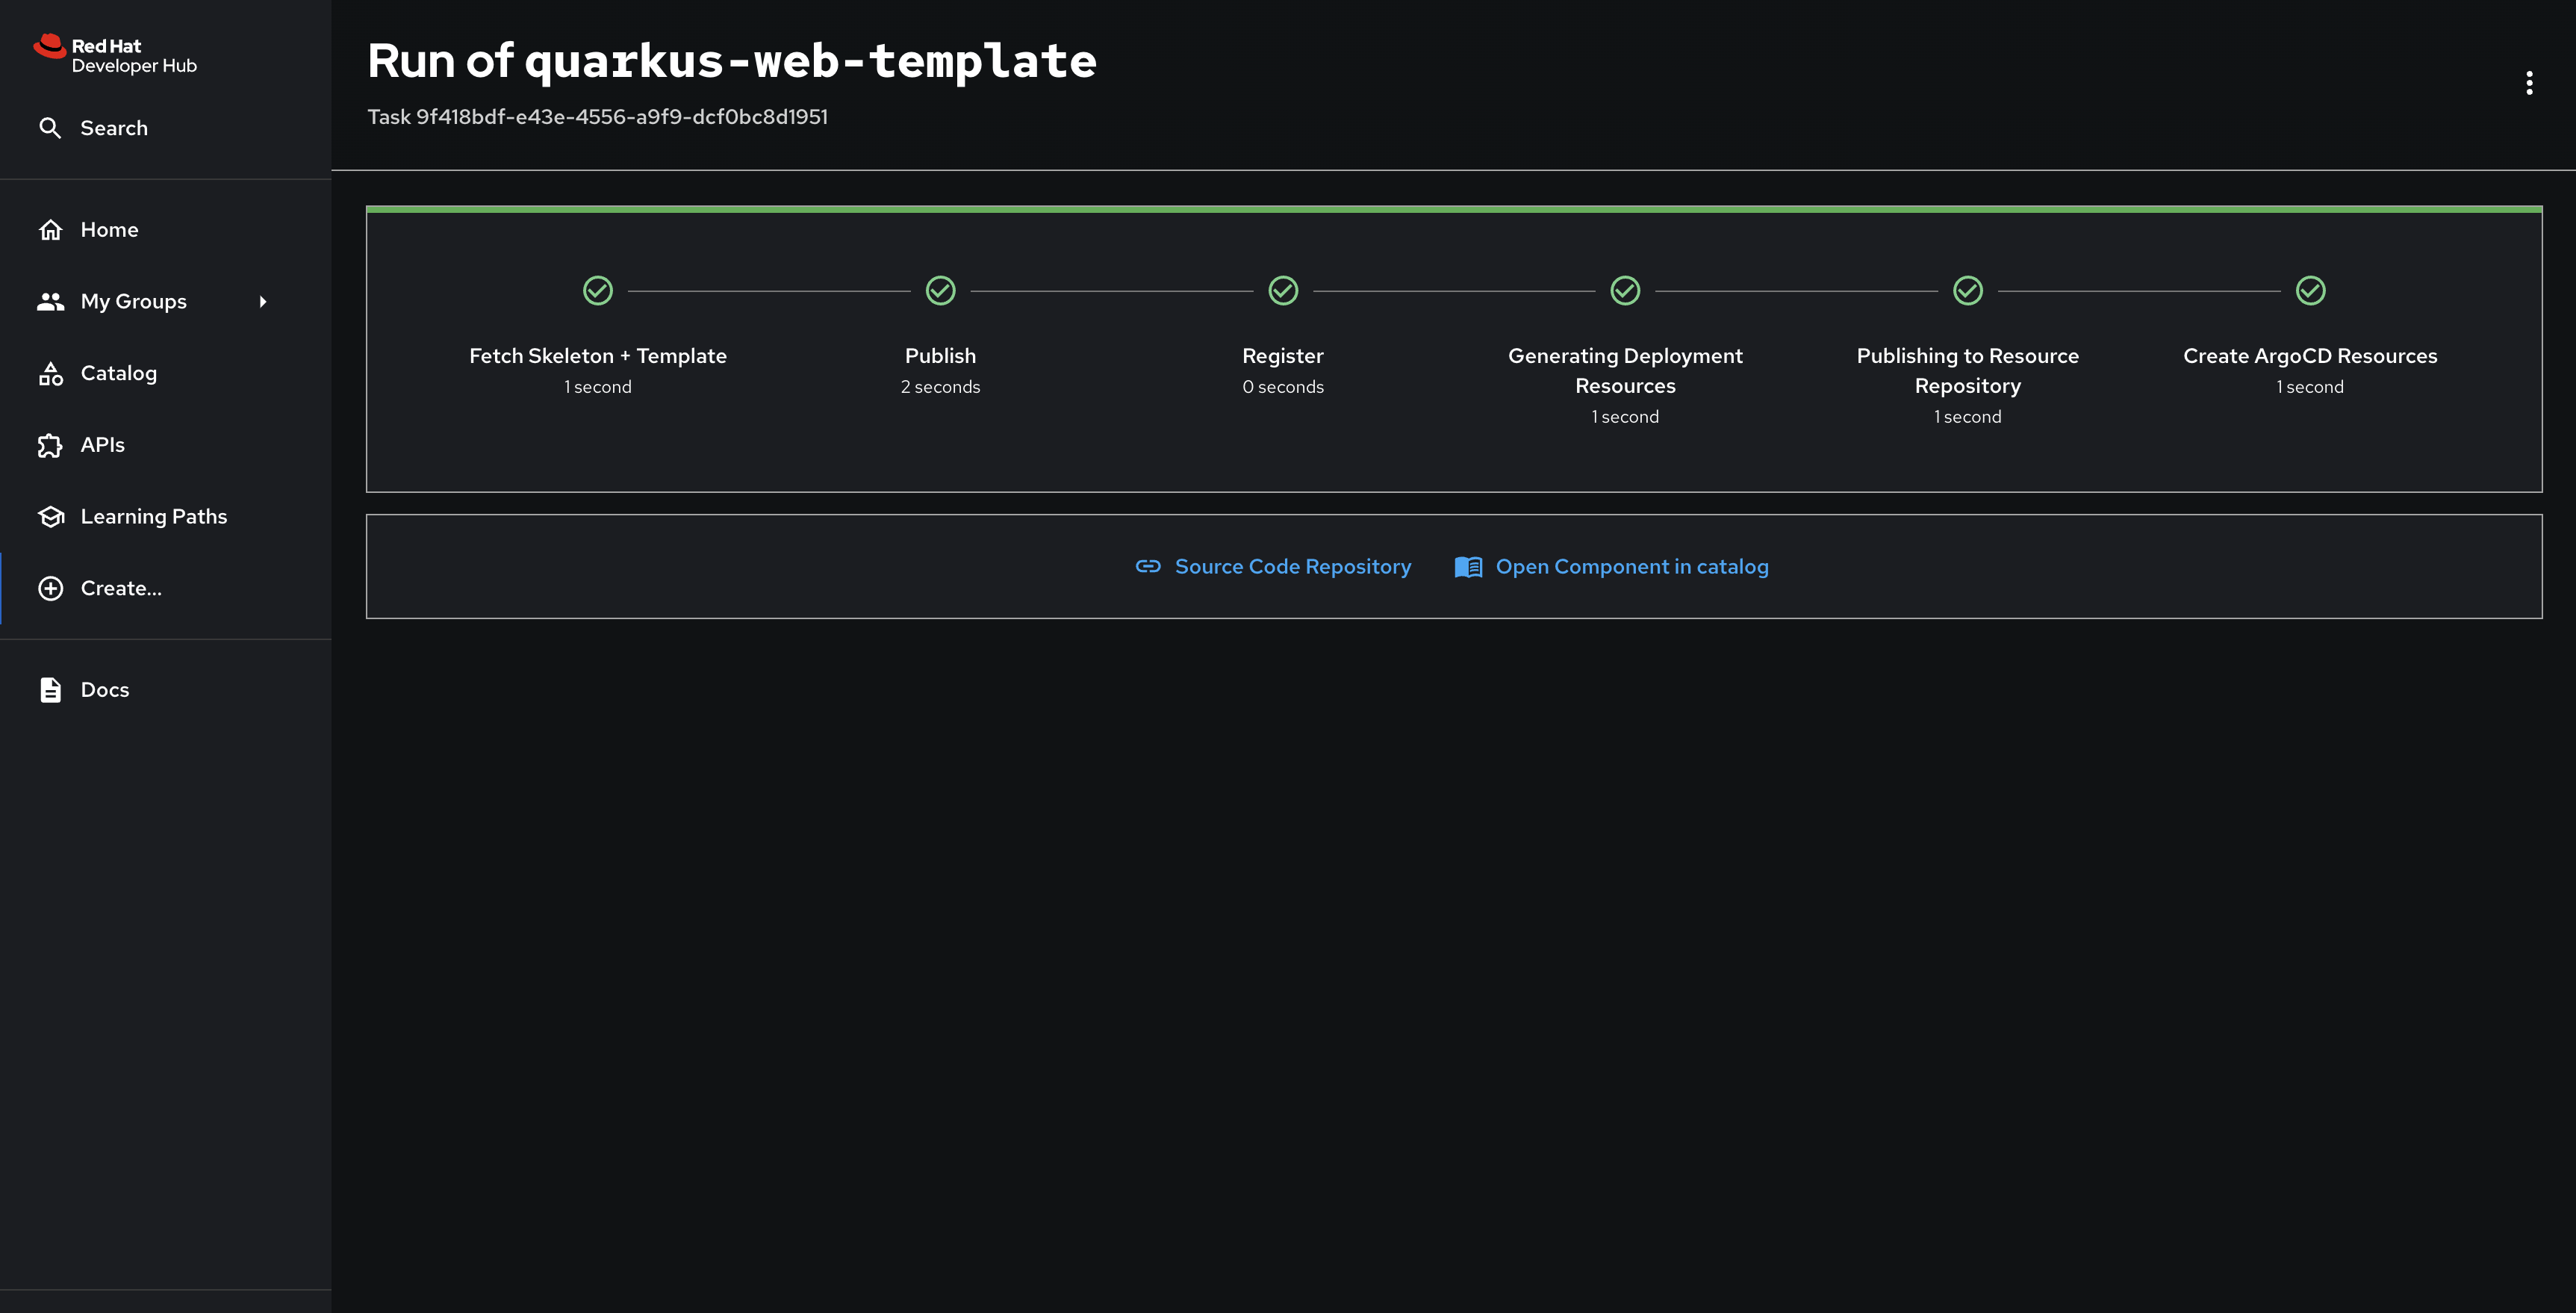
Inspect the new Component and Container Image
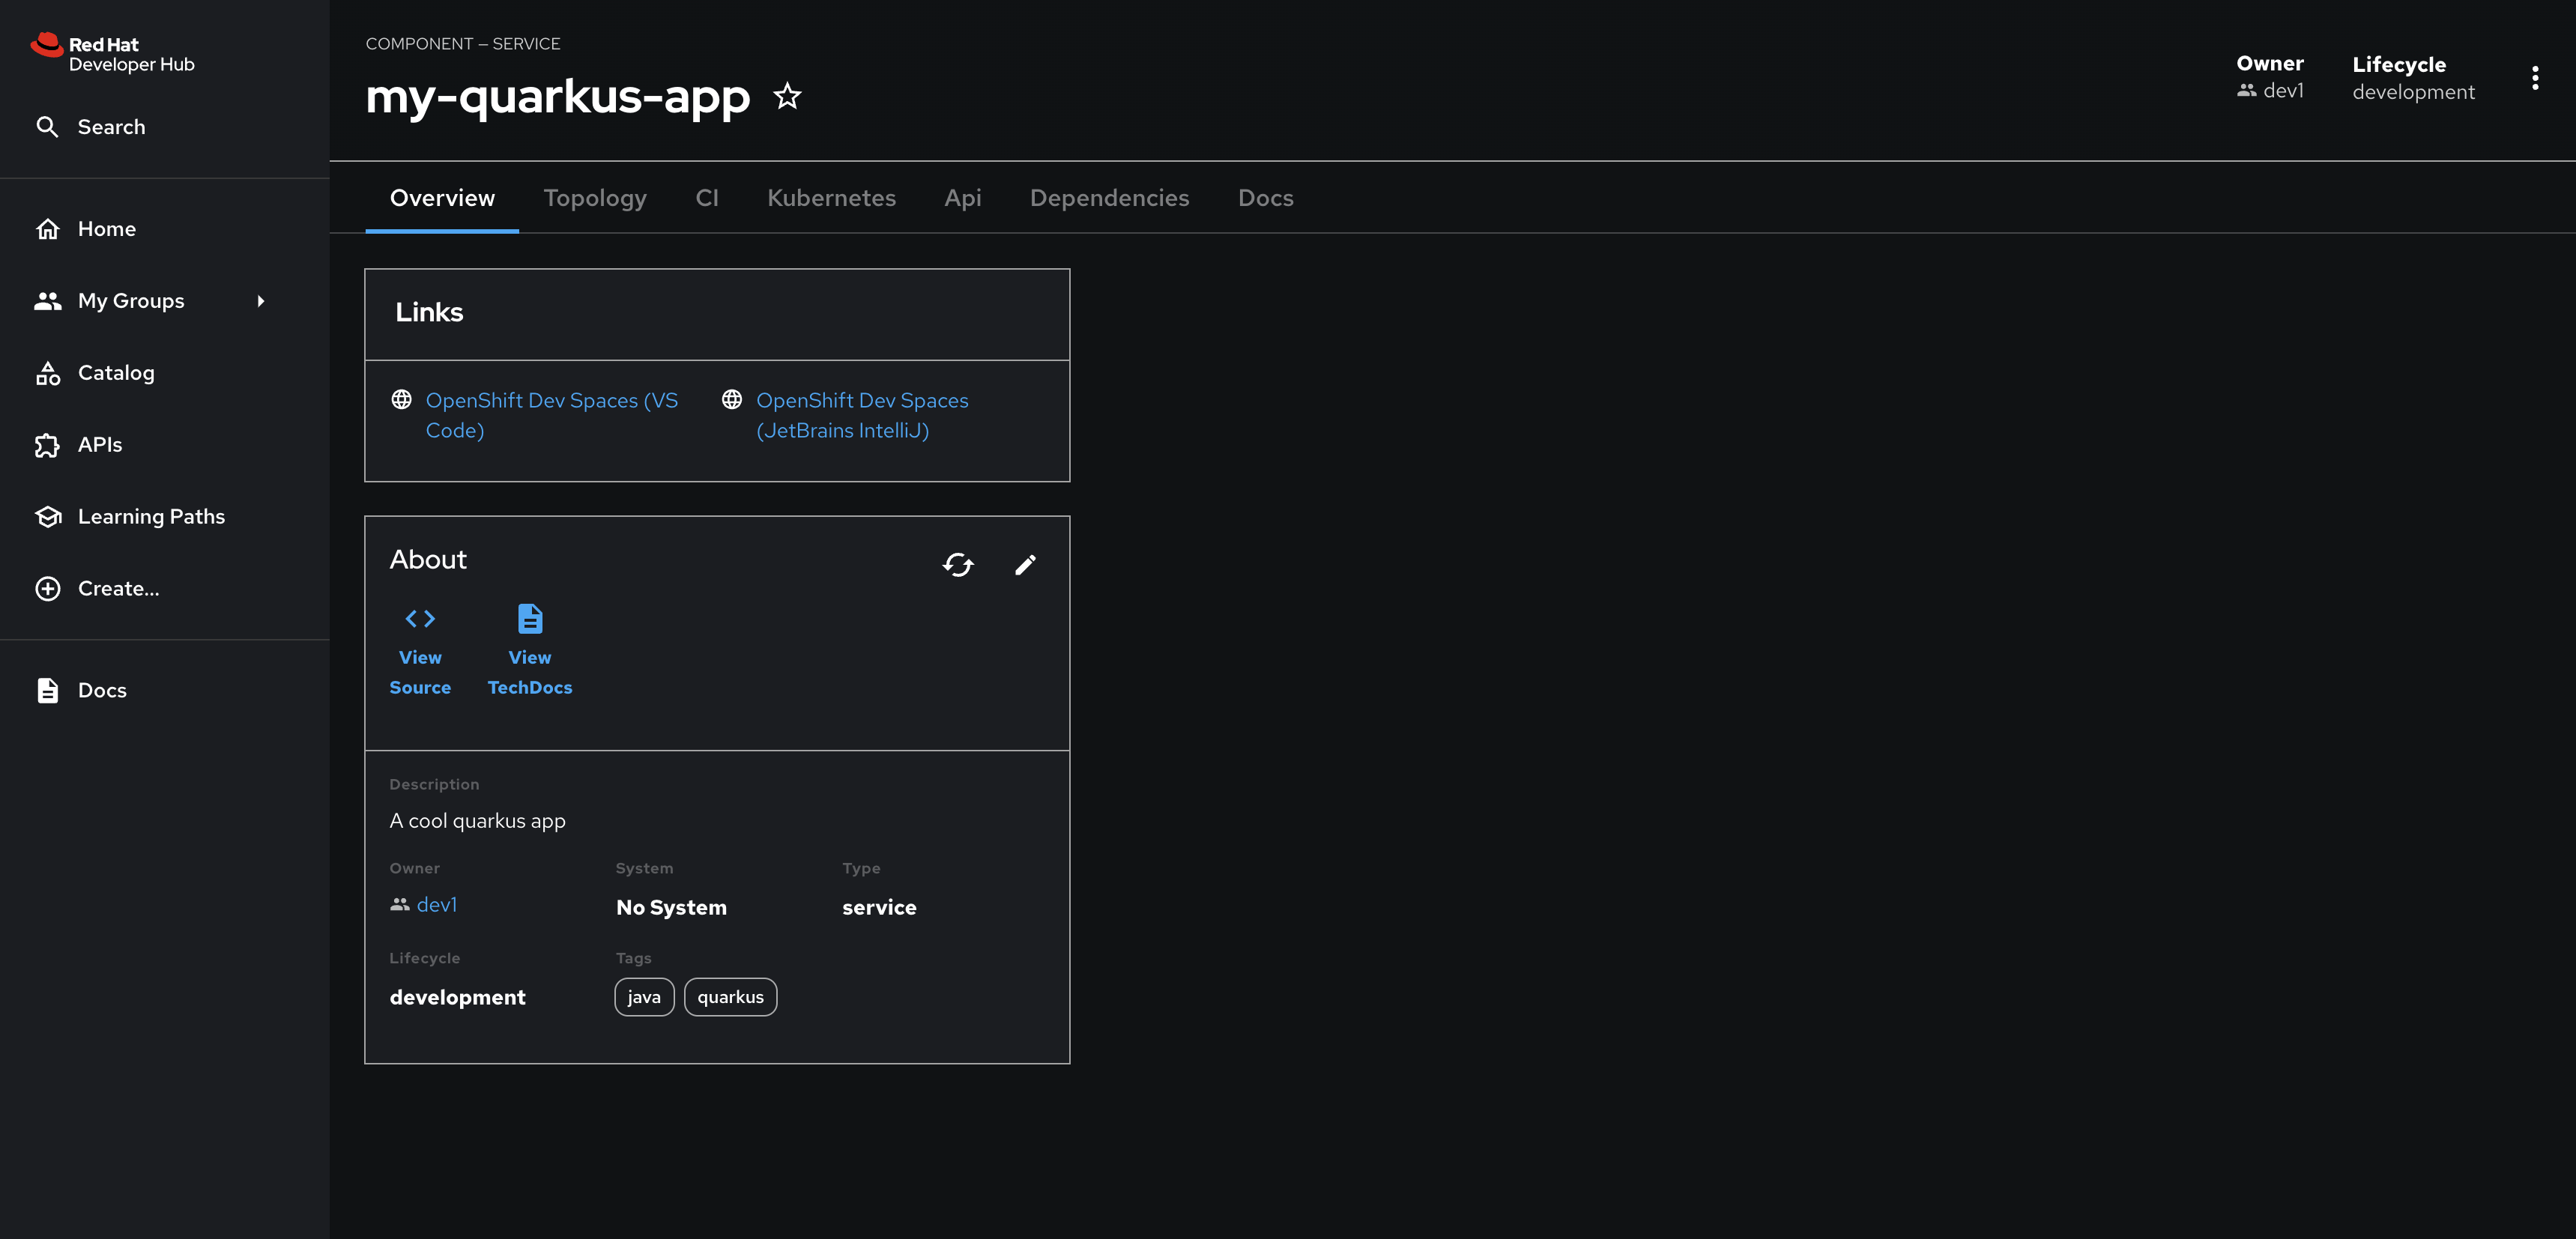
Click the Open Component in catalog link to view the new my-quarkus-component Component.
You’ll see links to the GitLab repository (View Source link) and note that you’re listed as the owner since your identity was passed to the skeleton code used to create the Component’s catalog-info.yaml file.
You can see the user identity values being passed to the fetch:template action in the template.yaml.
|
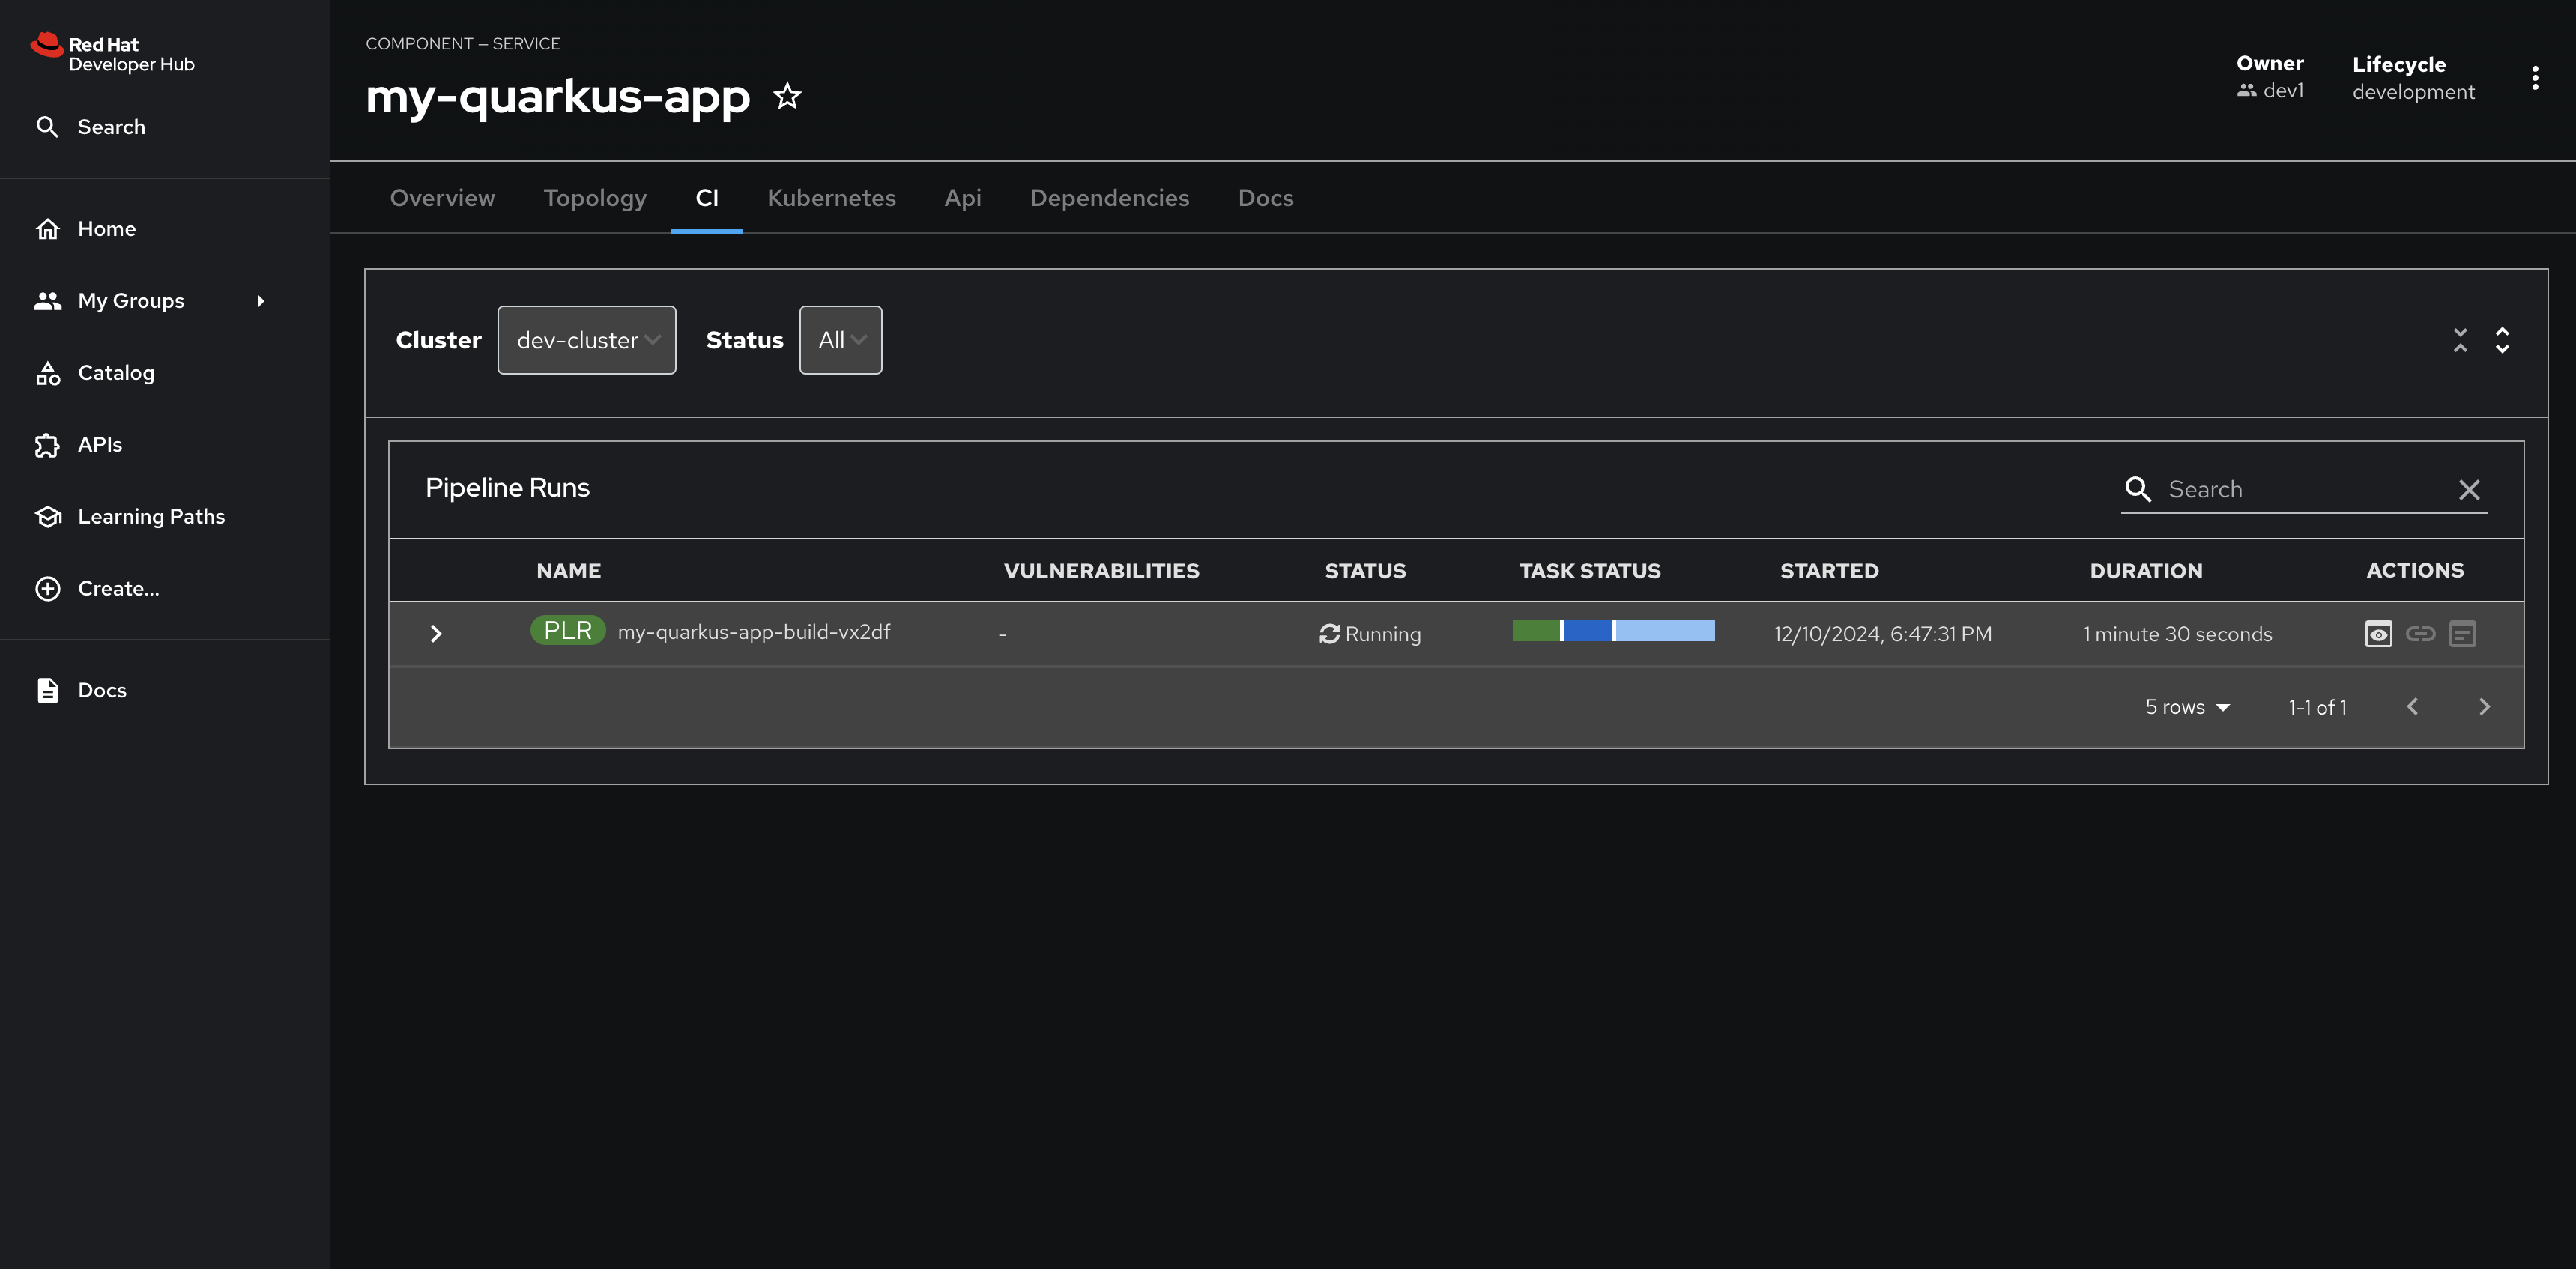
Select the CI tab to view the status of the OpenShift Pipelines (Tekton) build. It might take a moment or two for the currently to appear in the Pipeline Runs pane. The Pipeline Run is triggered by a set of build manifests that were created in a separate GitOps repository from the Quarkus application’s source code - you can find the manifests in the helm/quarkus-build folder. The GitOps Application responsible for applying the build manifests can be seen in the argocd/argocd-app-dev-build.yaml file that was added to Argo CD by the argocd:create-resources action in the template.yaml.
Manifests related to the developer’s applications are managed by a second instance of OpenShift GitOps named rhdh-gitops. This second instance is used to manage Parasol’s development team’s applications, whereas the OpenShift GitOps instance you accessed earlier manages platform components - including the second instance of OpenShift GitOps. View the rhdh-gitops ArgoCD Application by logging in to the primary OpenShift GitOps instance using admin / {openshift_gitops_password}.
|
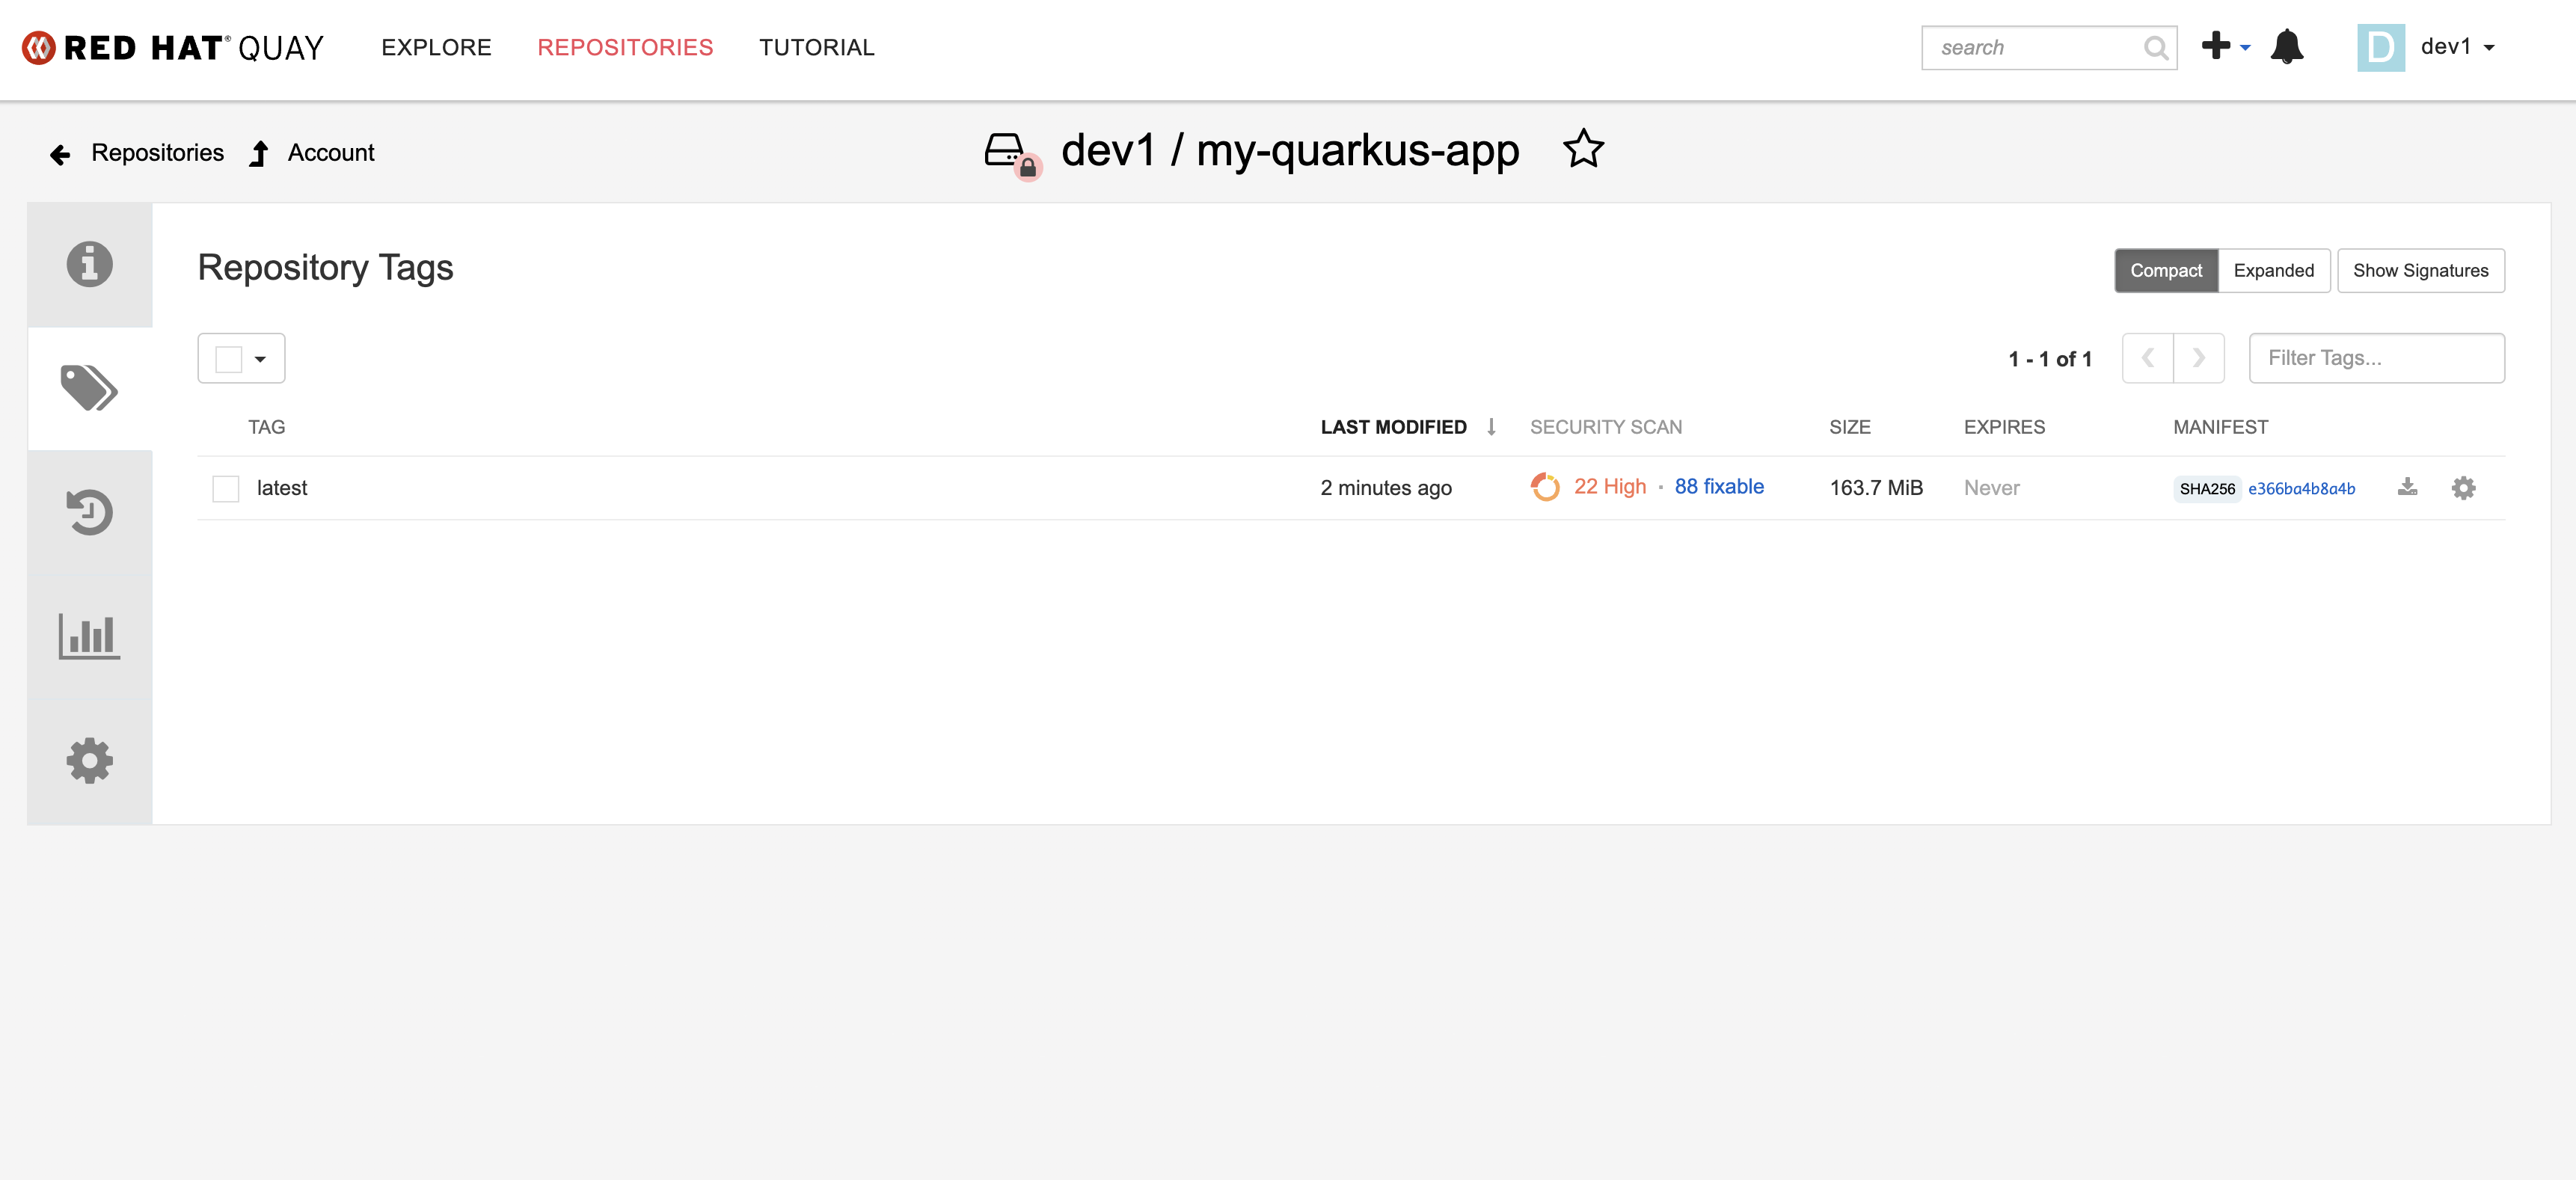
Wait for the build to complete, and visit the dev1 organization in Quay. You’ll be able to view the new my-quarkus-app repository and see the newly pushed latest image tag.
Developer Activity: Update a Component’s Catalog Info
The Argo CD Backstage plugin brings sync status, health status, and update history of your Argo CD Application to your Red Hat Developer Hub’s Component view. However, simply installing the Argo CD plugin doesn’t automatically make the associated deployment information visible when viewing Components in the Software Catalog. An argocd/app-selector annotation must be added to the Component’s YAML definition. This annotation instructs the Argo CD plugin to fetch the information related to the Component from the Argo CD instance you configured.
Your lab environment’s Red Hat Developer Hub has the Argo CD plugin enabled and preconfigured, as can be seen in the valyes.yaml in the rhdh/developer-hub-config.
Please ensure you are logged in as a Developer with dev1 / {common_password} as you were guided to in a previous step.
|
Update the Catalog Info
Update your Quarkus application’s catalog-info.yaml with the correct annotation:
-
Visit the dev1/my-quarkus-app/catalog-info.yaml file in GitLab.
-
Select Edit > Edit single file.
-
Uncomment the following annotation:
argocd/app-selector: rht-gitops.com/rhdh-gitops=dev1-my-quarkus-app -
You can confirm this annotation is correct by visiting the dev1-my-quarkus-app-dev in the rhdh-gitops instance and clicking the Details button to view the applied labels. Login as
adminusing{common_password}if prompted.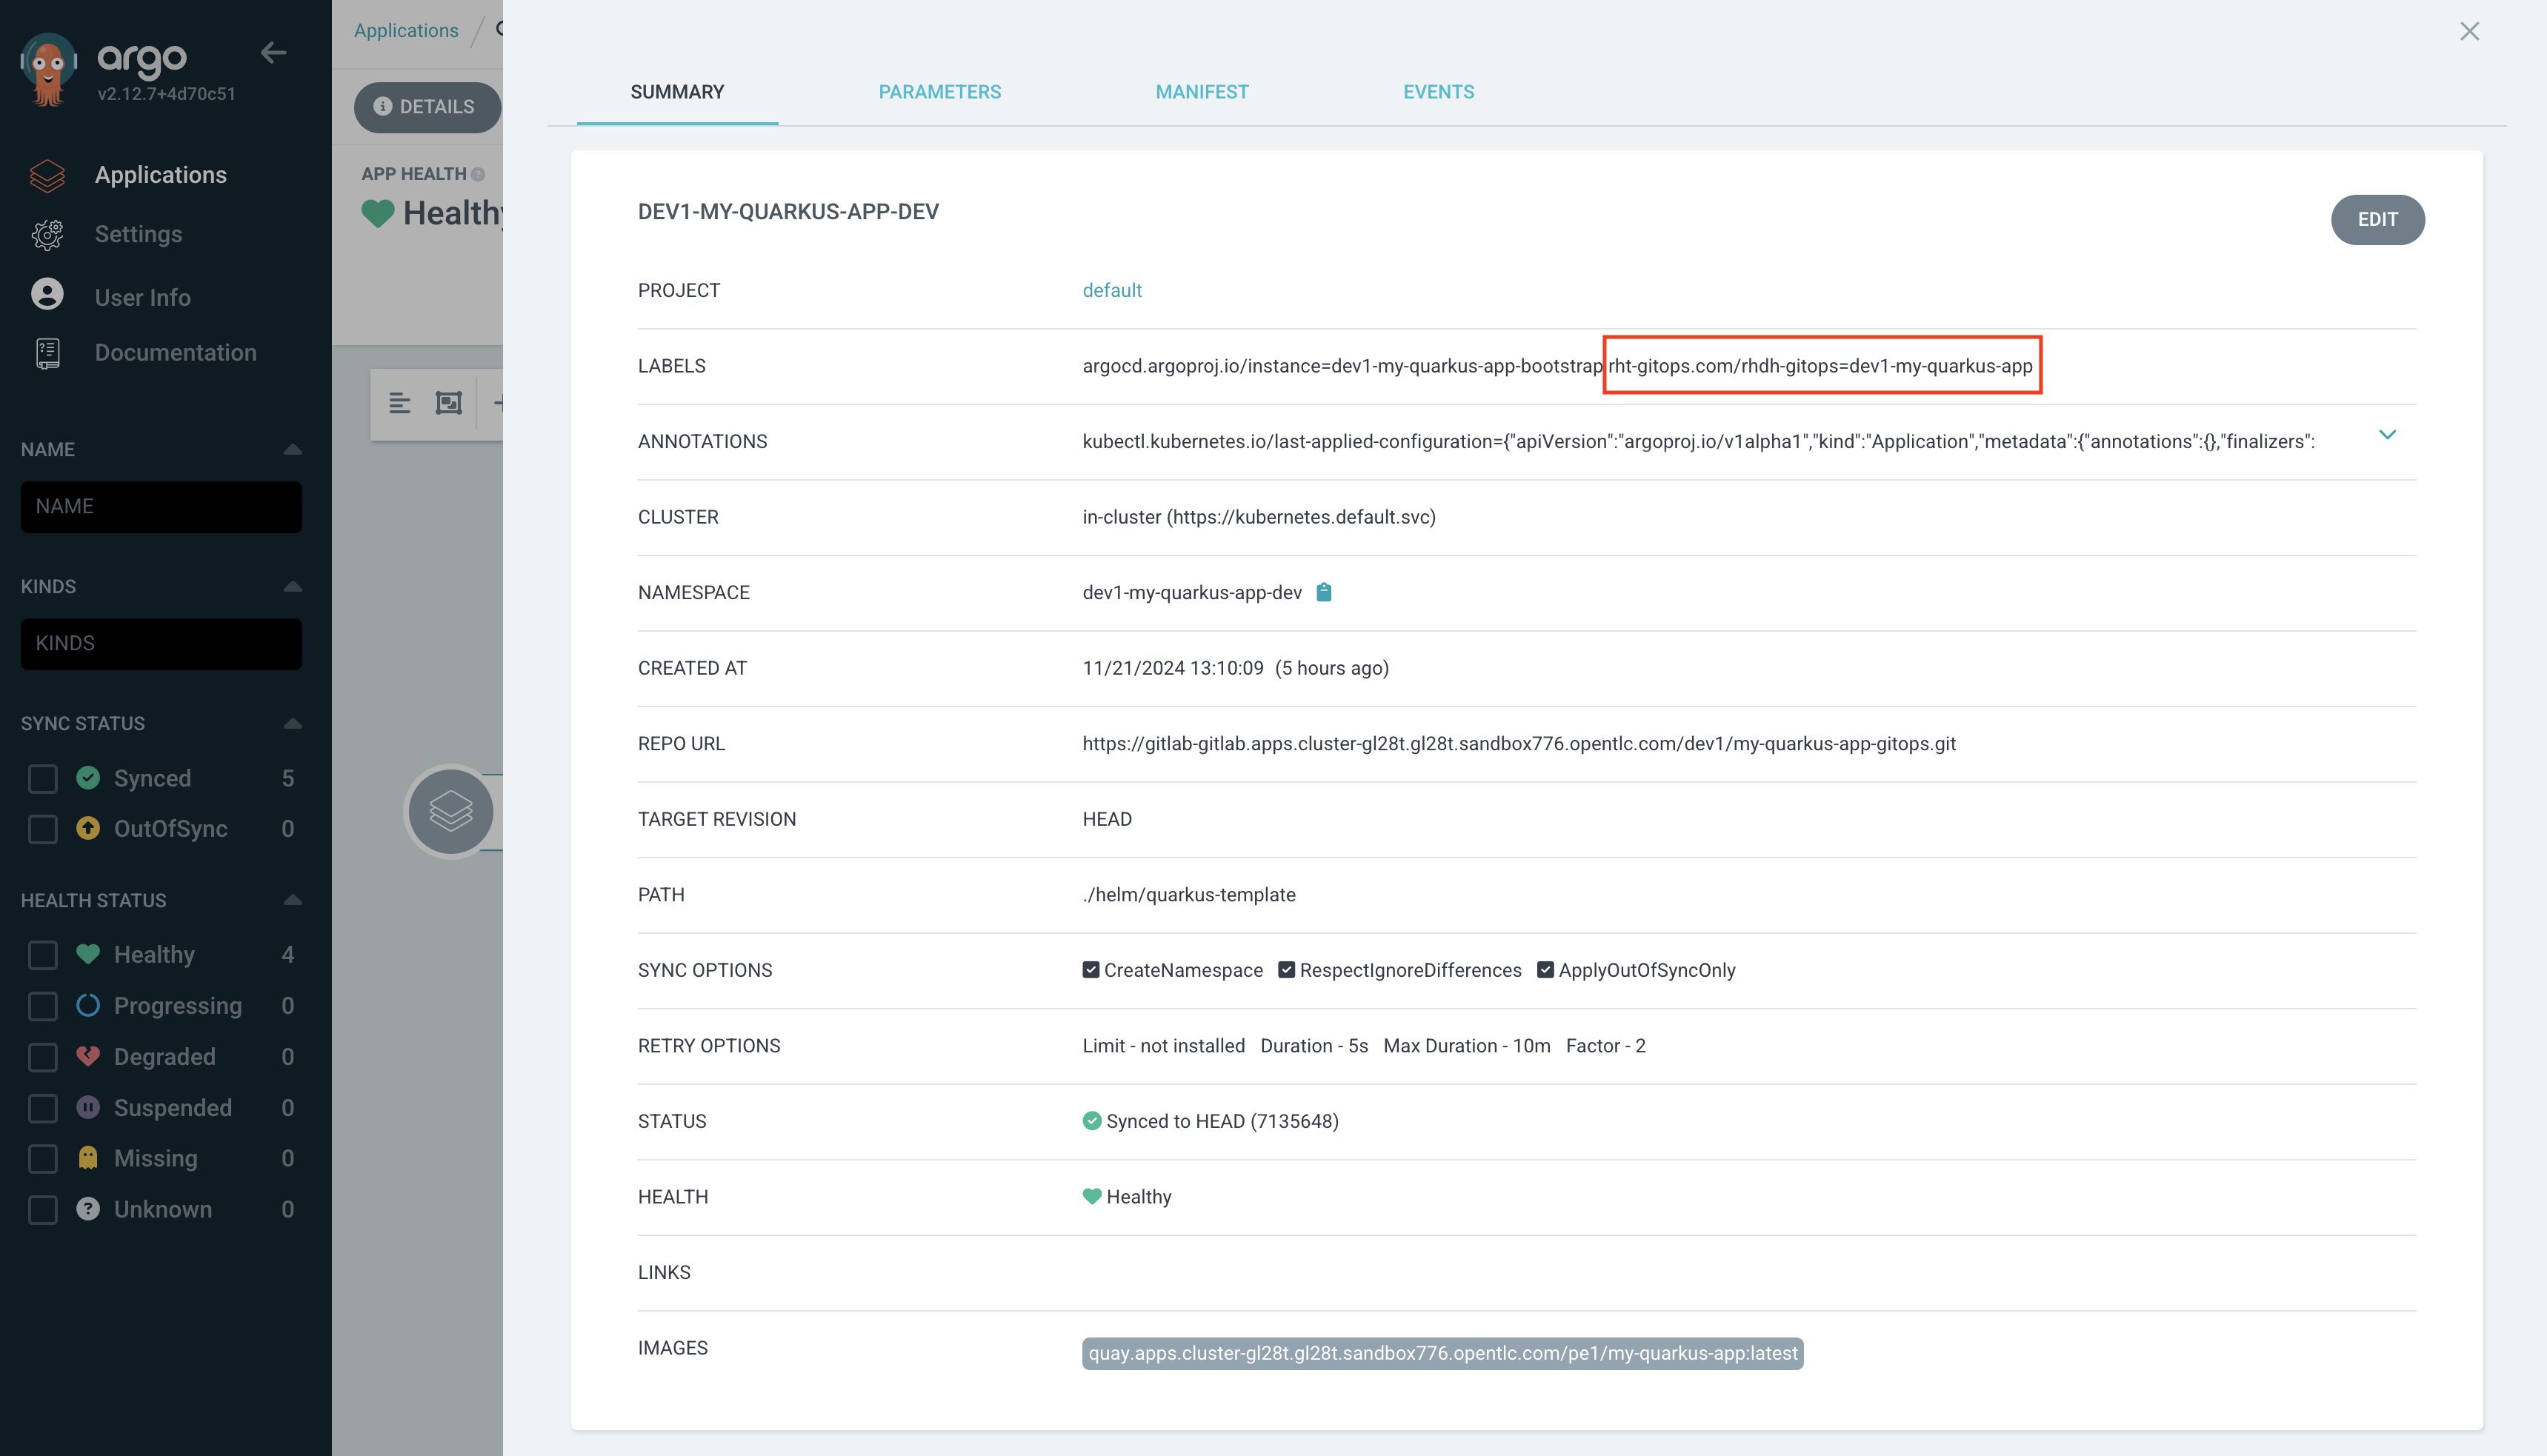
-
Scroll down and enter a commit message
feat: Add argocd/app-selector annotation. -
Use the Commit changes button to commit the annotation.
Refresh the Entity’s Catalog Info
-
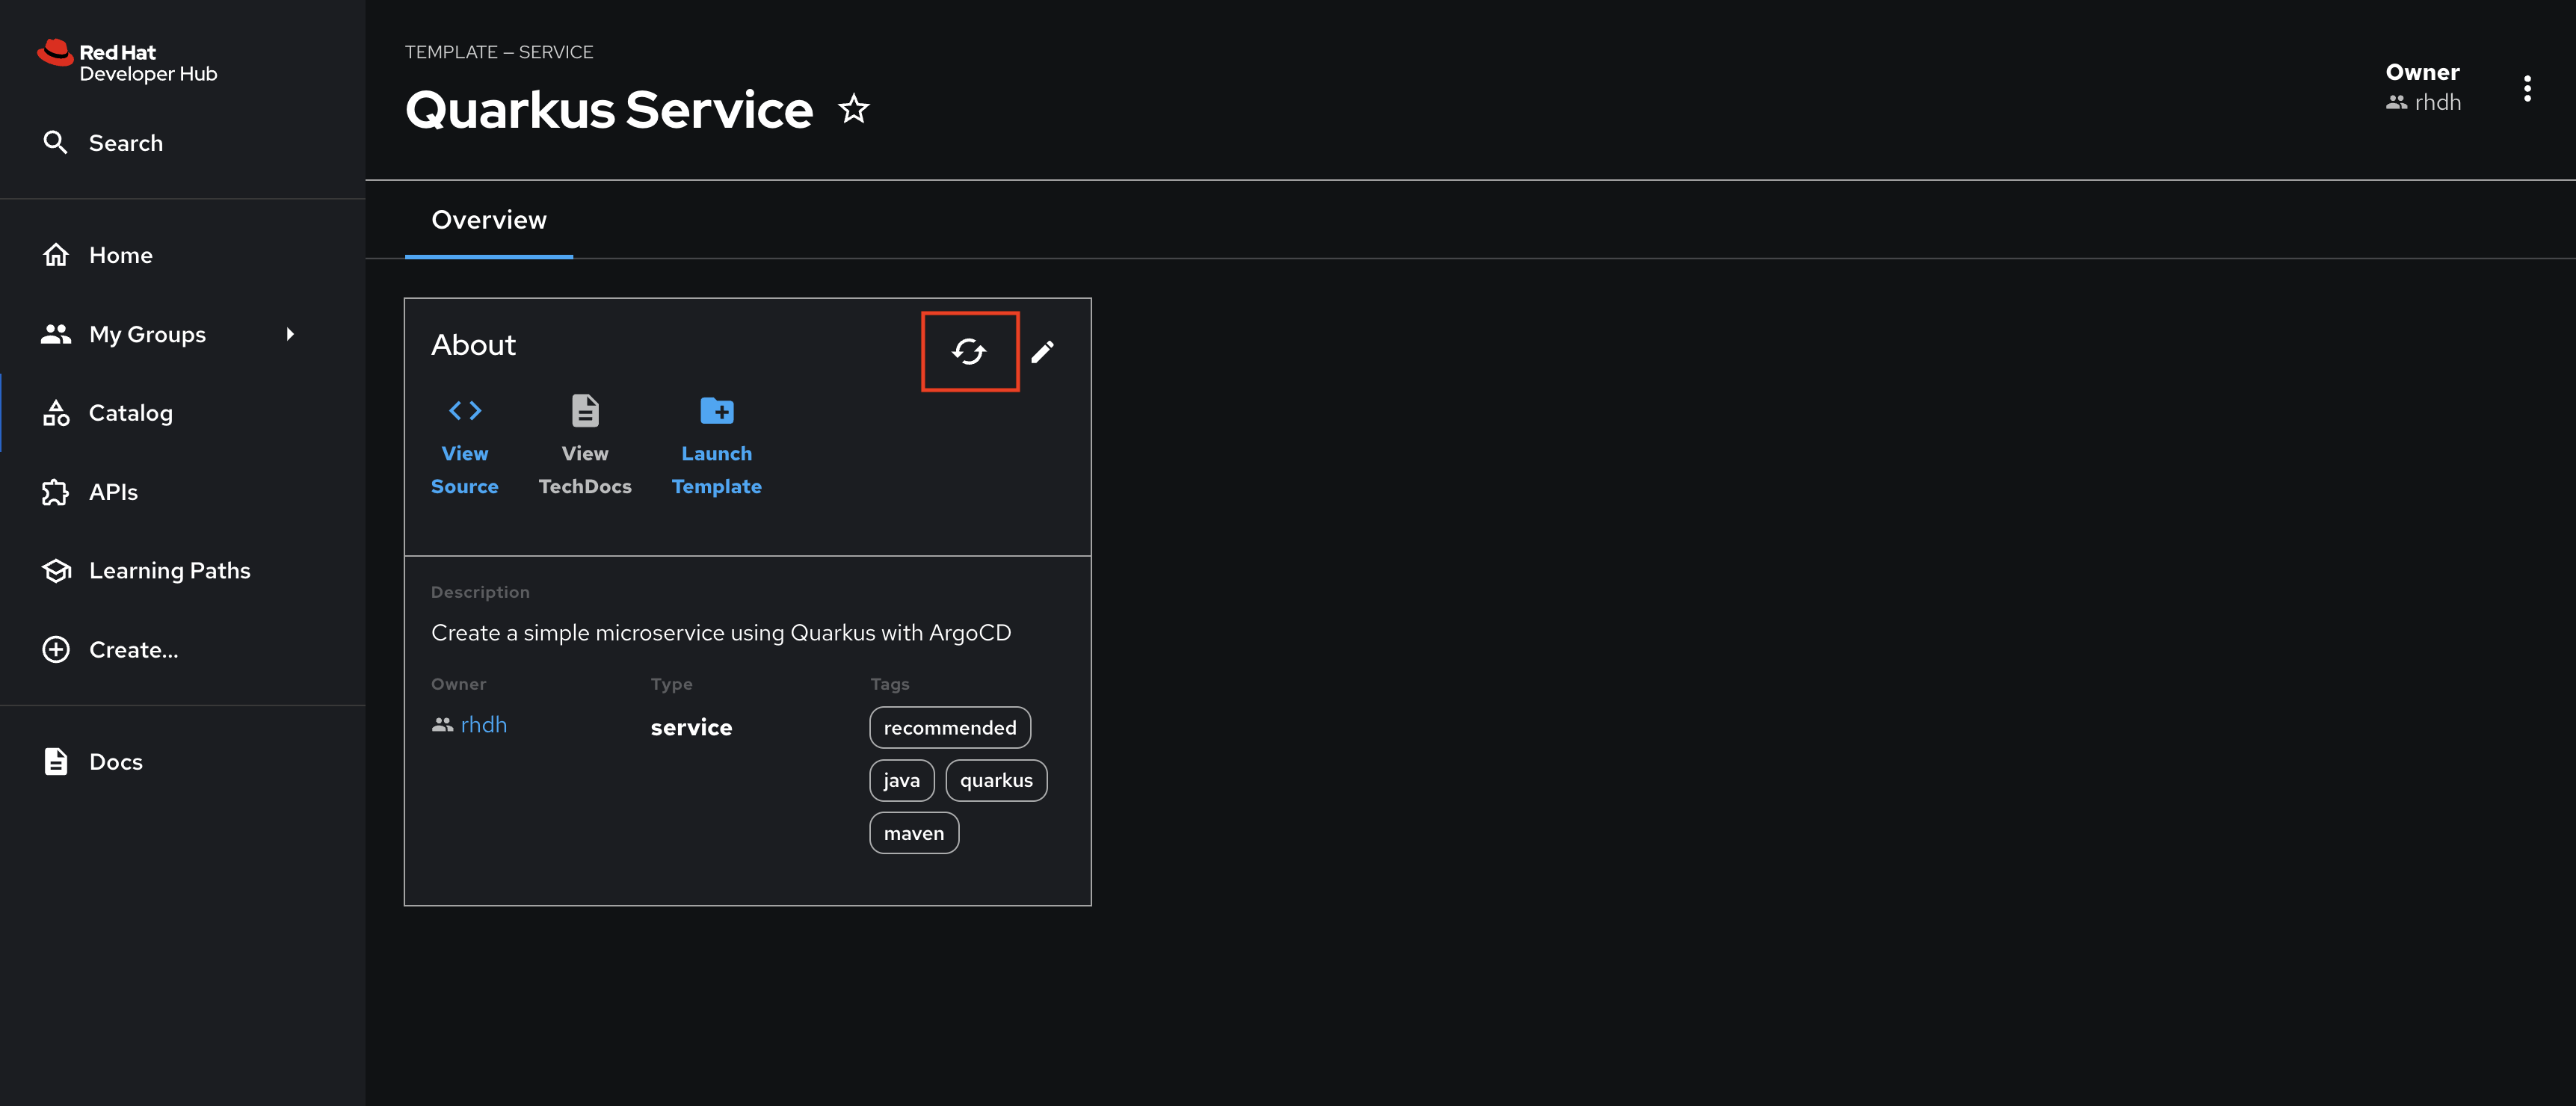
Return to your instance of Red Hat Developer Hub after committing the change to view the newly created
my-quarkus-appComponent. Use the Schedule entity refresh button to pull this change from Git to Red Hat Developer Hub for your Quarkus application.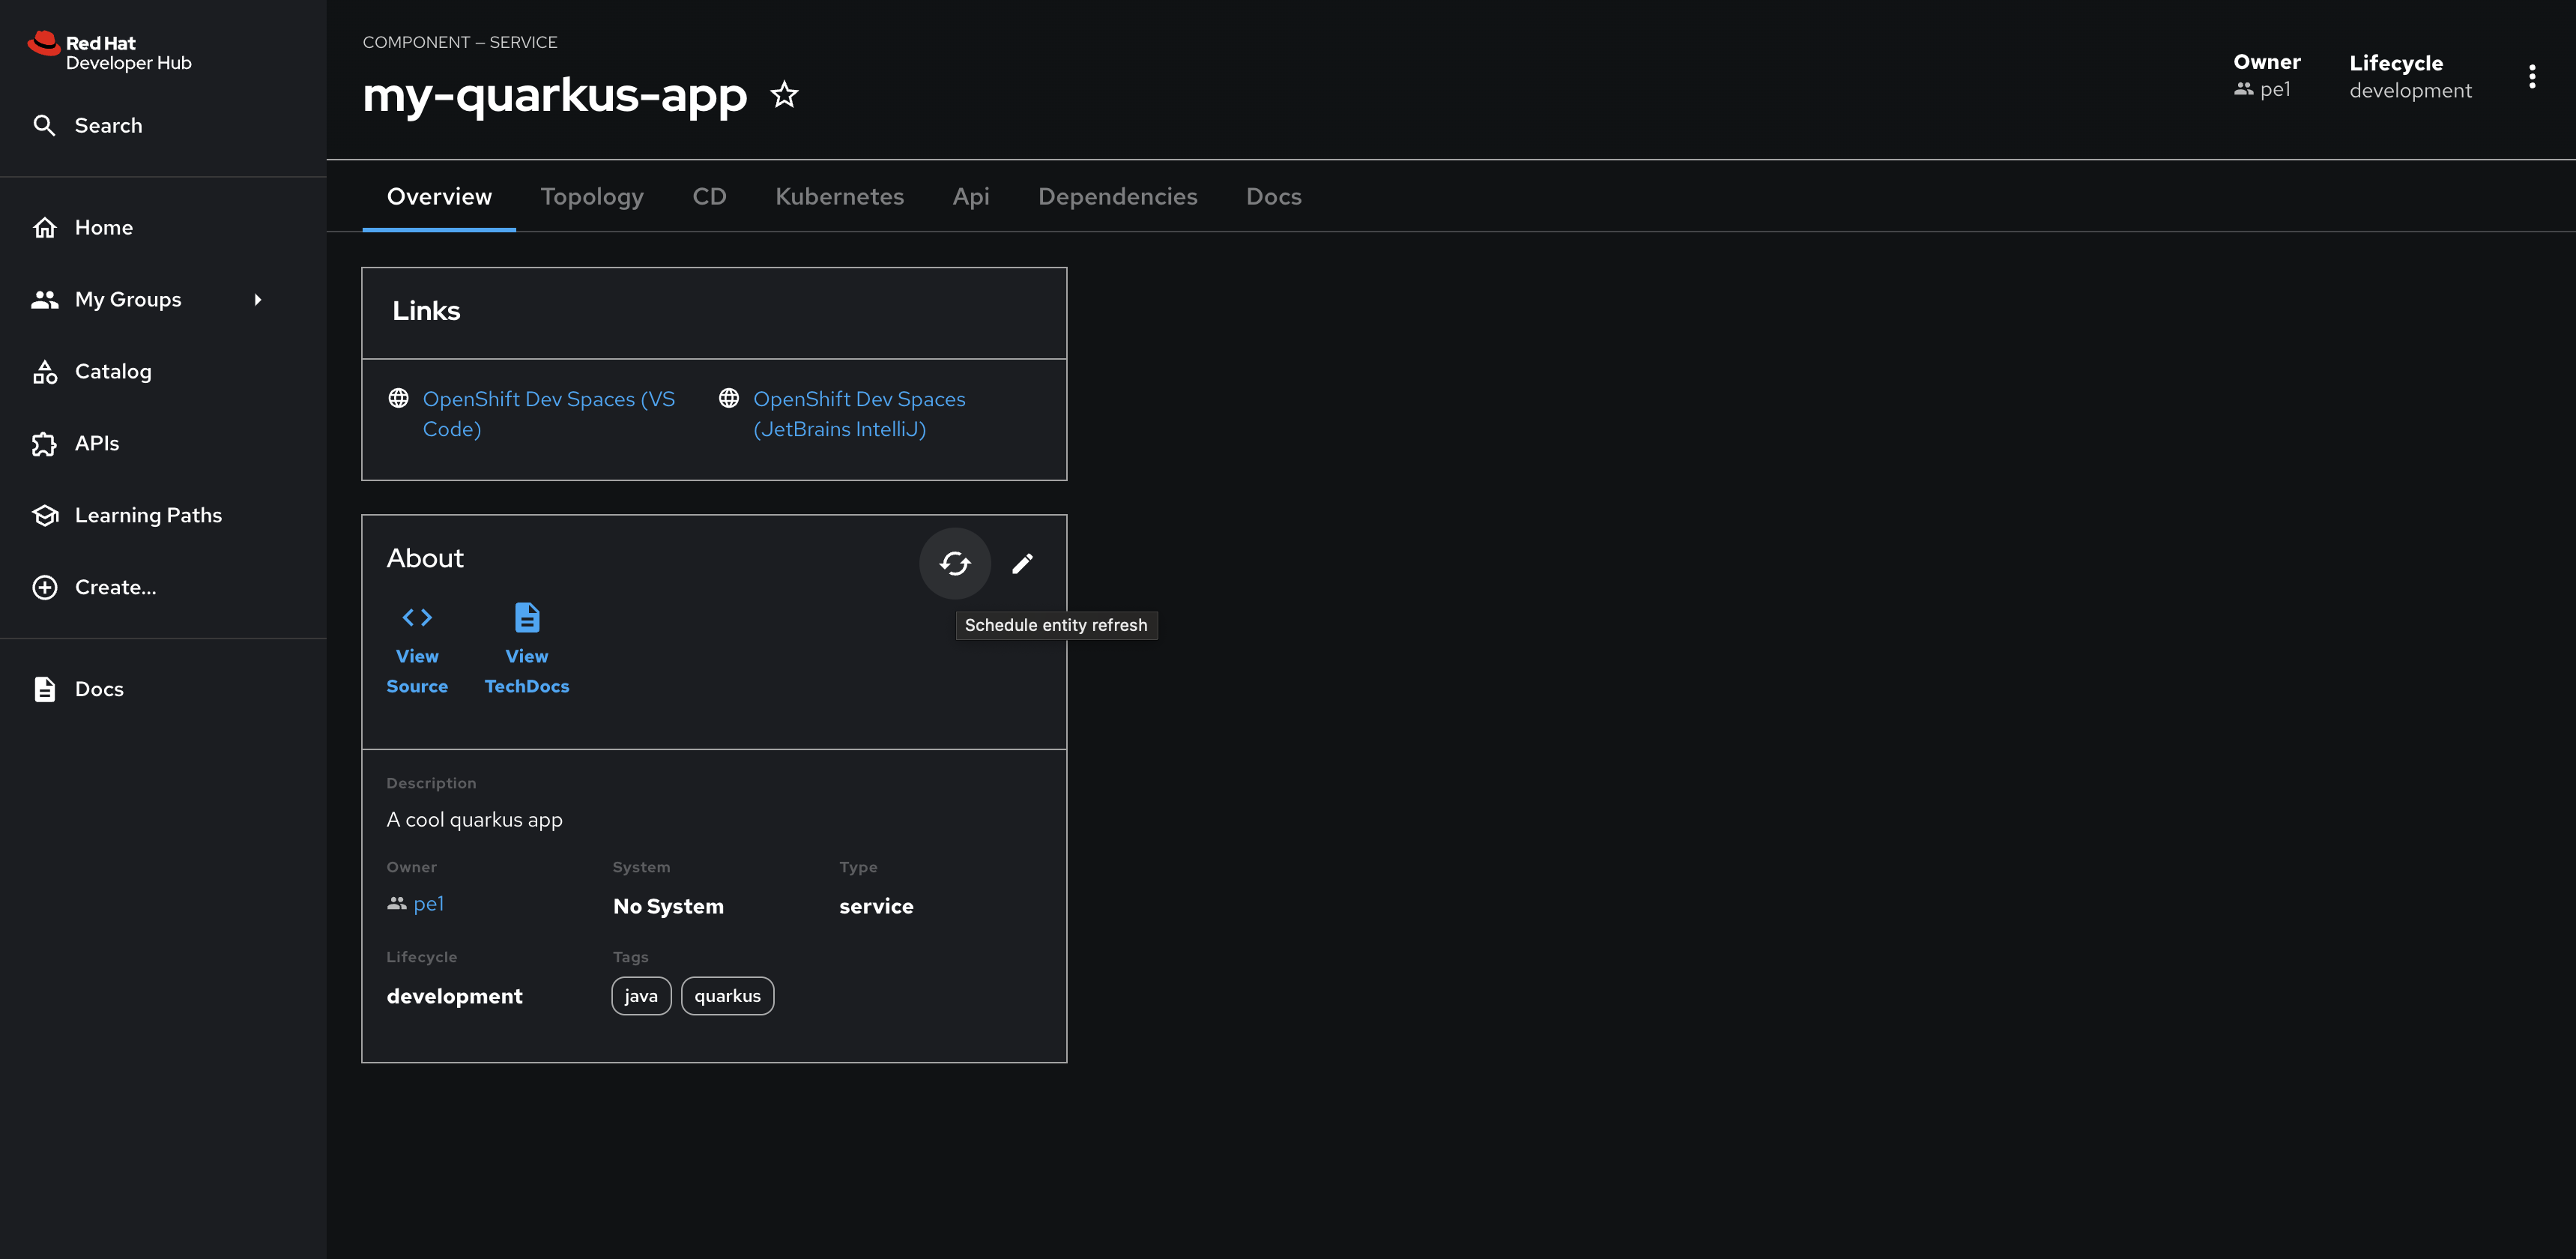
-
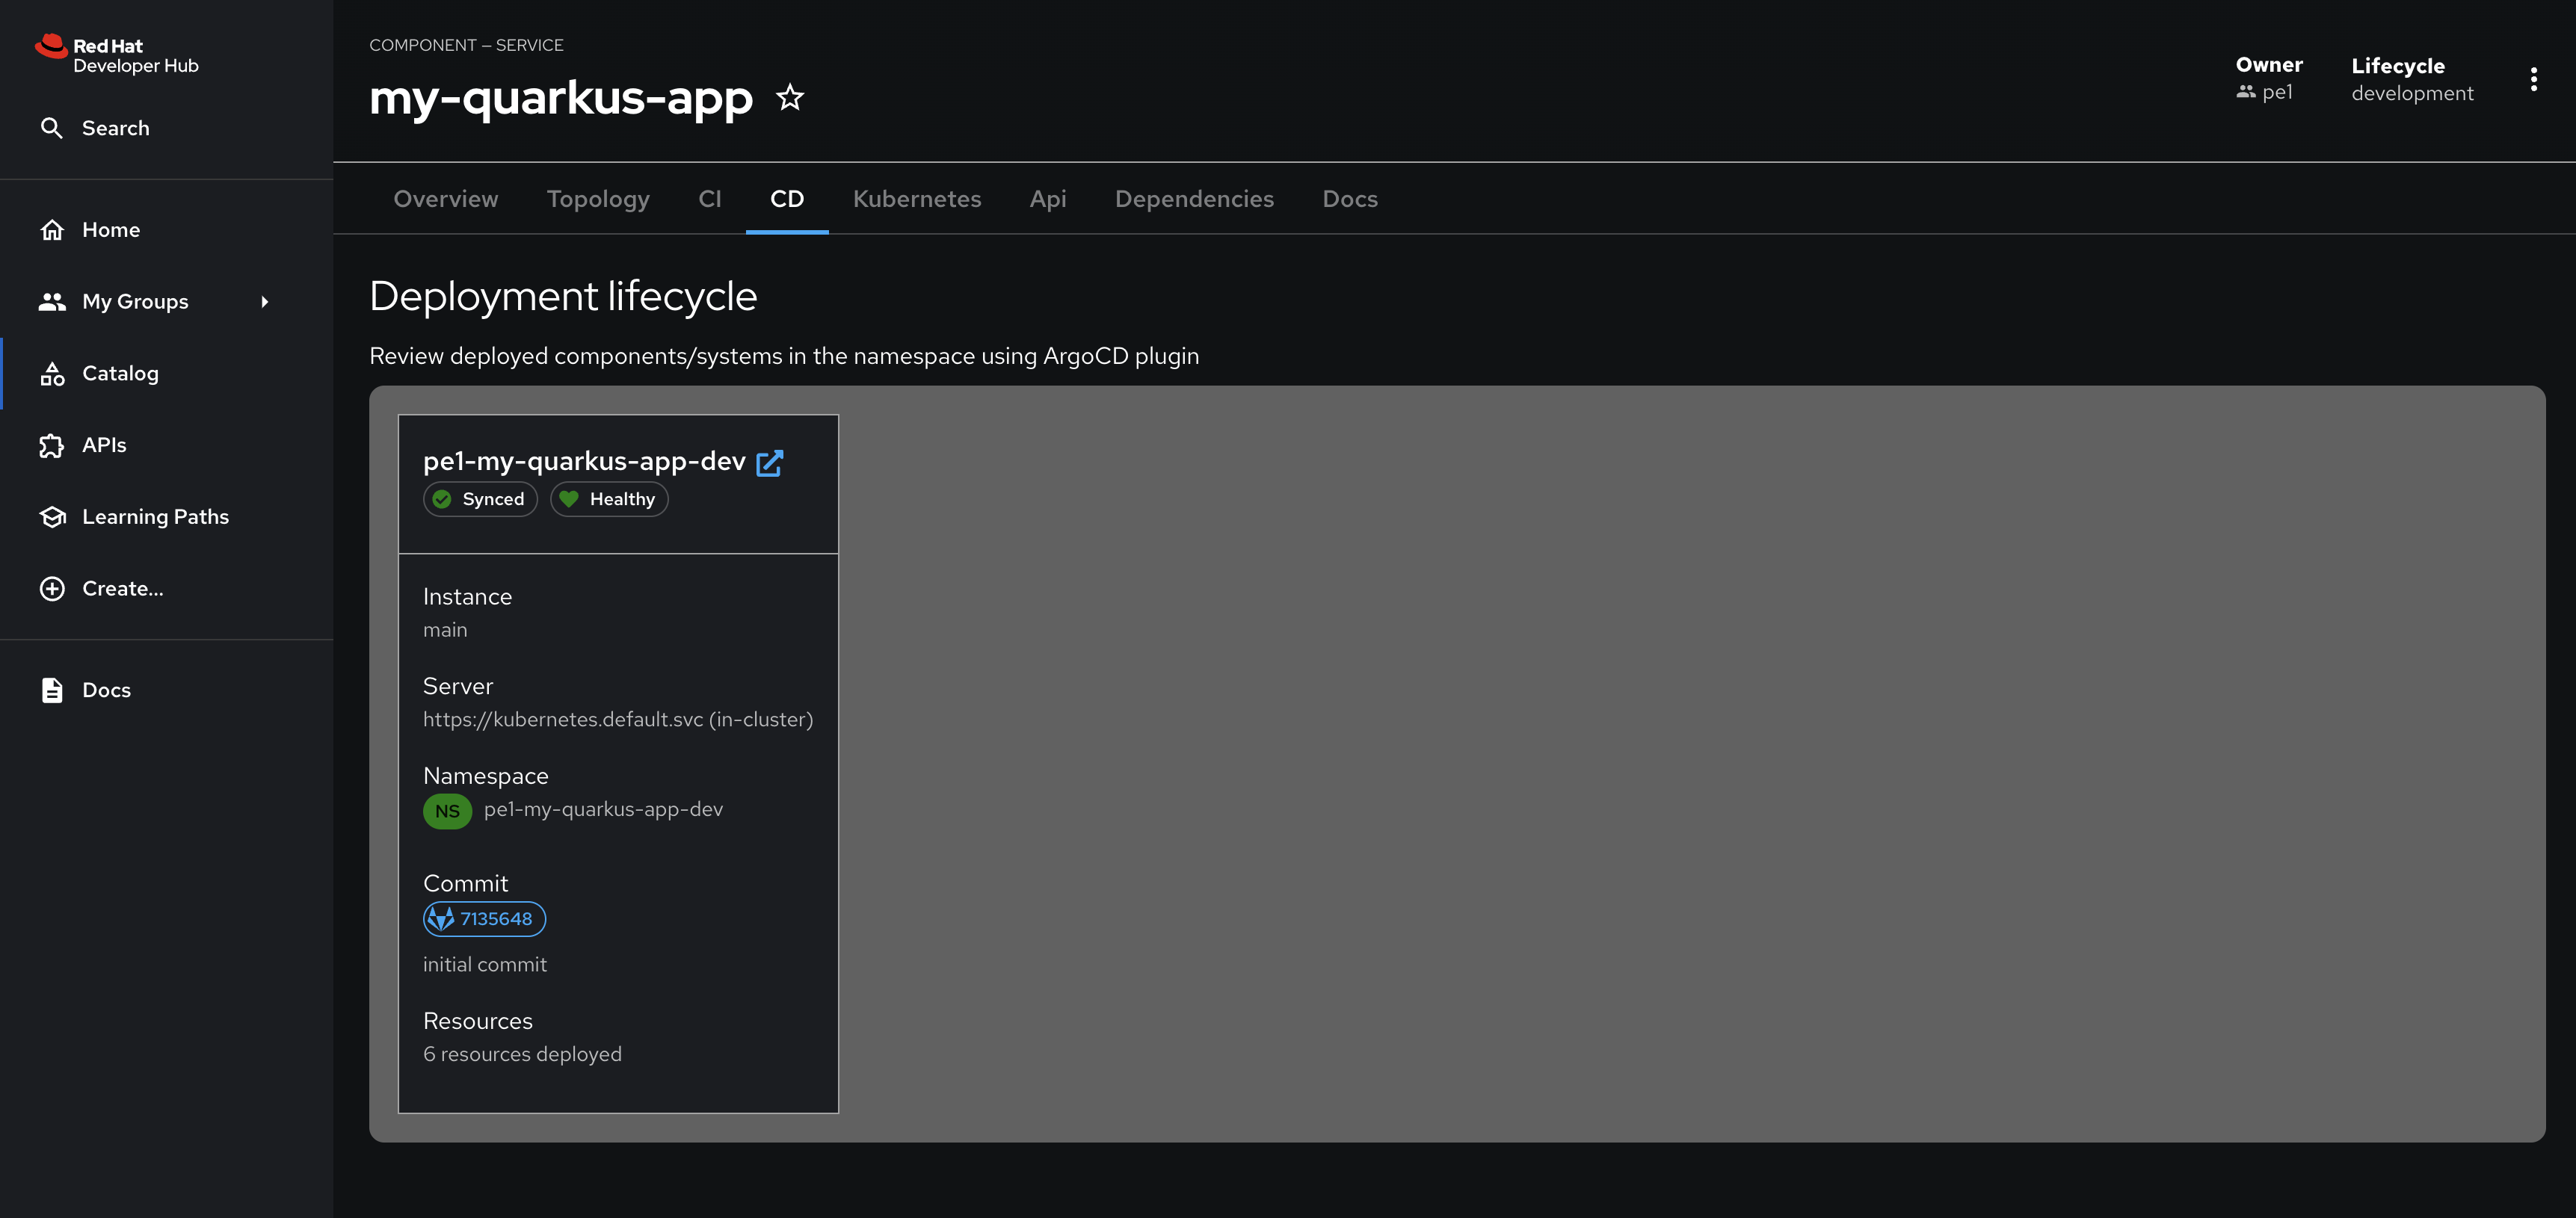
Next, refresh your browser. The CD tab should appear, and you can view the Argo CD Application’s information.
Summary
Congratulations! You updated your Component’s dev1/my-quarkus-app/catalog-info.yaml, and enabled new functionality using a plugin specific annotation. :imagesdir: ../../assets/images
Platform Engineer Activity: Update the Component Template
While the developer can add the necessary annotations to their Component, it’s best to update the Template so future developers can benefit from the Argo CD integration without having to manually add the annotation.
Login as Platform Engineer
Please make sure to log in as a Platform Engineer with pe1 / {common_password}. Expand to the below note to familiarise yourself with the process.
|
Click to learn how to login as a Platform Engineer
Login as Platform Engineer
You will perform this activity as a Platform Engineer. Please follow the below steps to logout from Red Hat Developer Hub and GitLab, and login back as a Platform Engineer (pe1 / {common_password})
-
Logout from Red Hat Developer Hub
-
Sign out of Red Hat Developer Hub from the Profile dropdown as shown in the screenshot below.

-
-
Logout from GitLab
-
Click on the Profile icon, and Sign out from the dropdown as shown in the screenshot below.

-
-
Login back as a Platform Engineer to Red Hat Developer Hub and GitLab using the credentials
pe1/{common_password}
Update the Quarkus Service template in GitLab
-
Visit the rhdh/template-quarkus-simple/skeleton/catalog-info.yaml file in GitLab.
-
Select Edit > Edit single file.
-
Uncomment the following in the
annotationssection of the file:argocd/app-selector: rht-gitops.com/${{ values.gitops_namespace }}=${{ values.owner }}-${{values.component_id}}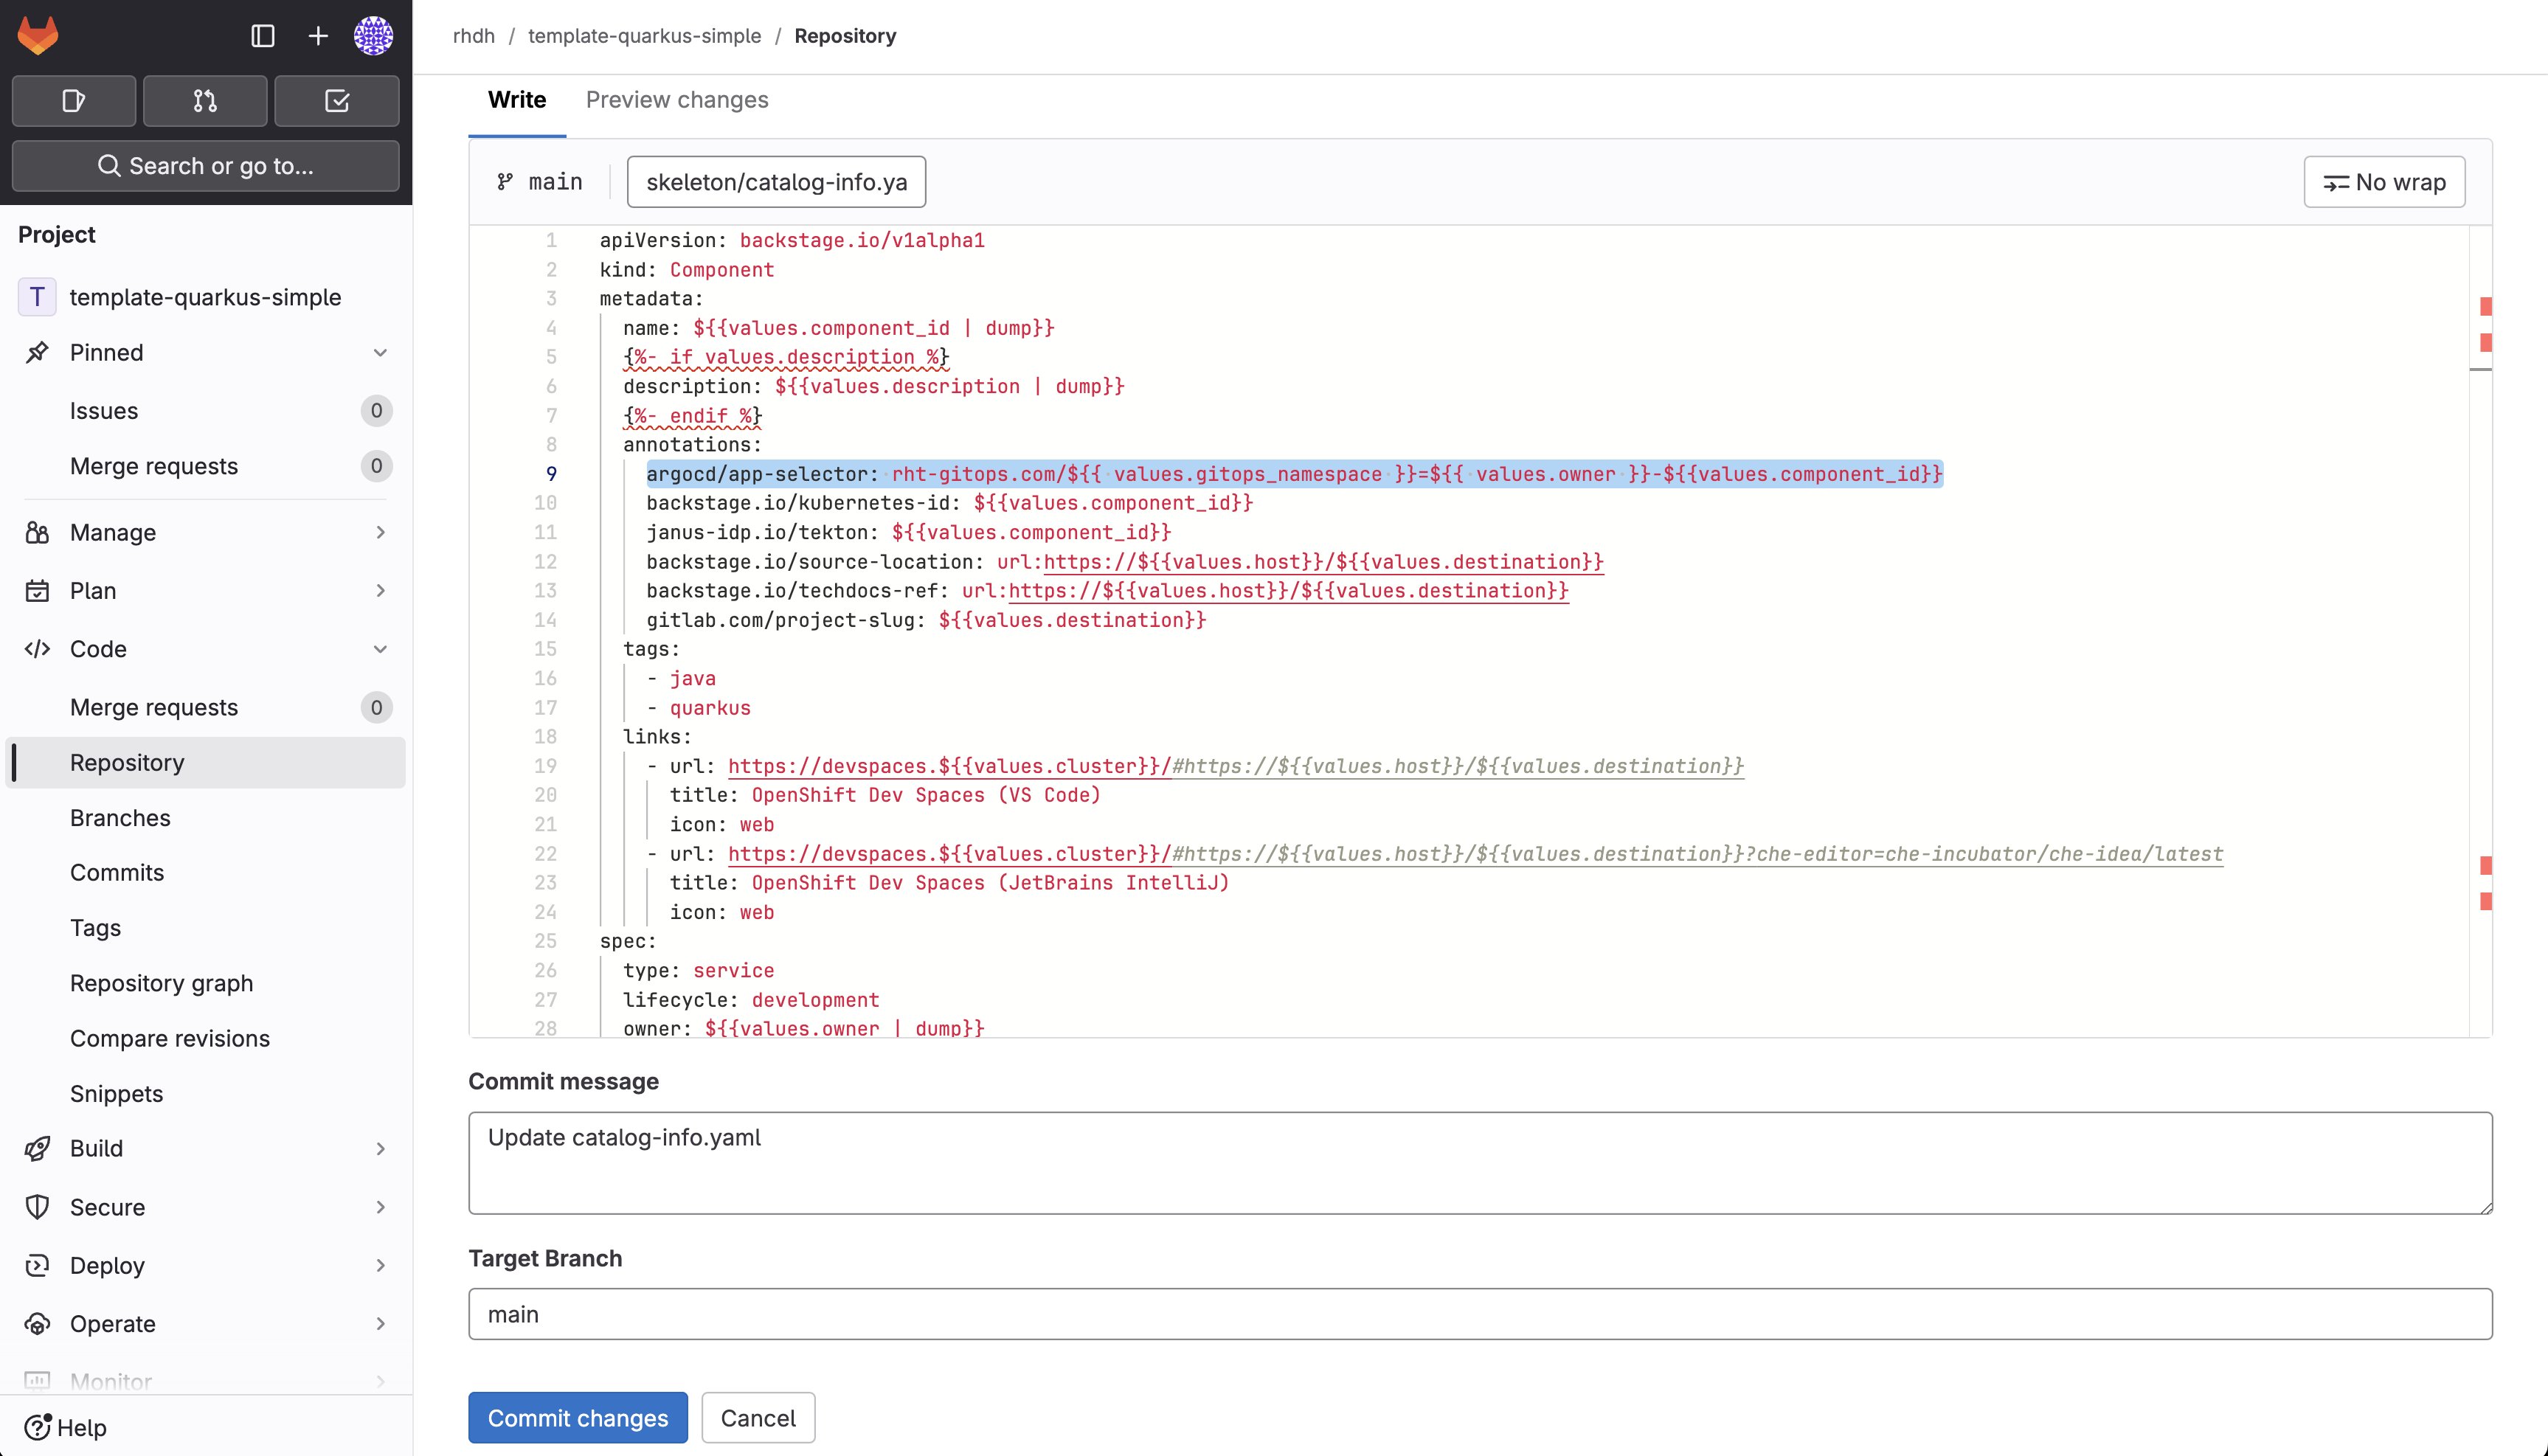
-
Scroll down and enter a commit message
feat: Enable argocd/app-selector annotation. -
Use the Commit changes button to commit the new annotation.
The annotation value will be automatically generated, similar to the Argo CD label, using the values provided by developers when they use the Template.
Refresh the Quarkus Service Template on Red Hat Developer Hub
Return to your Red Hat Developer Hub instance to view the quarkus-web-template after committing the change. Use the Schedule entity refresh button to pull this change from Git to Red Hat Developer Hub for your Quarkus application.
| Manually refreshing is an optional step, since Red Hat Developer Hub will check for upstream Entity changes every few minutes. |
From this point forward any new Component created using the Template will display the CD tab automatically.
Conclusion
Congratulations! You’ve learned how to:
-
Create and Import Software Templates
-
Create new Components using a Software Template
-
Use annotations to provide information to plugins
-
Force refresh Entities in the Software Catalog :imagesdir: ../../assets/images
Platform Engineer Activity: Setup Role-Based Access Control
By setting up Role-Based Access Control (RBAC), the Platform Engineer can restrict the visibility of entities and availability of actions to subsets of users. It’s possible to define roles with specific permissions and then assign those roles to the Users/Groups to meet the specific needs of your organization and teams. RBAC can be configured via the Red Hat Developer Hub UI and REST API, or by using configuration files.
In this module you will
-
Define policies in a declarative fashion using a configuration file.
-
Create a ConfigMap to hold your RBAC configuration file.
-
Configure Red Hat Developer Hub to use this ConfigMap.
RBAC Configuration File Overview
Policies are stored on OpenShift using a ConfigMap. The ConfigMap containing policies has has been pre-deployed to streamline this section of the workshop. Click here to view the policies in the OpenShift backstage namespace. The RBAC policies are defined using the Casbin rules format.
|
Casbin is a powerful and efficient open-source access control library that supports various access control models for enforcing authorization. For information about the Casbin rules format, see Basics of Casbin rules. |
Policies define roles and their associated permissions, and assign roles to groups and users. The following example states that any user or group with role role:default/platformengineer can create Catalog Entities:
p, role:default/platformengineer, catalog.entity.create, create, allowTo assign this role to a group group:default/platformengineers, you’d use the following sytntax:
g, group:default/platformengineers, role:default/platformengineerThe result is that users belonging to the platformengineers group can create Catalog Entities.
Enable the RBAC Plugin and Setup the Policies
As with other Red Hat Developer Hub plugins, enabling RBAC involves modifying the configuration file stored in GitLab.
-
Access the rhdh/developer-hub-config configuration on GitLab.
-
Select Edit > Edit single file. When prompted, login as
pe1/{common_password}. -
There are 2 sections in the Red Hat Developer Hub configuration which refer to the RBAC setup, both under
-- RBAC --blocks. You can useCMD + /orCTRL + /keys to uncomment the blocks.-
Look for the first block; This enables the
backstage-community-plugin-rbacdynamic plugin which allows you to assign permissions to users and groups; highlight this block and uncomment it.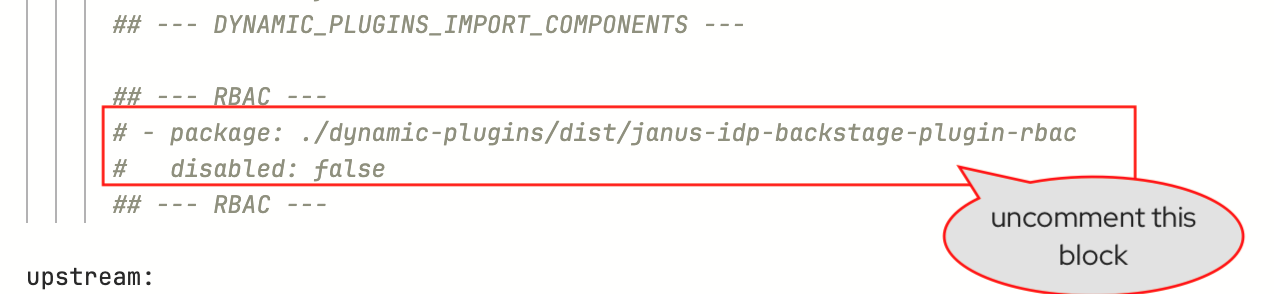
-
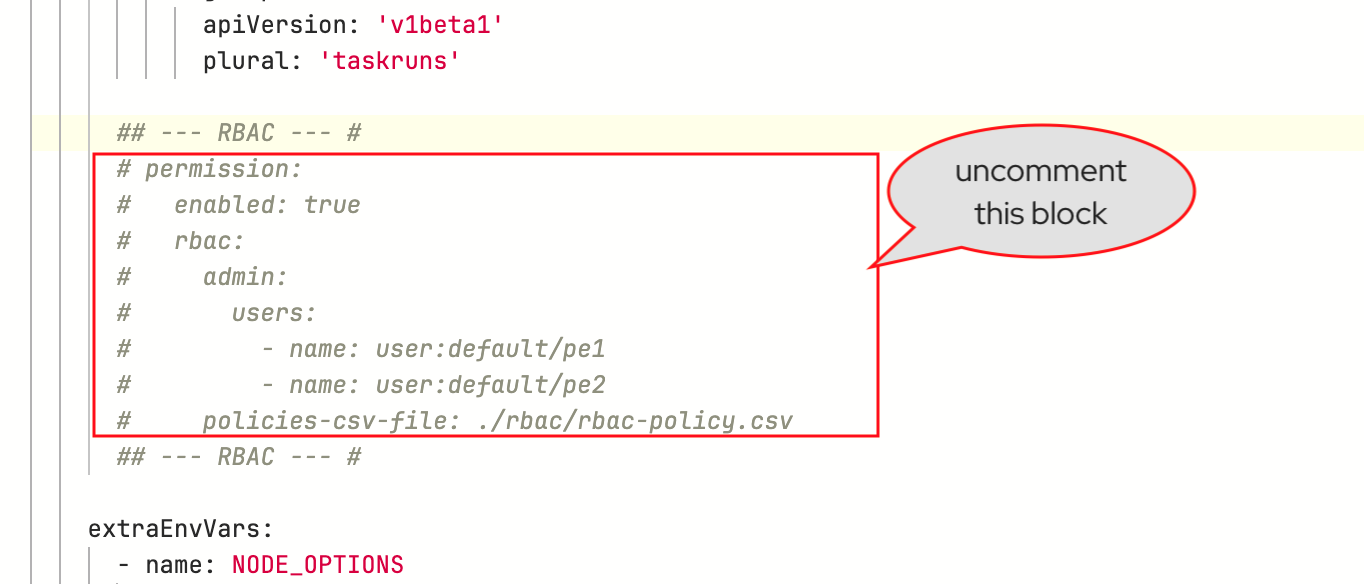
The second block defines RBAC admin users and references the file contained in ConfigMap explained in the previous section; highlight and uncomment it.
-
Scroll down and enter a commit message:
feat: enable RBACand click the Commit button.
-
-
Visit the
backstageApplication in OpenShift GitOps (login usingadmin/{openshift_gitops_password}) and click Refresh. Wait until it reports aHealthystatus.
Test the RBAC Configuration
As a Platform Engineer
-
Ensure you’re logged in as a Platform Engineer.
Click to see how
-
Navigate to Red Hat Developer Hub’s Settings screen and check the logged-in user’s name under the Profile section.
-
If you are not logged in as a Platform Engineer (
peuser), Click on Sign Out. -
Log in as
pe1/{common_password}.
-
-
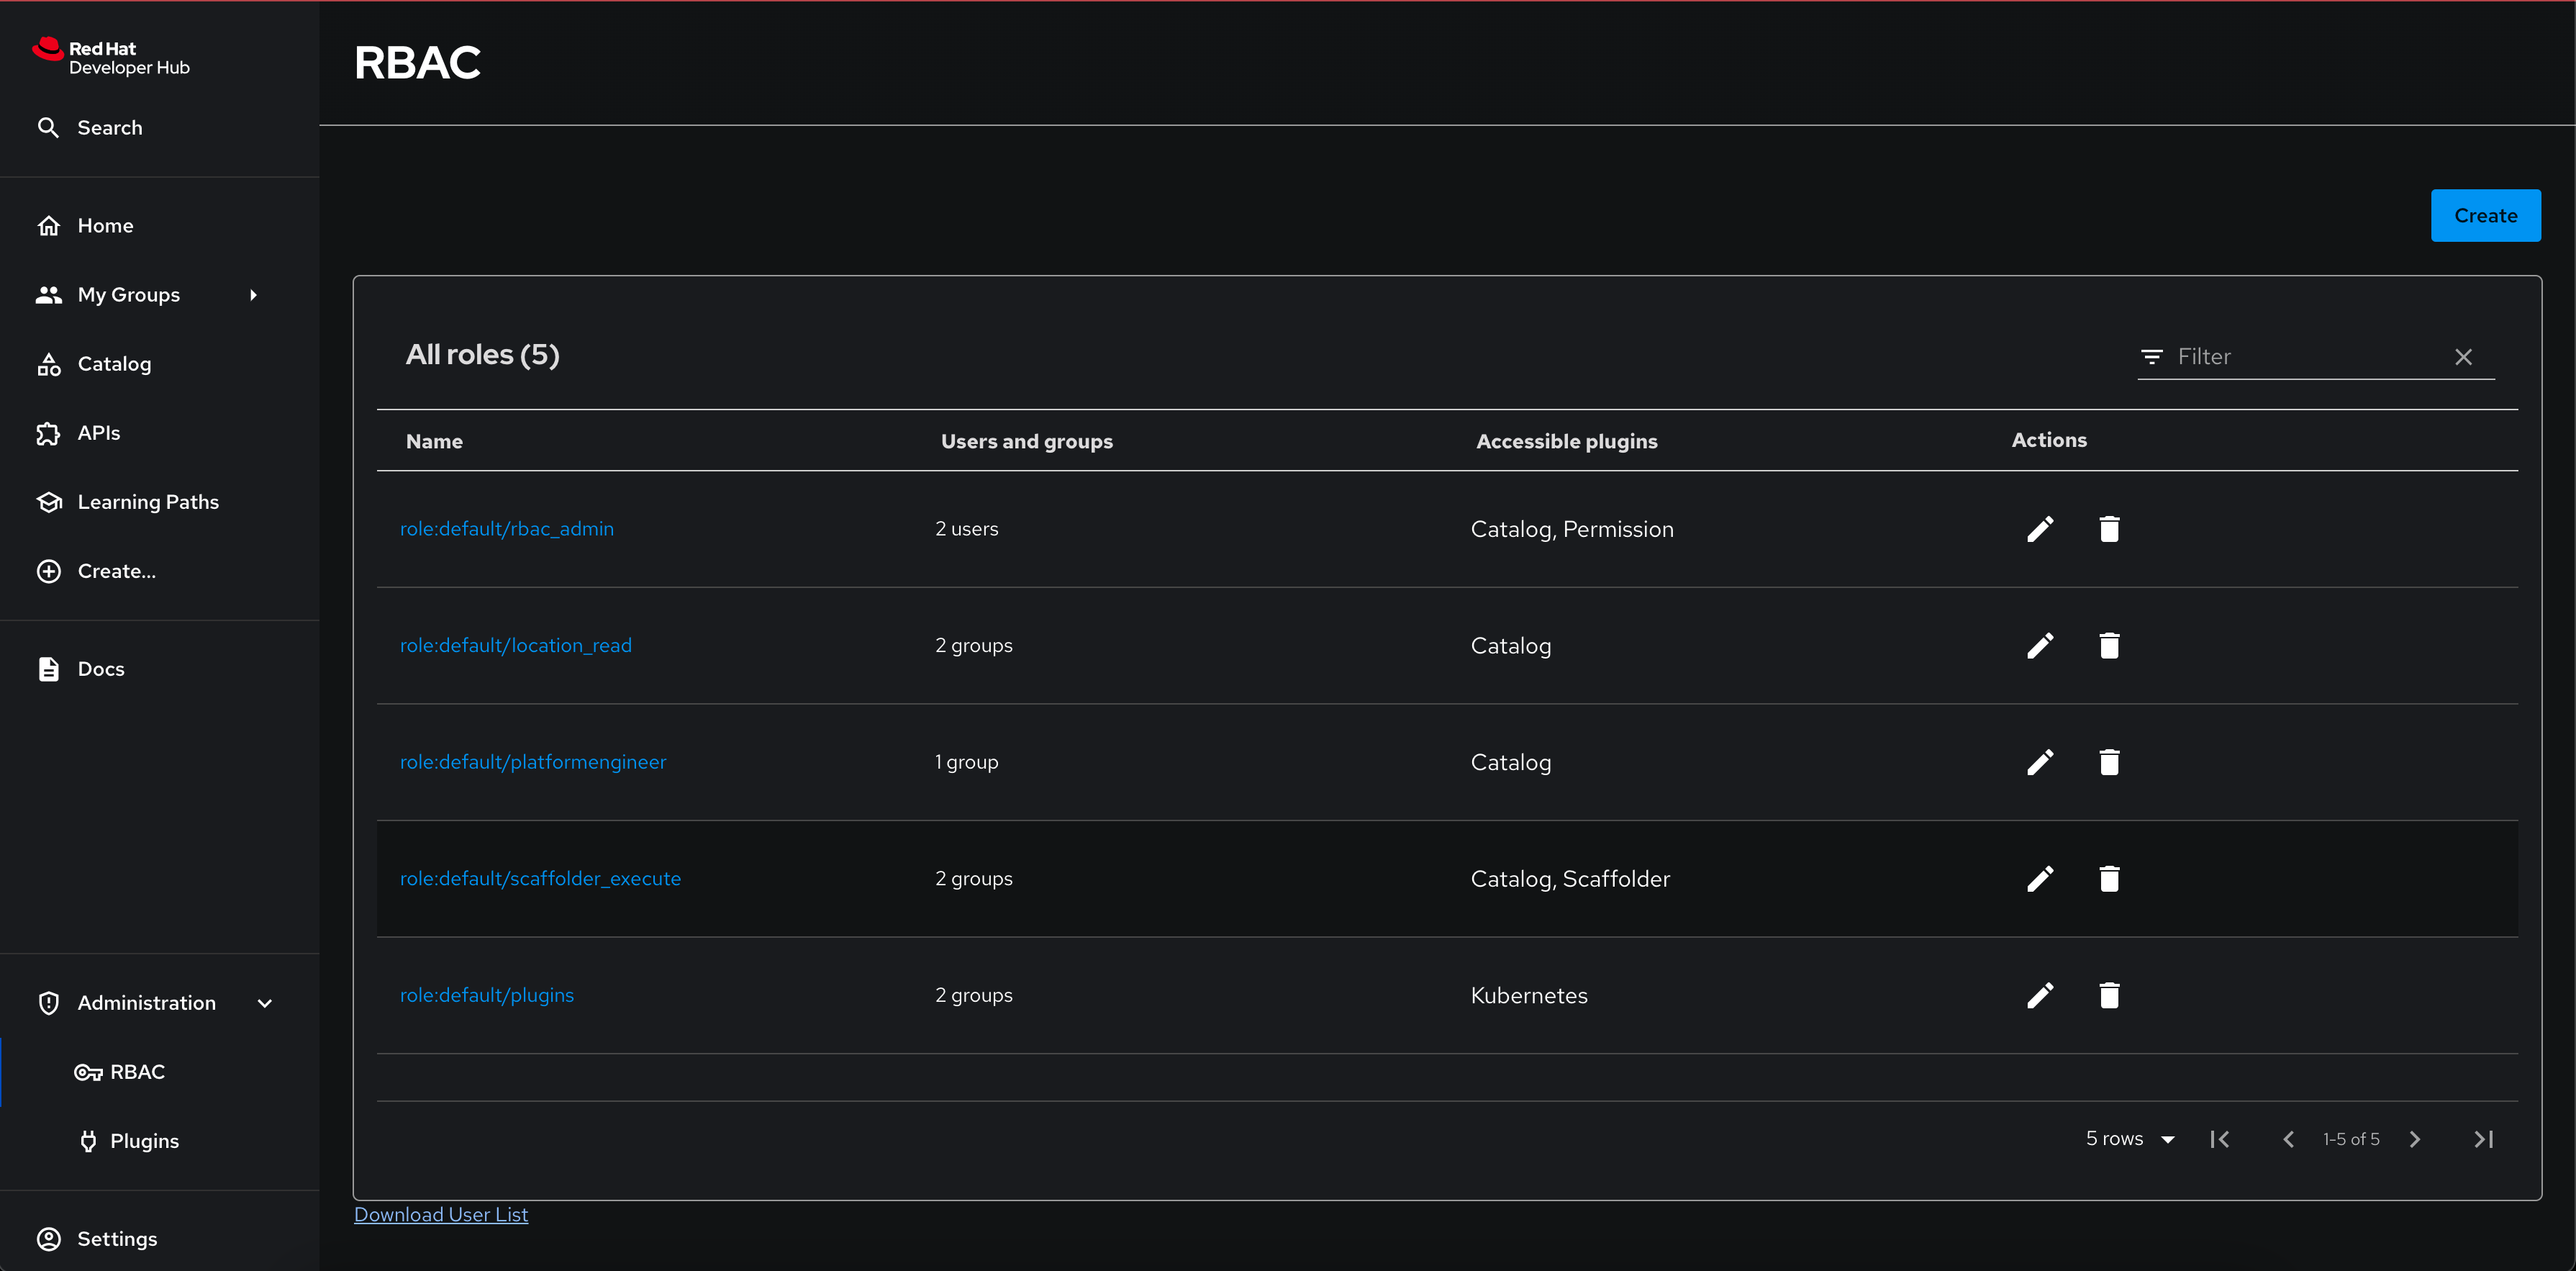
You will now be able to view the RBAC policies you setup in the Administration > RBAC left-hand menu.
-
Policies managed using a CSV file cannot be edited or deleted using the Red Hat Developer Hub Web UI.
-
You can download the list of users in CSV format using the Red Hat Developer Hub web interface.
-
This downloaded file contains a list of active users and last logged in times as shown below
userEntityRef,displayName,email,lastAuthTime
user:default/dev1,dev1 rhdh,dev1@rhdemo.com,"Tue, 10 Dec 2024 05:25:00 GMT"
user:default/pe1,pe1 rhdh,pe1@rhdemo.com,"Tue, 10 Dec 2024 05:25:22 GMT"
-
-
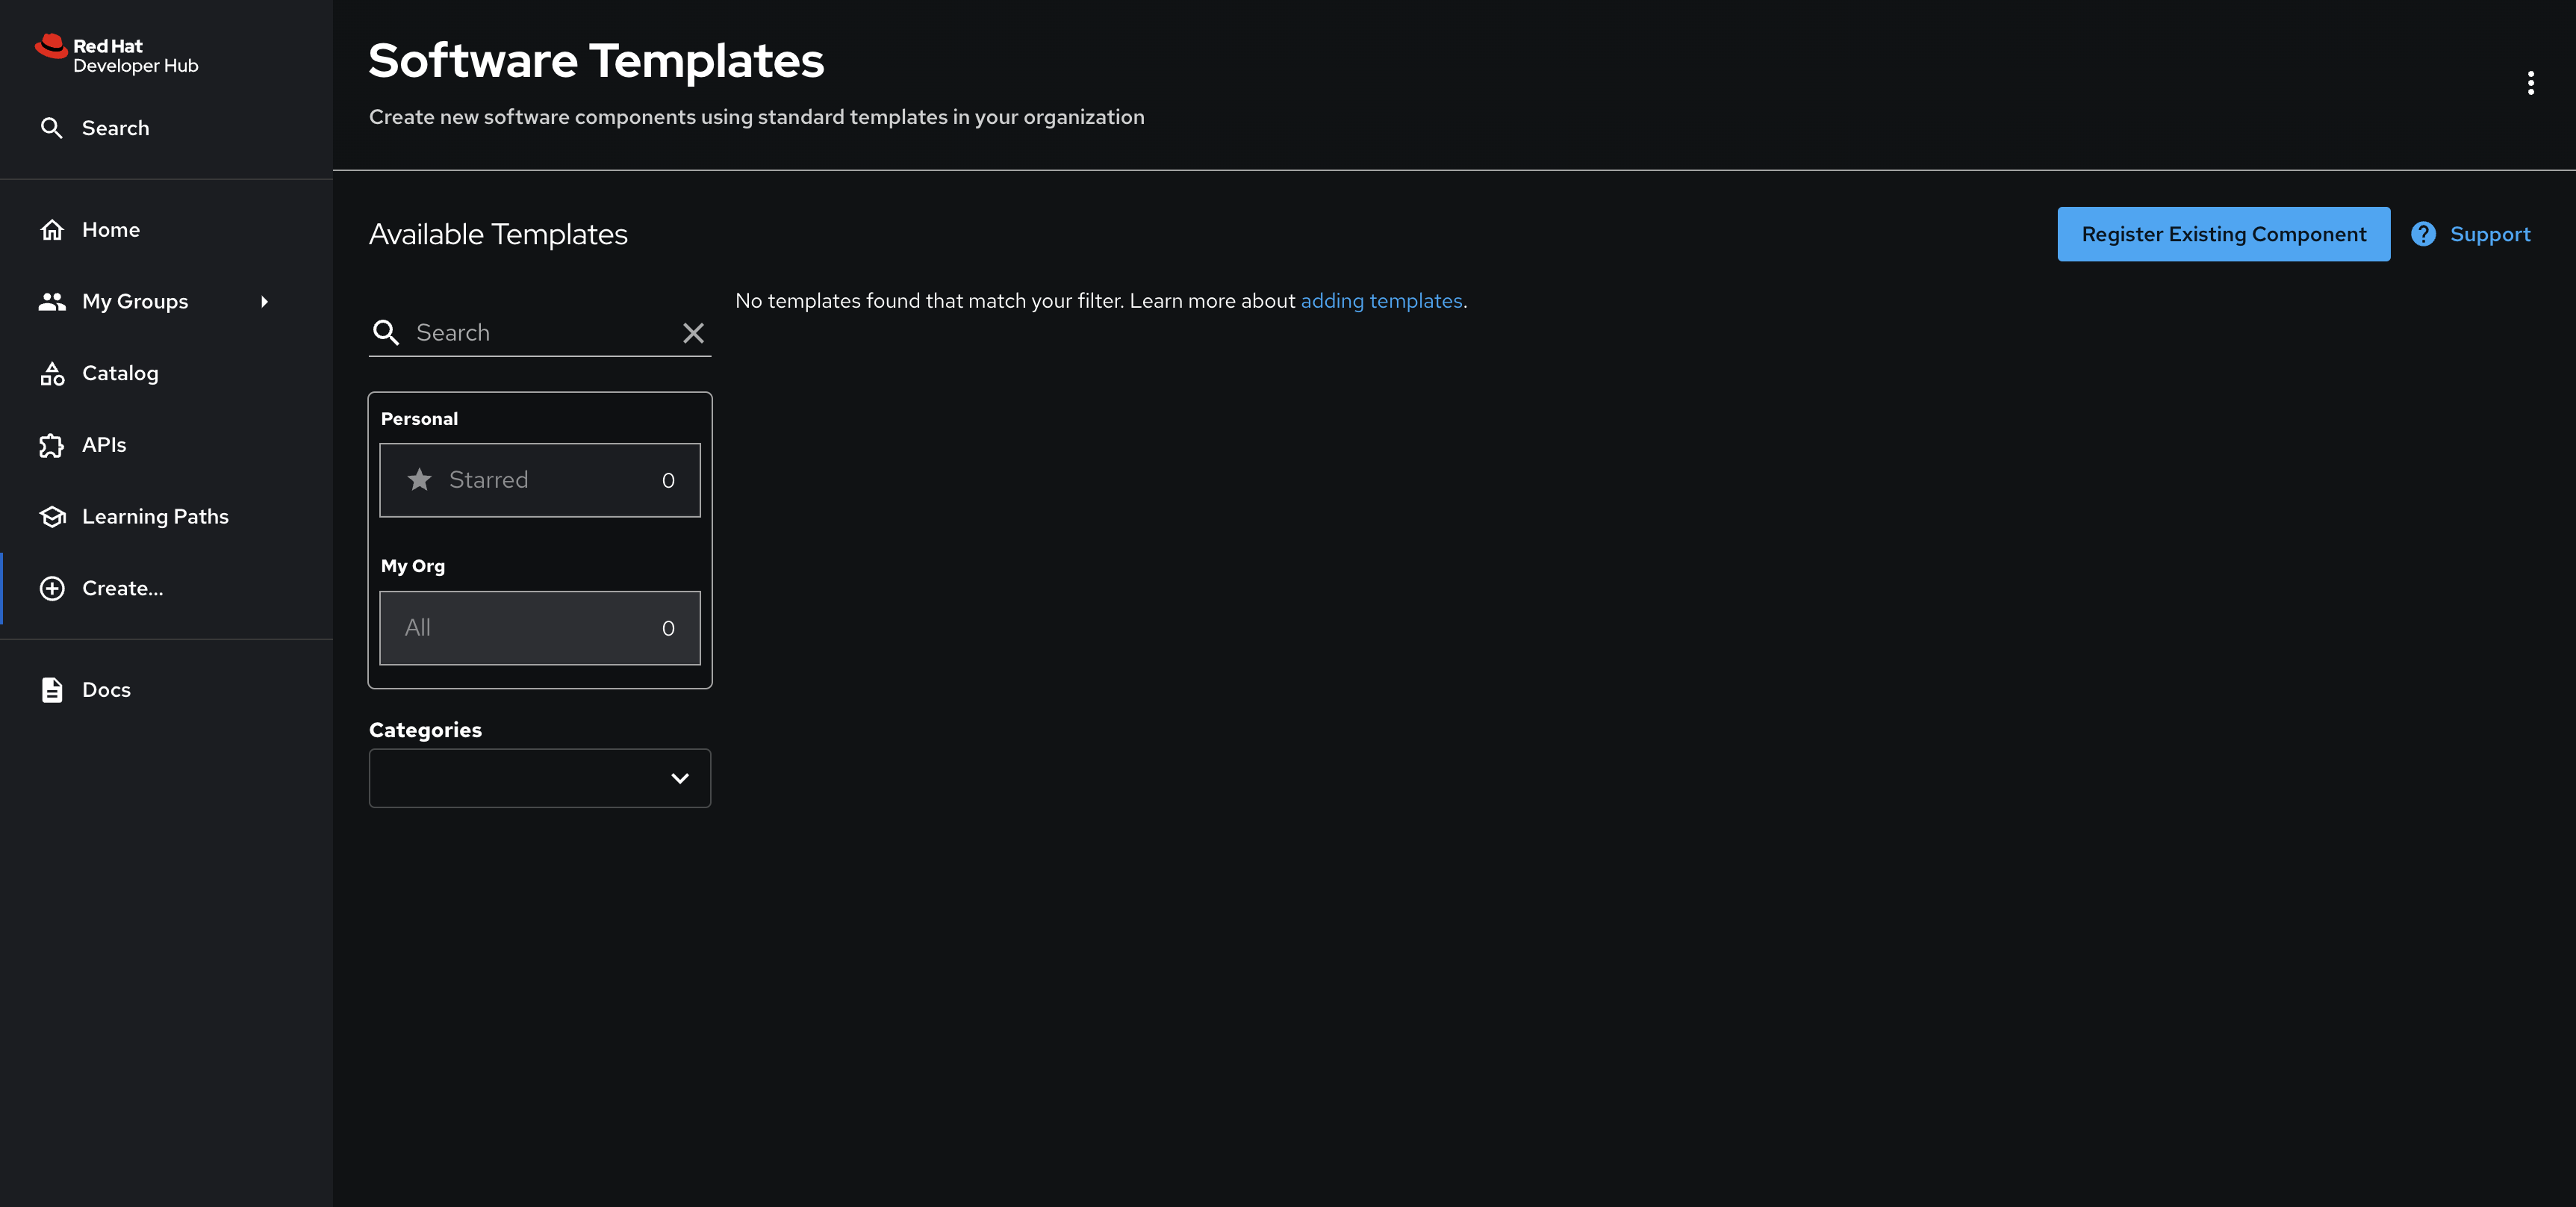
Navigate to the Create screen and confirm you can see the Register Existing Component button.
As a Developer
-
Logout from your pe1 user, and log back in as a developer with
dev1/{common_password}. -
You will not be able to see the Administration > RBAC menu, since developers are not assigned the
adminrole in the Red Hat Developer Hub configuration. -
Navigate to the Create screen.
-
Note that you cannot see the Register Existing Component button. You can still use the templates already created.
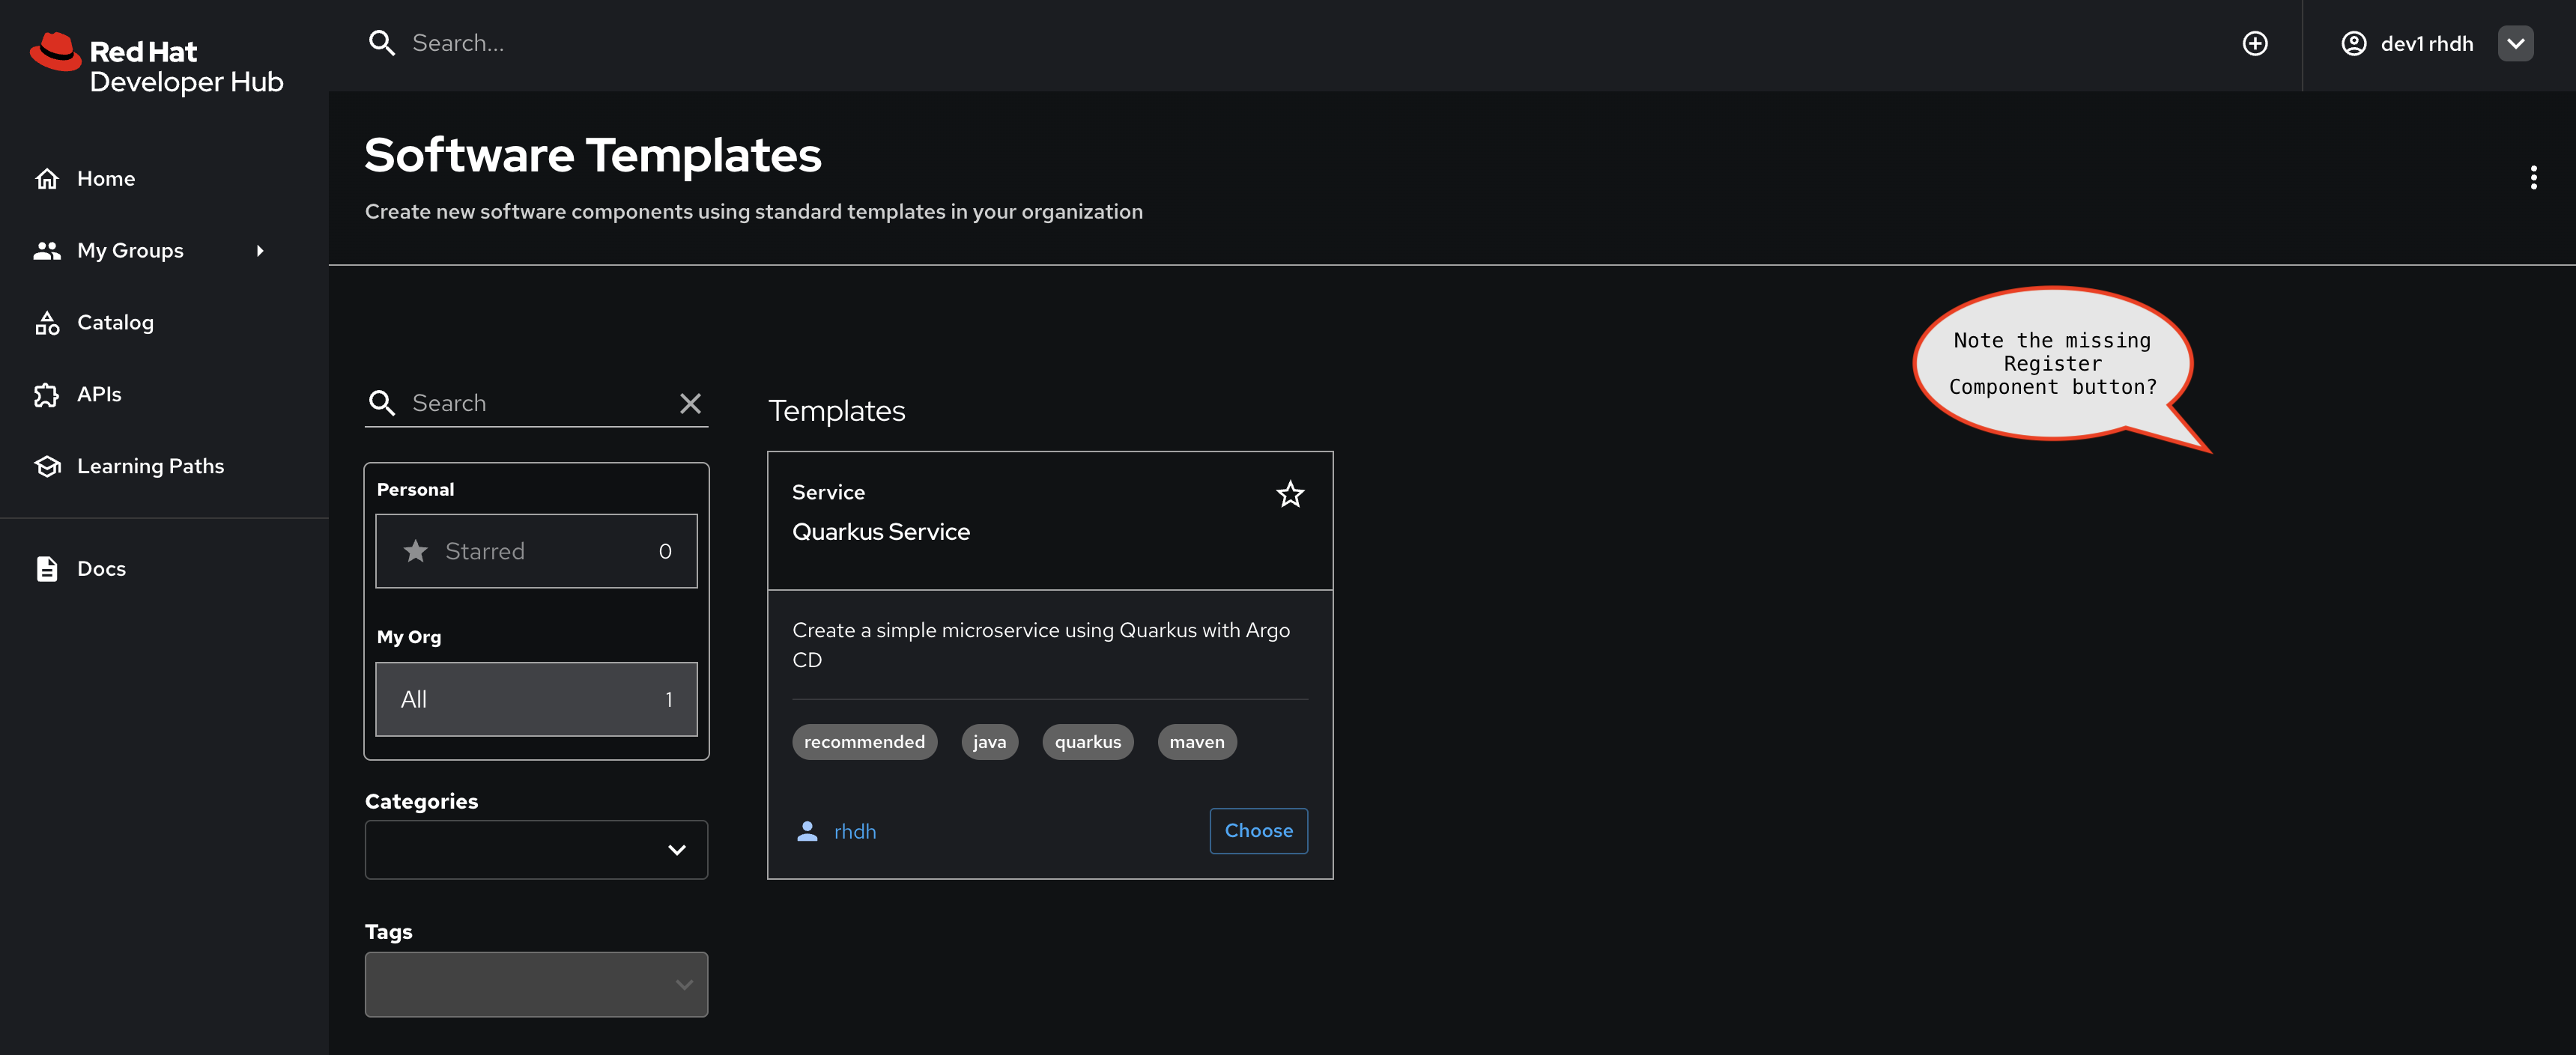
-
This is because, as we saw earlier, the RBAC policy has been setup to allow
catalog.entity.createonly forgroup:default/platformengineers
Conclusion
So far in this workshop we assumed that only Platform Engineers can create Catalog Entities, but without configuring RBAC policies any user can create, edit, and delete Entities. Using RBAC allows you to configure read/write access as it suits your organization.
For details on other ways to setup RBAC polices refer to the Authorization guide in the Red Hat Developer Hub documentation.
Module 4: Accelerate Developer Inner-Loop
Overview
Organizations need to provide a pathway for teams to import their existing services, APIs and resources to Red Hat Developer Hub. This module focuses on an opinionated way to onboard existing projects and applications so that developer teams can discover them through the internal developer portal.
Platform Engineering teams can create Software Templates that enable teams to import their apps into Red Hat Developer Hub. The Software Template can gather details about the component’s repository, documentation, dependencies, CI/CD, and various other details which allows development teams to accelerate their inner-loop of developing the assigned features and tasks.
Module Objectives
-
Platform Engineers create Software Templates and integrations that support importing existing software components from Git.
-
Developers use these Software Templates to import their existing software components and APIs.
-
Developer is assigned the task of enhancing an existing application, and creates a Git feature branch.
-
Developer uses Software Templates to setup an Ephemeral Development environment based on the feature branch.
-
Developer can rapidly develop and view actions performed right from Red Hat Developer Hub thereby reducing cognitive load.
-
Once code is ready, the Developer issues a PR from the feature branch to the upstream project repository. :imagesdir: ../../assets/images
Introduction to Concepts and Module Overview
Let’s look at a few concepts relevant to using Software Templates to import existing applications.
Catalog Info: A Refresher
You’ve already seen the magic of the catalog-info.yaml file. Red Hat Developer Hub can identify and import components based on the presence of a catalog-info.yaml file in the repository. This file contains:
-
Helpful links
-
Ownership information
-
Instructions on where to find the TechDocs
-
Relationships between the Component and other Entities
With the right plugins, configuration can be added to the catalog-info.yaml to show critical information in the Component view on Red Hat Developer Hub:
-
CI Pipelines
-
CD Deployments (as you saw with OpenShift GitOps already!)
-
Git Merge/Pull Requests and Issues
-
Cluster Details
-
API Documentation
What is Inner-Loop and Outer-Loop
Application development and deployment cycles can be defined to have an Inner-Loop and an Outer-Loop.
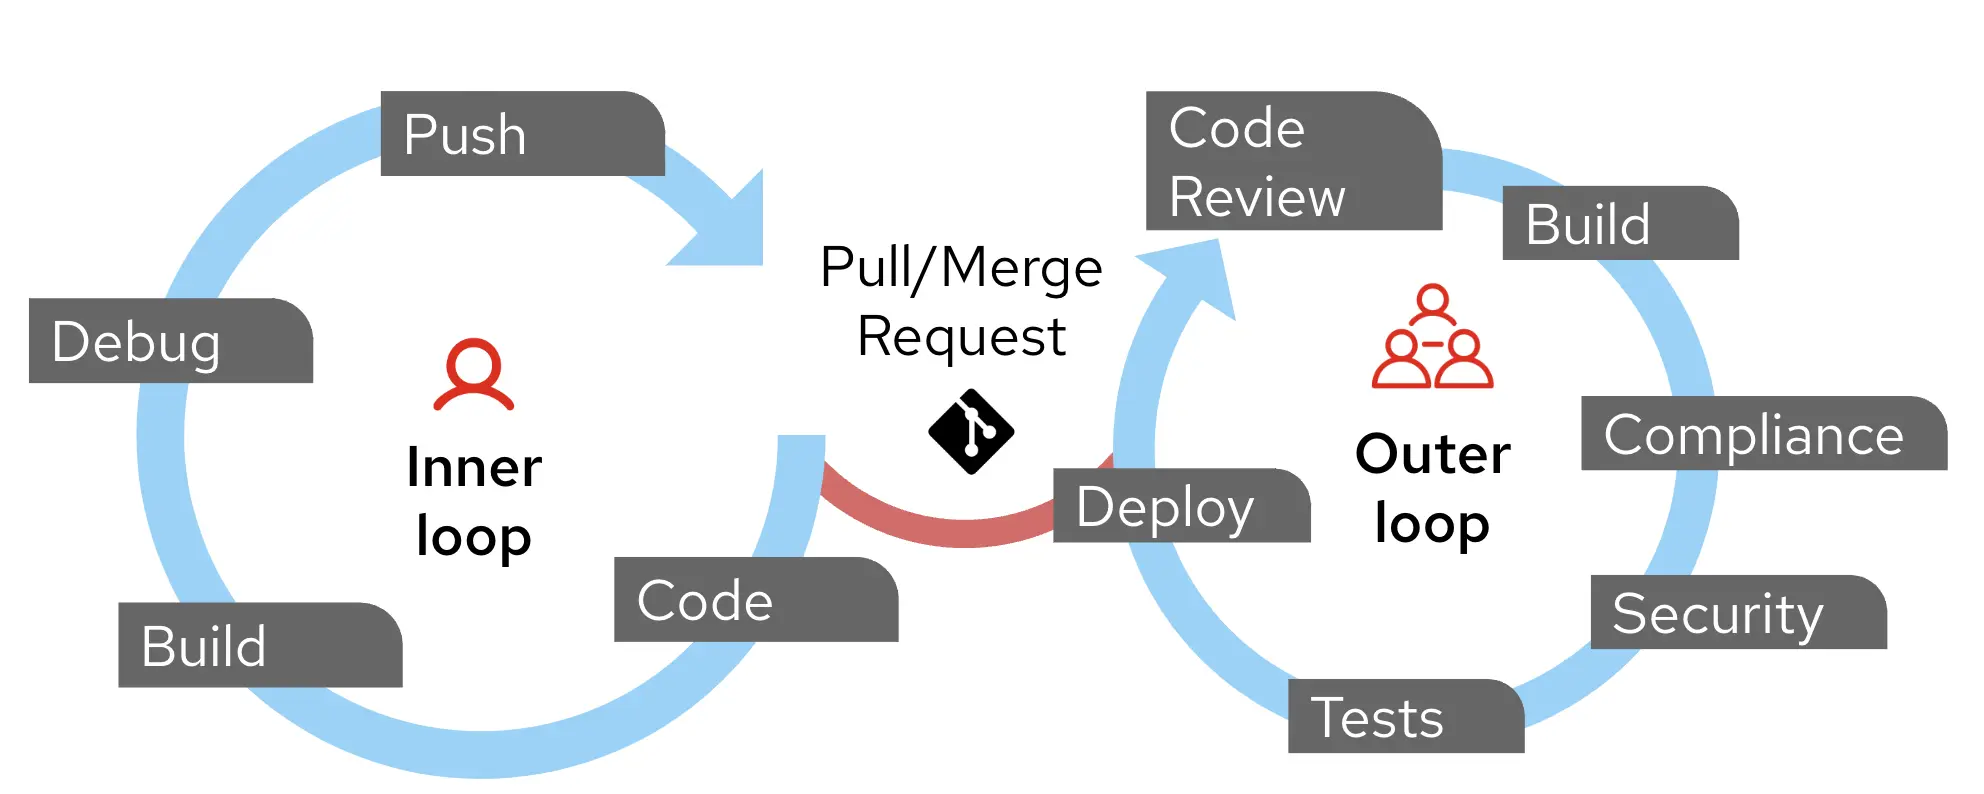
The Inner Loop is the iterative development cycle that developers follow when writing, testing, and debugging code locally before integrating it into a shared environment. Developers primarily live within the inner loop. In many organizations, the inner loop typically takes place on a developer’s computer. In this workshop the inner loop extends to an ephemeral (or preview) environment (namespace) on OpenShift that allows a developer to test their changes in a production-like environment.
| An Ephemeral environment is meant to be a transient environment to be used to build specific features, and can be torn down once the feature development is complete |
The Outer Loop begins when a developer pushes code to a version control system. It involves integration, validation, compliance and security checks, and deployment to target environments. Typically this is where Platform and DevOps Engineers operate.
The two cycles operate independently, except when the developer pushes code to Git, which triggers the outer loop.
An Opinionated Approach
| Different organizations have different ways of achieving the inner and outer loops. This module is a highly opinionated approach to the inner and outer loops. The primary intent is to showcase the art of the possible with Red Hat Developer Hub. |
To make the process of importing a large number of existing applications into Red Hat Developer Hub scalable, the Platform Engineering (PE) team creates a Software Template that automates both the creation of the catalog-info.yaml file and a TechDocs skeleton structure for developers.
The necessary Catalog Info and TechDocs could be stored in one of two locations for these existing applications:
-
The new files can be added to the same Git repository as the existing source-code.
-
Alternatively, a repository containing an Entity of
kind: Locationcan be created to store a collection of all of thecatalog-info.yamland TechDocs files. An Entity ofkind: Locationreferences other places to look for catalog data.
Parasol team’s approach
The Parasol team chooses the second approach to avoid adding files to existing source code repositories.
-
They create a dedicated repository called
all-location-parasolcontaining a Location file. -
This
Locationentity serves as a central index, referencing allcatalog-info.yamlfiles within the same repository.apiVersion: backstage.io/v1alpha1 kind: Location metadata: name: all-location-parasol description: A collection of Parasol components spec: type: url target: ./**/catalog-info.yaml -
Platform Engineers create Software Templates to import existing APIs, services and apps into Red Hat Developer Hub
-
Developers can register their components by using these Software Templates. The template auto creates a
catalog-info.yamlfile and a skeleton TechDocs for each component.
Red Hat Developer Hub can auto-discover these Location files based on the file and repository names (e.g all-location.yaml file in a folder which begins with the word all-location ) across Git. You can also configure a schedule that defines how often you want it to run. For this workshop we have a super short frequency of 15 seconds.
But, it is good practice to limit auto-discovery to specific filenames and be judicious with the scheduling frequency to ensure you don’t hit API rate limits with your Git hosting provider. Click here to learn more about GitHub rate limits.
all-location-entity:
    filters:
        branch: main
    entityFilename: all-location.yaml
    catalogPath: /**/all-location.yaml
    projectPattern: \b(all-location\w*)
    schedule:
        frequency:
            seconds: 15
        initialDelay:
            seconds: 15
        timeout:
            minutes: 3
An Overview of Parasol Application
The Developer is asked to build new features into the existing Parasol application which consists of the following Components:
-
parasol-webonline web-app (Node.js & Angular) -
parasol-storecore services (Quarkus) -
parasol-dbcore database (PostgreSQL) -
parasol-api(OpenAPI Spec)
In the next sections of this module, we will shadow both the Platform Engineers and Developers as they navigate through onboarding existing applications and accelerate the inner-loop leading to increased developer productivity. :imagesdir: ../../assets/images
Platform Engineer Activity: Setup Software Templates to Import Existing API/Apps
As mentioned in the previous section, the Platform Engineering team created two Templates for importing existing applications/services (Components), and APIs into Red Hat Developer Hub. While it is possible to use the same template to import both of them, there are some key differences in the data that must be gathered for API and Component Entities.
Please make sure to log in as a Platform Engineer with pe1 / {common_password}. Refer to the below guide for assistance.
|
Click to learn how to login as a Platform Engineer
Login as Platform Engineer
You will perform this activity as a Platform Engineer. Please follow the below steps to logout from Red Hat Developer Hub and GitLab, and login back as a Platform Engineer (pe1 / {common_password})
-
Logout from Red Hat Developer Hub
-
Sign out of Red Hat Developer Hub from the Profile dropdown as shown in the screenshot below.
-
-
Logout from GitLab
-
Click on the Profile icon, and Sign out from the dropdown as shown in the screenshot below.
-
-
Login back as a Platform Engineer to Red Hat Developer Hub and GitLab using the credentials
pe1/{common_password}
Register the Import API and Component Templates
Software Template Overview
You learned how to create and import Software Templates using the Red Hat Developer Hub UI in module 3. In this section, you’ll import Templates that have been pre-built for you by adding them directly to the catalog.locations configuration in your values.yaml file instead of using the UI registration wizard.
The two Software Templates you’ll be importing are:
-
import-existing-api - Available in the import-existing-api-template/template.yaml file in GitLab
-
import-existing-app - Available in the import-existing-app-template/template.yaml file in GitLab
The import-existing-api template does the following:
-
Gather details of the API (GitLab org name, repo name) as template parameters.
-
Creates a Merge Request to create the new catalog-info.yaml and TechDocs files, which will register the API in the Software Catalog once merged.
The import-existing-app template does the following:
-
Gather details of the new Component to be created (Git repository for the Component, the catalog info, etc.)
-
Creates a Merge Request to create the new catalog-info.yaml and TechDocs files, which will register the Component in the Software Catalog once merged.
Add Templates to Catalog Configuration
-
Visit your rhdh/developer-hub-config repository on GitLab. If prompted, login with
pe1/{common_password}. -
You should already be in Edit mode of the
values.yamlfile if you clicked the link above. -
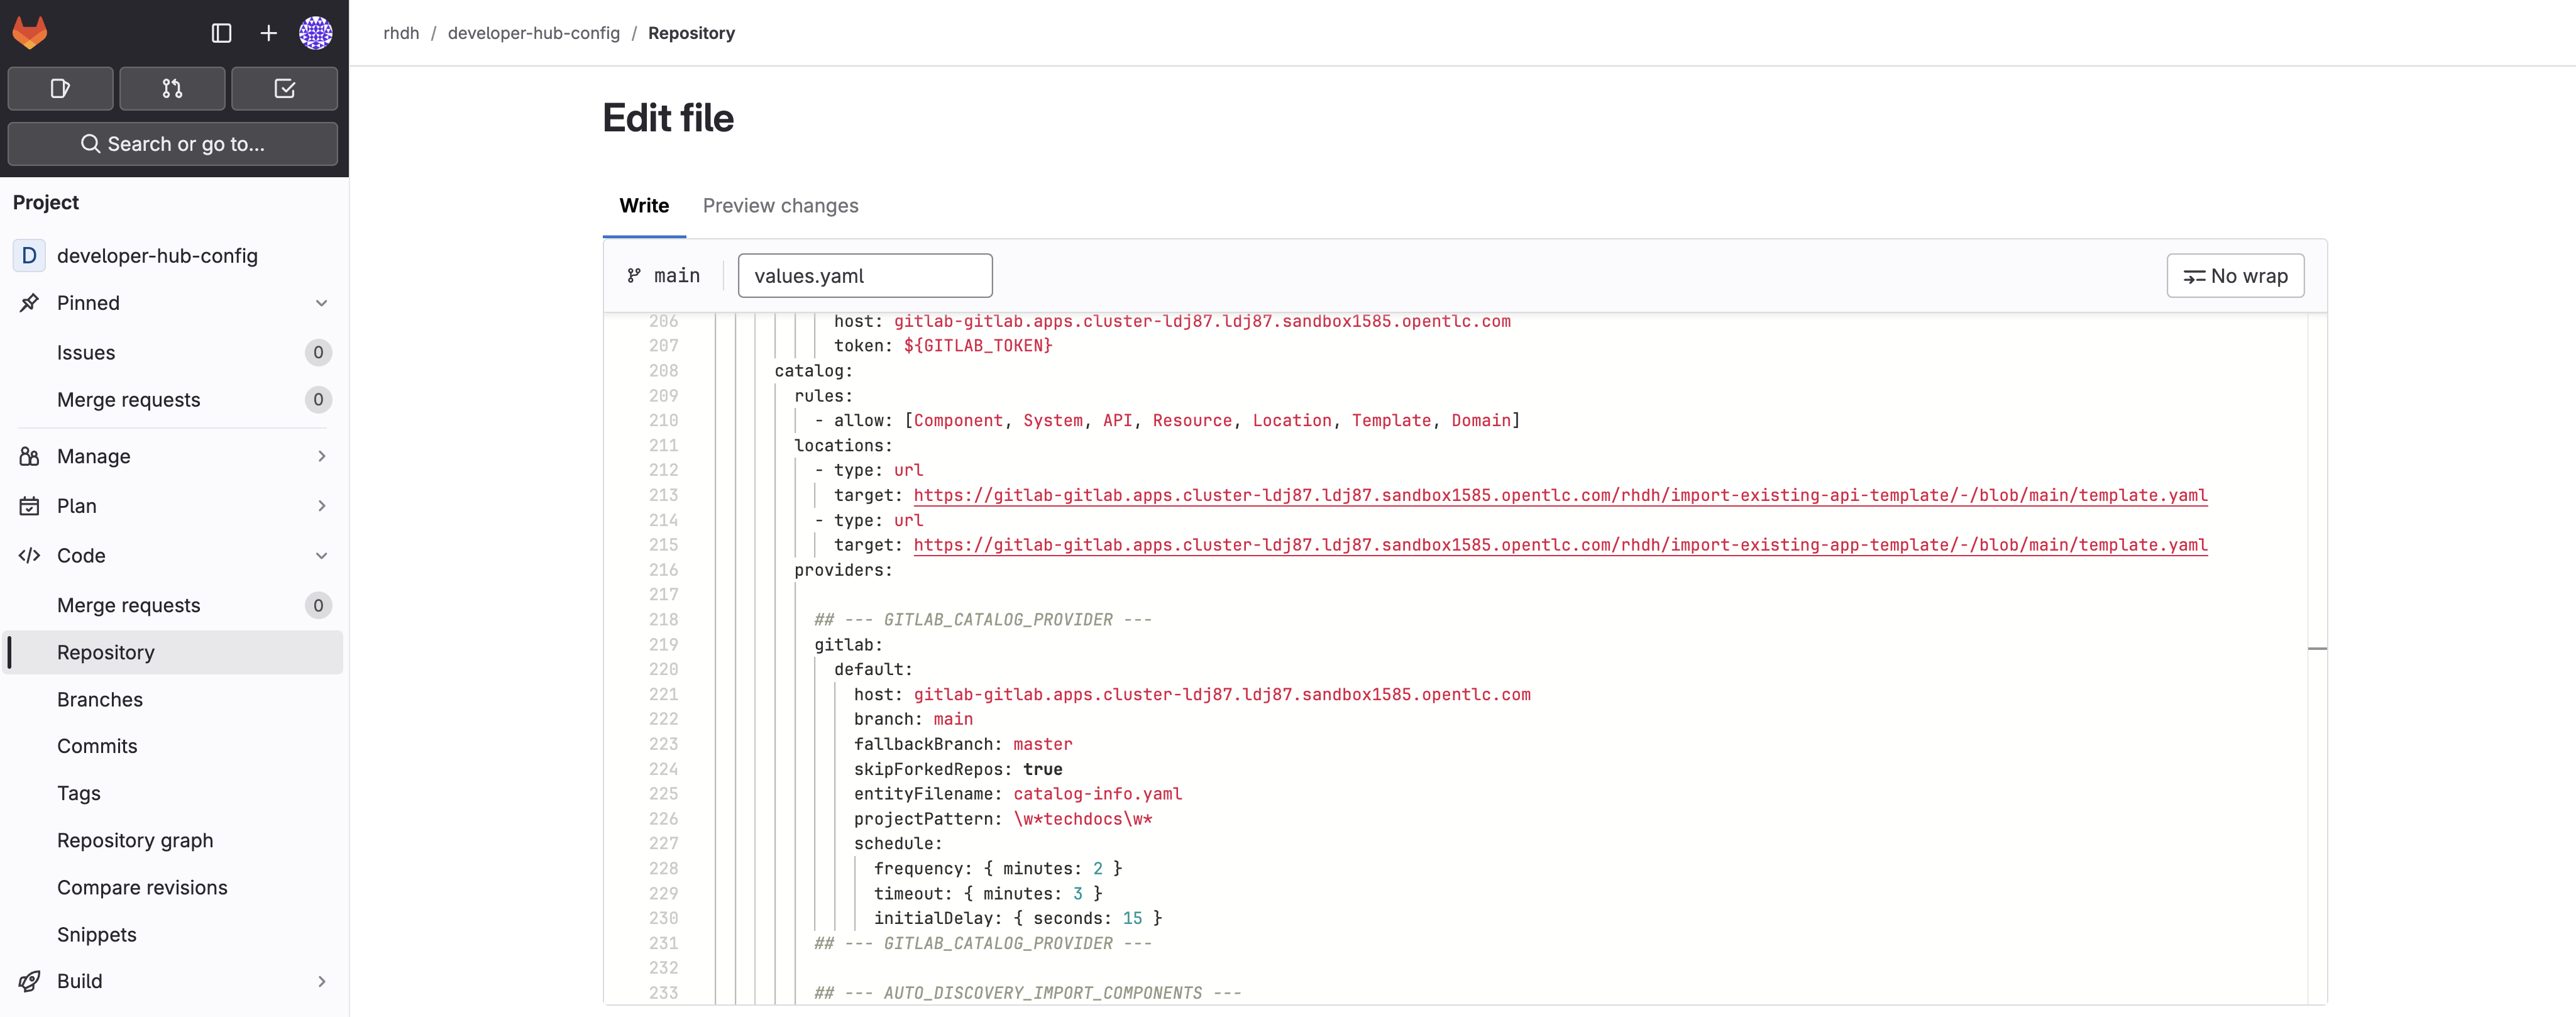
Locate the
catalog:section and find thelocations:array. -
Add the following two new entries to the
locations:array to import both Software Templates:catalog: locations: - type: url target: https://gitlab-gitlab.{openshift_cluster_ingress_domain}/rhdh/import-existing-api-template/-/blob/main/template.yaml - type: url target: https://gitlab-gitlab.{openshift_cluster_ingress_domain}/rhdh/import-existing-app-template/-/blob/main/template.yamlMake sure to maintain proper YAML indentation and alignment with the existing locations:entries. -
Don’t commit the changes yet - you need to also enable the required dynamic plugins for these templates to function properly.
Your changes in GitLab should resemble the following screenshot.
Setup GitLab Entity Auto-Discovery
The new templates require plugins to function, and ensure the newly created Entities are detected by Red Hat Developer Hub:
-
backstage-plugin-catalog-backend-module-gitlab-dynamic to enable auto-discovery of
catalog-info.yamlfiles. -
immobiliarelabs-backstage-plugin to create Merge Requests using the GitLab API.
Enable the Plugins
-
Visit your rhdh/developer-hub-config repository on GitLab. If prompted, login with
pe1/{common_password}. -
You should already be in Edit mode of the
values.yamlfile. -
Locate the comment
--- DYNAMIC_PLUGINS_IMPORT_COMPONENTS --- -
Highlight the YAML section shown in the below screenshot, and uncomment those lines. Use
CMD + /orCTRL + /to do so.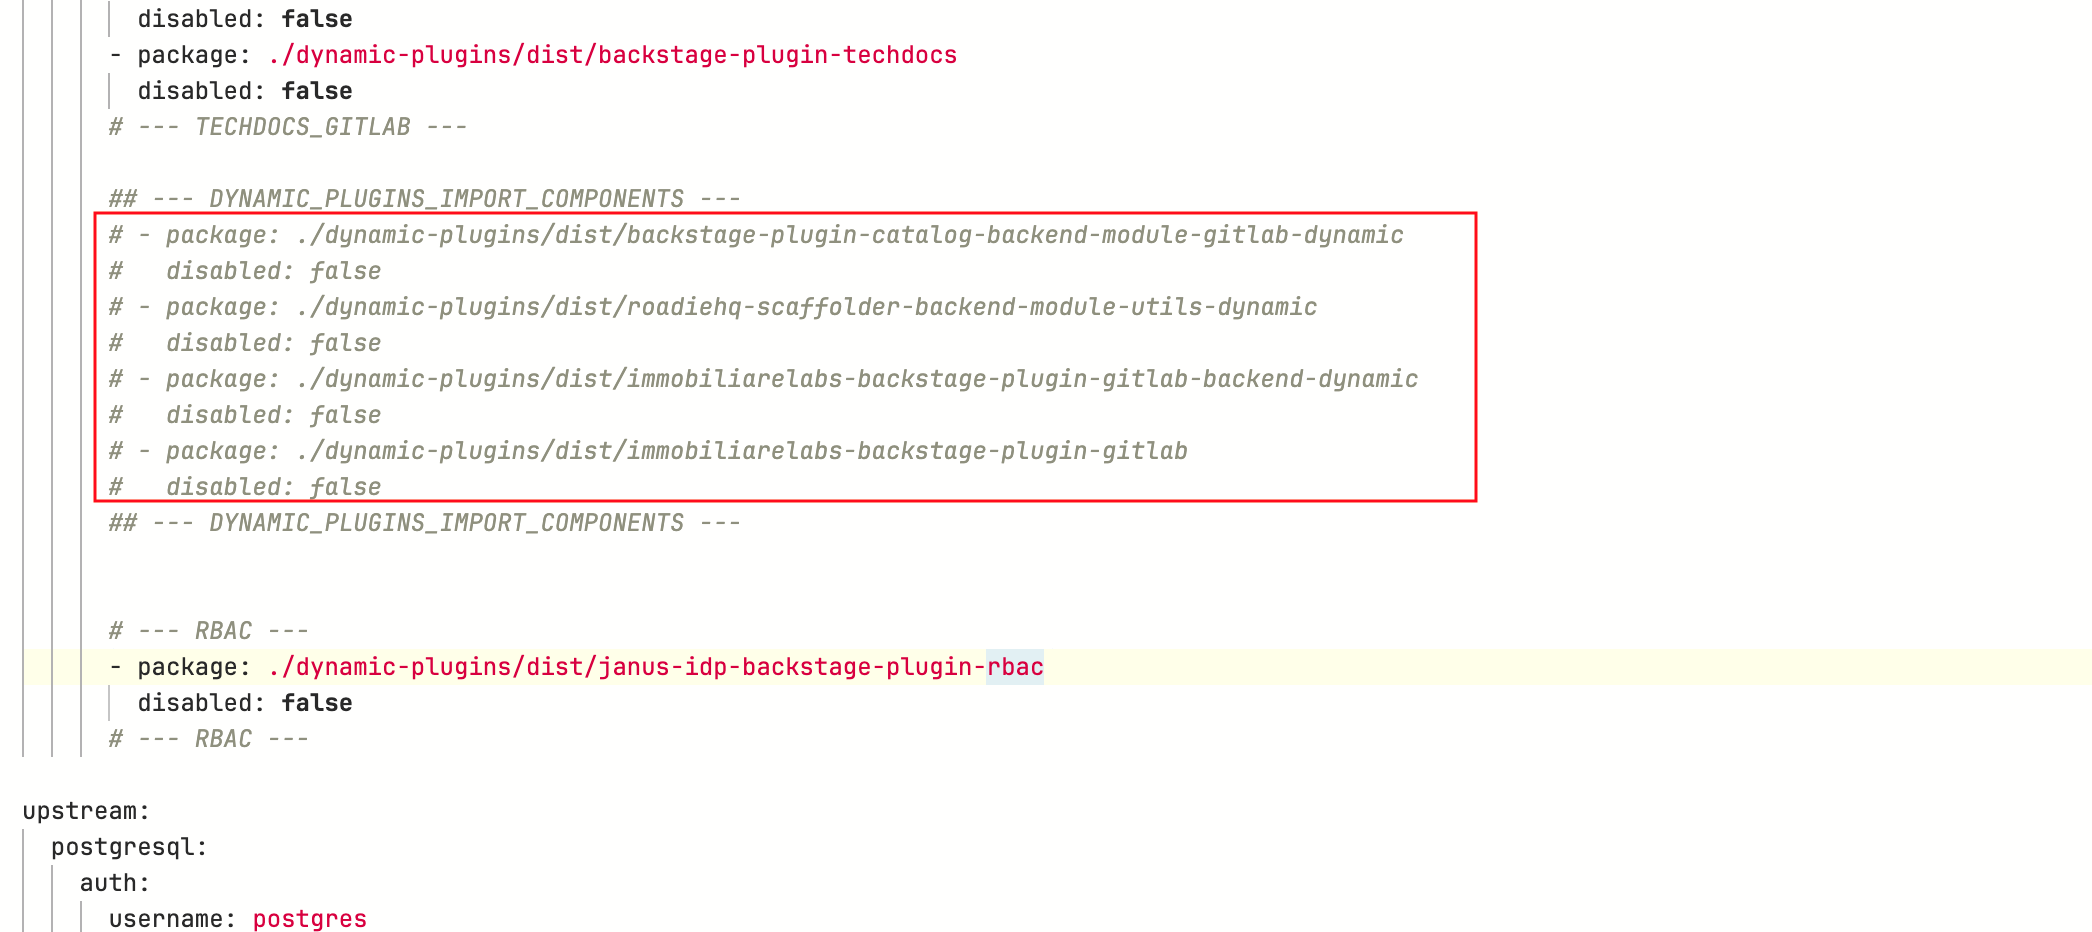
-
Don’t commit the changes yet - you need to also enable auto-discovery.
Enable Auto-Discovery
-
Locate the comment
--- AUTO_DISCOVERY_IMPORT_COMPONENTS ---in the samevalues.yamlfile. -
Highlight the YAML as shown in the below screenshot, and uncomment those lines.
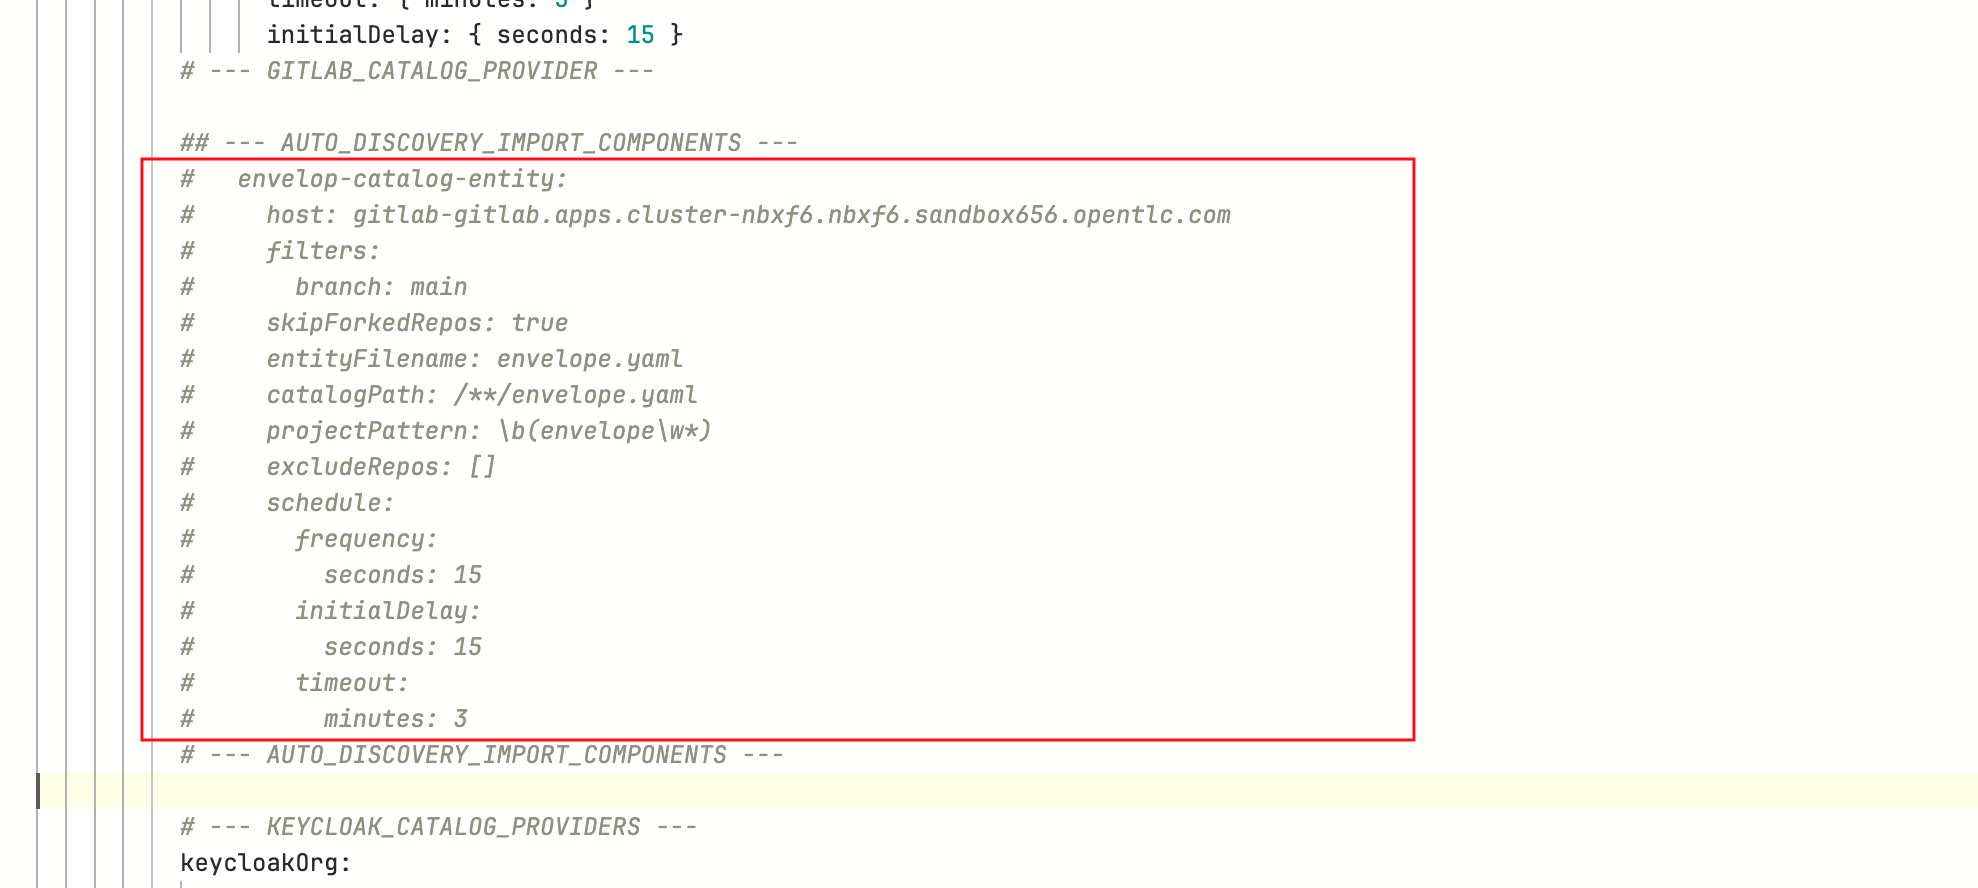
This YAML snippet enables auto-discovery for all files named all-location.yaml (the entityFilenameoption) where the repo name starts with the word all-location (theprojectPatternoption). -
Scroll down and enter a commit message
feat: Enable GitLab plugin and component auto discovery. -
Commit the file now using the Commit Changes button at the bottom of the page.
-
Refresh the
backstageApplication to rollout the new Red Hat Developer Hub configuration - login asadmin/{openshift_gitops_password}. Wait until the Application turns green and marked as Healthy.
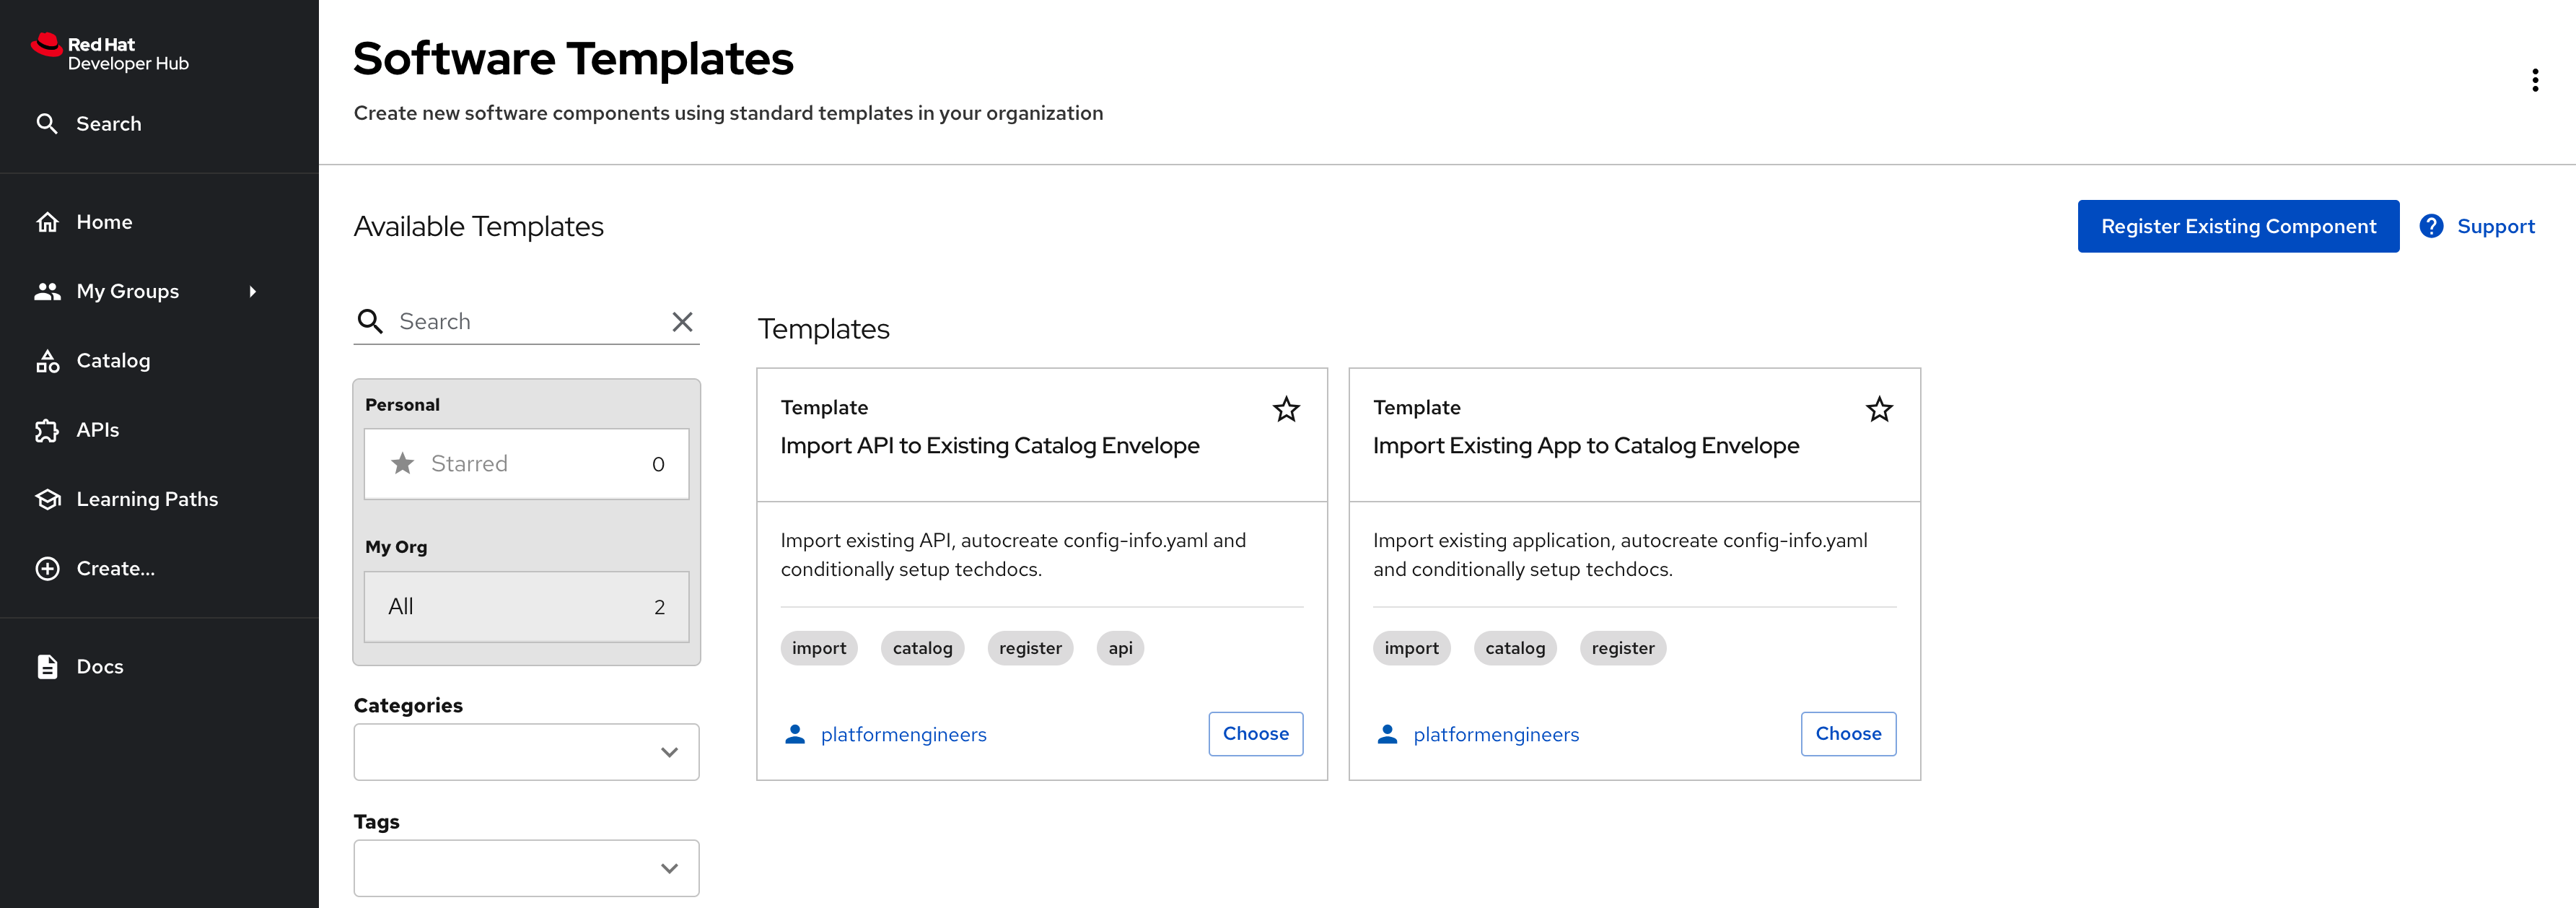
View the Imported Templates
After you complete the configuration in the following sections and commit your changes, you can verify the templates are available by navigating to the Create screen. You should see both templates for importing APIs and applications to Red Hat Developer Hub.
Onboard Parasol’s System and Domain
In a previous chapter you learned how System and Domain Entities help organize and provide a hierarchy of Components in Red Hat Developer Hub. In this section you will setup Parasol’s System and Domain.
-
From Red Hat Developer Hub, navigate to Create screen; choose Register Existing Component button
-
Paste the below URL and click on Analyze
https://gitlab-gitlab.{openshift_cluster_ingress_domain}/rhdh/rhdh-entities/-/blob/main/locations.yaml -
Click Import in the Review section.
-
The Systems and Domain are setup.
|
Systems are the basic level of encapsulation for related entities. Domains are useful to group a collection of Systems that share terminology, domain models, business purpose etc. |
Developer Activity: Import API and Component
In this module, you will import an existing API and an existing application (Component) using the Software Templates that were setup by the Platform Engineer in the previous section.
Please make sure to log in as a Developer with dev1 / {common_password}.
|
Click here to view instructions to login as a Developer.
Login as Developer
-
You will perform this activity as a Developer.
-
Logout from Red Hat Developer Hub
-
Click the dropdown in the top-right of Red Hat Developer Hub, then click on the Logout link.
-
-
Logout from GitLab
-
Click on the Profile icon, and Sign out from the dropdown as shown in the screenshot below.
-
-
Login back as a Developer to to Red Hat Developer Hub and GitLab using the credentials
dev1/{common_password}
Import Parasol Store OpenAPI
-
Select the
icon on the top navigation bar to access the Self-service menu, and click the Choose button on the Import Existing API Template.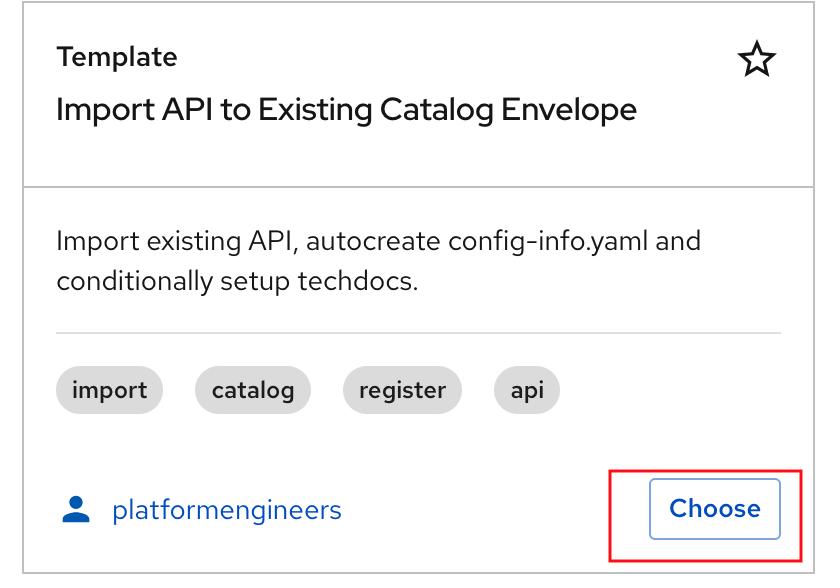
-
You will be presented with the Software Template wizard.
A number of these fields have been prepopulated with default values for convenience. In reality, developers will need provide almost all of the values that are needed to import existing apps/APIs.
-
Step 1: Information about your existing API. Fill out the following values and click Next.
Field Description Value GitLab hostname
Keep default value
https://gitlab-gitlab.{openshift_cluster_ingress_domain}
GitLab Organization of Existing API
Keep default value
parasolRepository name of Existing API
Keep default value
parasol-store-apiAPI specification path
Enter full path of the API
https://gitlab-gitlab.{openshift_cluster_ingress_domain}/parasol/parasol-store-api/-/blob/main/openapi.yaml
Type Of API
Keep default value
openapi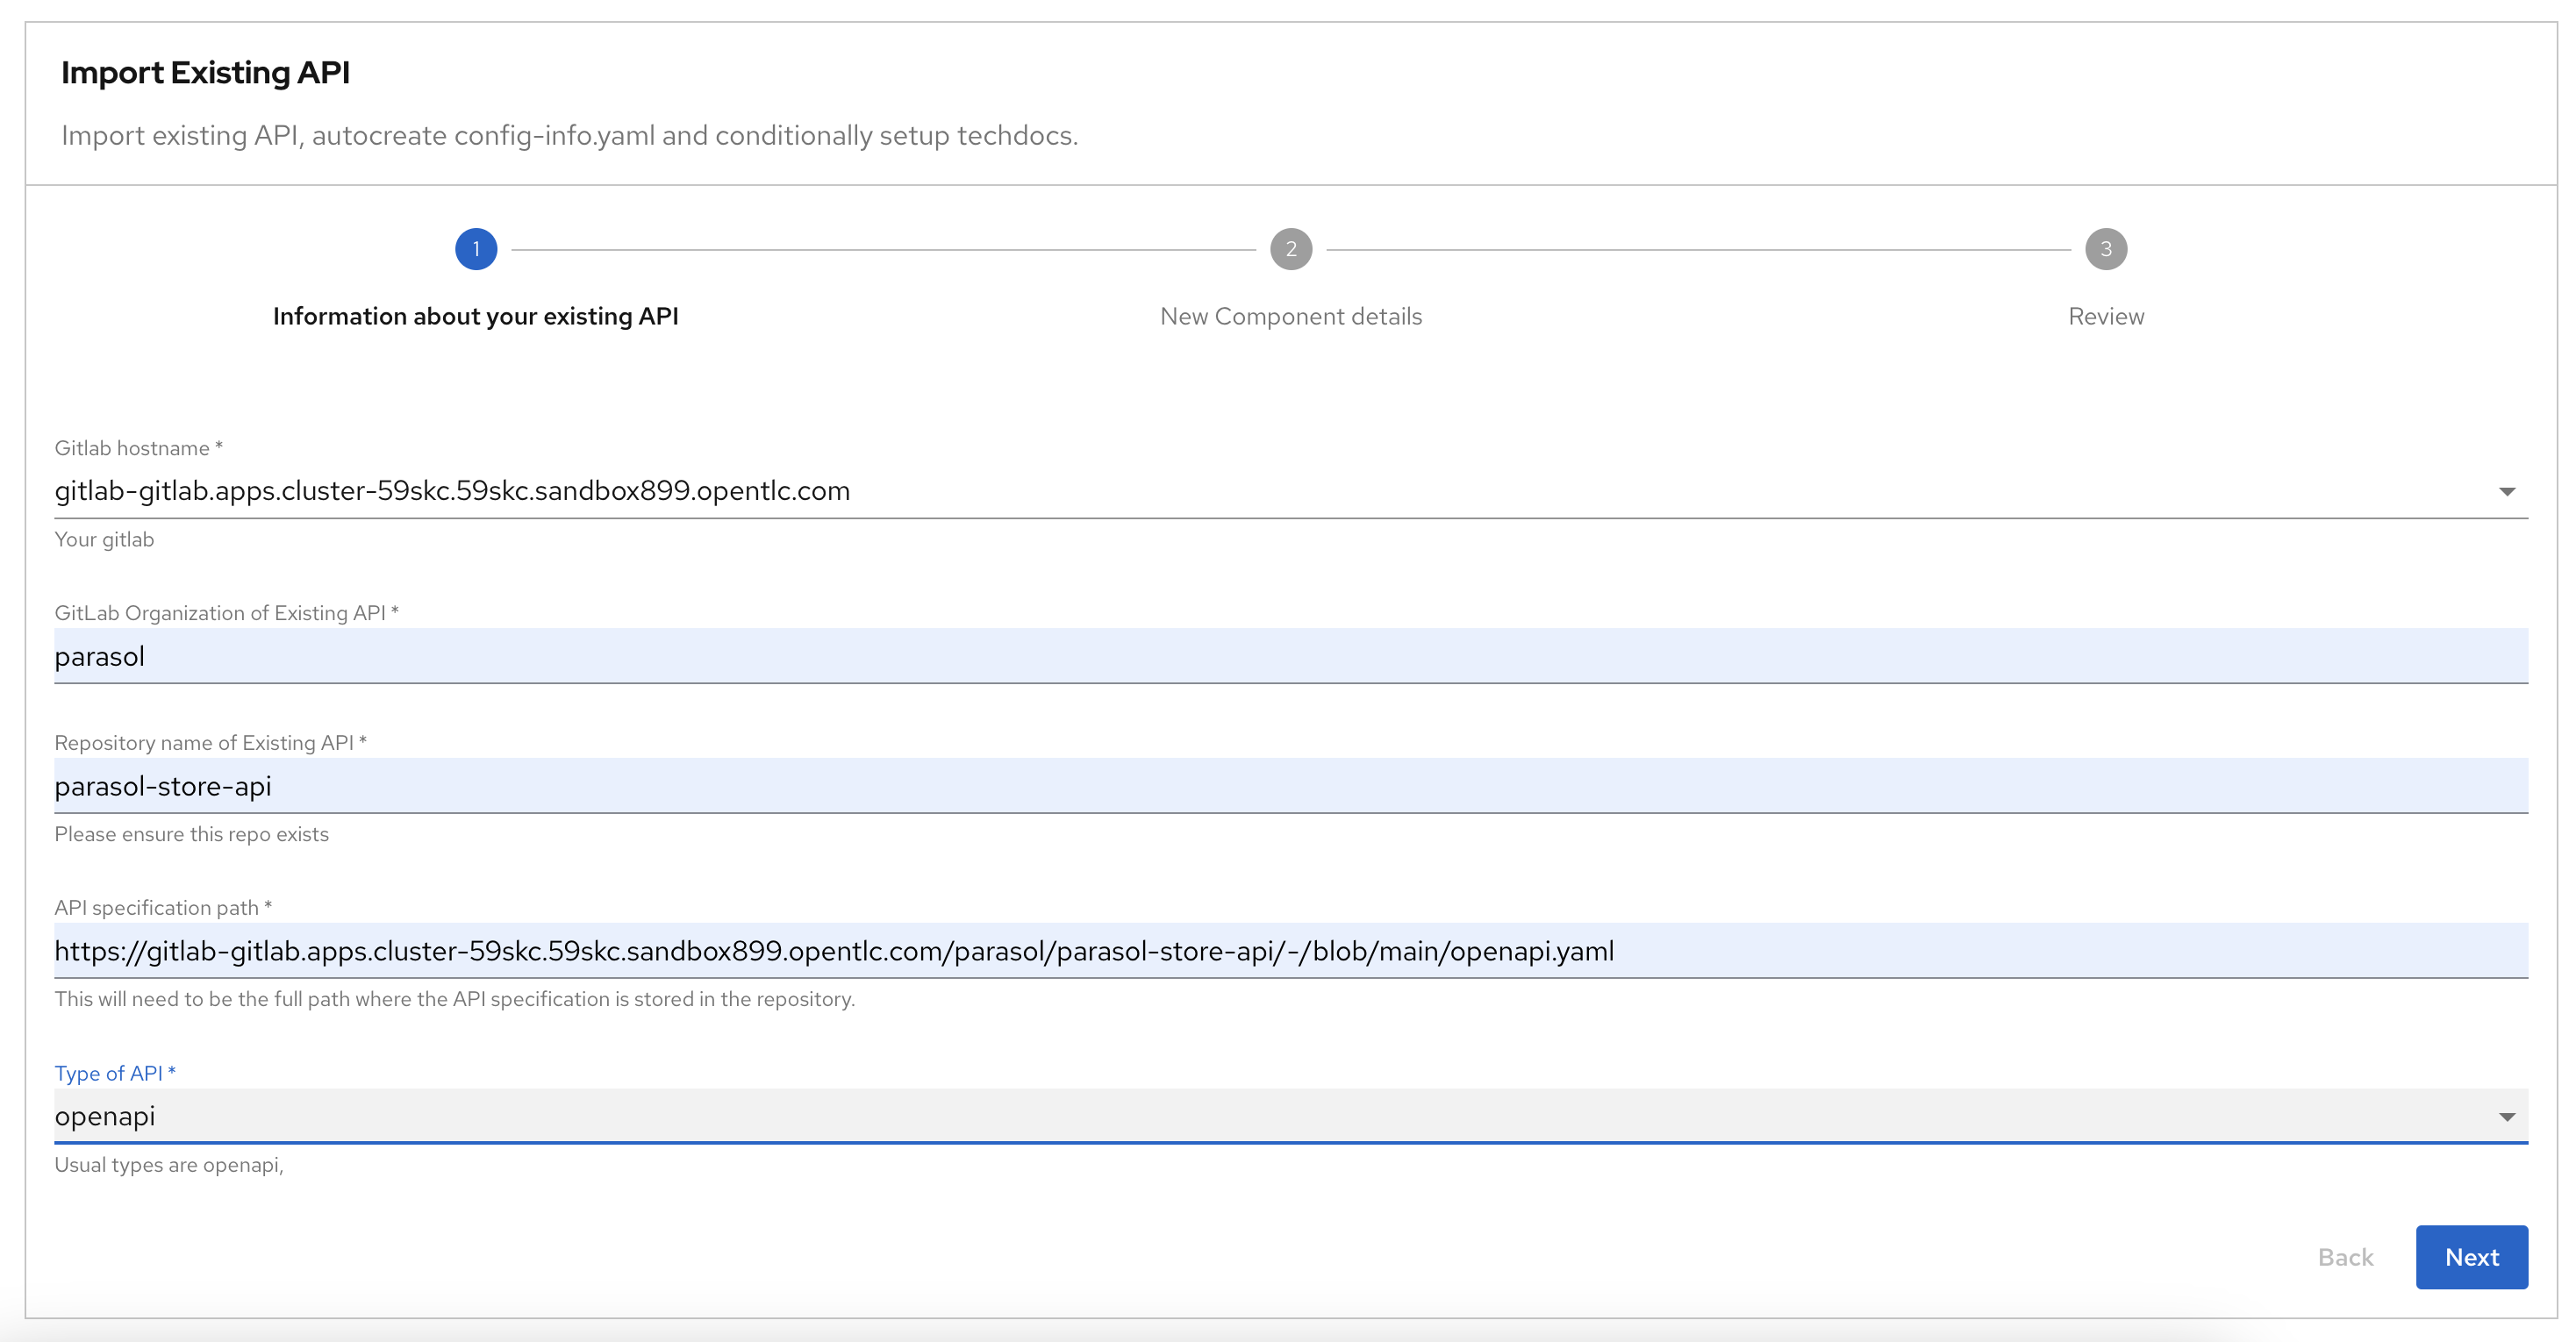
-
Step 2: New Component details.
Provide information about the new component you are registering. Fill out the following values and click ReviewField Description Value Component GitLab Organization
Keep default value
parasolComponent Repository name
Keep default value
all-location-parasolComponent Name of API
Keep default value
parasol-store-apiSystem Name
Choose from dropdown
system:default/parasol-systemOwner
Keep default value
user:default/dev1A Short Description Of This Component
Enter a suitable description
Open API specification for the parasol-store applicationLifecycle
Enter value. Can be any lifecycle value, but take great care to establish a proper taxonomy for these. (Well-known values
experimental,productionanddeprecated)production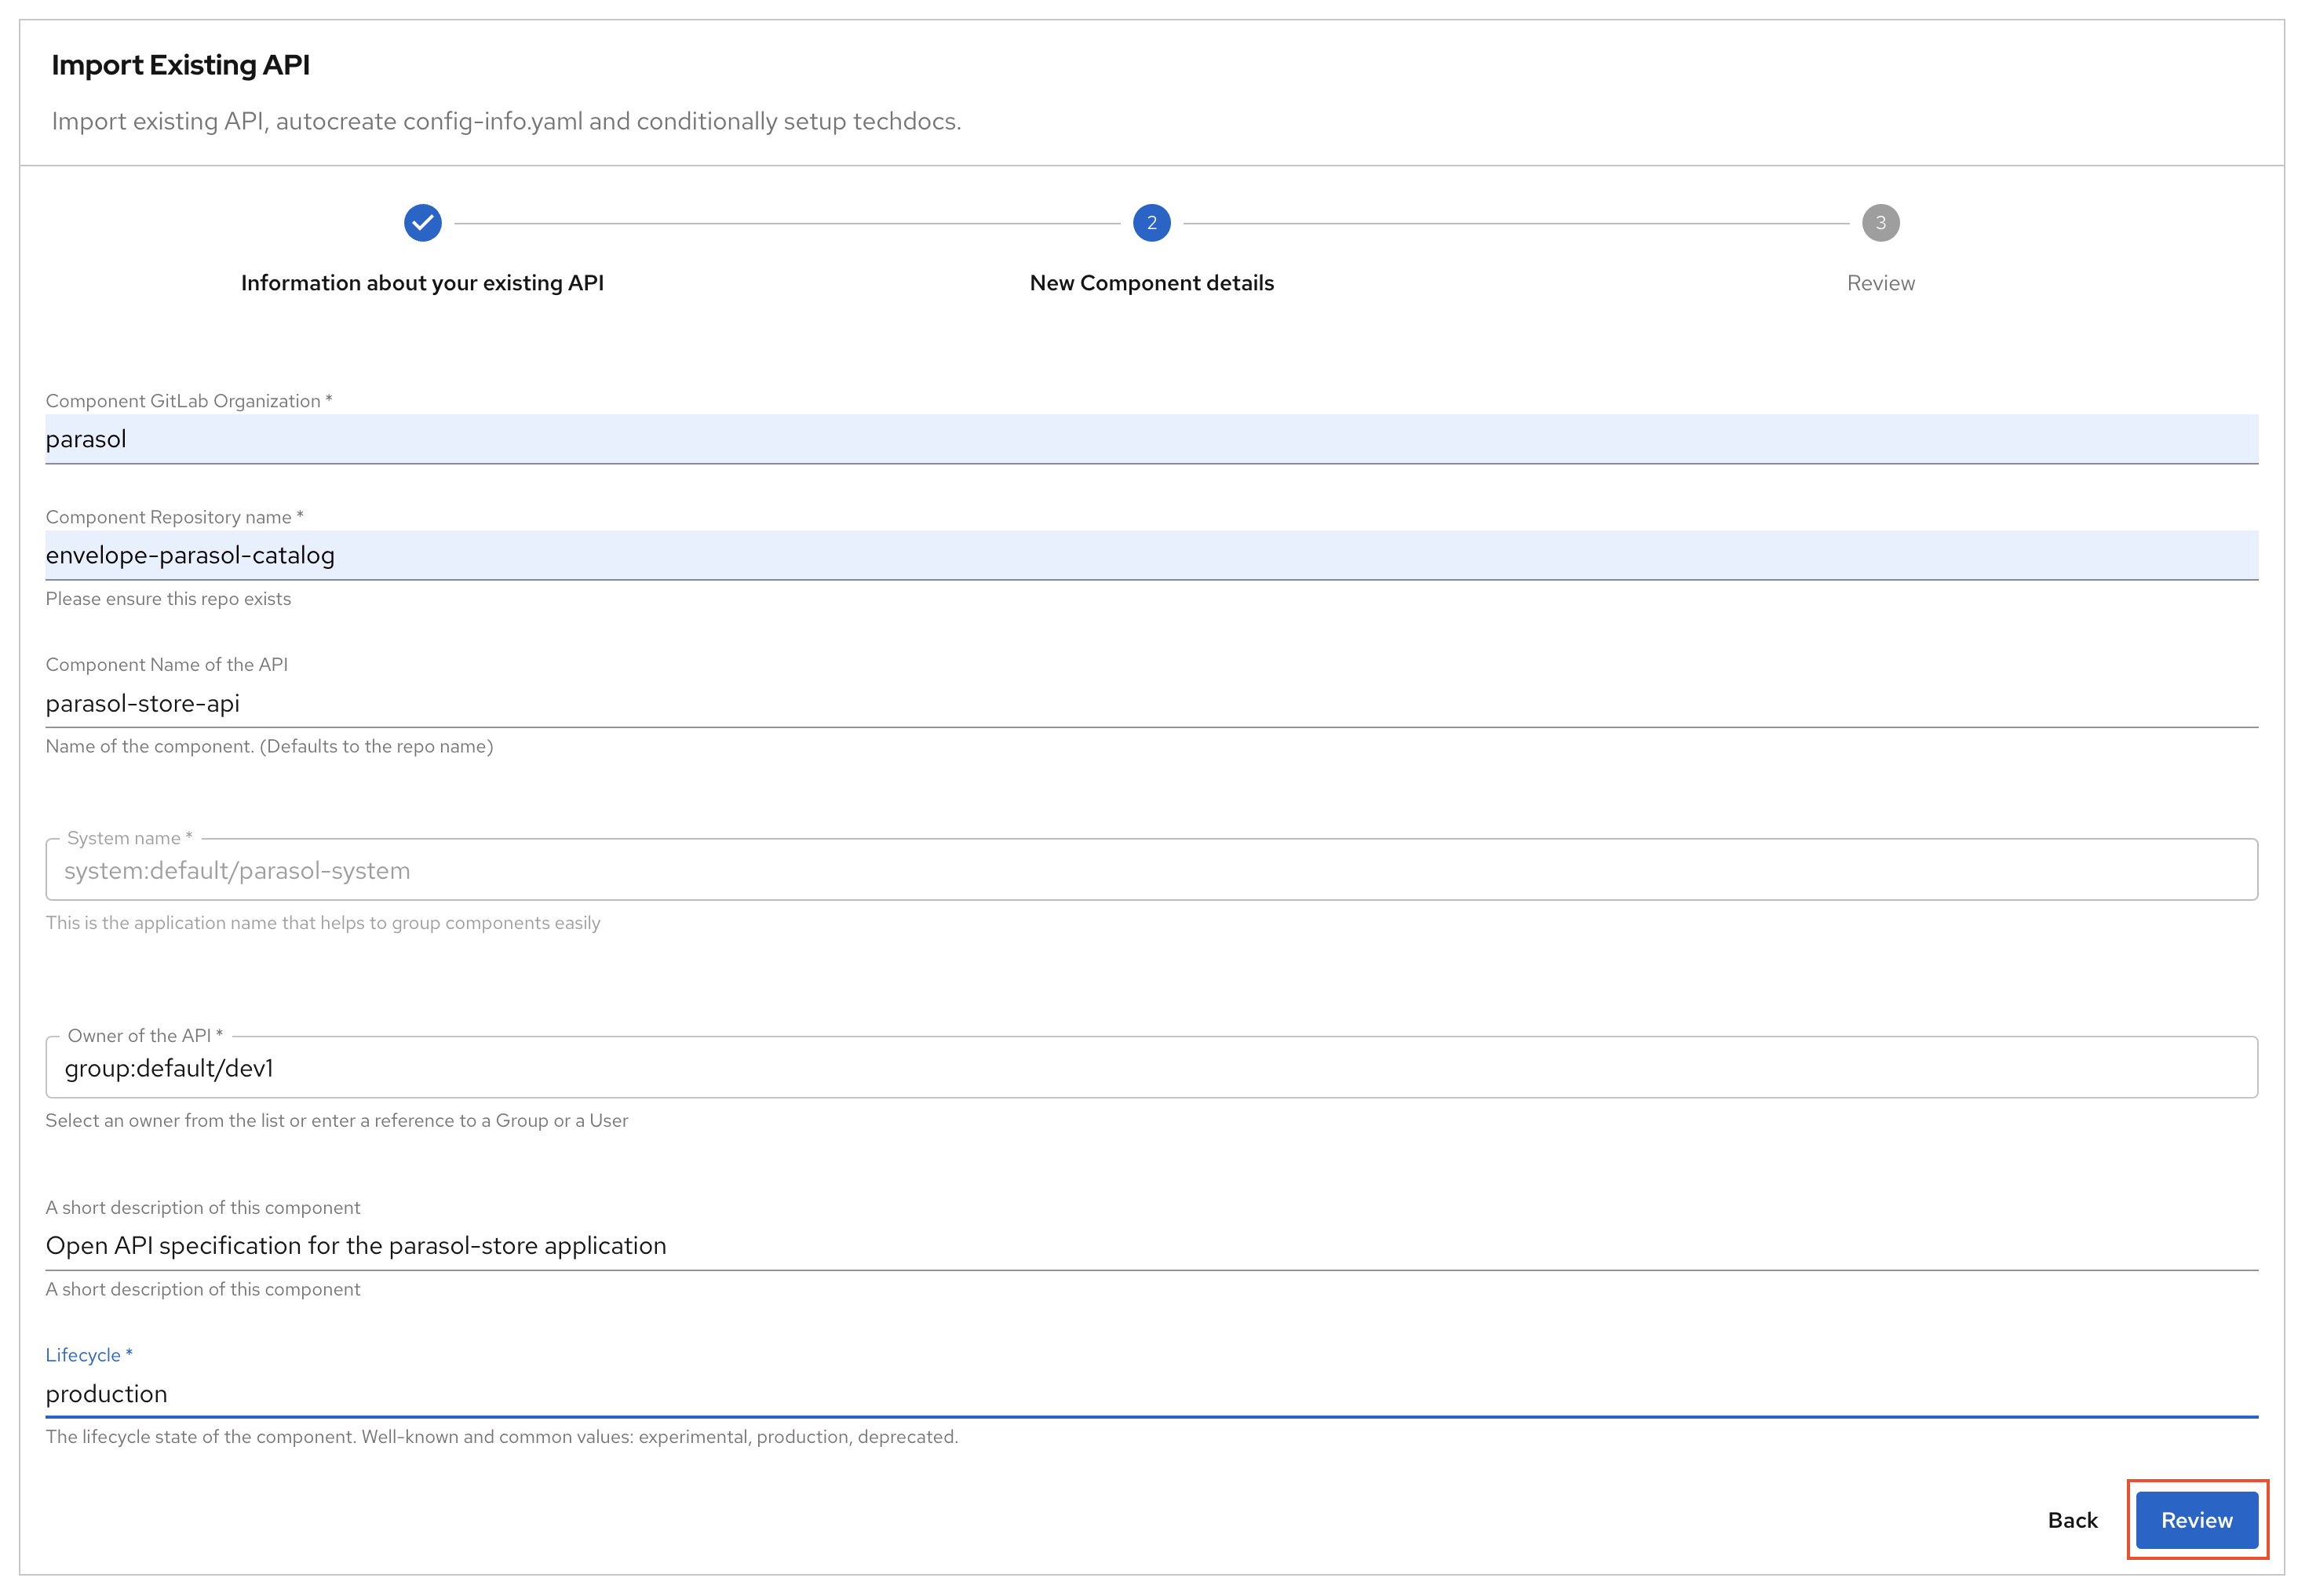
-
Step 3: Review & Create.
Review the fields, and click on the Create button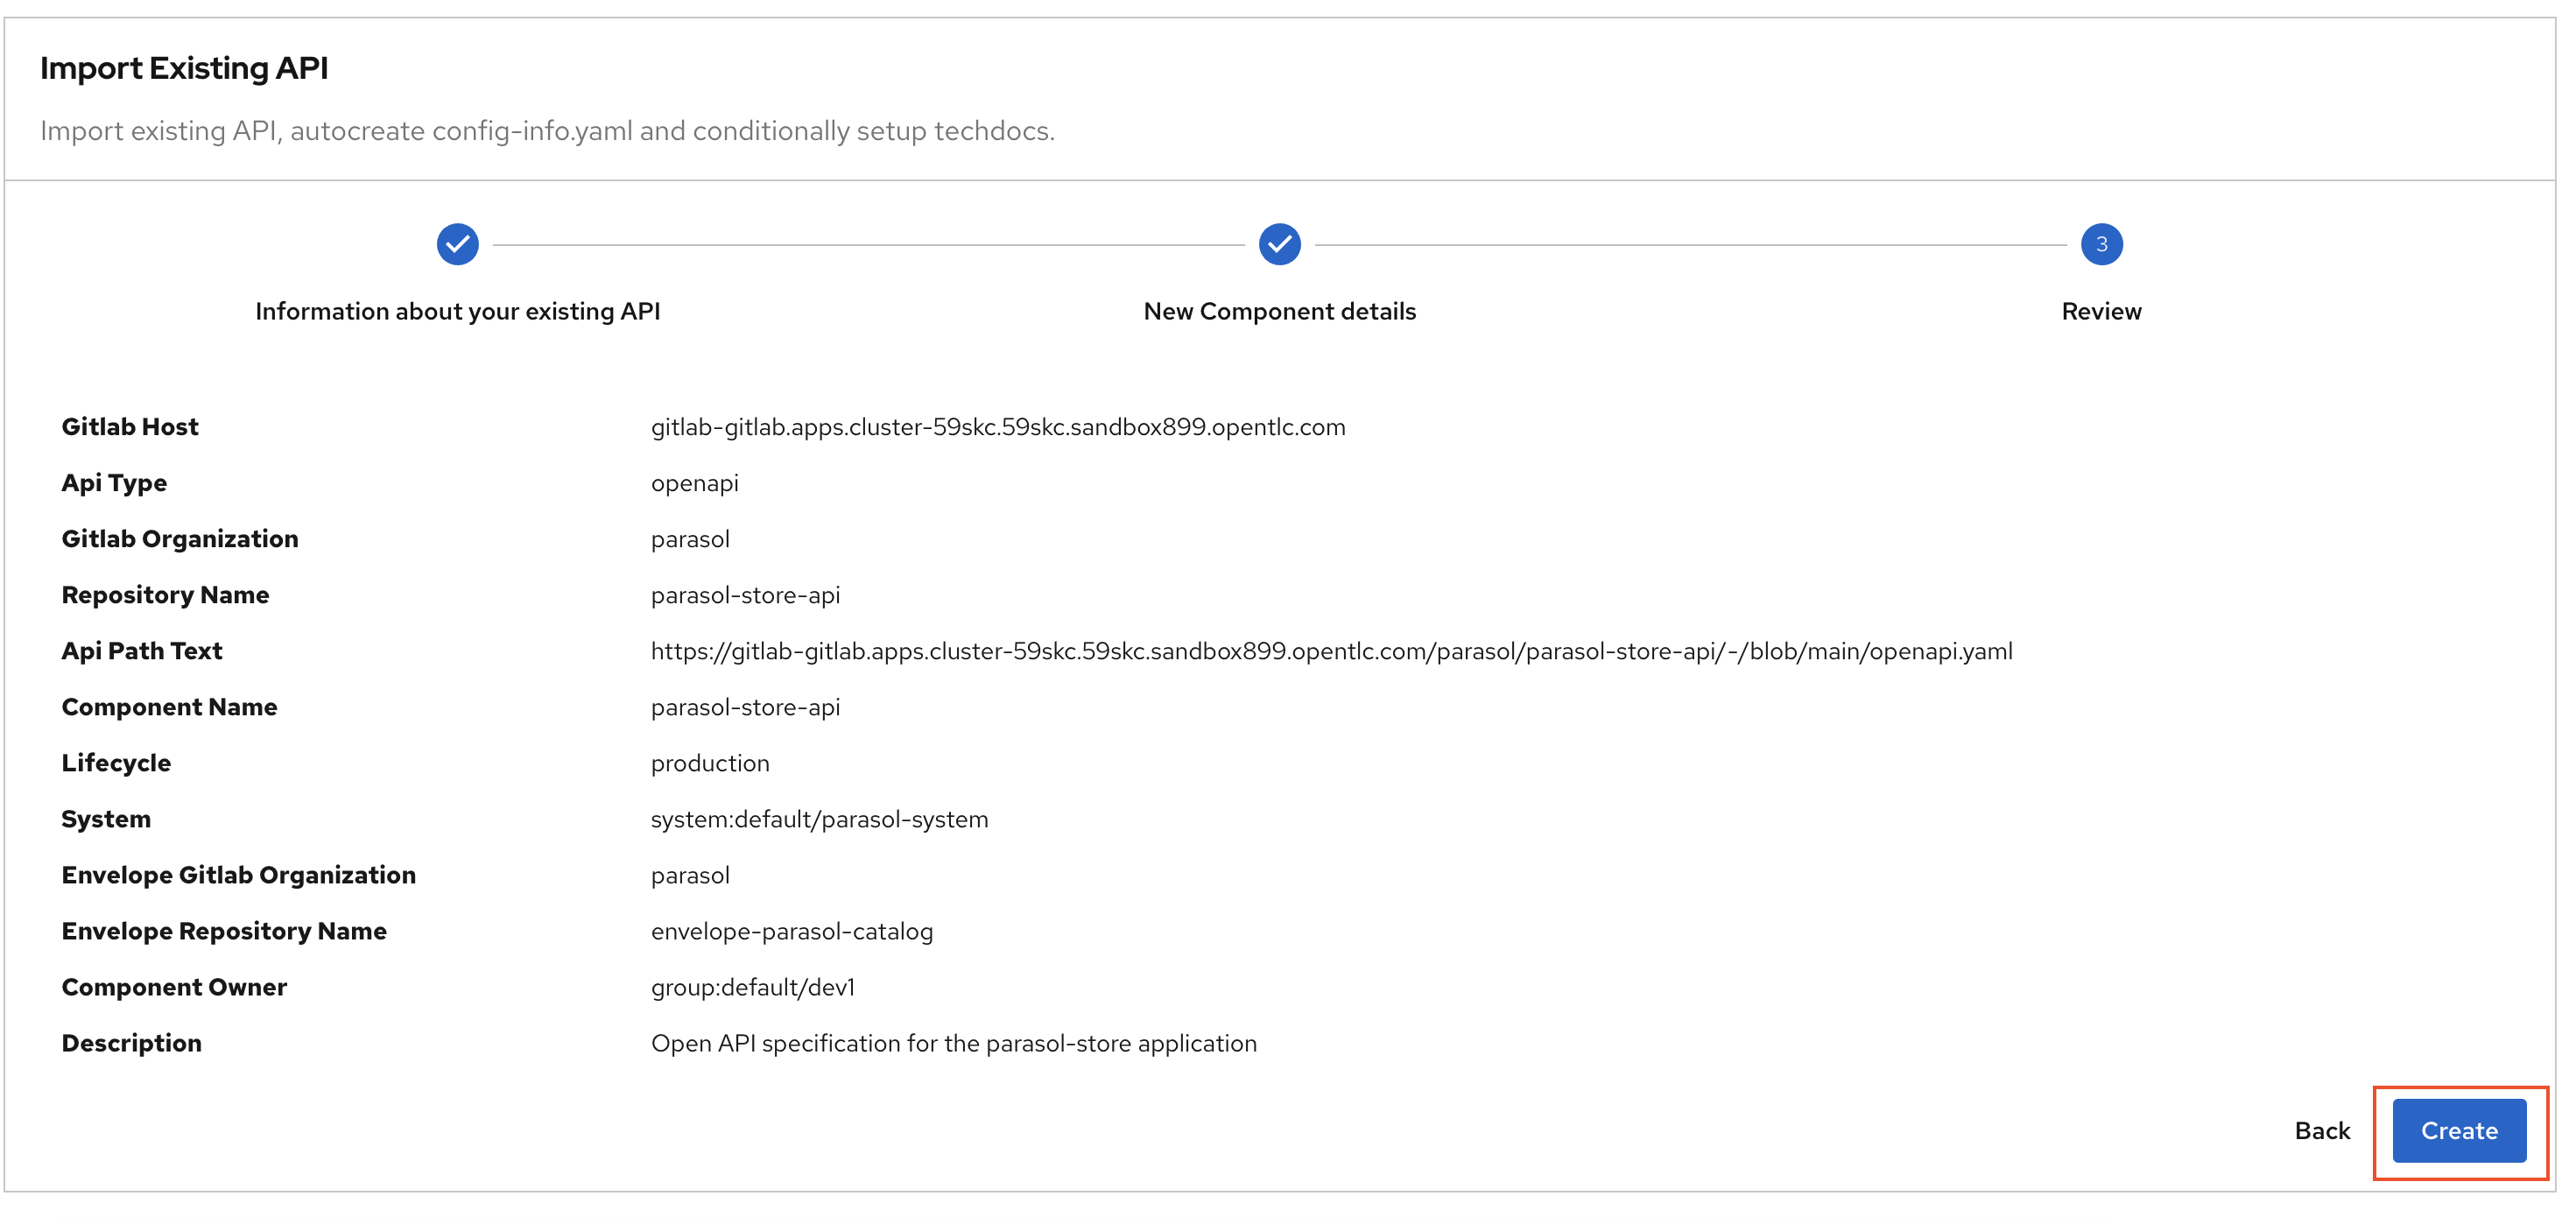
-
Run of import-api-catalog:
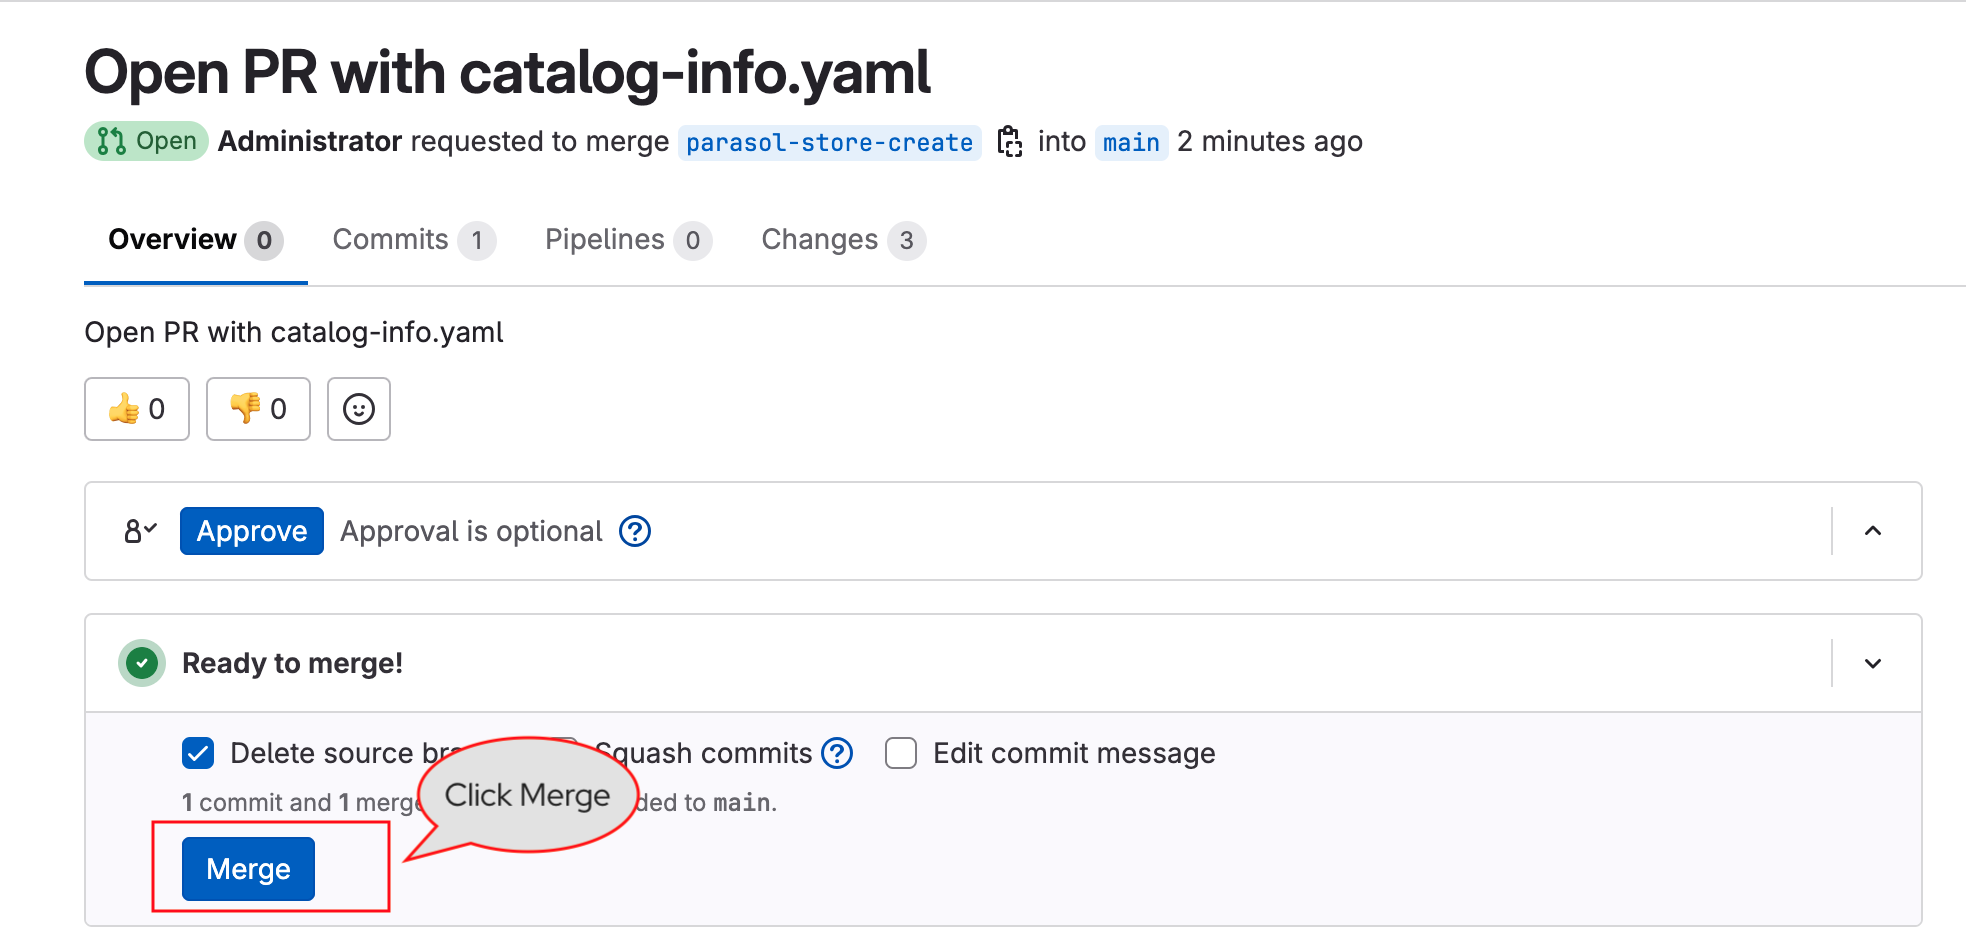
You are presented with a Component Merge Request URL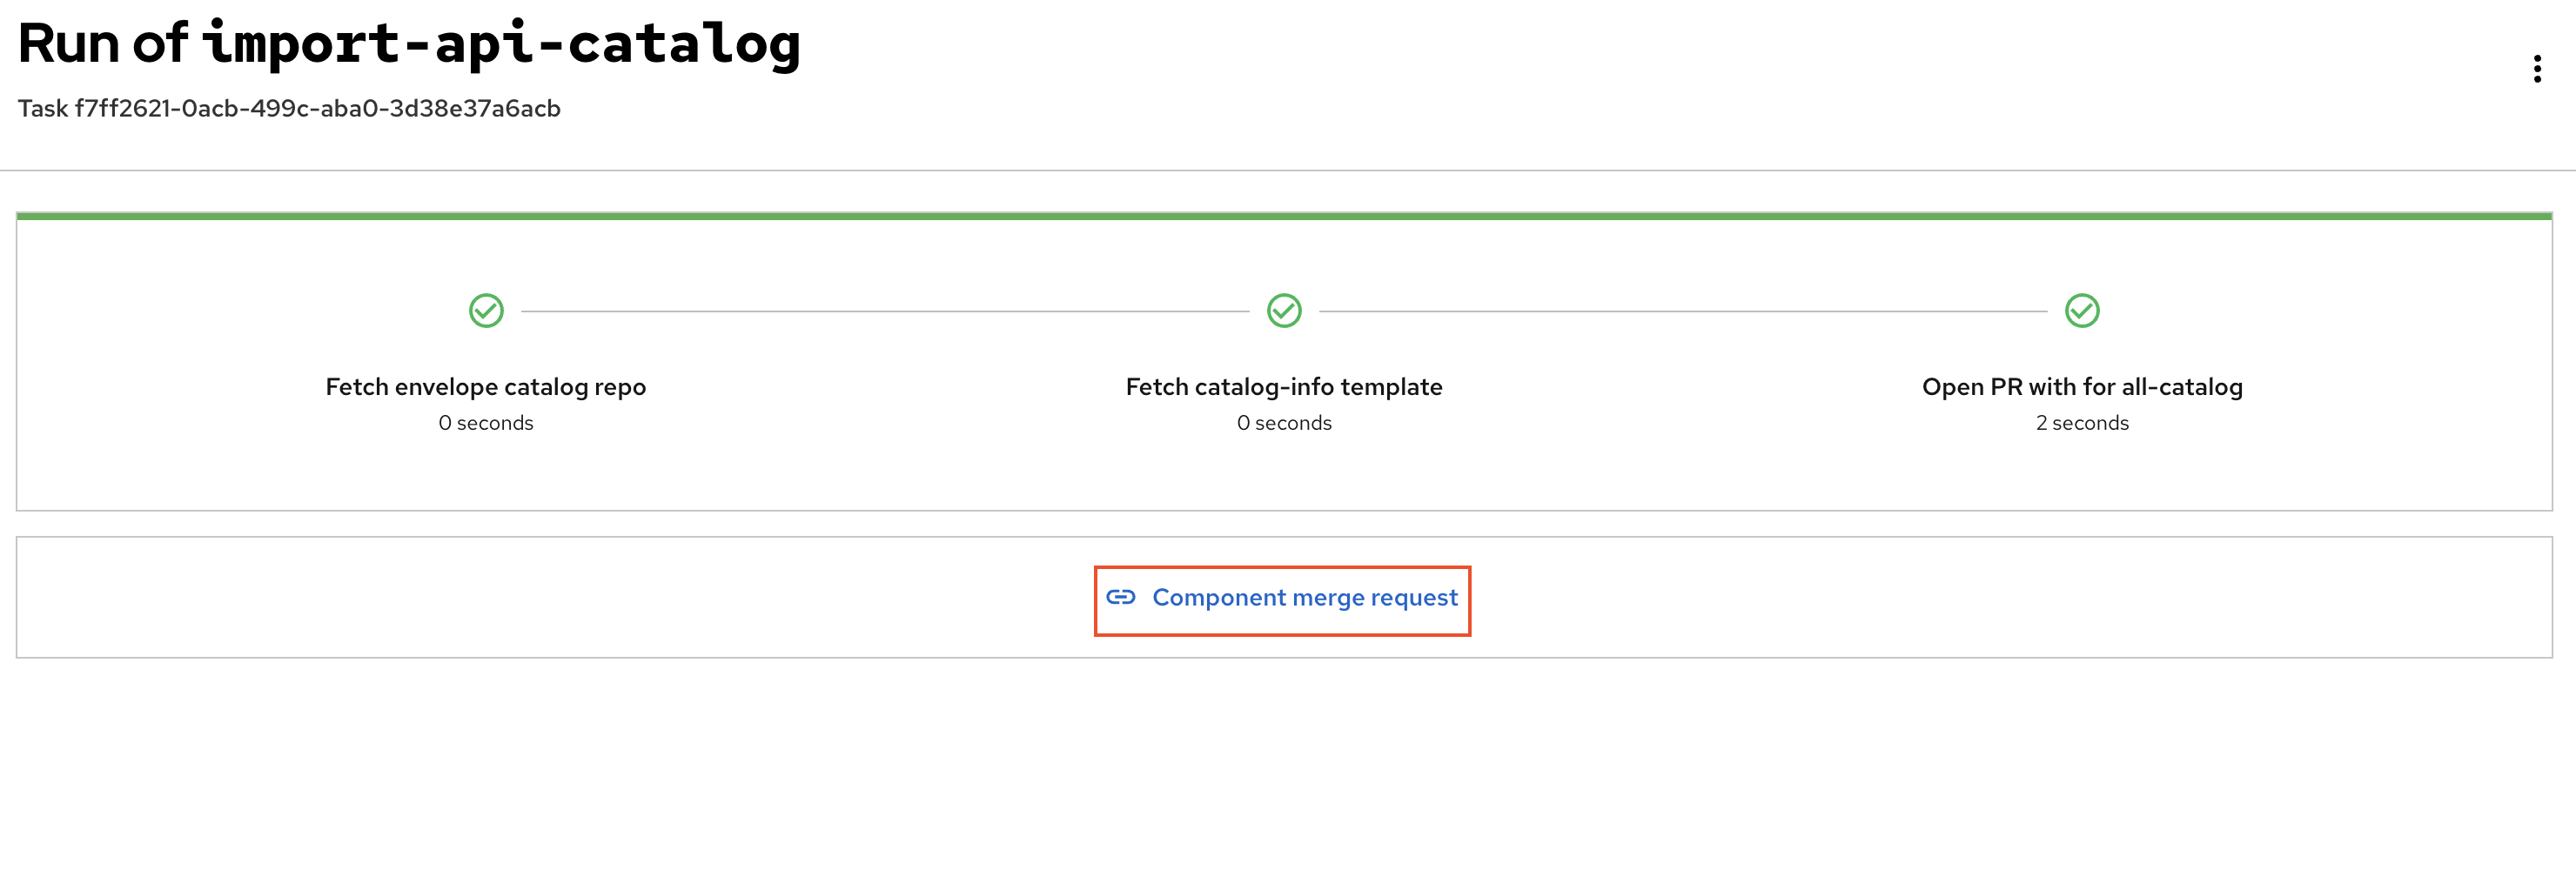
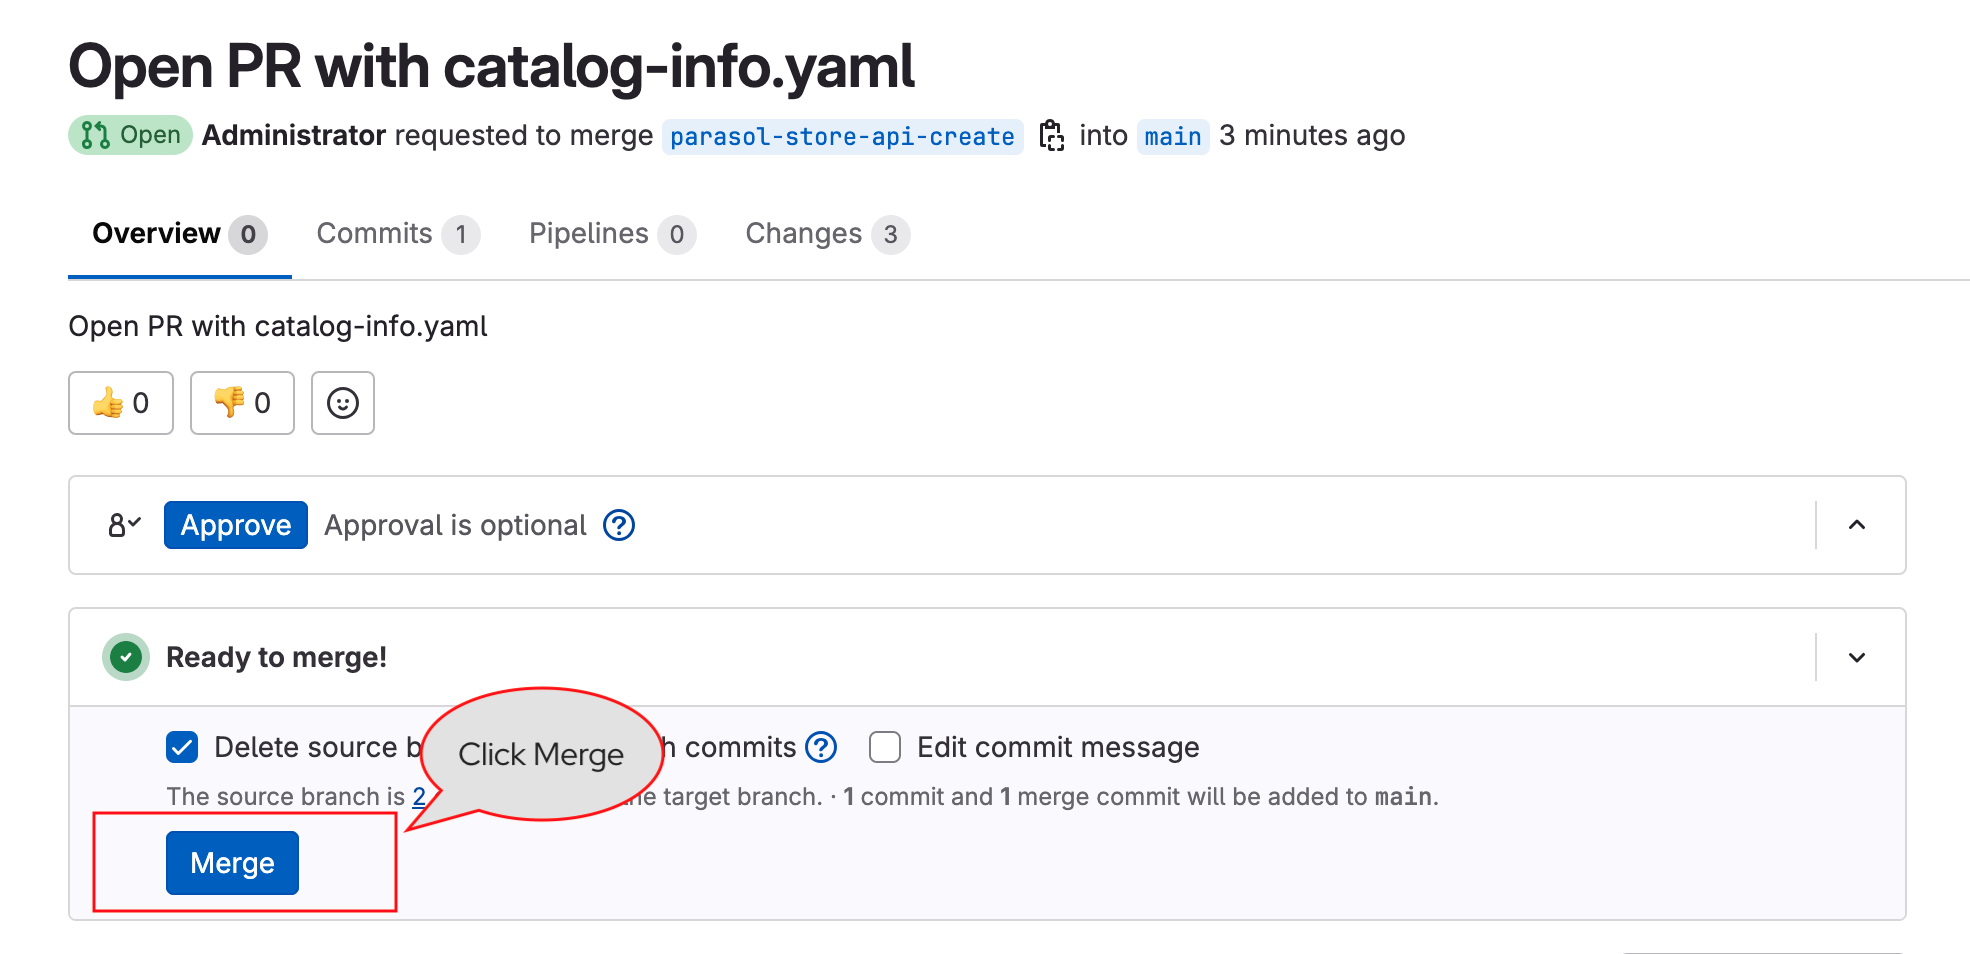
-
Click on the link to open the merge request, and complete the merge by click on the Merge button.
-
You can navigate to the all-location-parasol repo to see that a new folder named
parasol-store-apihas been created with acatalog-info.yamland a docs folder forTechDocs.
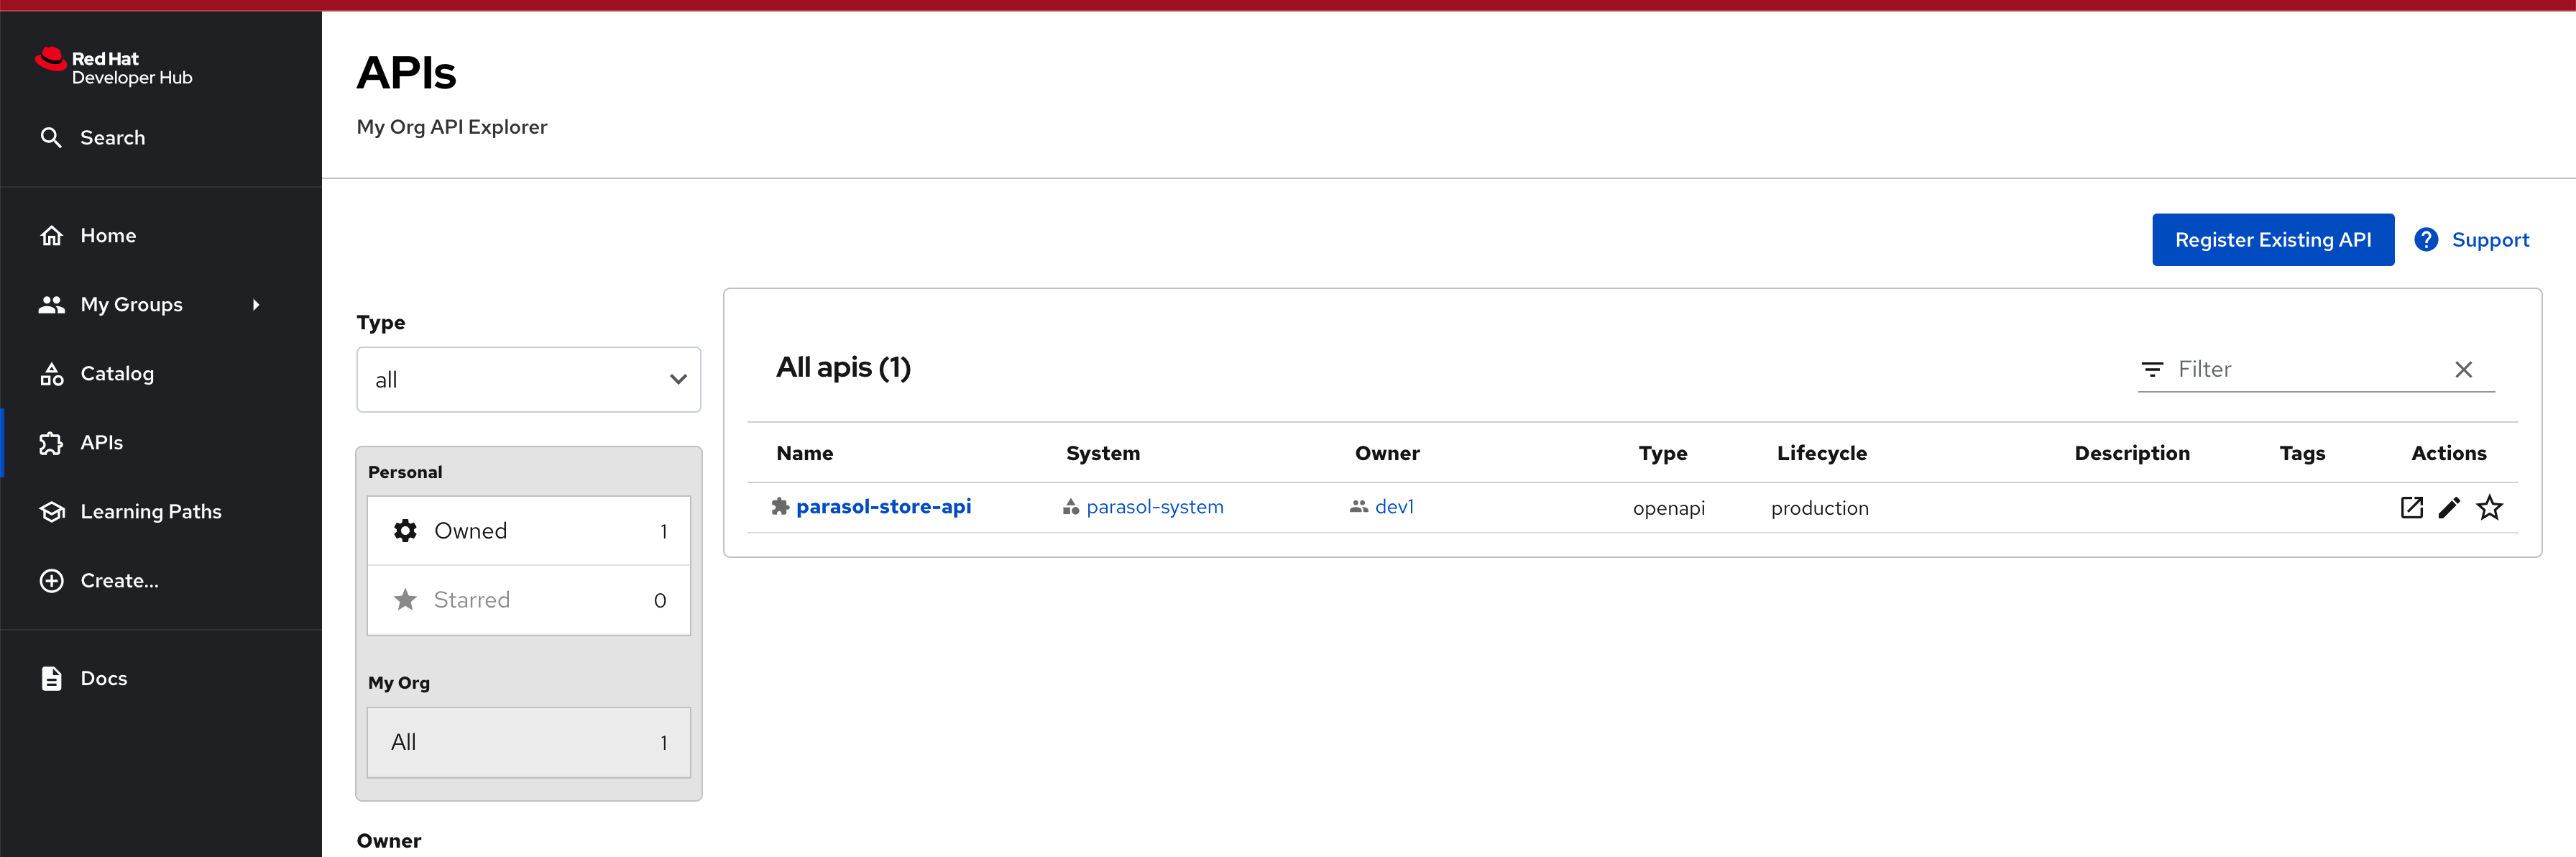
Explore the parasol-store-api component in the APIs section
-
The Parasol Store API that you just imported will appear in the APIs section automatically shortly. This is because of the auto-discover feature that you had enabled in the previous steps
-
Click on
parasol-store-apiand explore the component. The Docs tab displays the skeleton techdocs that was added. -
The Definition tab showcases the OpenAPI spec nicely formatted. This is due to the fact that you selected
openapias the API type while importing the API.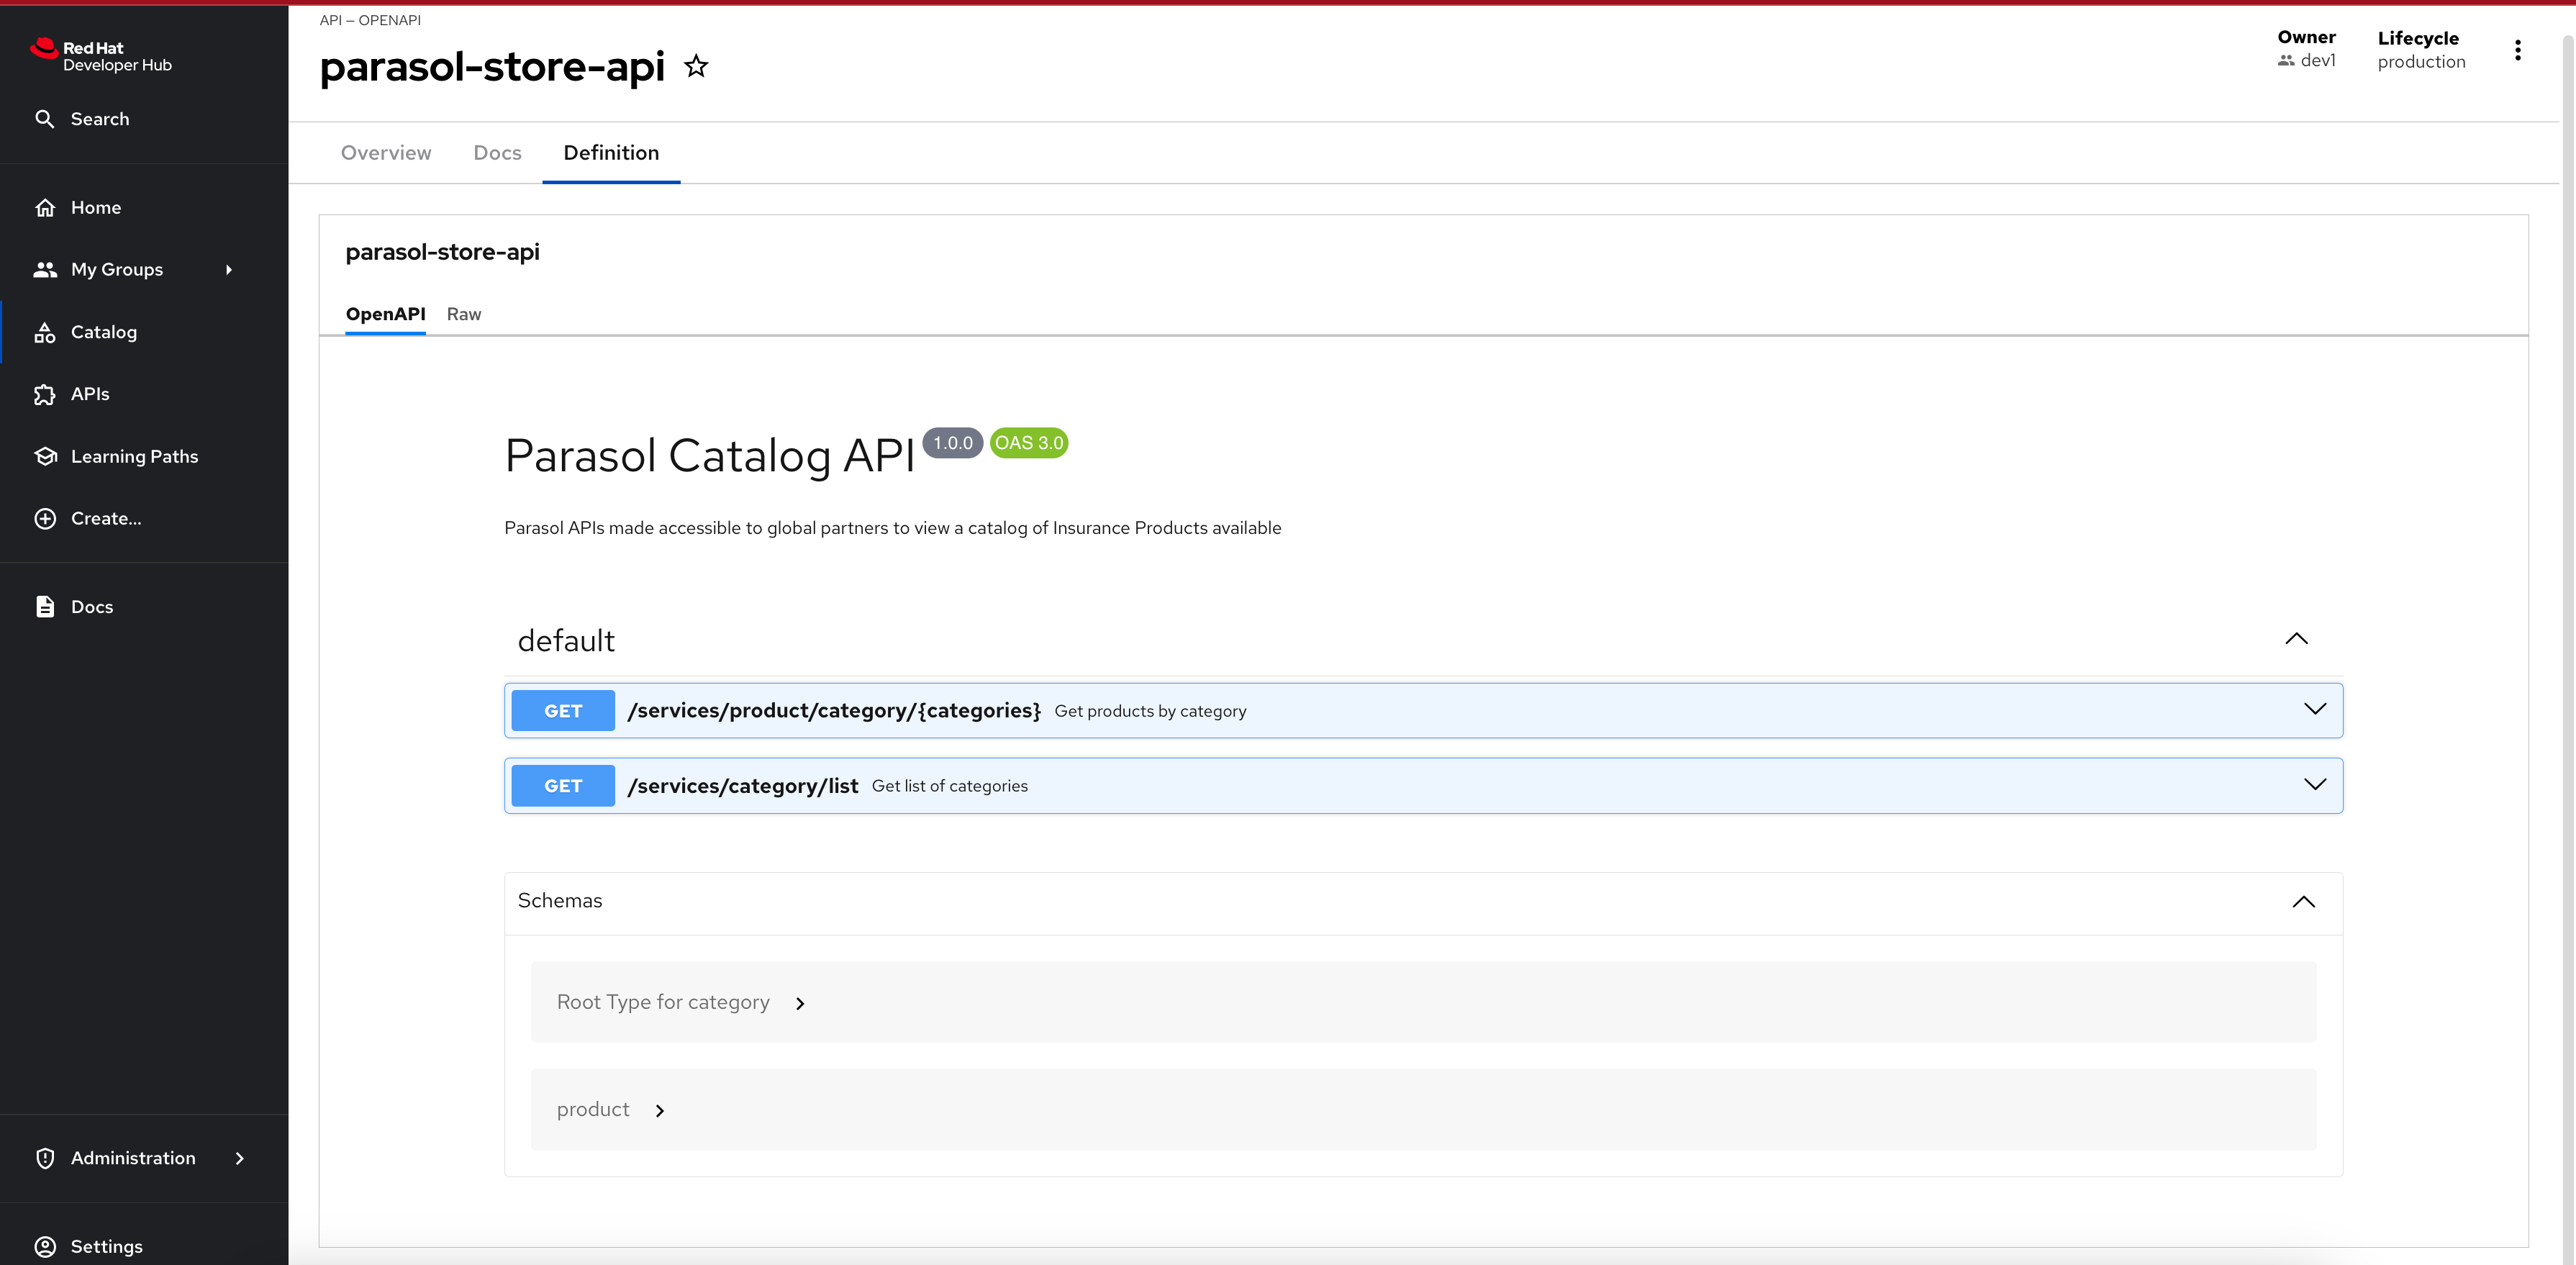
-
Import Parasol Store as a Component
-
Select the
icon on the top navigation bar to access the Self-service menu of Red Hat Developer Hub. -
Click the Choose button of the
Import Existing Applicationtemplate.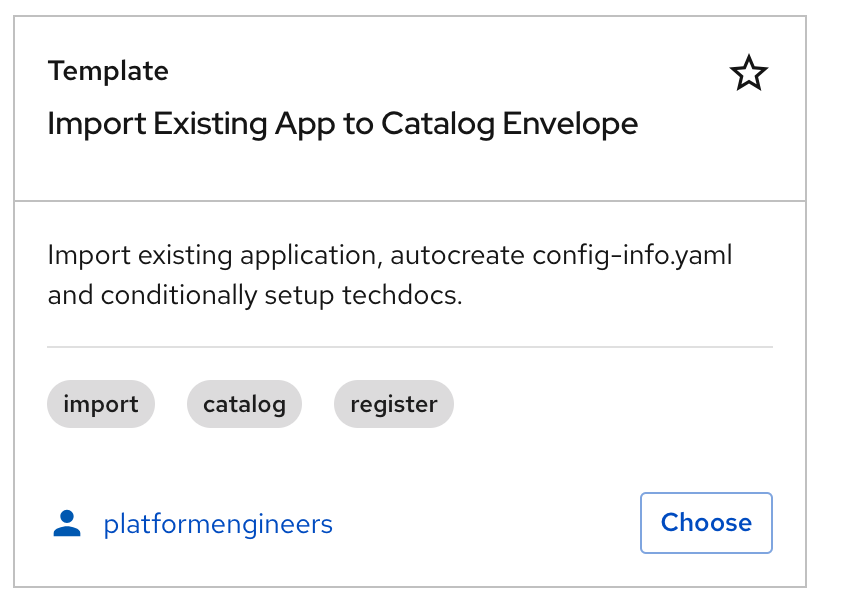
-
Fill out the following values in the Software Template wizard.
A number of these fields have been prepopulated with default values for convenience. In reality, developers will provide almost all of the values that are needed to import existing apps/APIs.
-
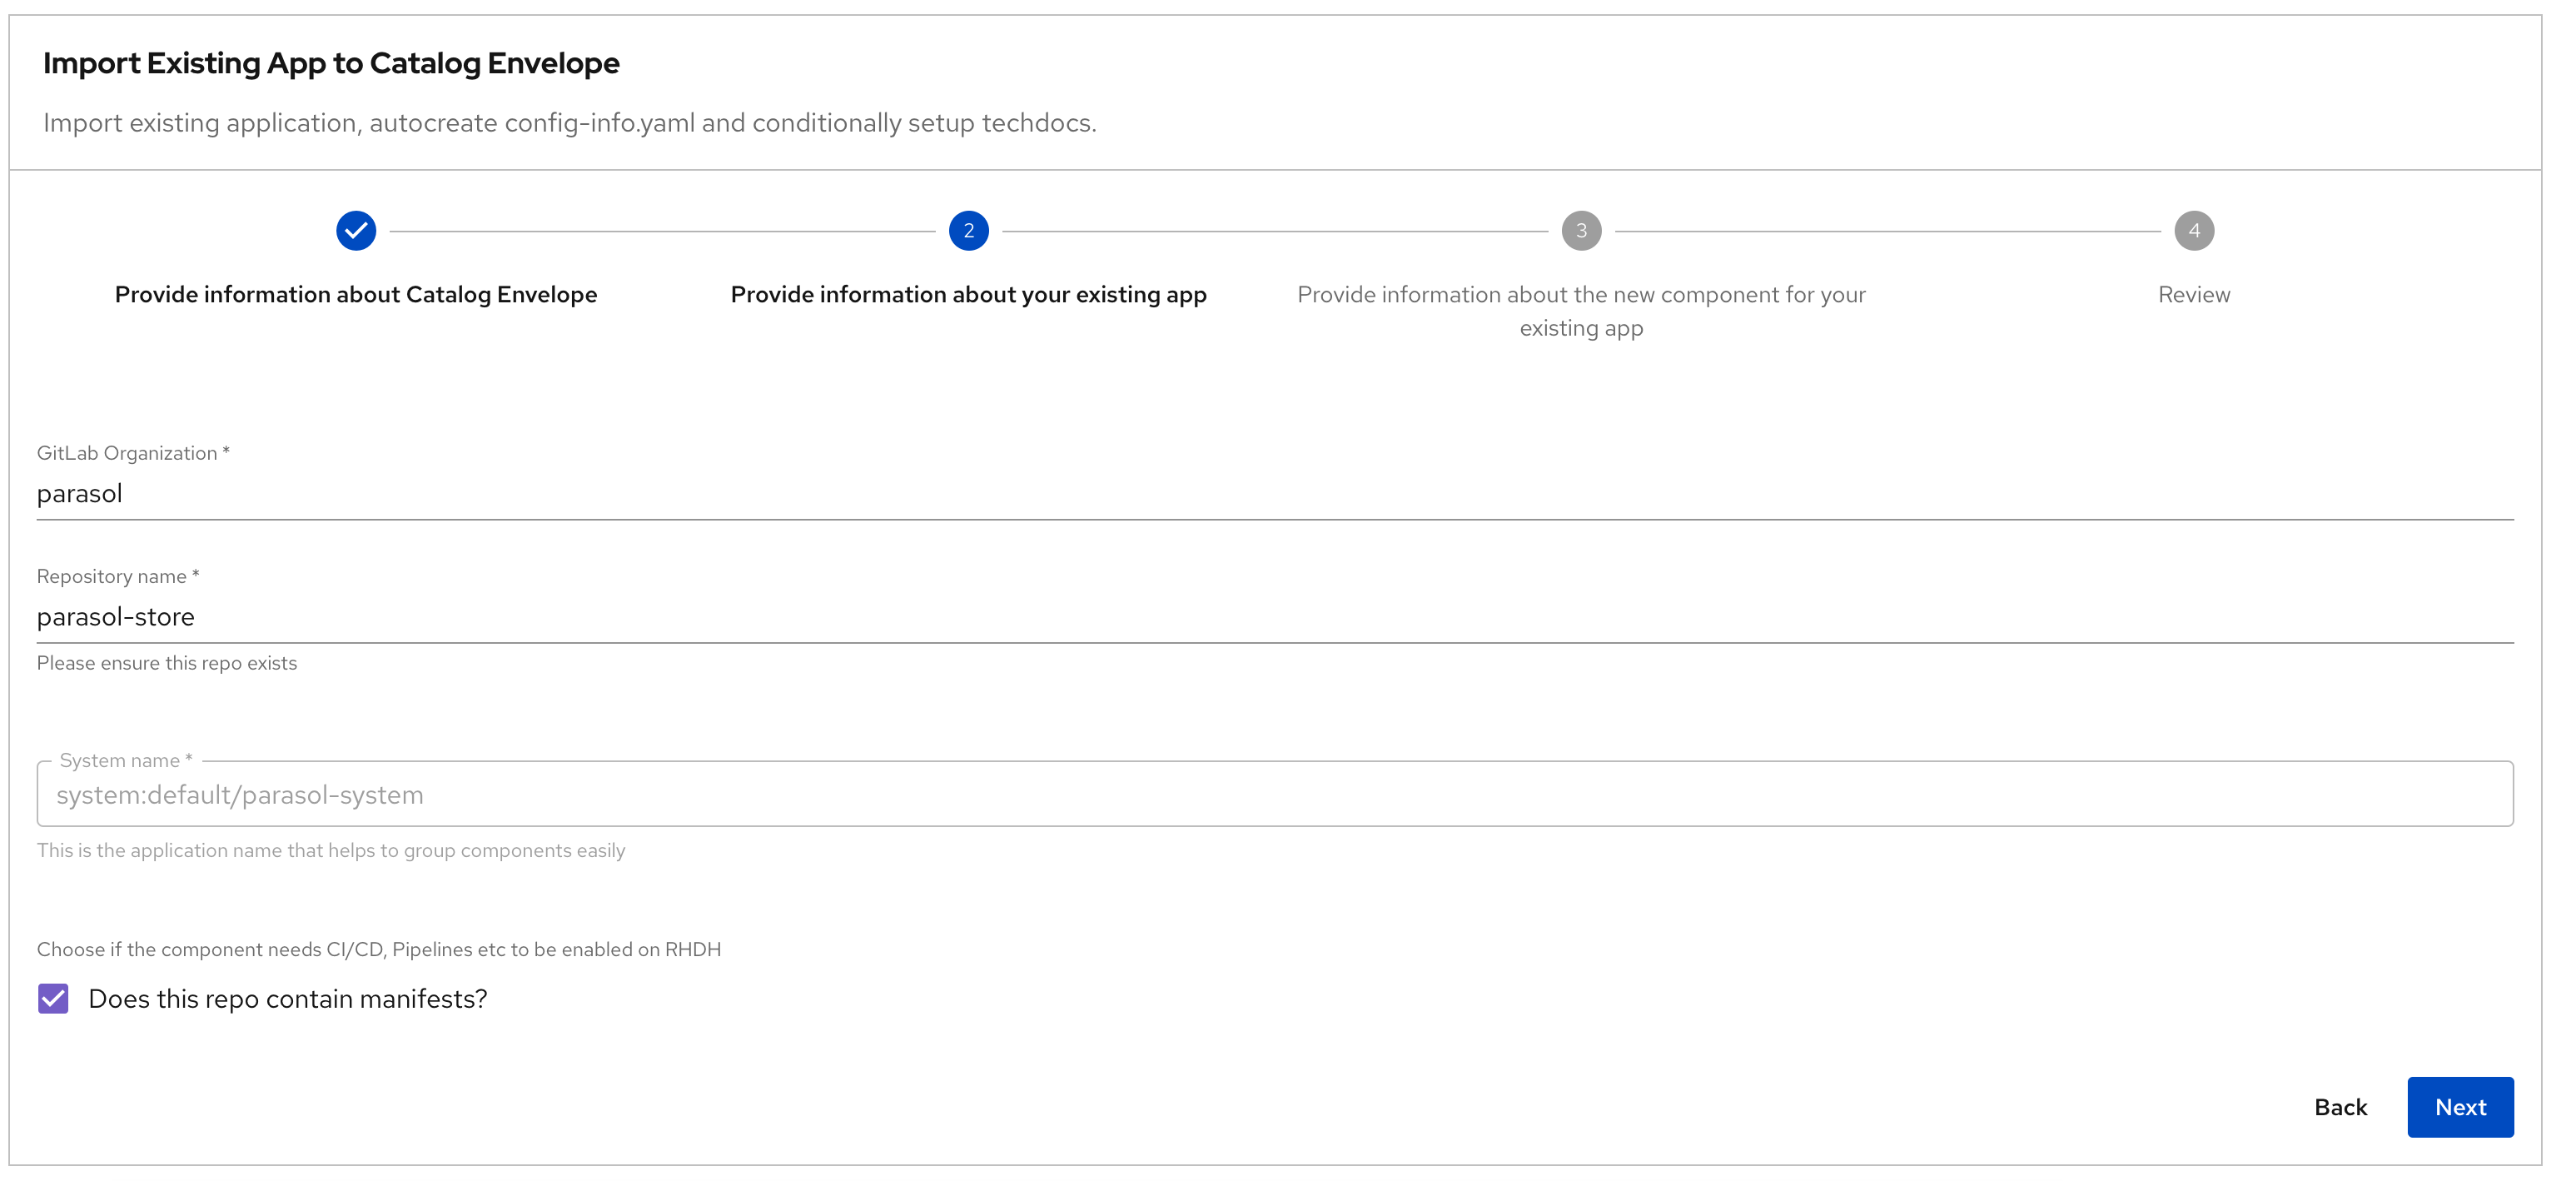
Step 1: Information about your existing application:
Provide information about your existing serviceField Description Value GitLab Hostname
Keep default value
GitLab Organization
Keep default value
parasolRepository Name
Keep default value
parasol-store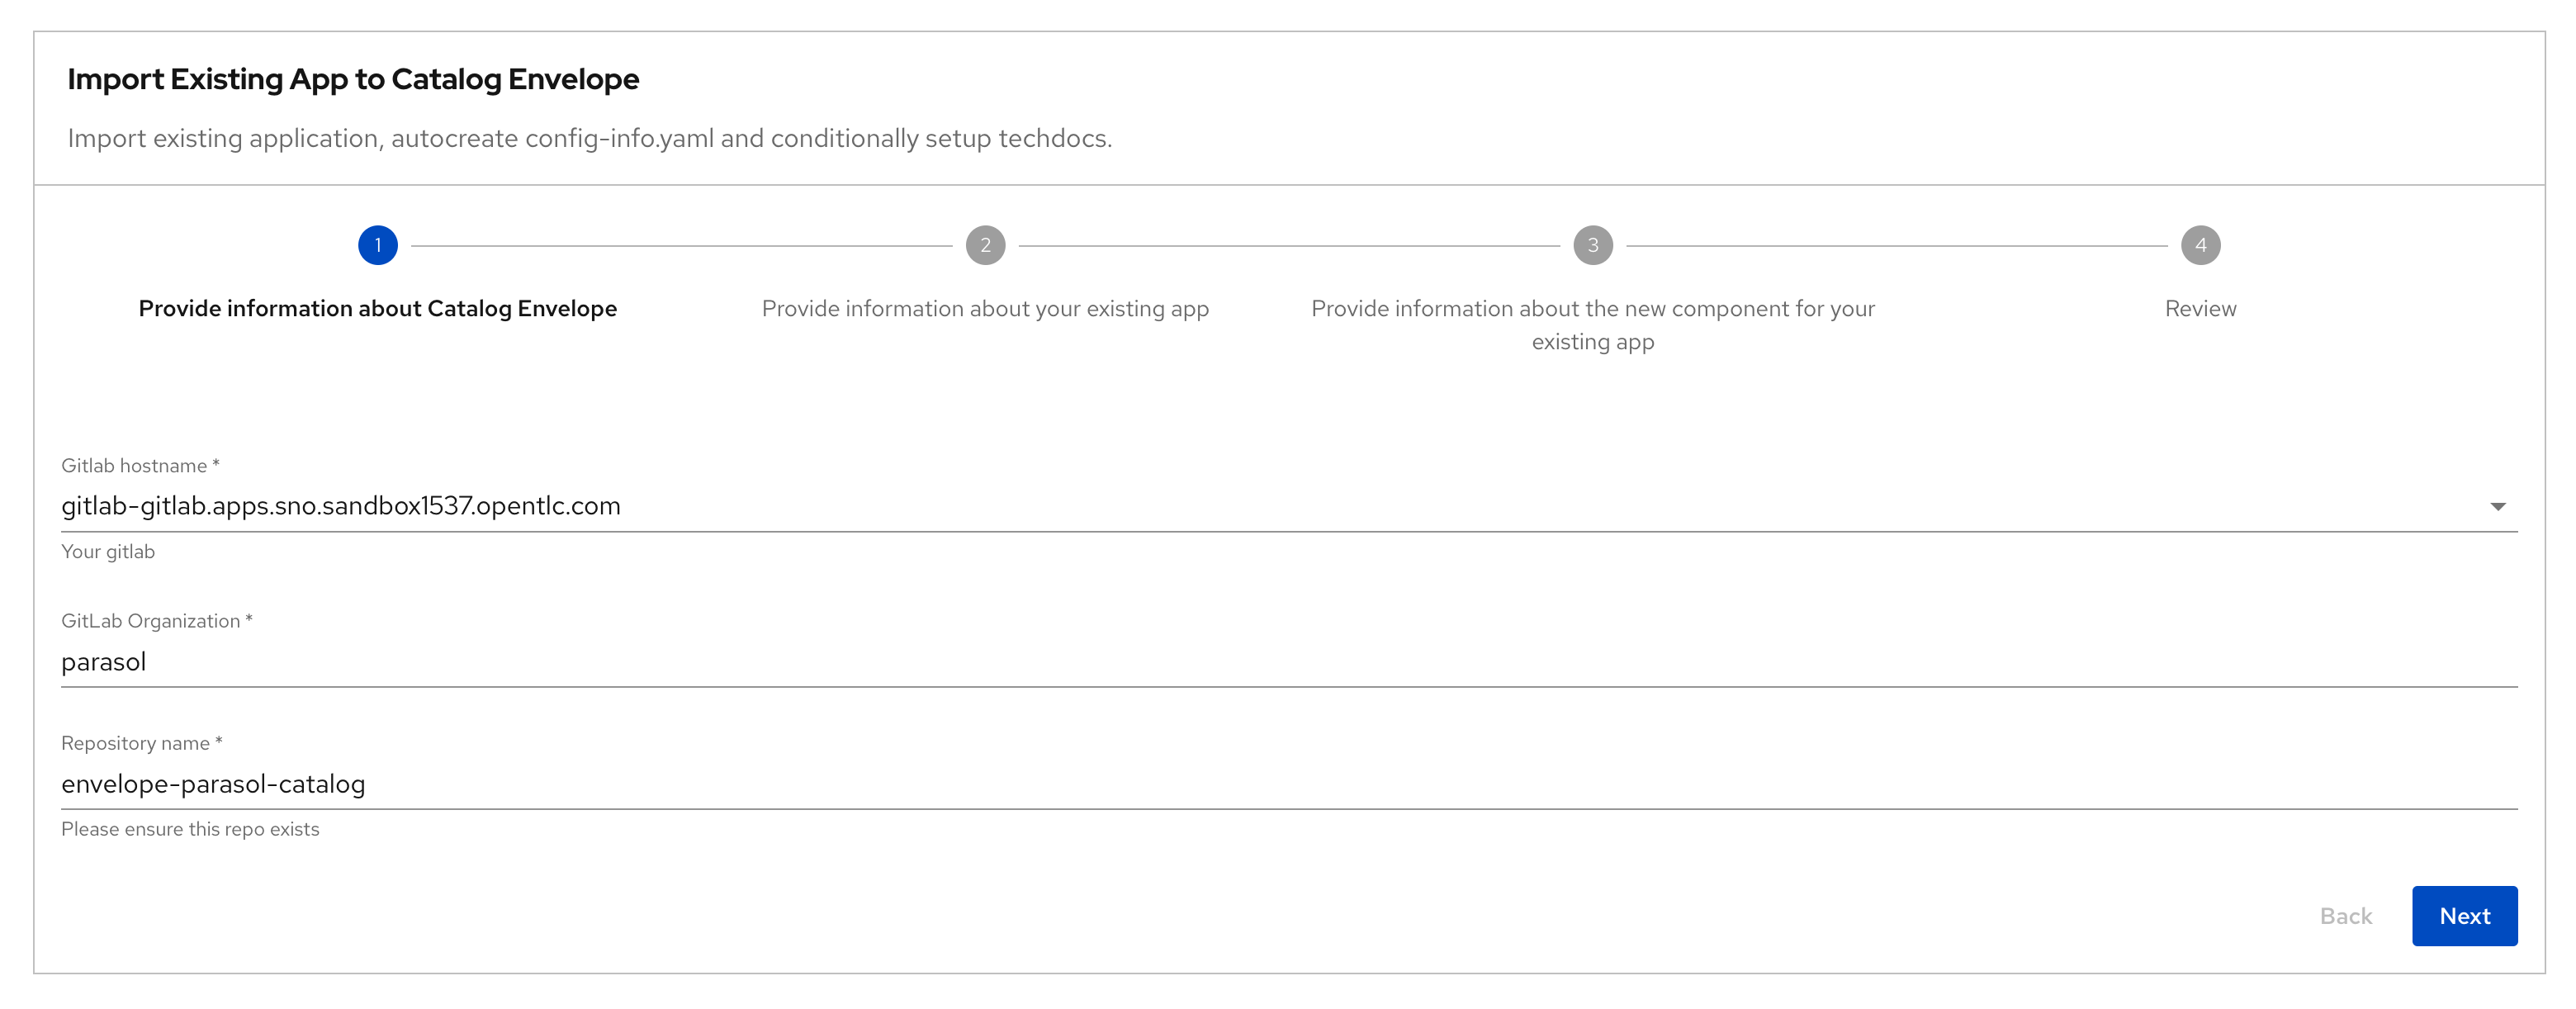
-
Step 2: New Component details:
Provide information about your existing appField Description Value Component GitLab Organization
Keep default value
parasolComponent Repository Name
Keep default value
all-location-parasolComponent Name of the App
Keep default value
parasol-storeSystem name
System (auto-populated)
system:default/parasol-systemOwner
Keep default value
user:default/dev1A Short Description Of This Component
Keep default value
Core services for the Parasol application
-
Step 3: Additional Component details:
Provide additional information about the new componentField Description Value Does this repo contain manifests?
This option conditionally auto-generates the metadata with the right labels which will be used to pull in CI/CD, Deployment and other details
Make sure to check the box
Type
The type of component. Well-known and common values: service, website, library.
serviceIndentify the APIs consumed by this component
This multi-select allows you to attach APIs to the component
Choose
parasol-store-apiCheck to add TechDocs
Conditionally auto-generates TechDocs skeleton for the component
Check the box
Lifecycle
Choose from dropdown
production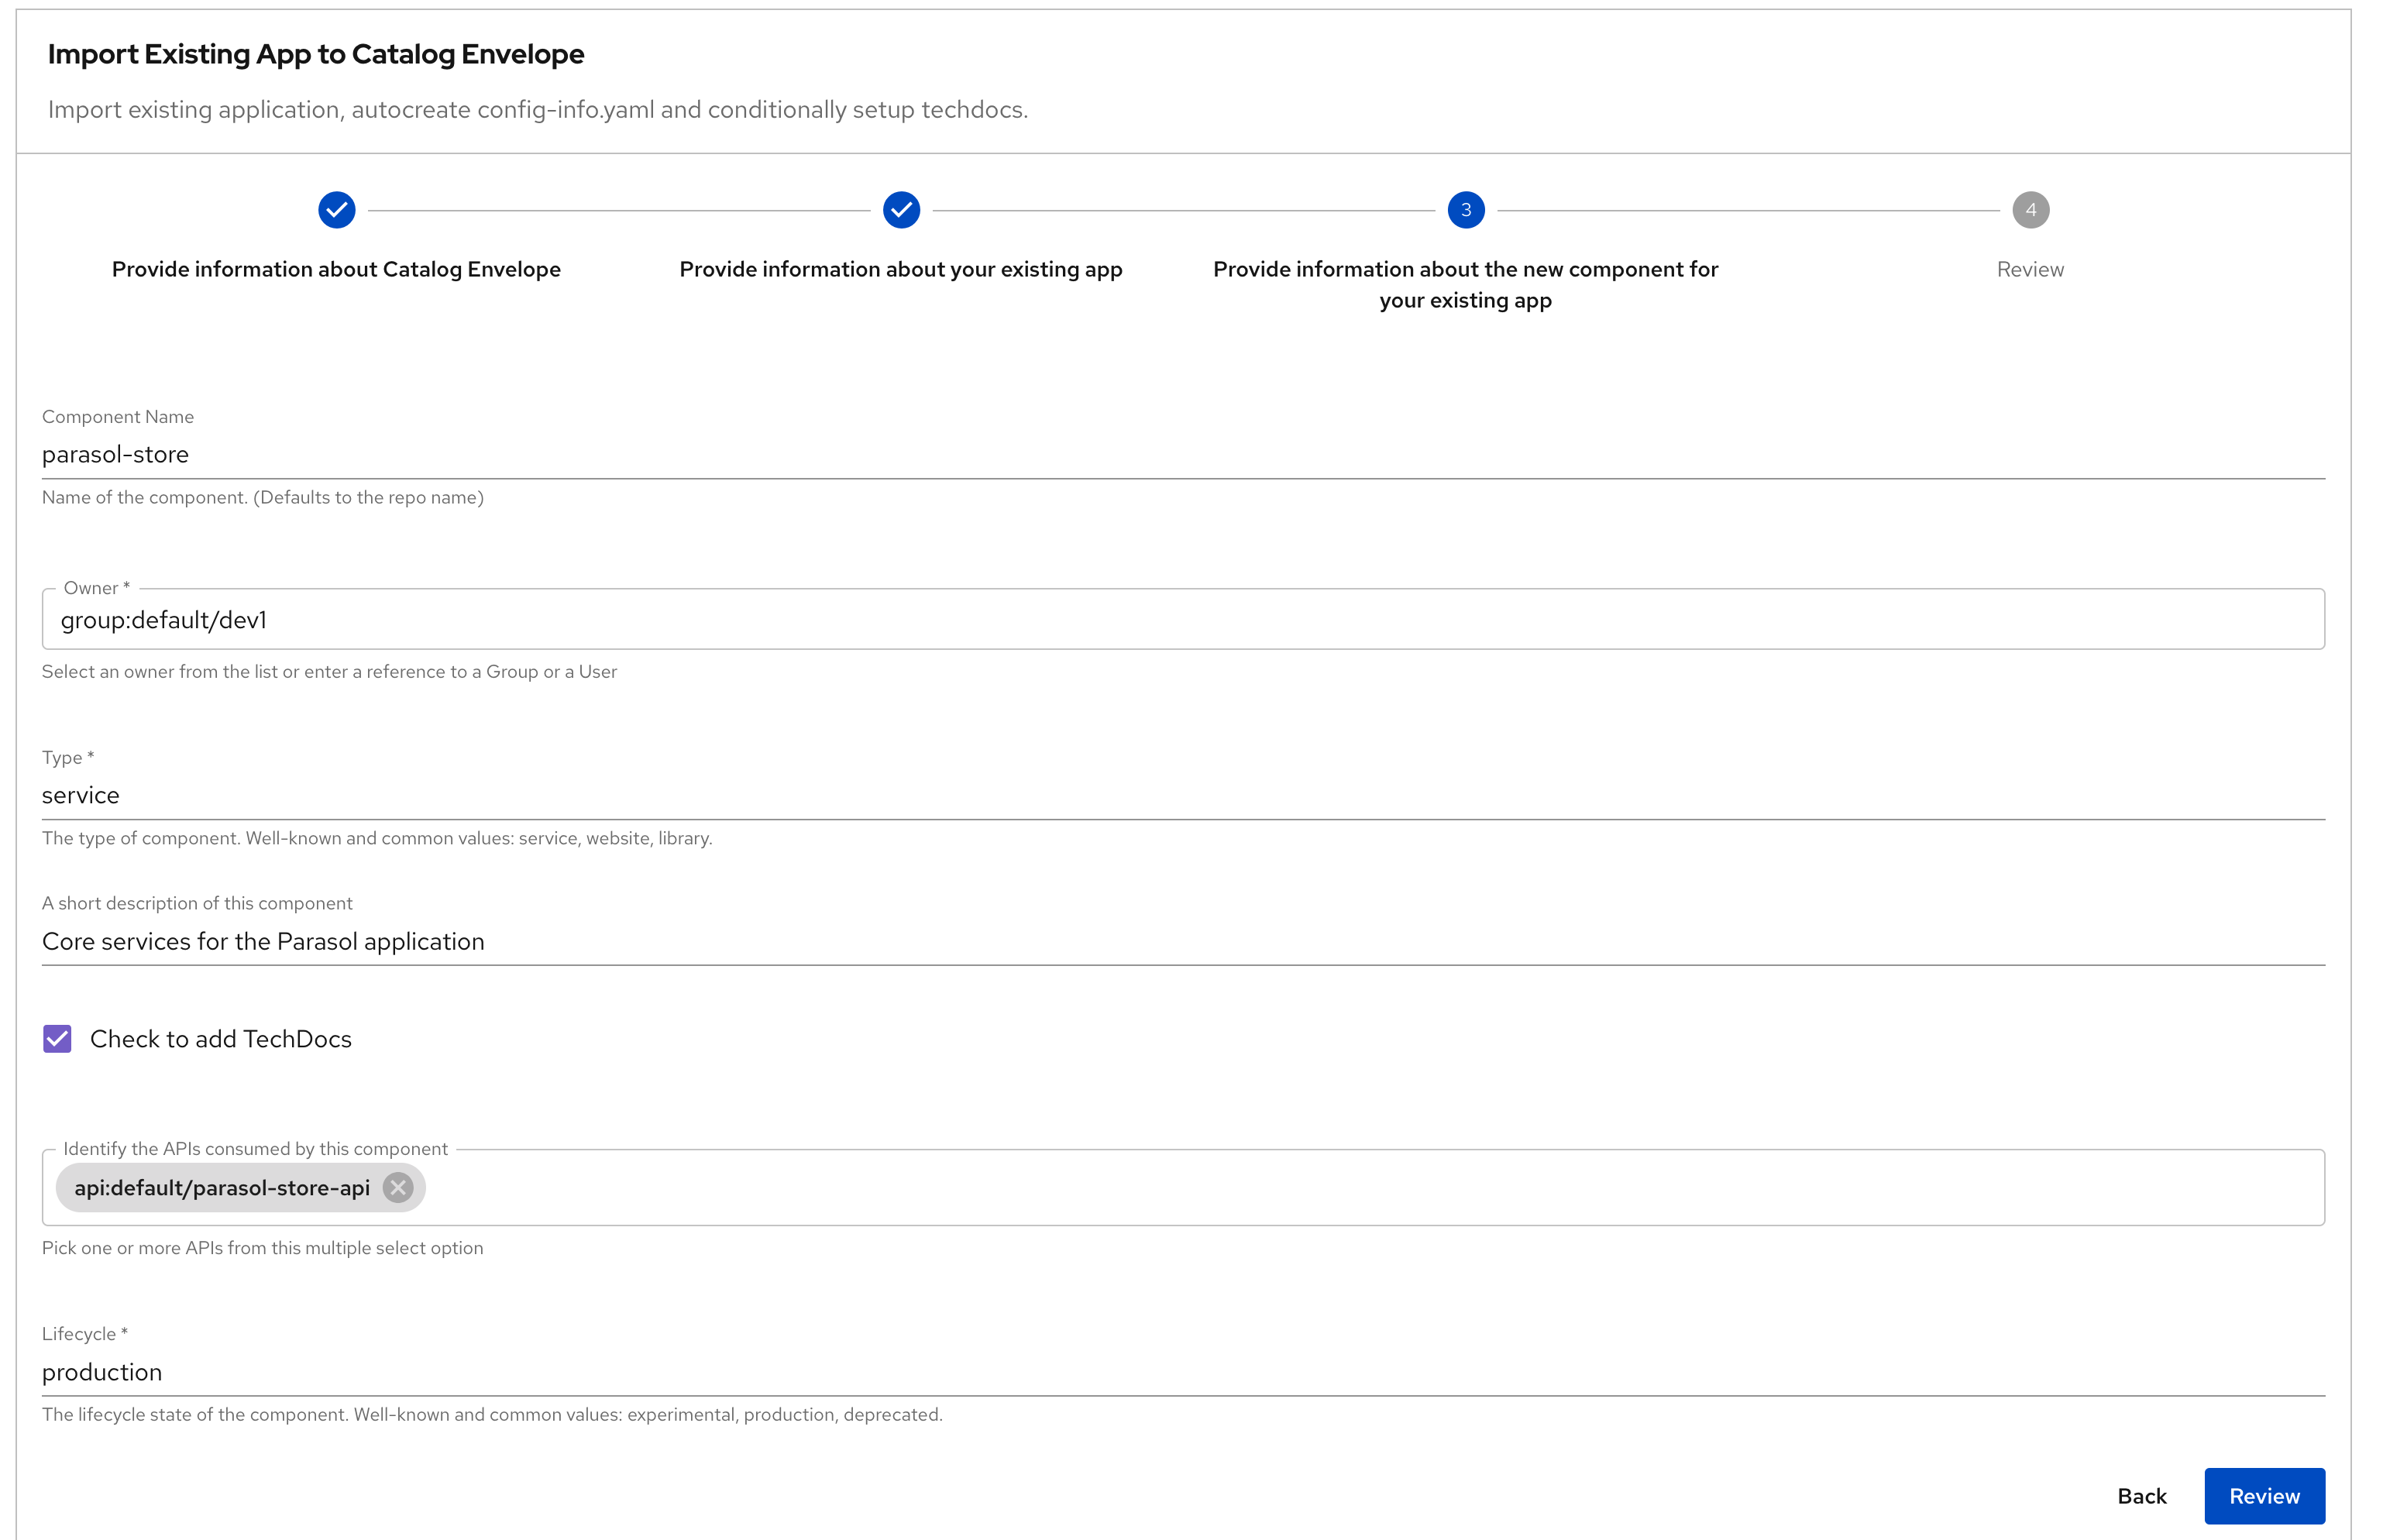
-
Step 4: Review
Review the fields, and click on the Create button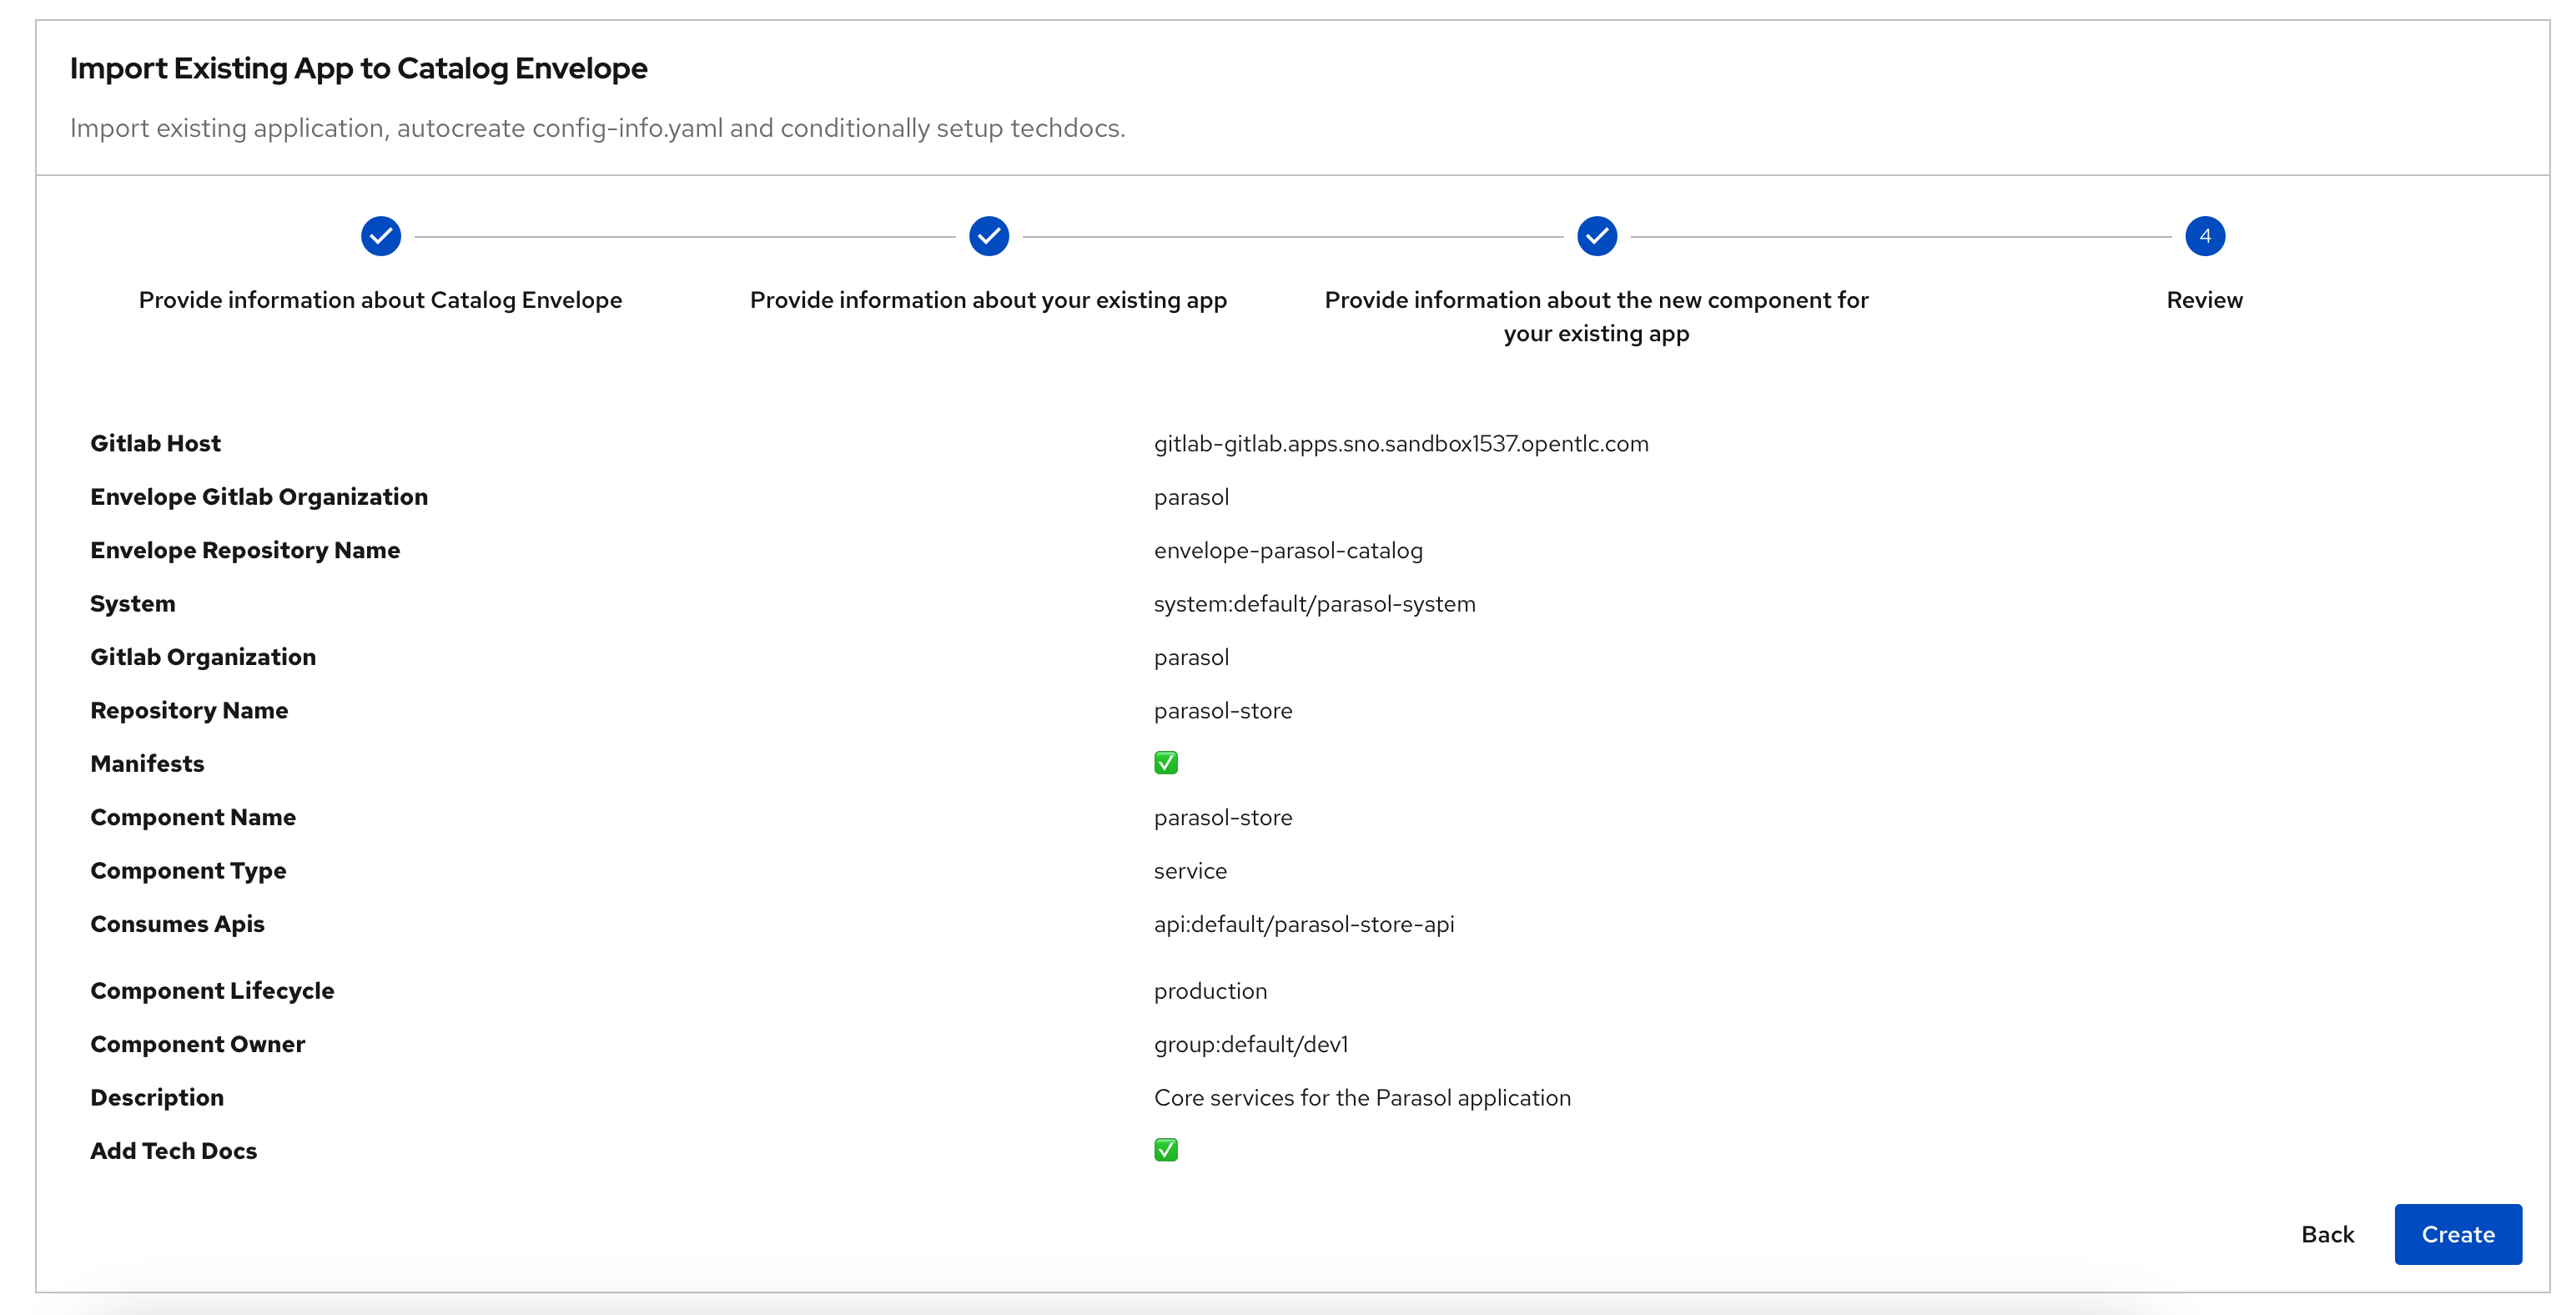
-
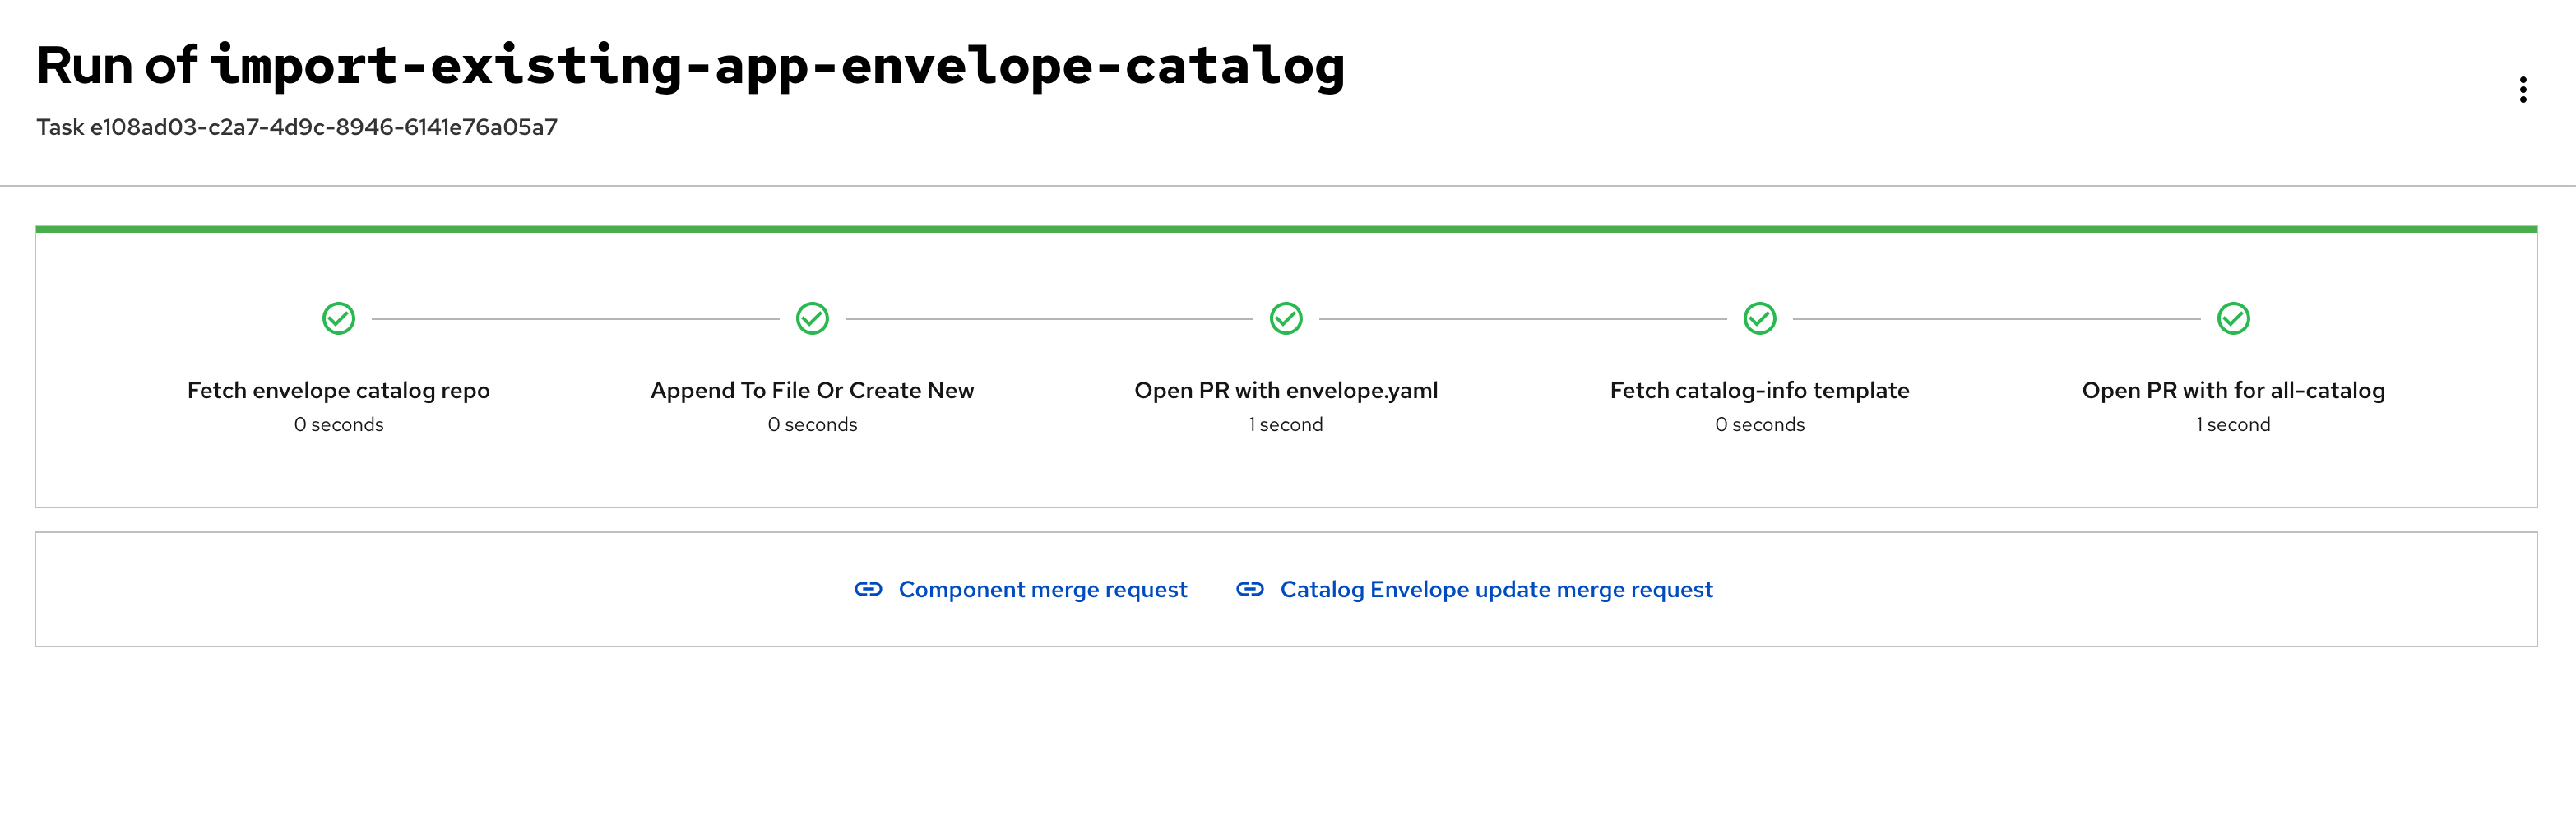
Run of import-existing-app-template In the final step you are presented with a Merge Request.
-
Click on Component Merge Request link to open the merge request on GitLab, and complete the merge by clicking on the Merge button
-
The Parasol Store service that you just imported will appear in the Red Hat Developer Hub Catalog shortly.
Explore the parasol-store component in the Catalog section
-
In a few minutes the
parasol-storeComponent you just imported will start appearing in the Catalog section of Red Hat Developer Hub automatically.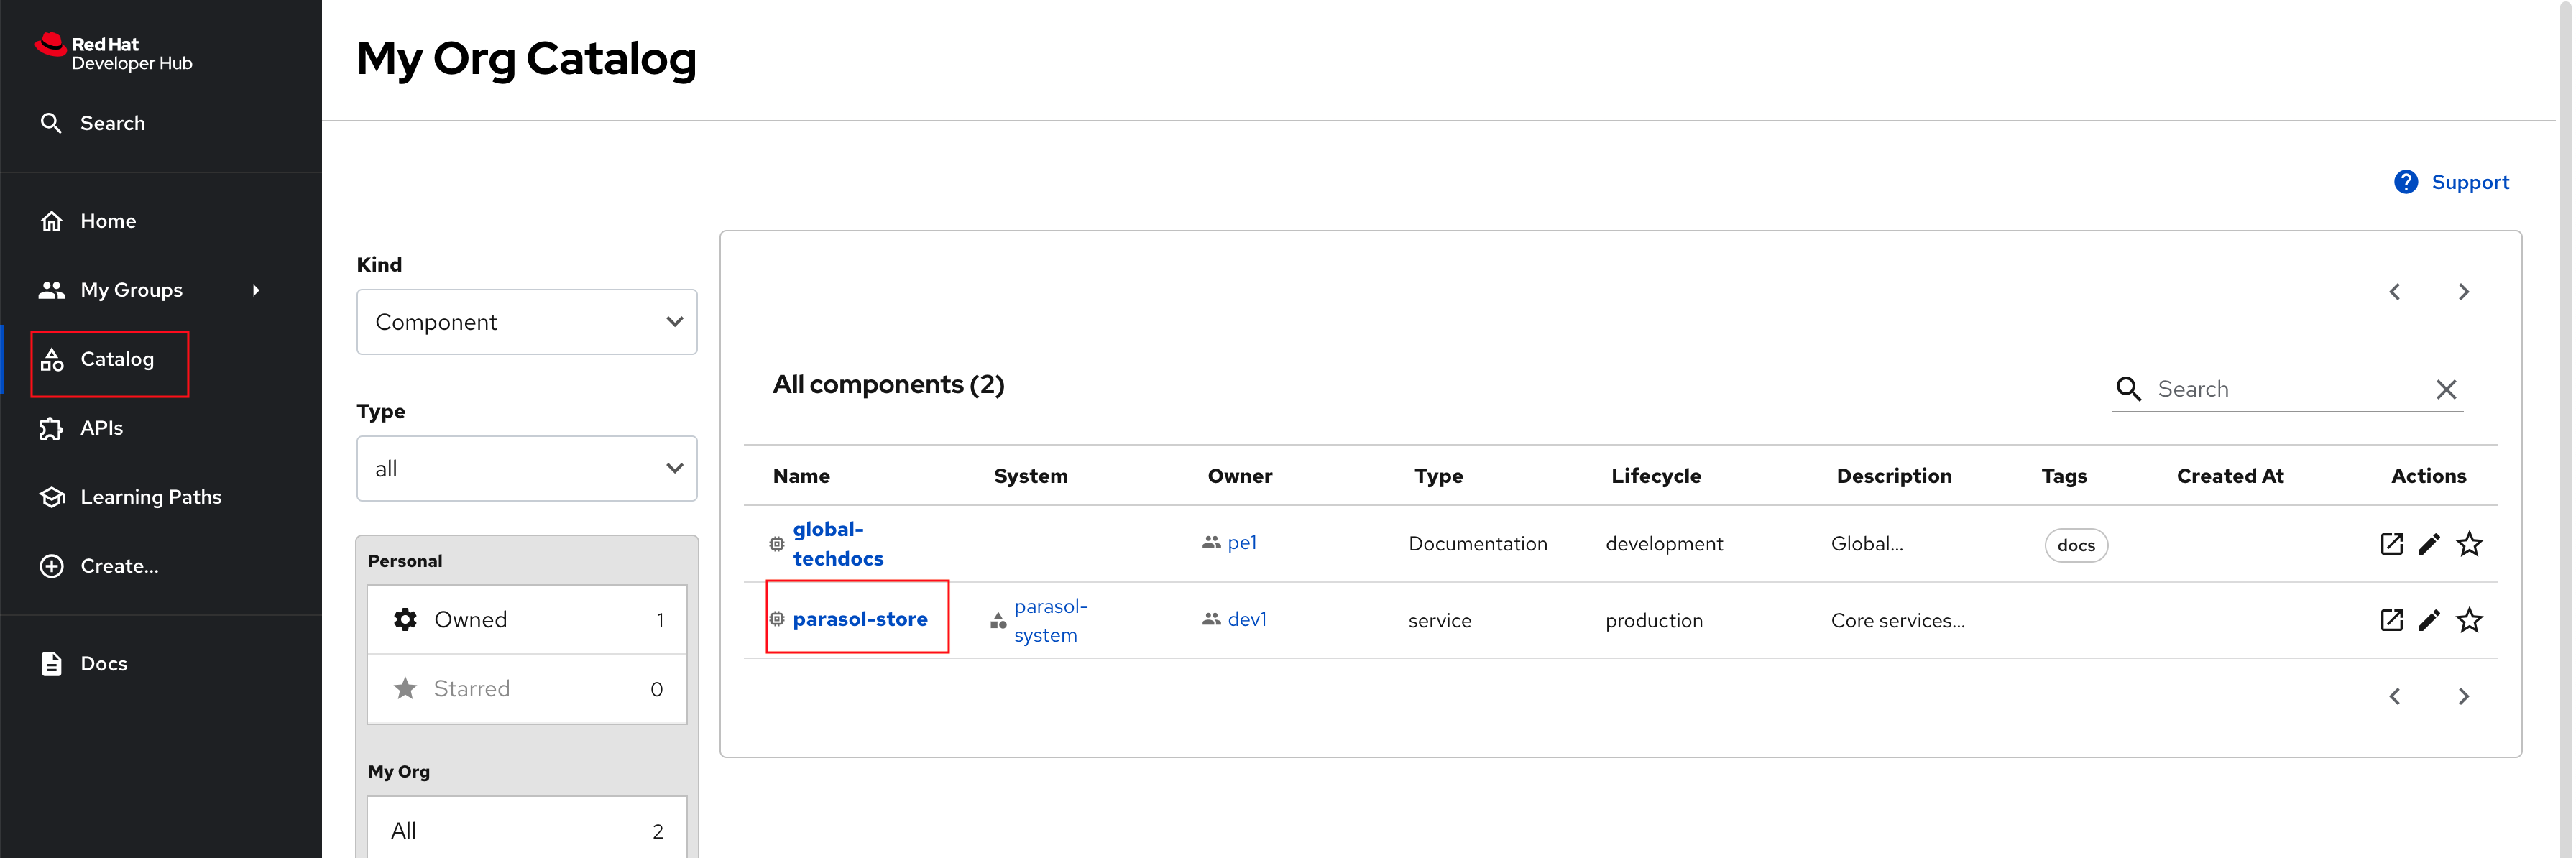
-
Click on the
parasol-storelink to view the component. You can step through each of the tabs to see how Red Hat Developer Hub provides a single pane of glass for your core development needs. -
Topology Tab shows the deployments on OpenShift

-
CI Tab displays any Pipeline Runs. This is currently empty because there are no pipeline runs yet.
-
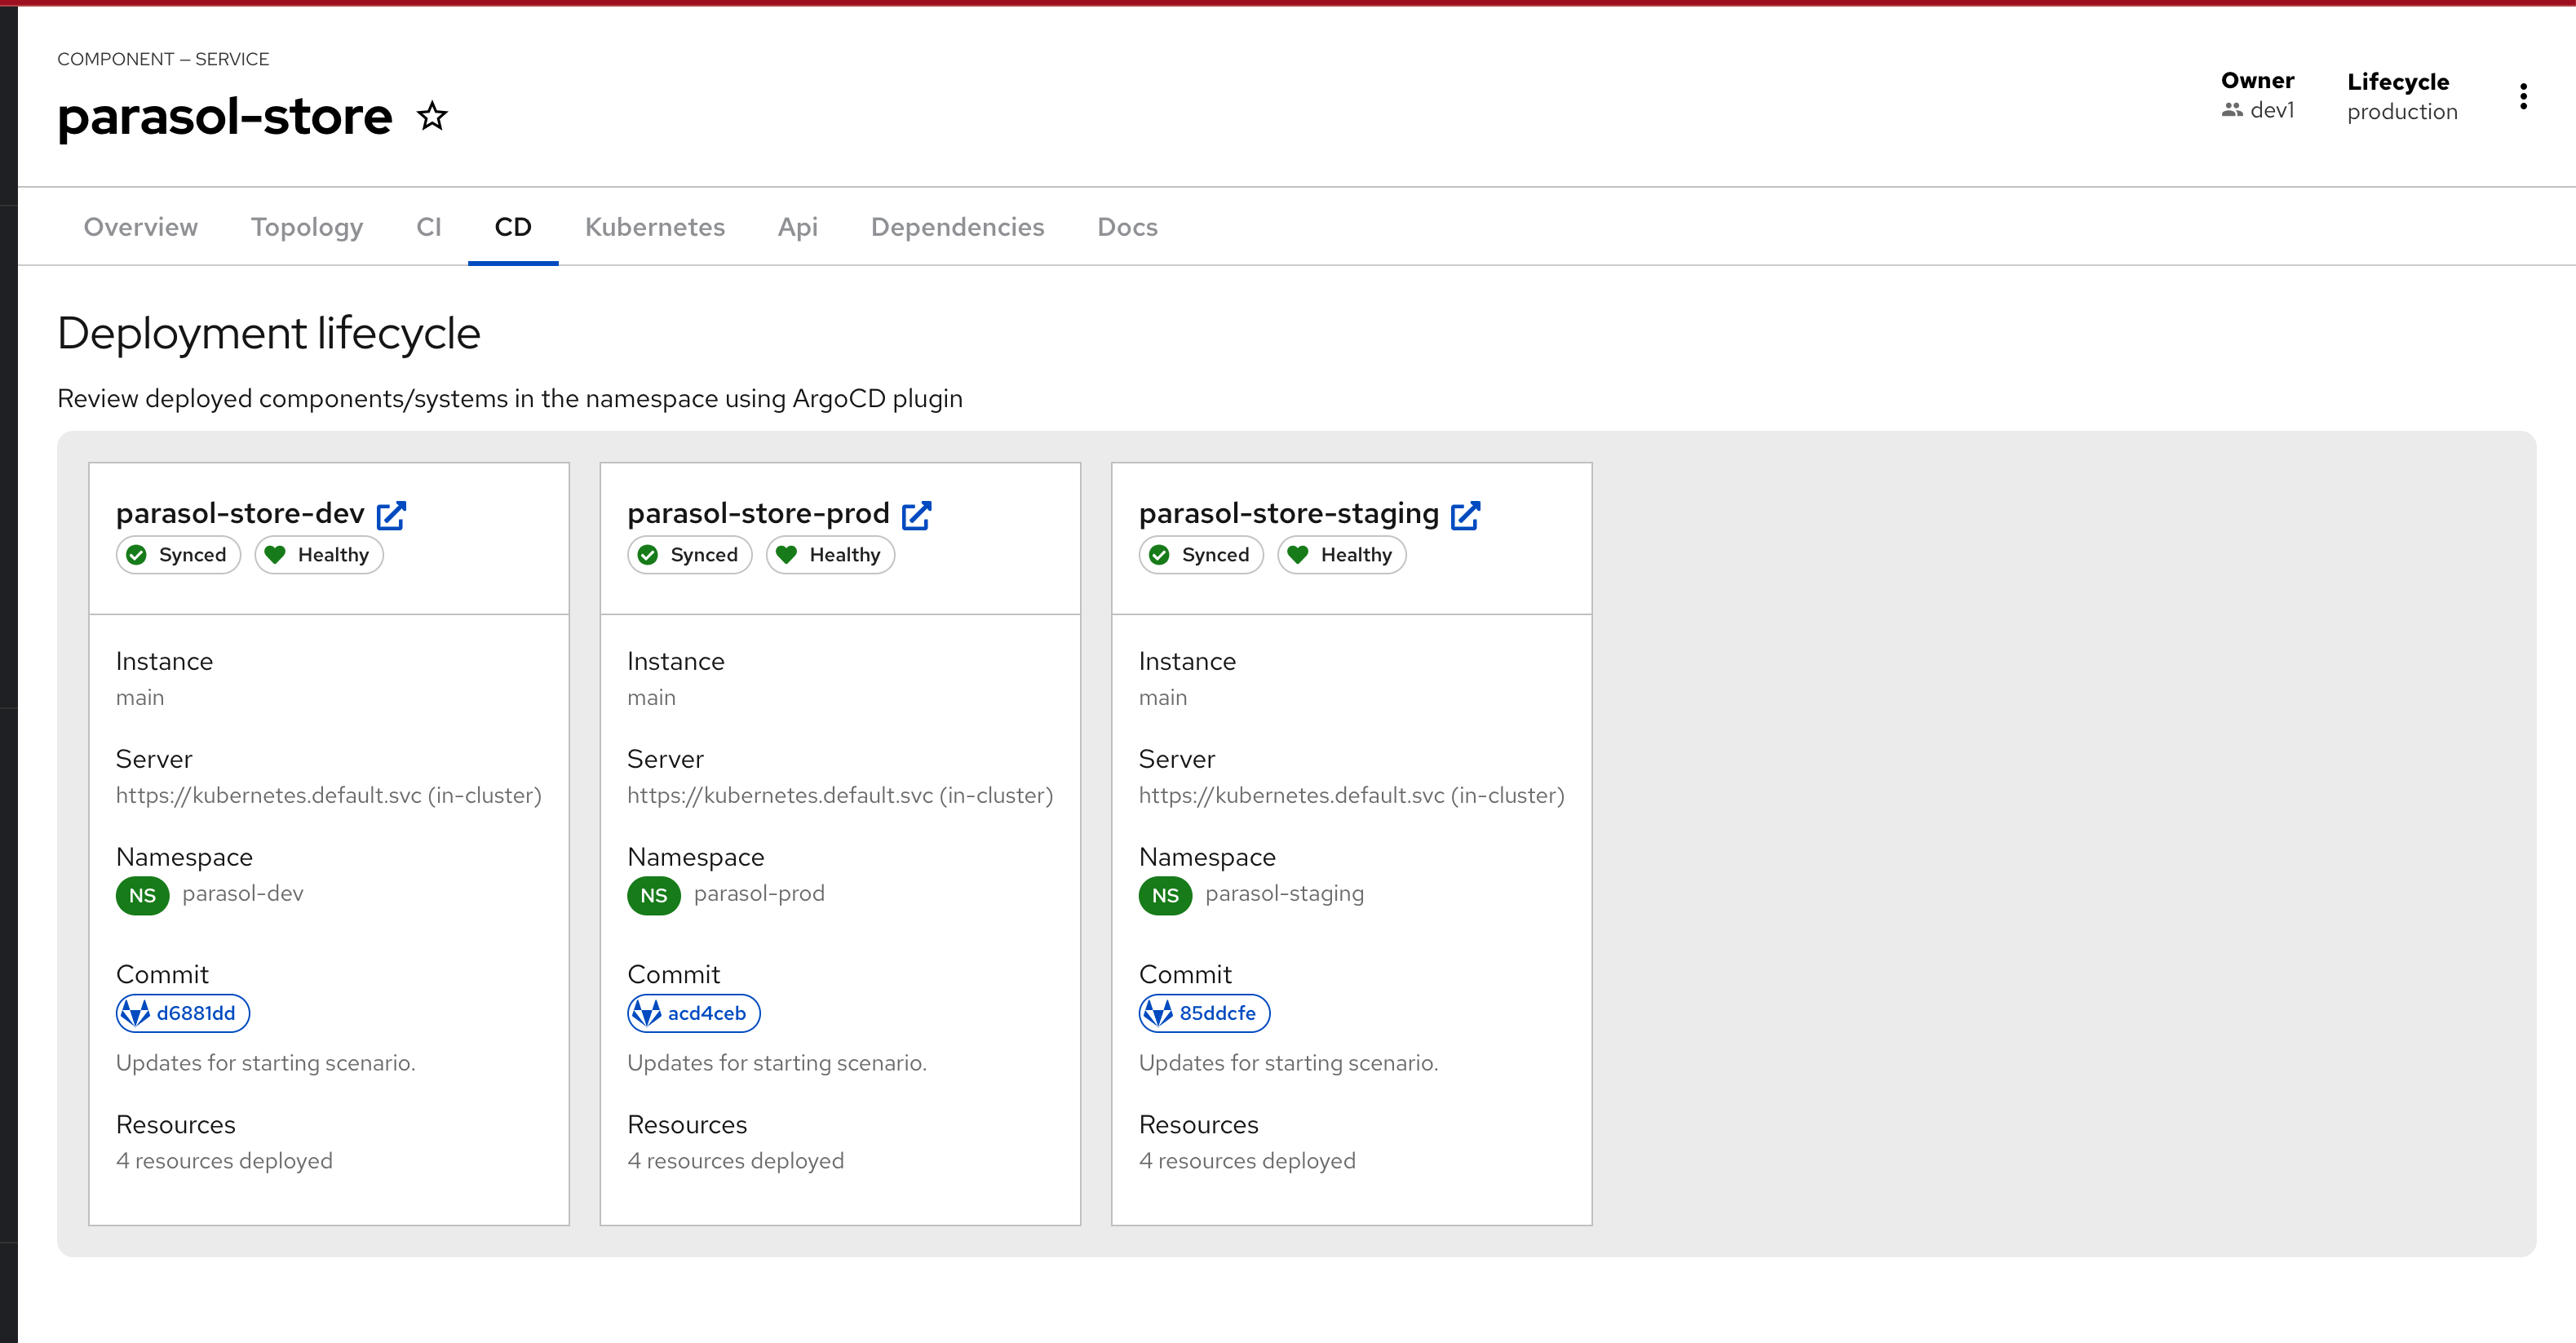
CD Tab displays the deployed components/systems using Argo CD plugin
-
Api Tab shows the Consumed API i.e.
parasol-store-api. Explore the Dependencies tab as well. -
Docs Tab contains the skeleton TechDocs created by the template. You can click on the
Pencil iconto edit the docs.
Platform Engineer Activity: Setup an Ephemeral Dev Environment on OpenShift
When developers are assigned a JIRA task or feature to enhance an application, they start by creating a feature branch on Git. They continue working on this branch until their changes are ready to be merged into the main branch. Providing an ephemeral development environment for these developers enables a continuous inner loop, enhancing productivity and accelerating development.
The Platform Engineer creates a new Software Template to set up an ephemeral development environment for Developers working on the parasol-store application. This template performs several tasks:
-
Creates a dedicated namespace for the feature branch in OpenShift
-
Connects the ephemeral development environment to a dev DB instance running in the same namespace OpenShift
-
Sets up development pipelines to build and deploy the developer’s changes in the environment
-
Generates GitOps/Argo CD manifests to manage CI/CD for the developer’s environment
With this approach, the Platform Engineers enable developers to just focus on coding. The templates simplify the set up of these ephemeral dev environments in a self-service manner. This allows the developers to create them repeatedly and easily, thereby rapidly increasing developer productivity.
Please make sure to log in as a Platform Engineer with pe1 / {common_password}. Refer to the below guide for assistance.
|
Click to learn how to login as a Platform Engineer
Login as Platform Engineer
You will perform this activity as a Platform Engineer. Please follow the below steps to logout from Red Hat Developer Hub and GitLab, and login back as a Platform Engineer (pe1 / {common_password})
-
Logout from Red Hat Developer Hub
-
Sign out of Red Hat Developer Hub from the Profile dropdown as shown in the screenshot below.
-
-
Logout from GitLab
-
Click on the Profile icon, and Sign out from the dropdown as shown in the screenshot below.
-
-
Login back as a Platform Engineer to Red Hat Developer Hub and GitLab using the credentials
pe1/{common_password}
Create parasol-store Dev Template
-
Access your Red Hat Developer Hub instance. If prompted login using
pe1/{common_password} -
Click on the
icon on the top navigation to access the Create menu, and choose Register Existing Component. -
Create a Software Template by pasting this template URL into the URL textbox
https://gitlab-gitlab.{openshift_cluster_ingress_domain}/rhdh/parasol-store-dev-template/-/blob/main/template.yaml -
Click on the Analyze button followed by clicking the Import button to import the template.
-
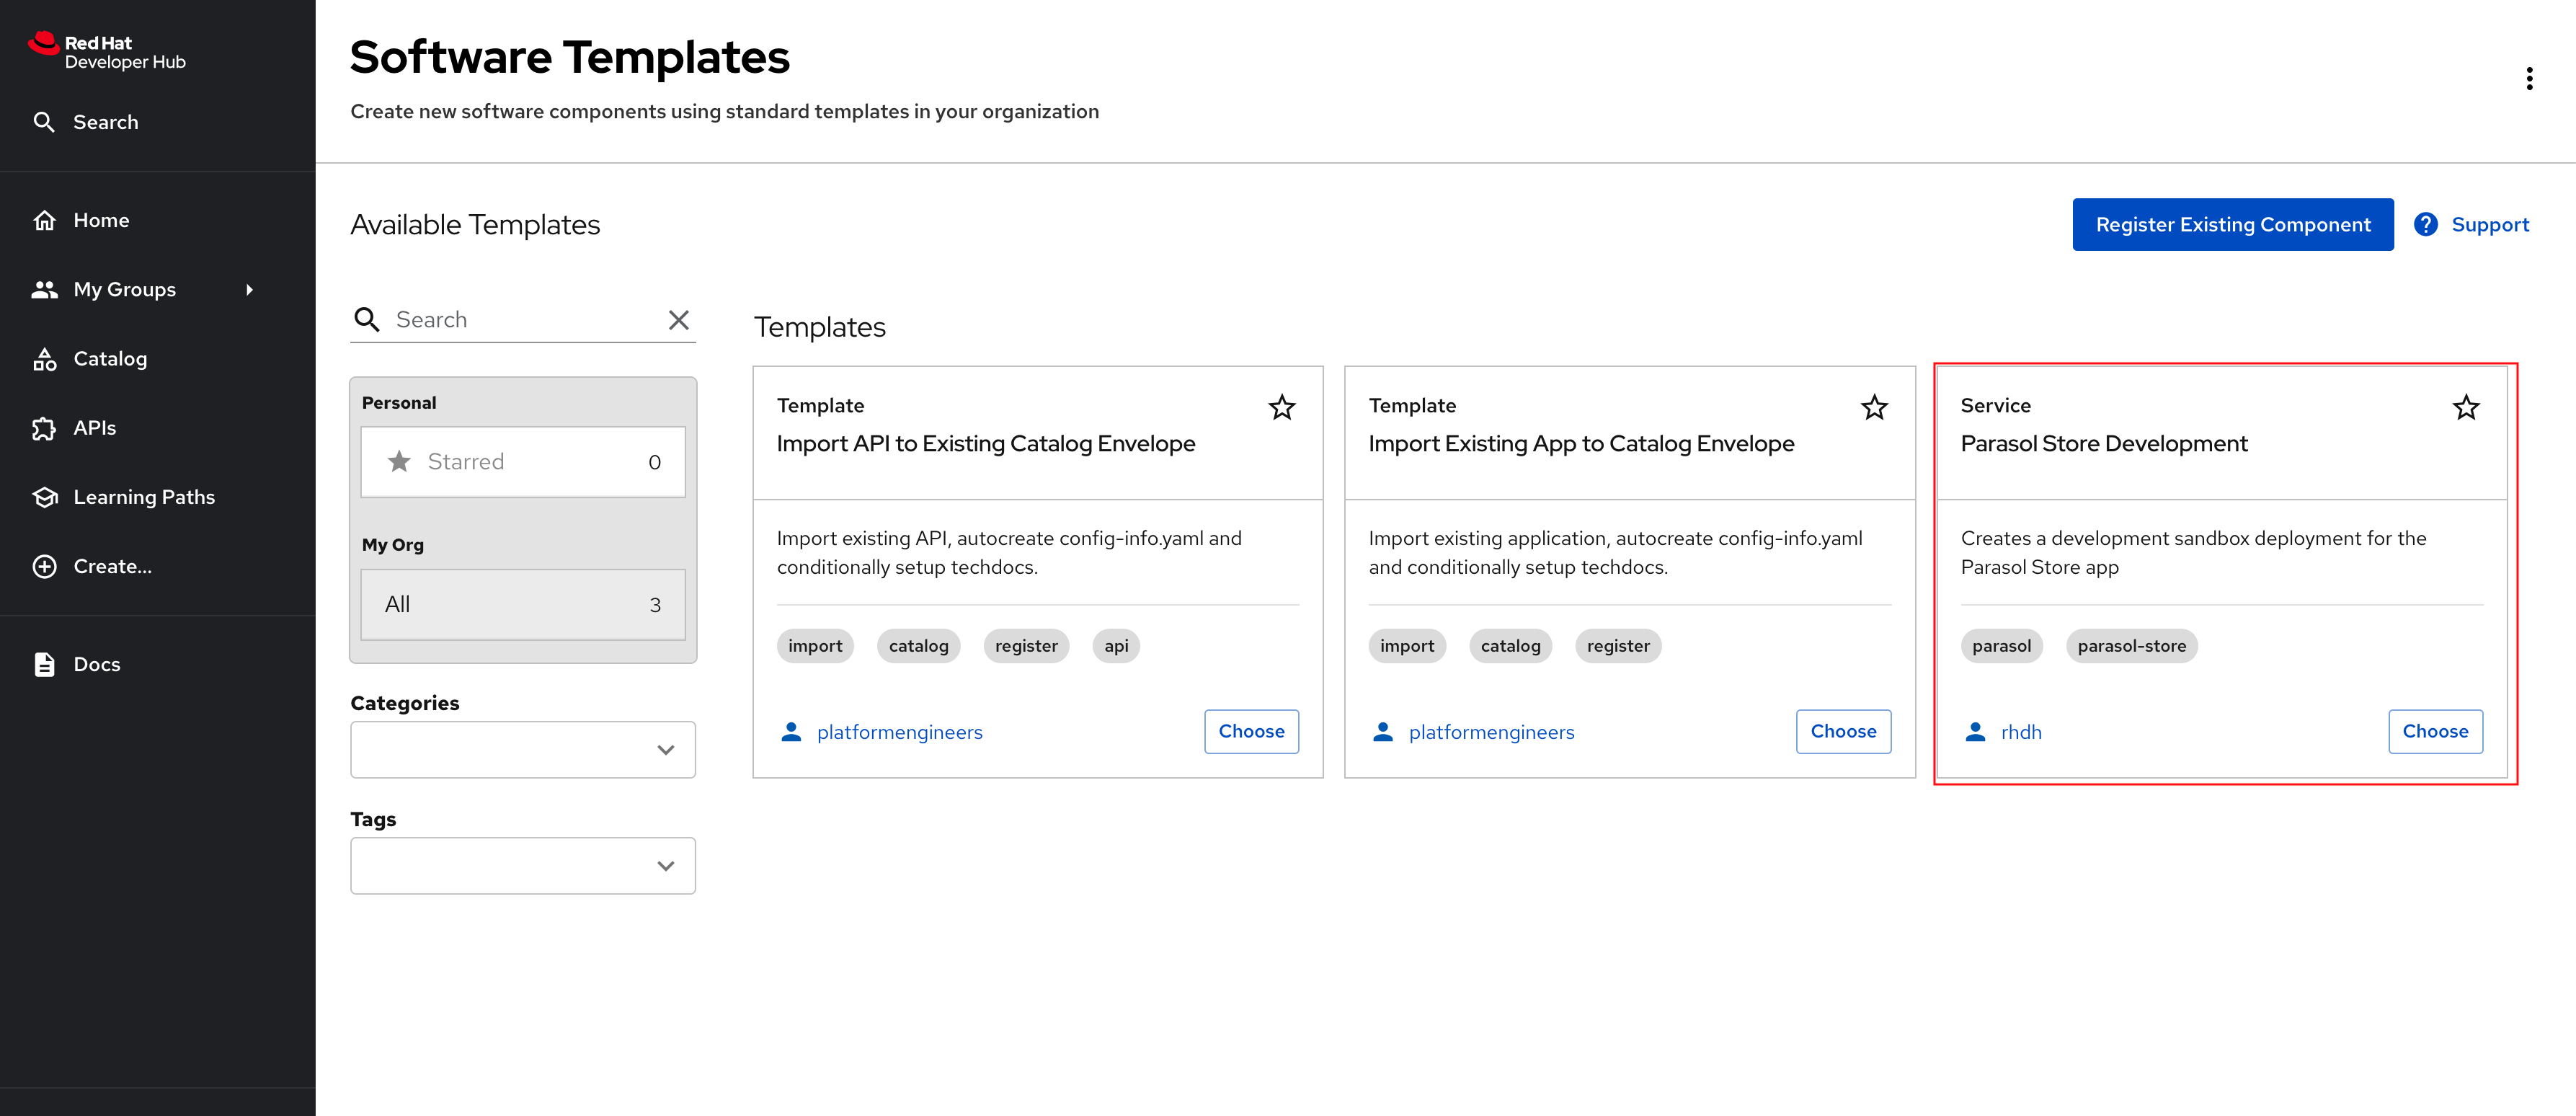
The Template will appear on the Create screen.
Developer Activity: Work on feature branch
In this module, as a Developer you are tasked to make changes to an existing service - the parasol-store service. You will create a feature branch of the repository and then work in an ephemeral environment that allows you to work independently without impacting other developers in your team. Once you are ready with the changes, you can raise a merge request to push your changes to main branch, and there progressing the changes to production deployment
Please make sure you are logged in as a Developer with dev1 / {common_password}.
|
Click here to view instructions to login as the Developer.
Login as Developer
-
You will perform this activity as a Developer.
-
Logout from Red Hat Developer Hub
-
Click the dropdown in the top-right of Red Hat Developer Hub, then click on the Logout link.
-
-
Logout from GitLab
-
Click on the Profile icon, and Sign out from the dropdown as shown in the screenshot below.
-
-
Login back as a Developer to to Red Hat Developer Hub and GitLab using the credentials
dev1/{common_password}
Create a Feature Branch
-
Click here to access the parasol-store repository.
-
Click on the (+) button as shown in the screenshot below, and click on New branch menu
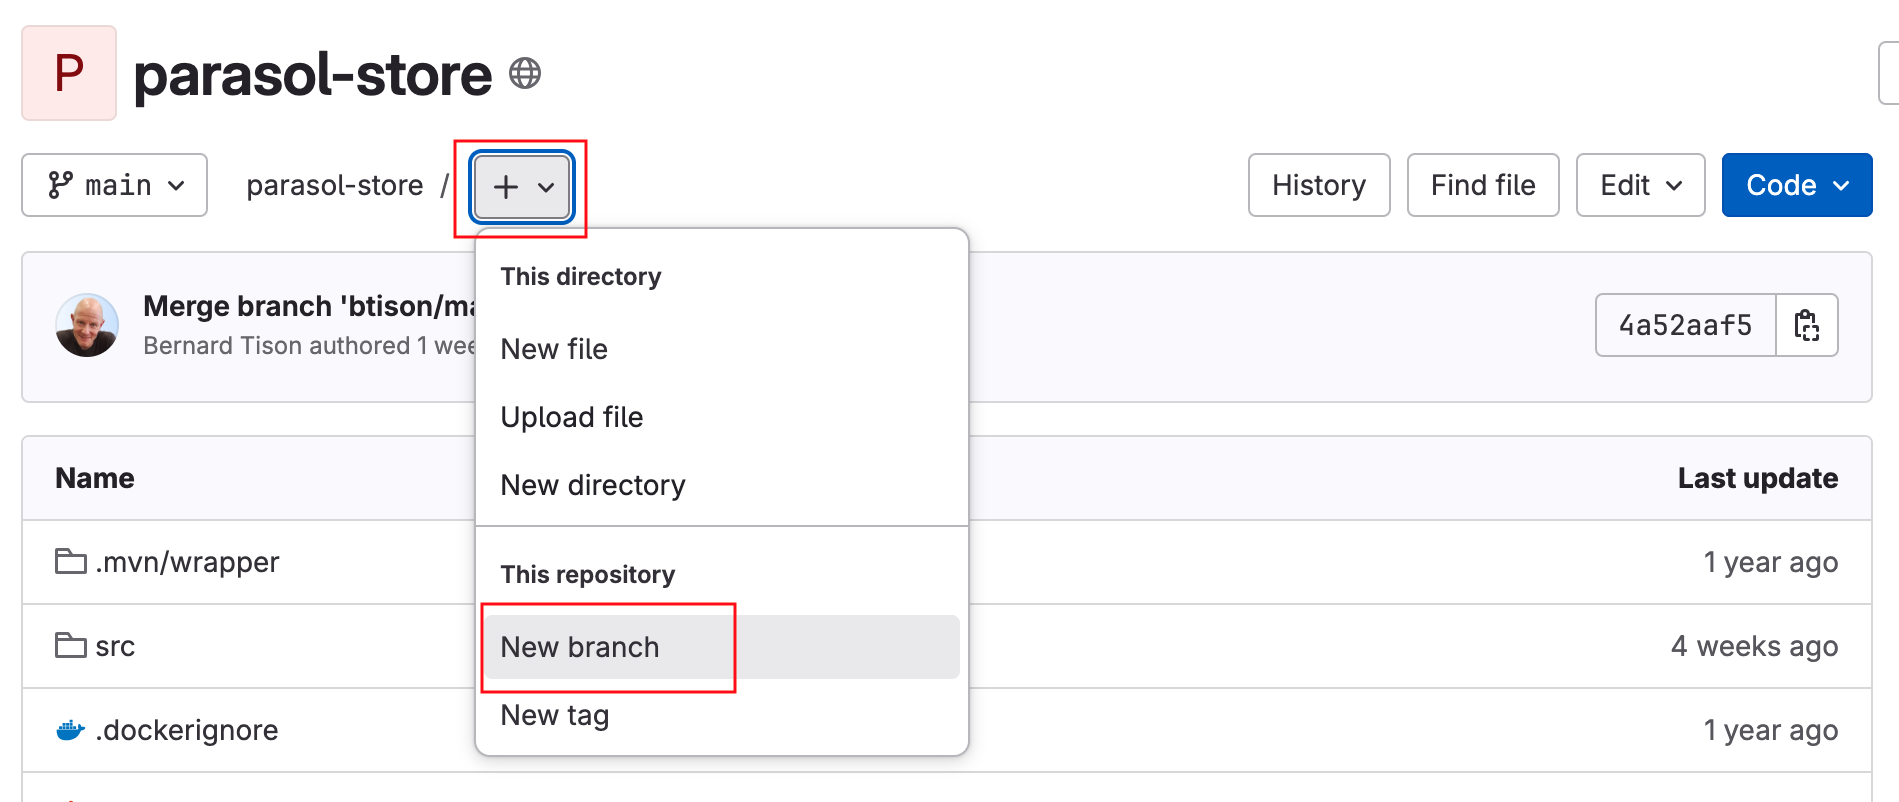
-
Name the branch
my-feature-branch. The rest of the instructions assume this is the branch name.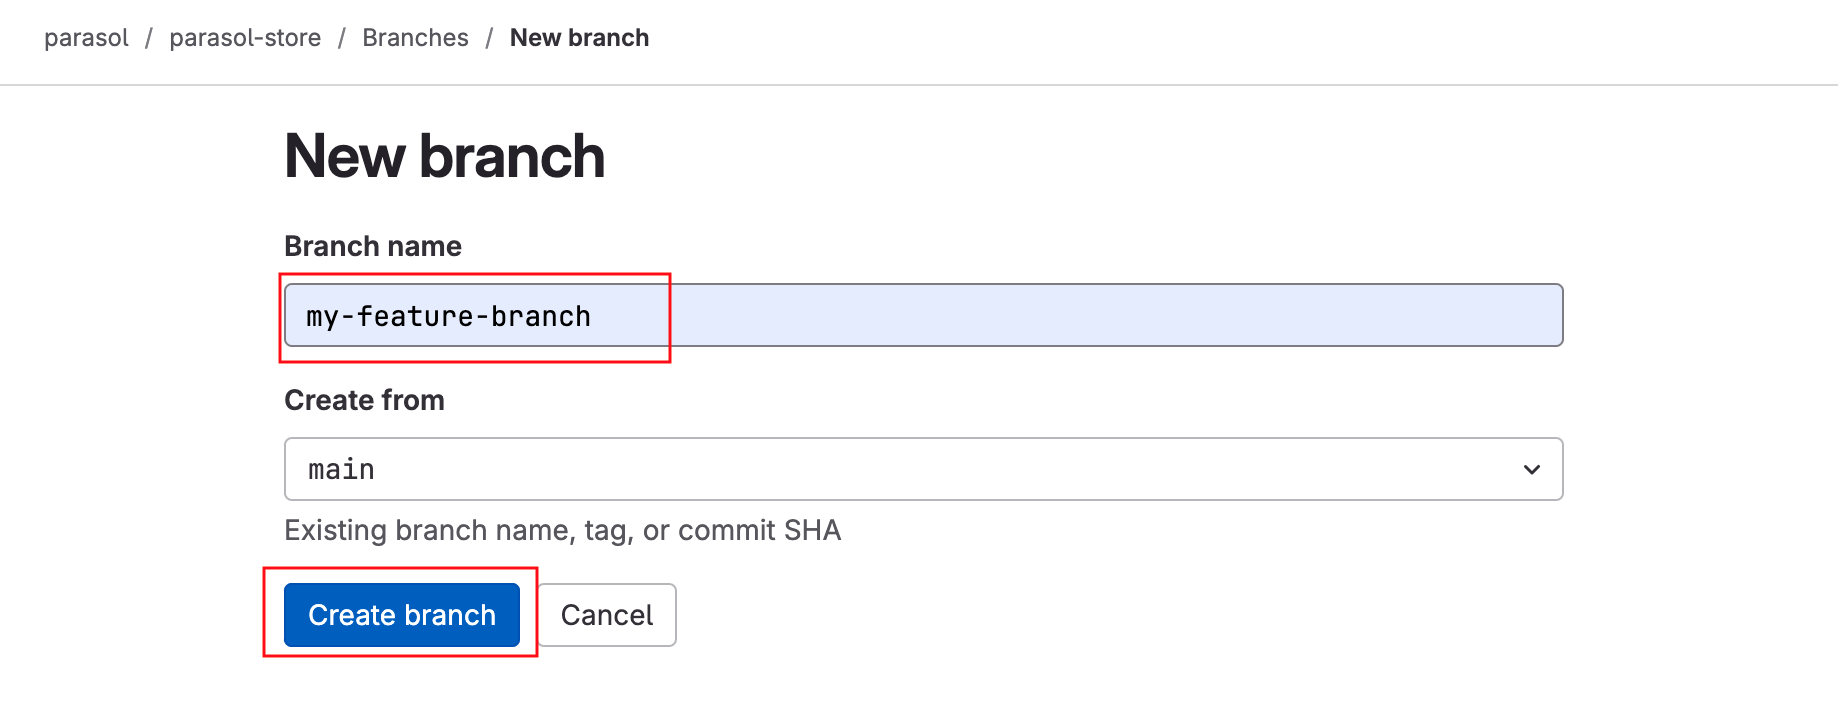
Onboard the Feature Branch using template
-
Visit your instance of Red Hat Developer Hub. If prompted, login as
dev1/{common_password}. -
Select the
icon on the top navigation bar to access the Self-service menu and view the available templates. -
Click Choose button on the Parasol Store Development template.
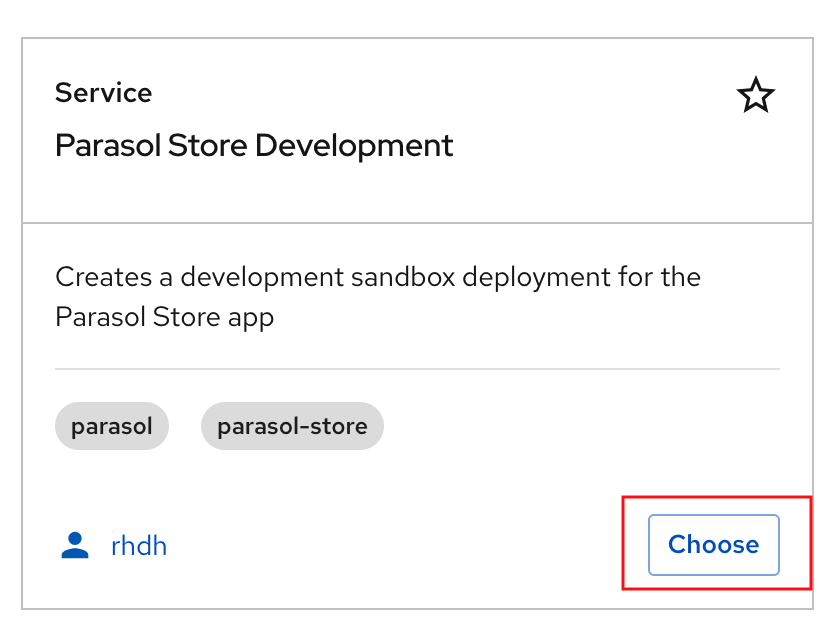
-
In Step 1: Provide Information for the sandbox deployment, enter the feature branch name
my-feature-branchor the name you have picked for your branch.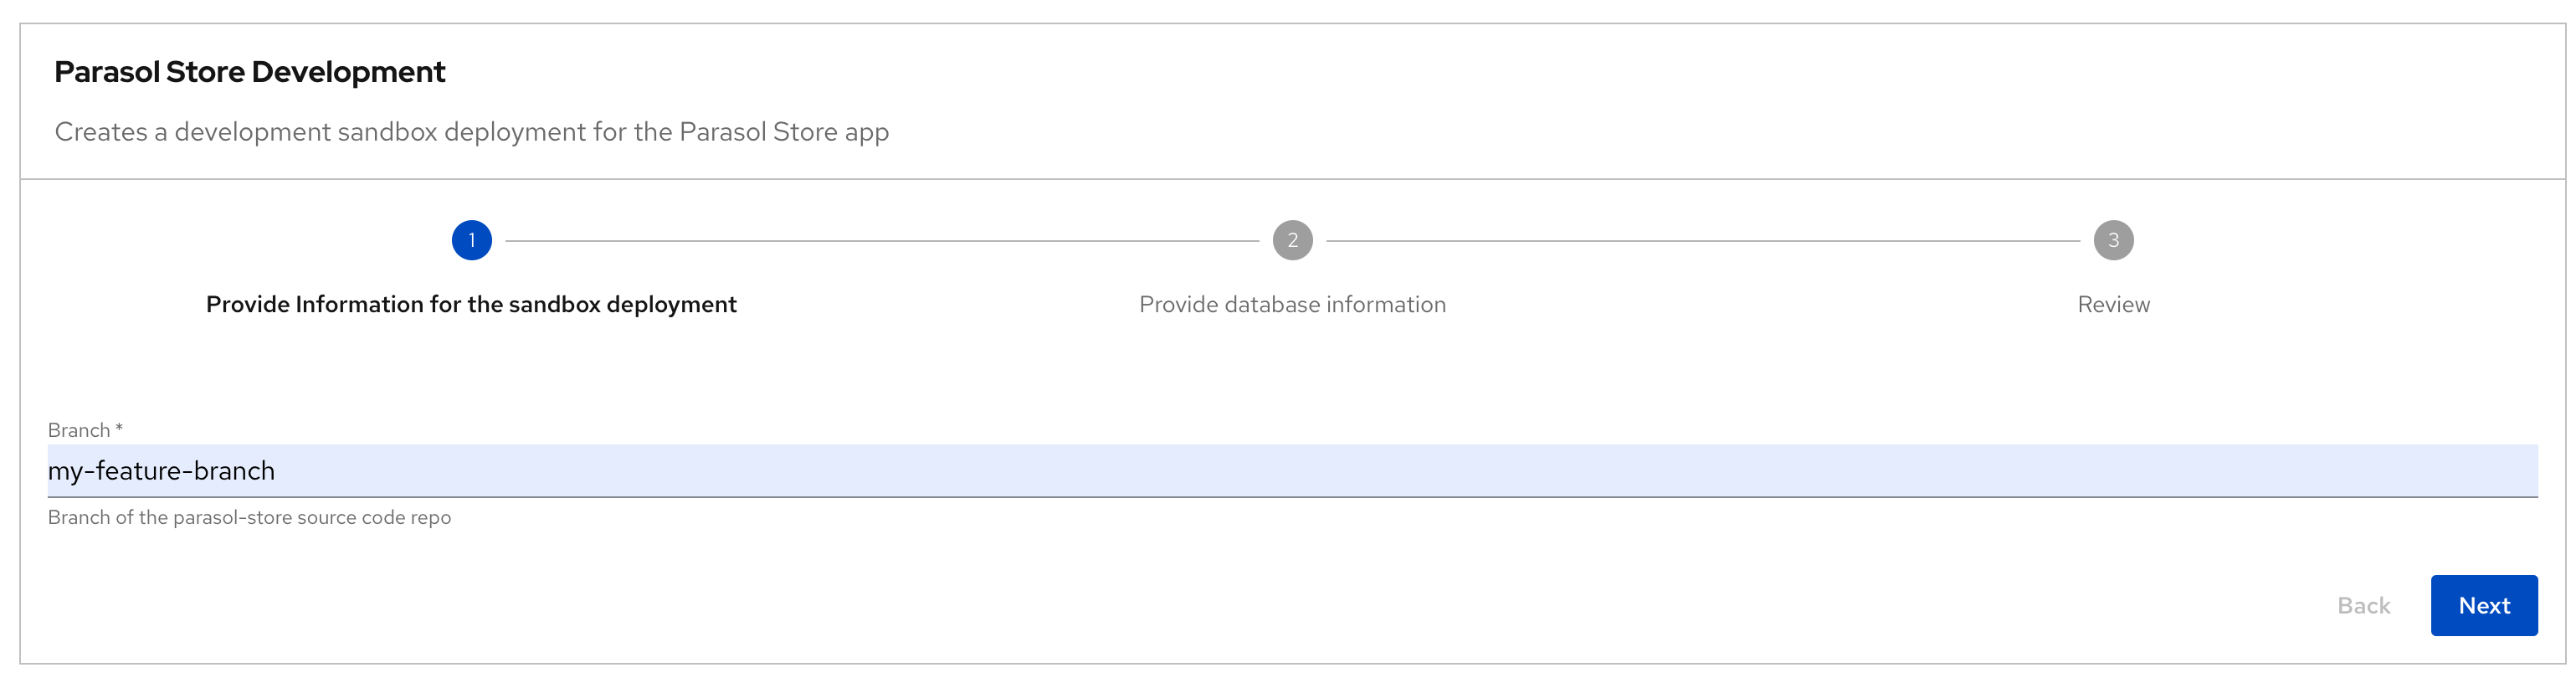
-
In Step 2: Provide database information. Keep all the fields as they are - no need to make changes.
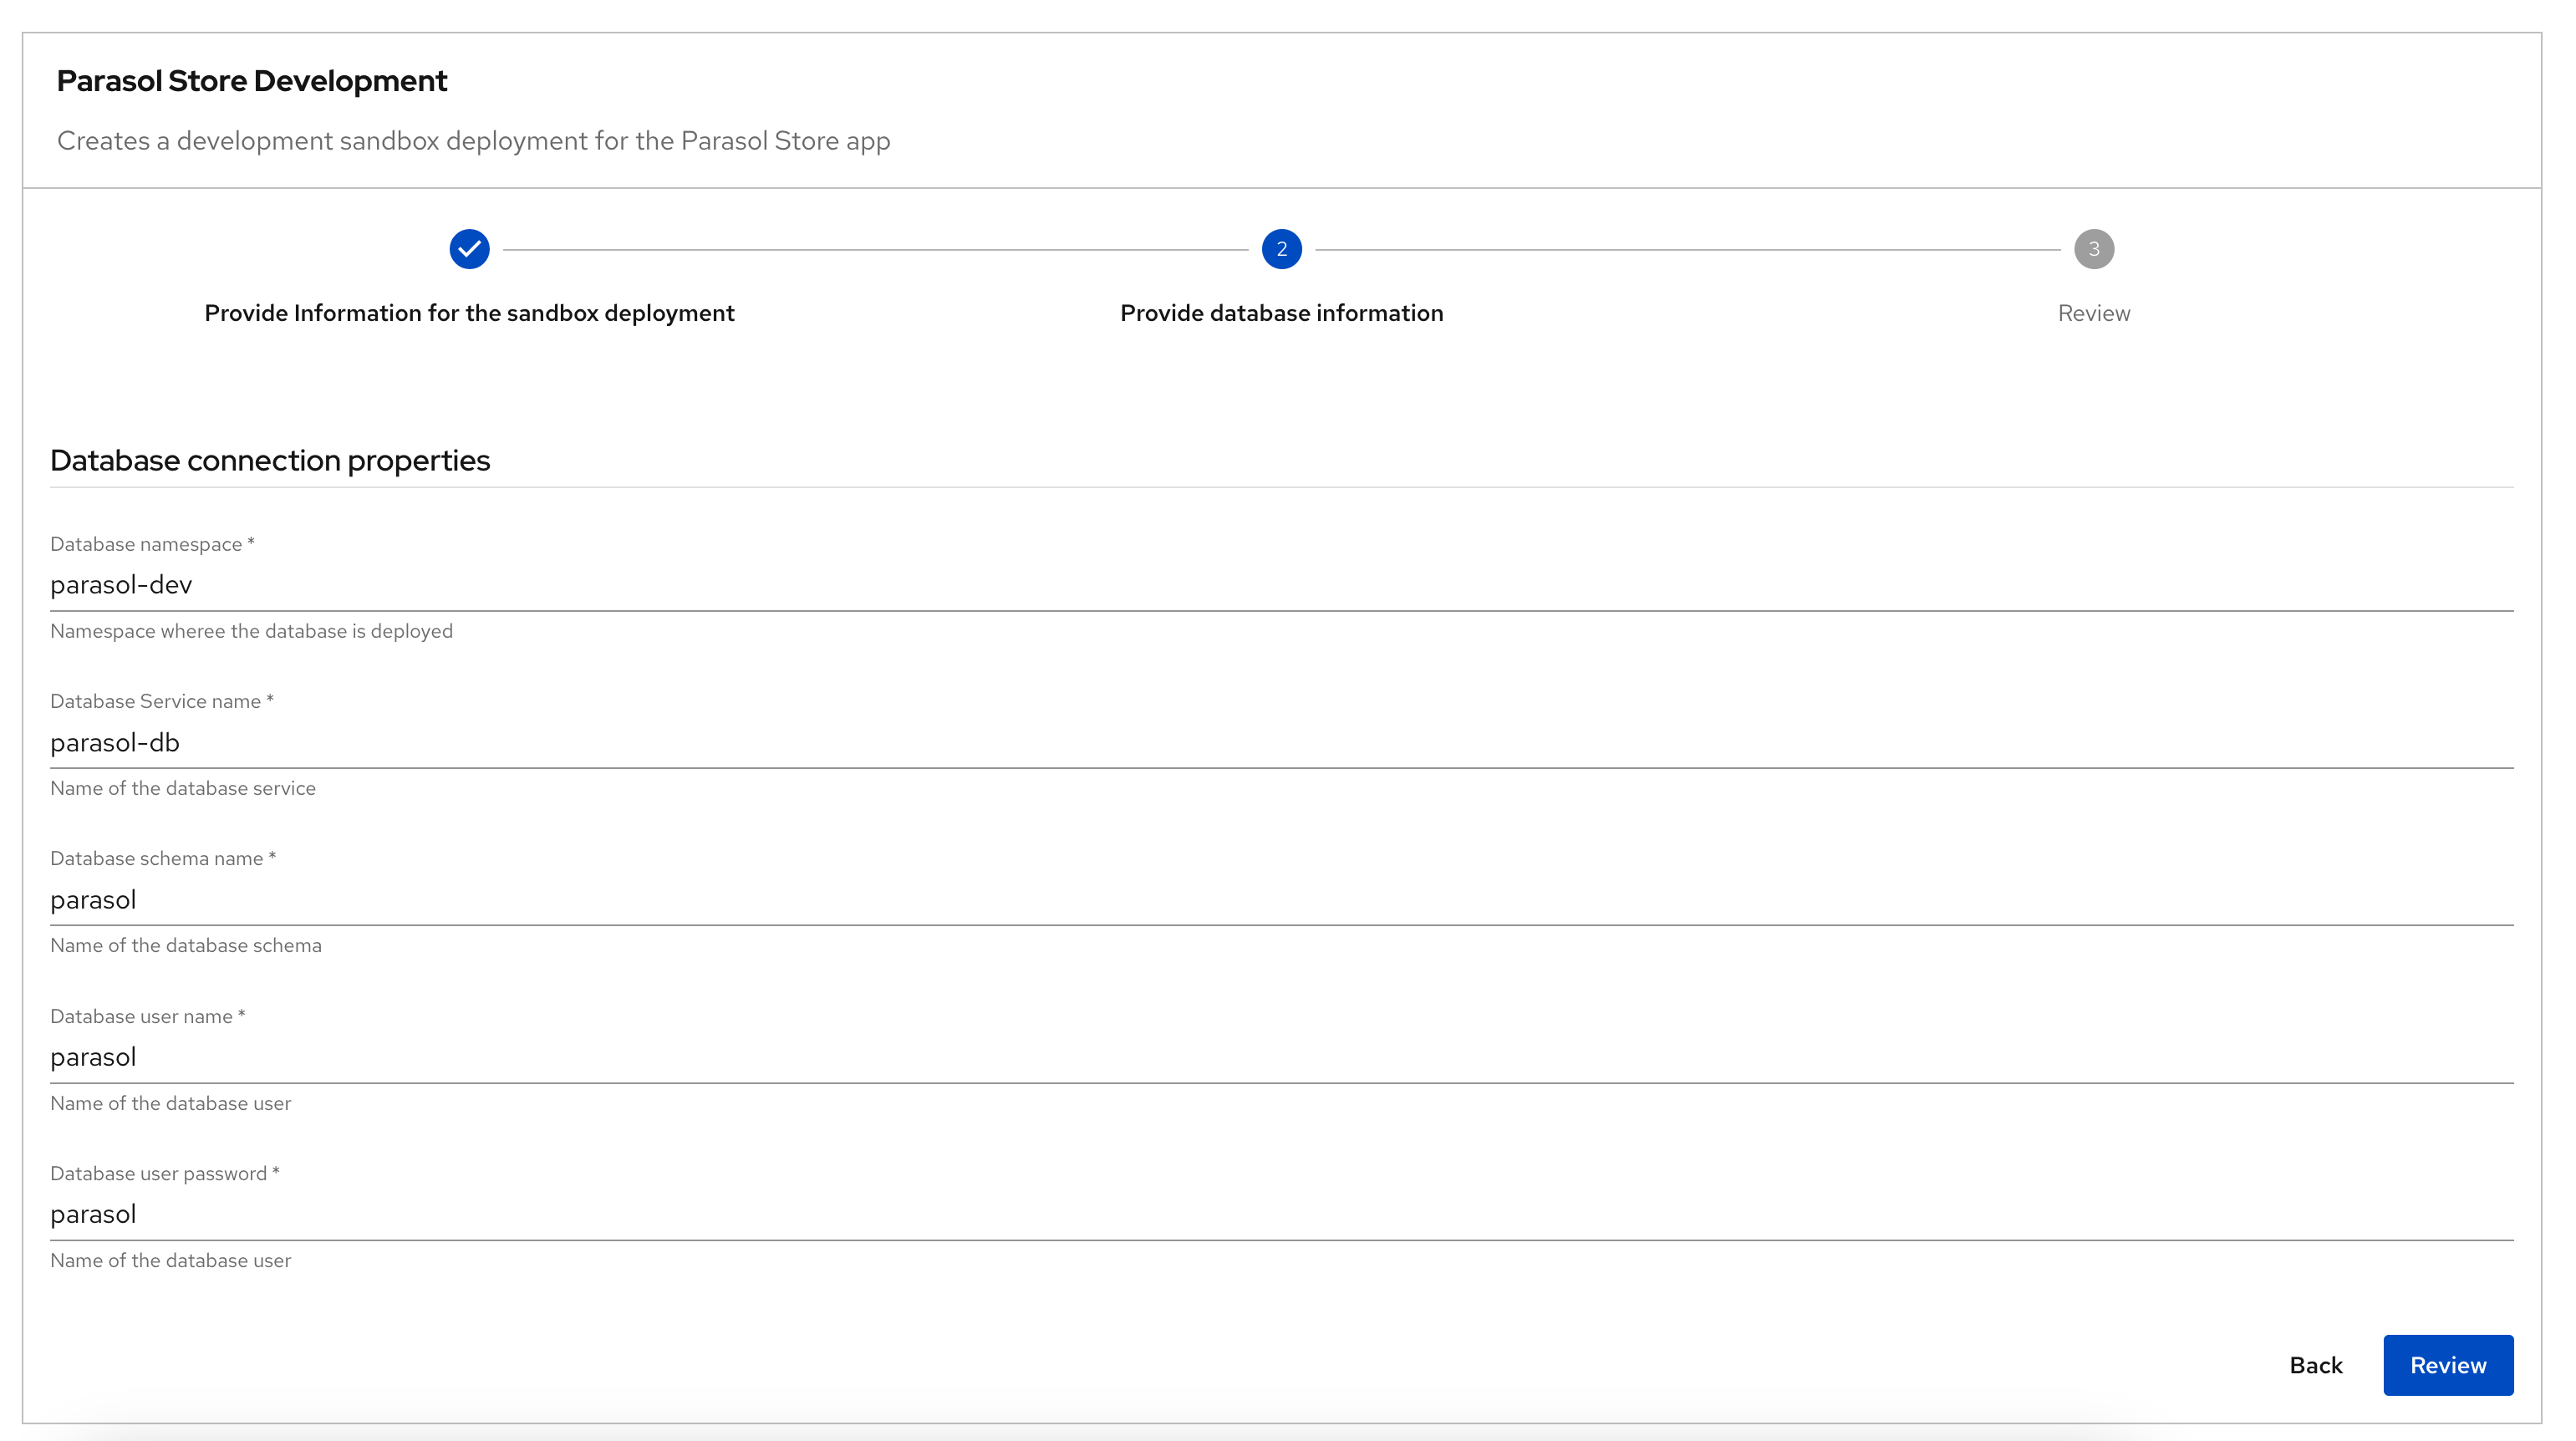
-
Click on Review, and proceed to Create
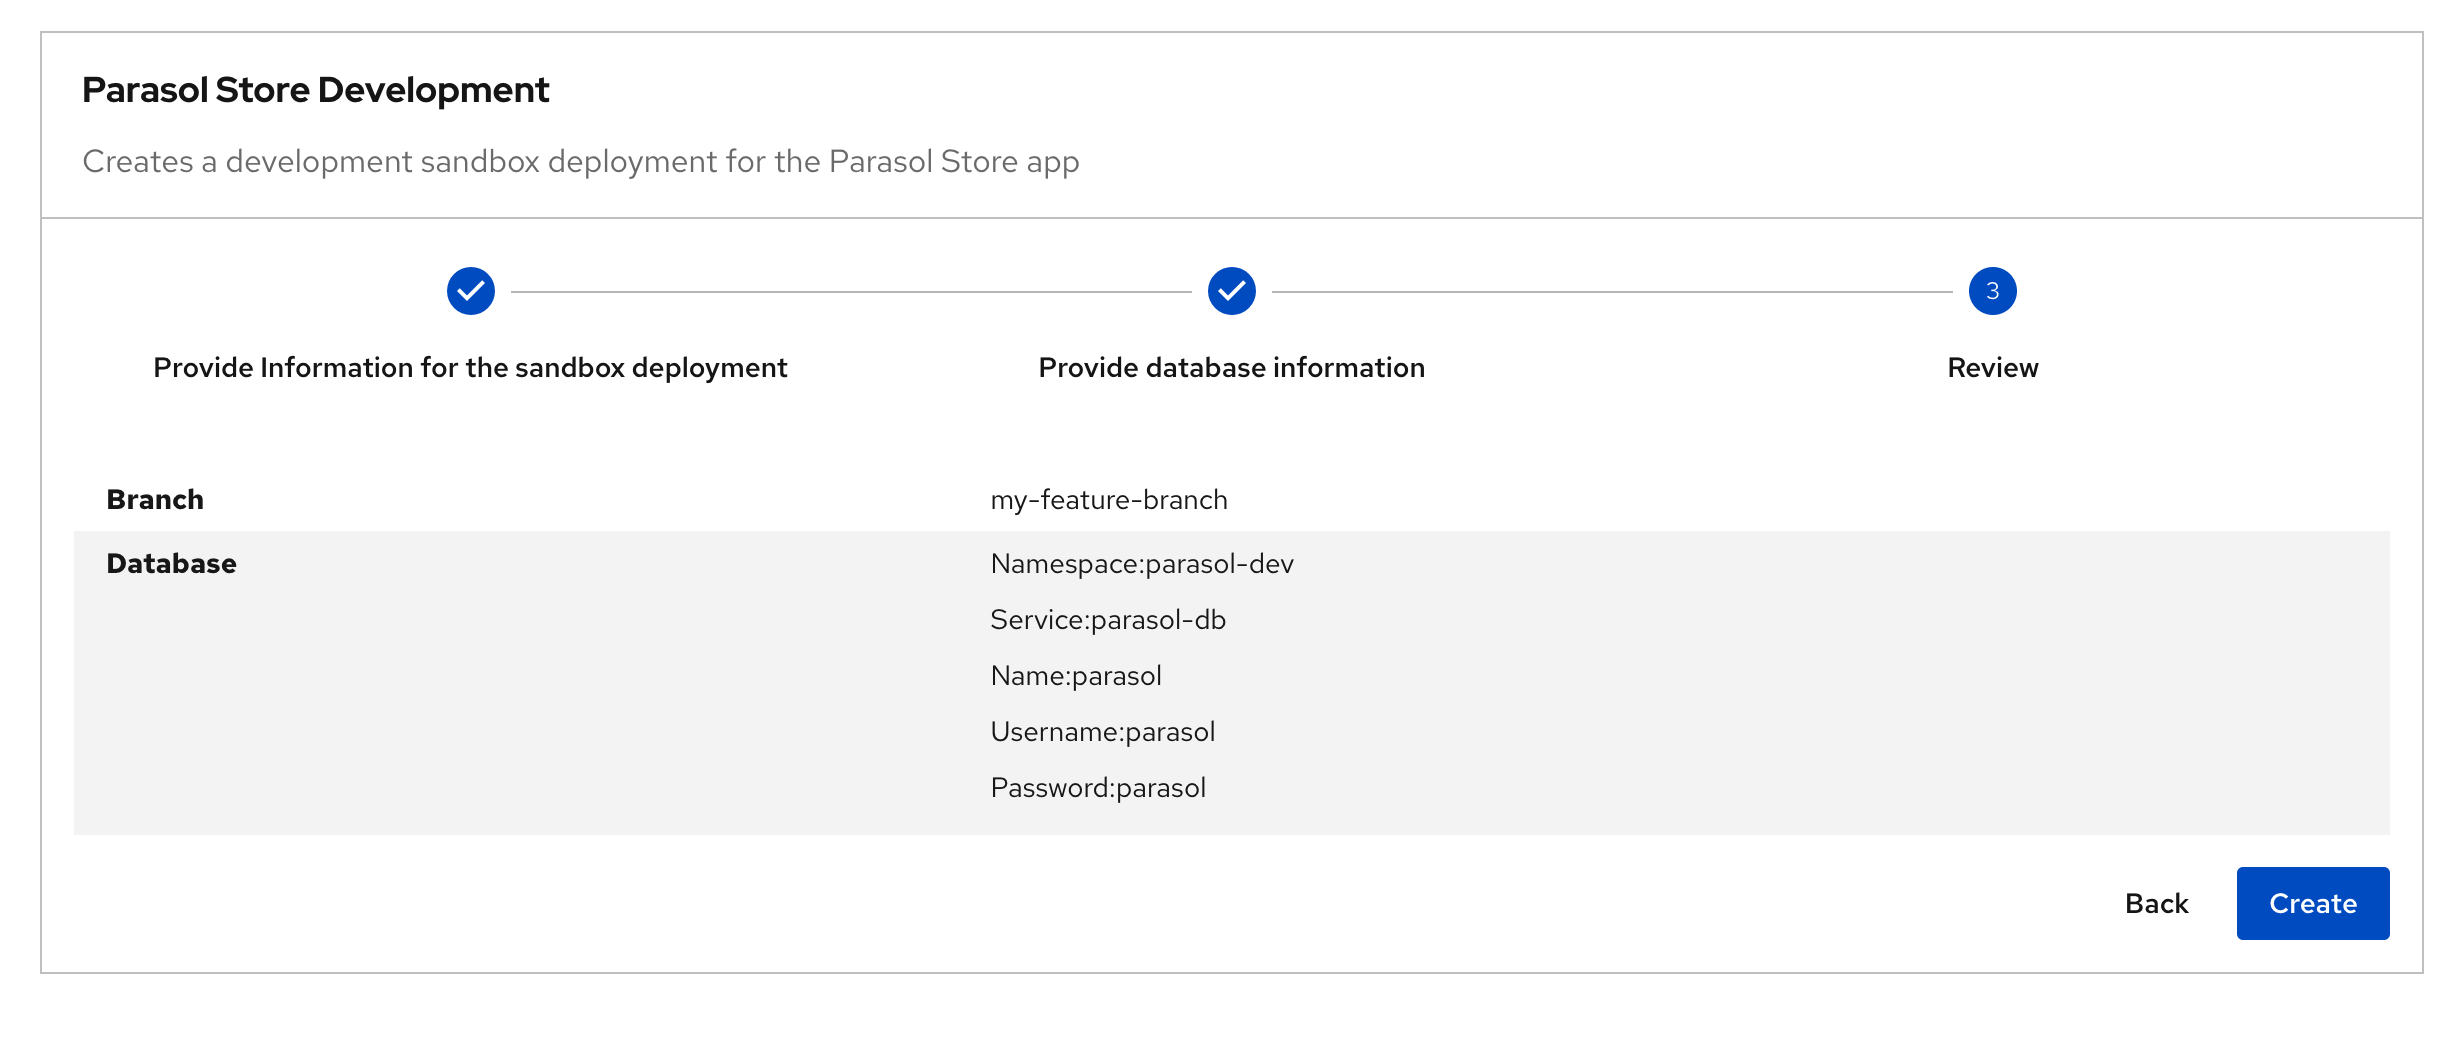
-
Click on the Open component on catalog link
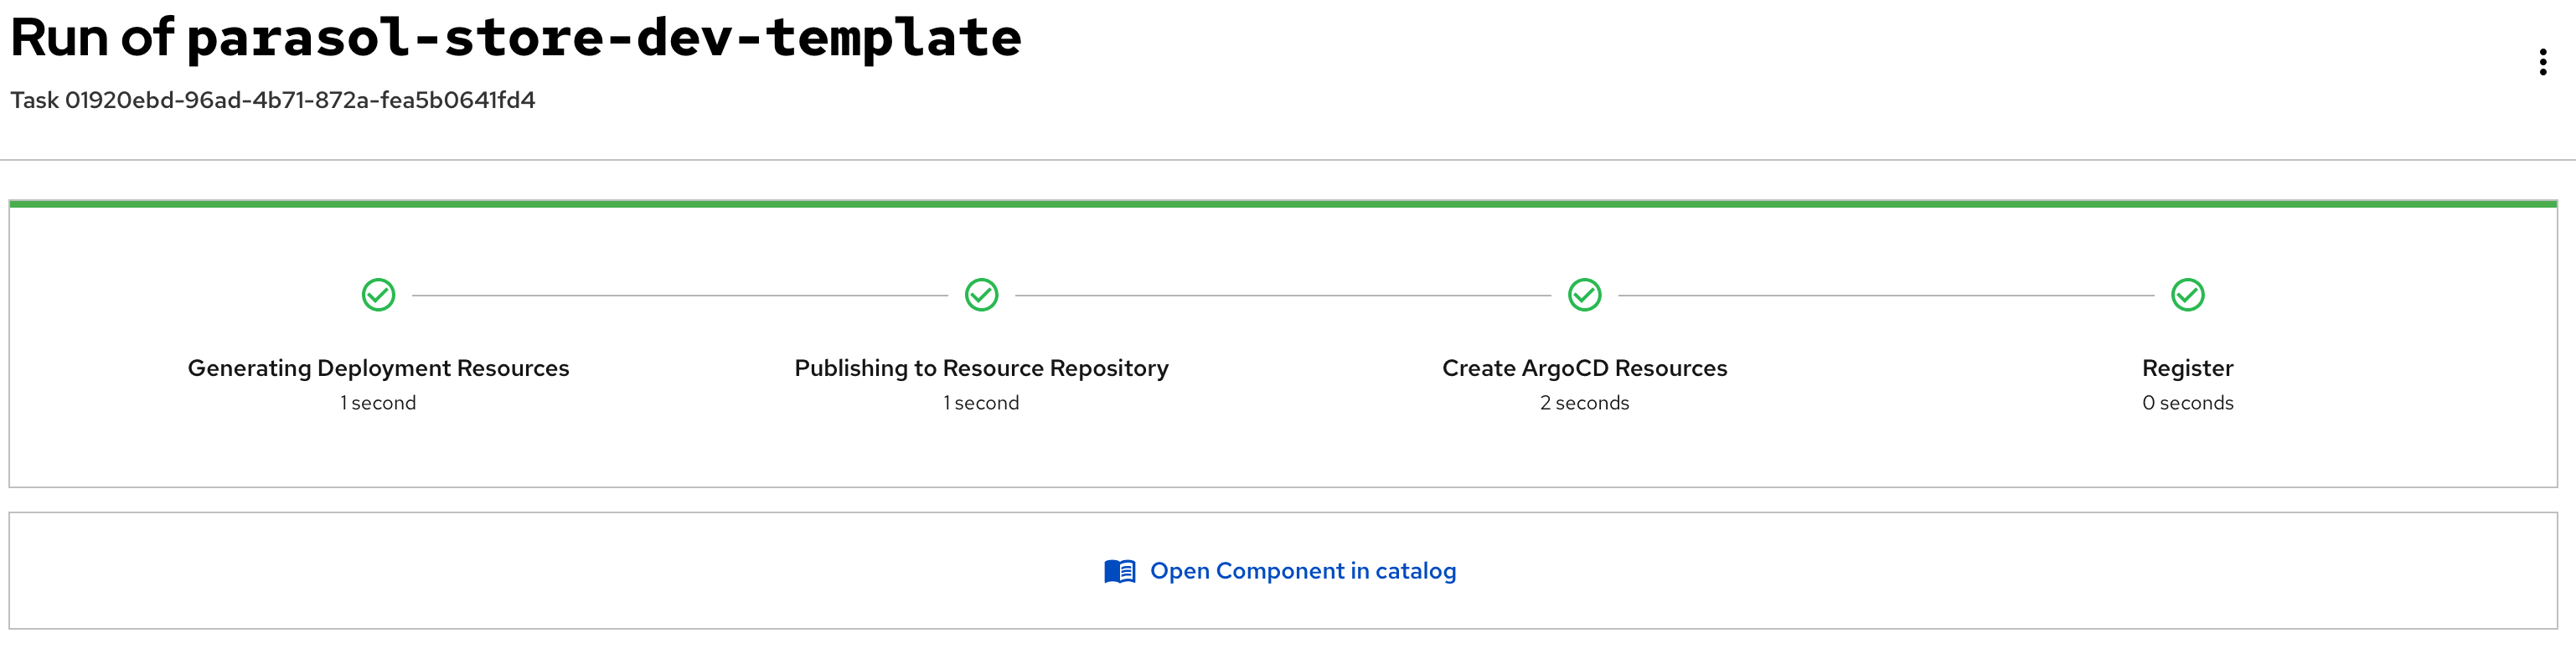
Explore the Component
-
The newly created component for the ephemeral environment acts as a single pane of glass to perform most of the acivities as a developer
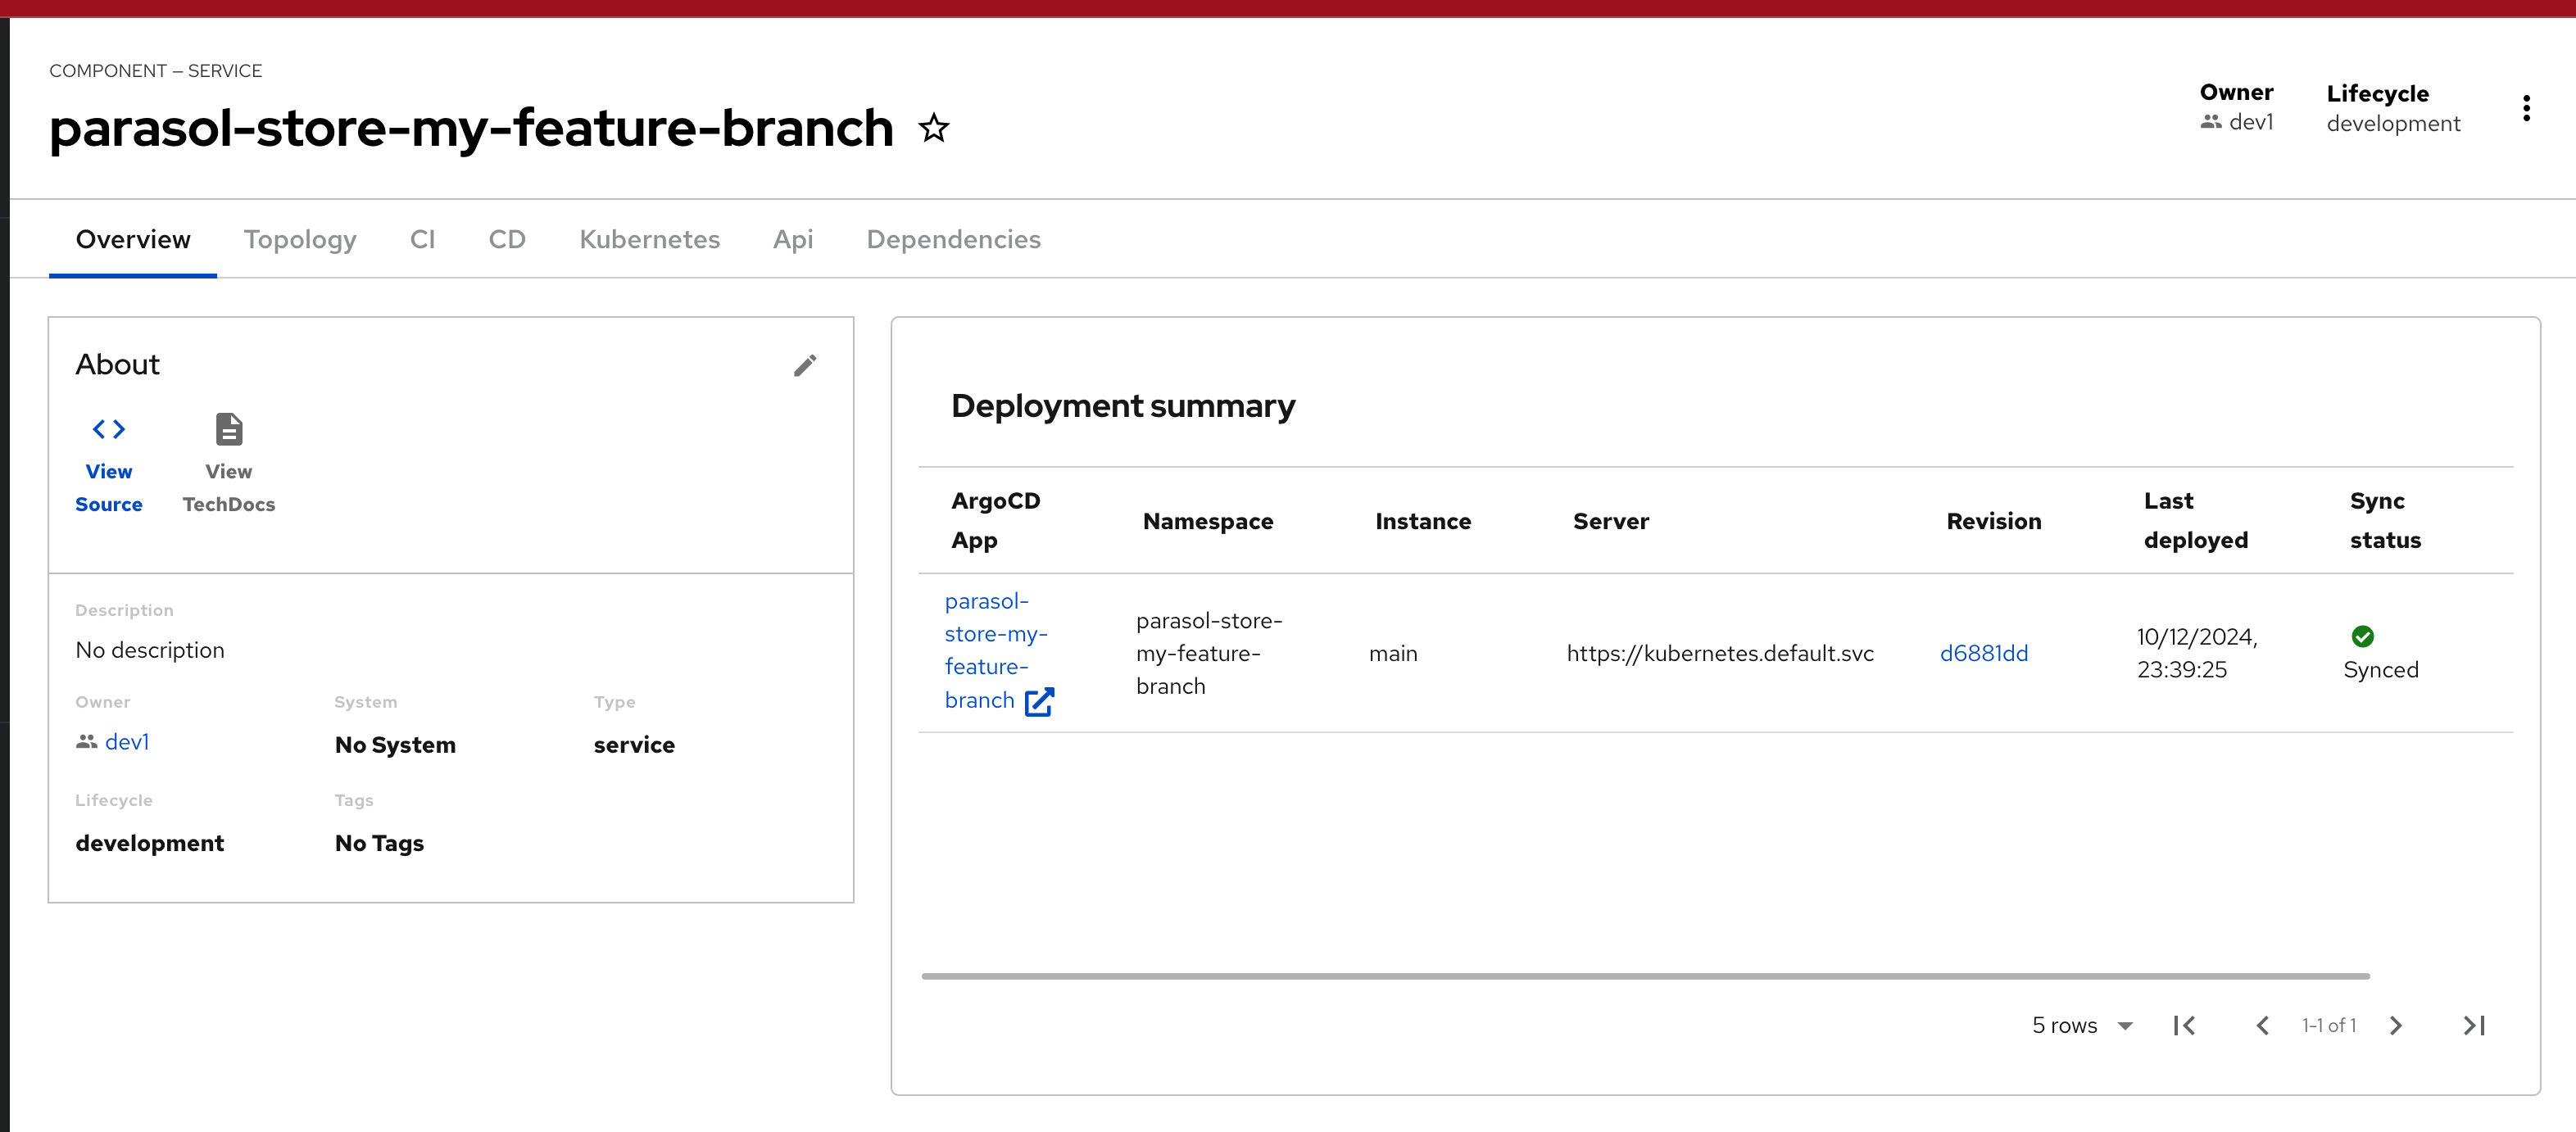
-
Notice that under the CI tab, a pipeline is in progress. If this isn’t in progress yet, allow a few minutes for the pipeline to kickoff.
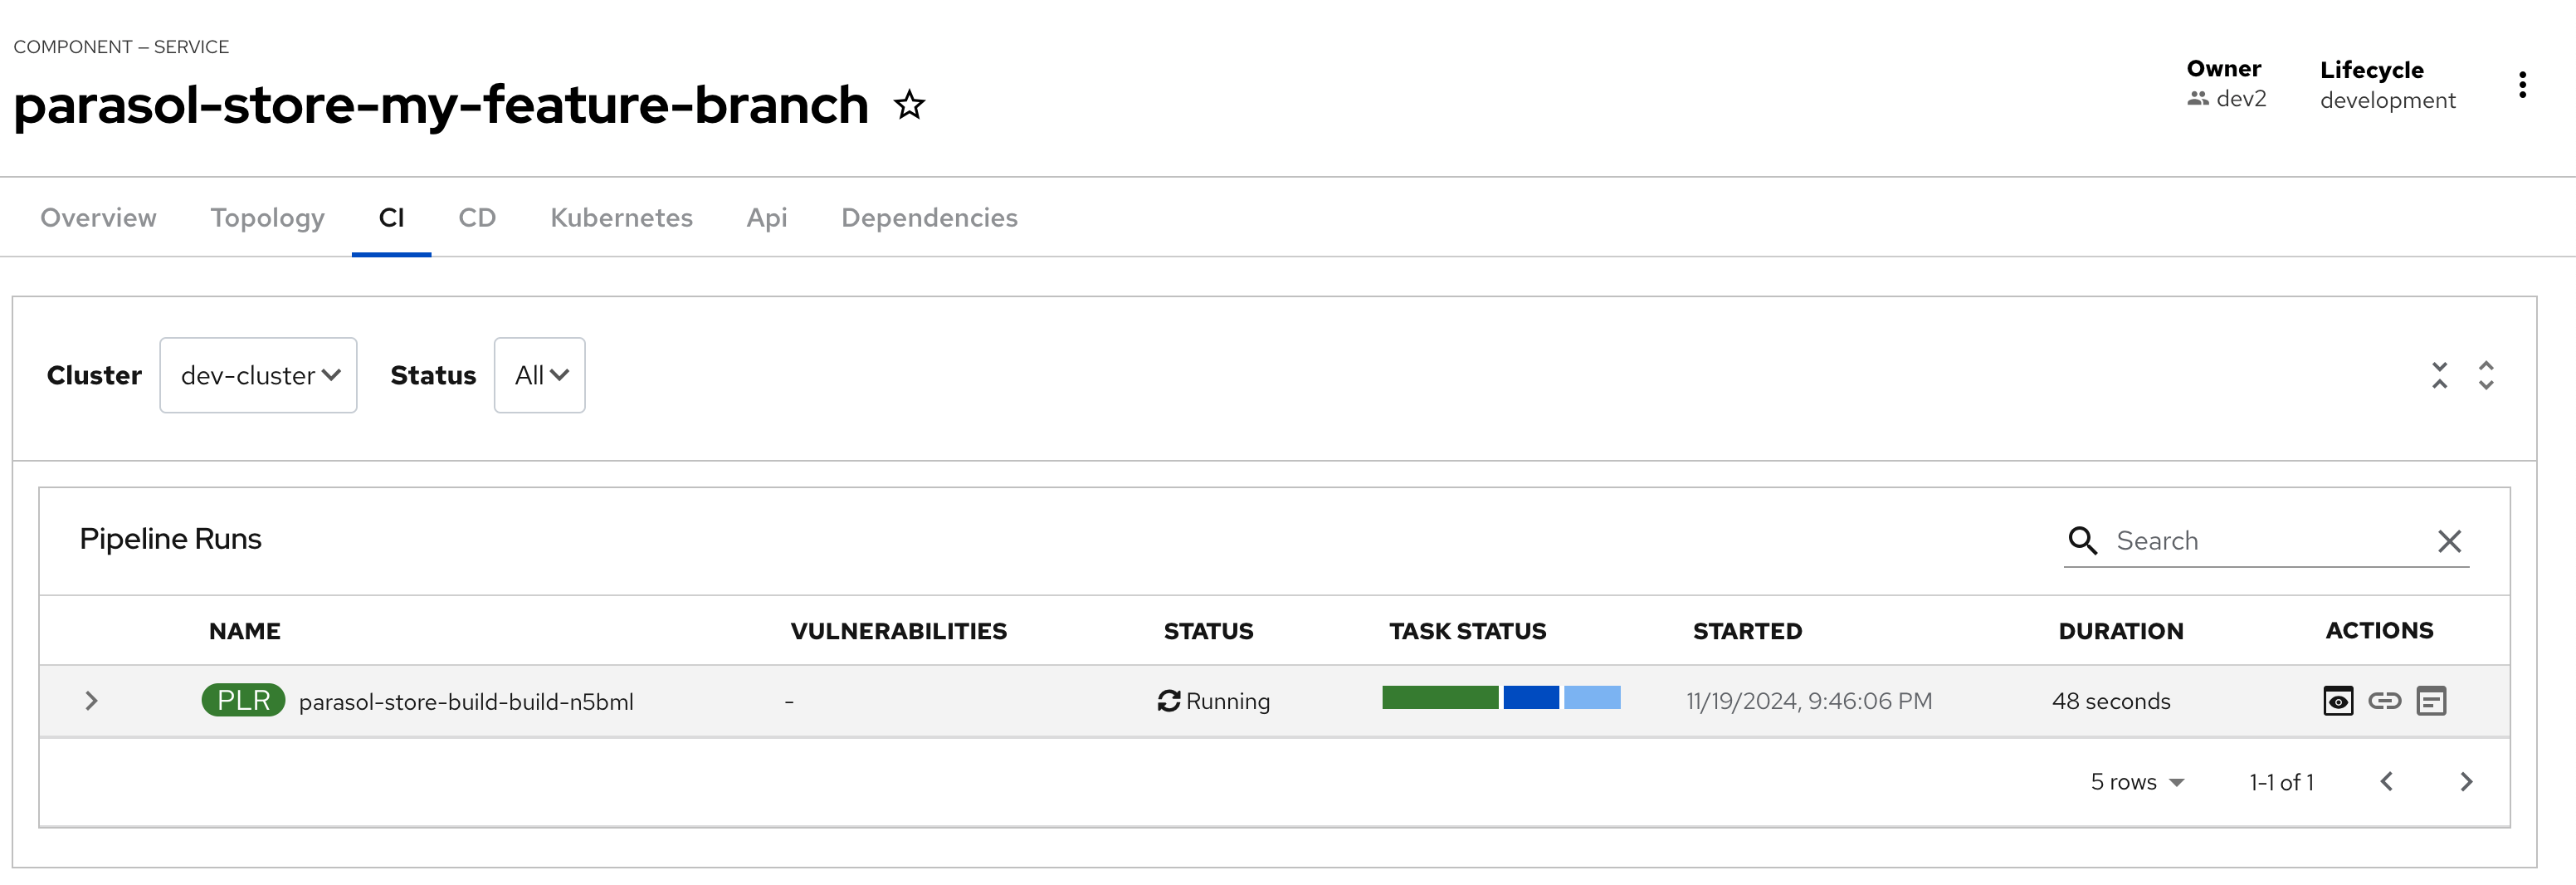
-
The pipeline turns green when it finishes the run successfully
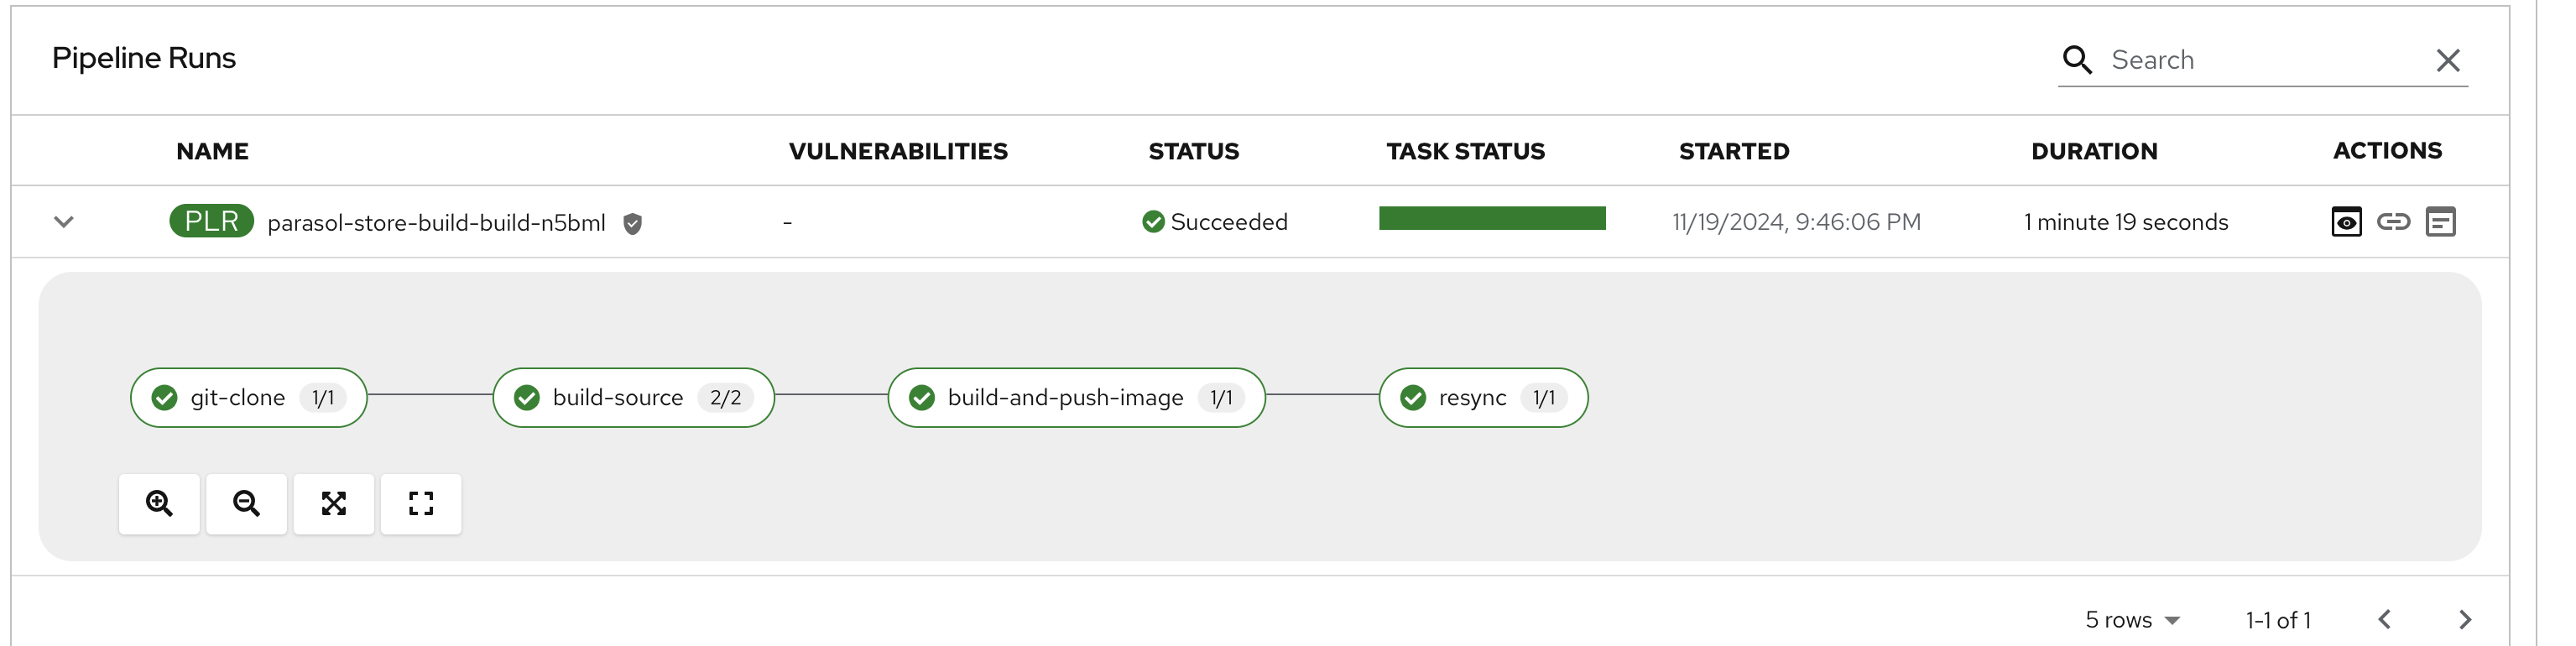
-
Explore the other tabs to see how Red Hat Developer Hub provides a single pane of glass for the Developer’s ephemeral dev environment.
-
The Overview tab provides easy access to the sourcecode and deployments
-
The Topology tab provides a window to the deployment on OpenShift, that gives a developer access to all the deployment parameters, labels and annotations - but also provides searchable access to the Pod logs, without the need to switch to OpenShift directly.
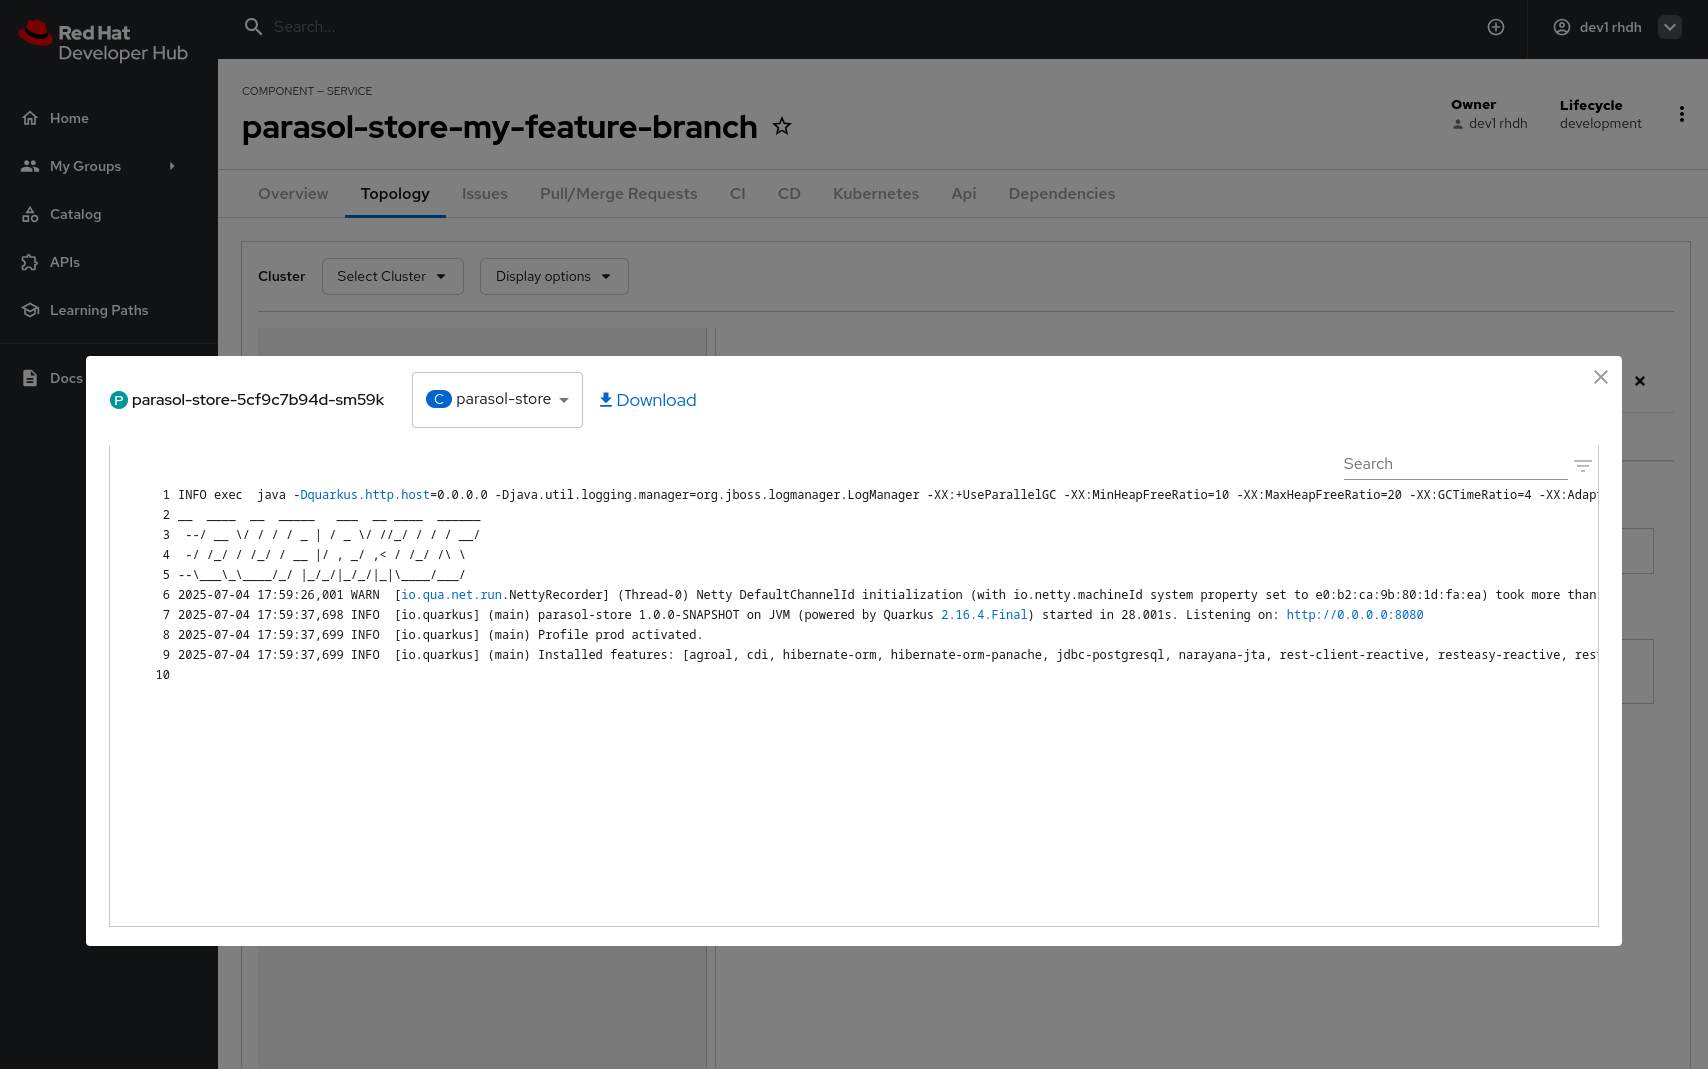
-
The Issues and Pull/Merge Requests tabs provide insights about the GitLab repo
-
CI tab shows an easy view of the pipeline in both OpenShift (Tekton based pipeline), and on GitLab
-
The CD tab shows the deployed components/systems in the namespace using Argo CD plugin
-
View the deployment on OpenShift
-
To view the deployment on OpenShift, click here.
|
Login to OpenShift using the credentials |
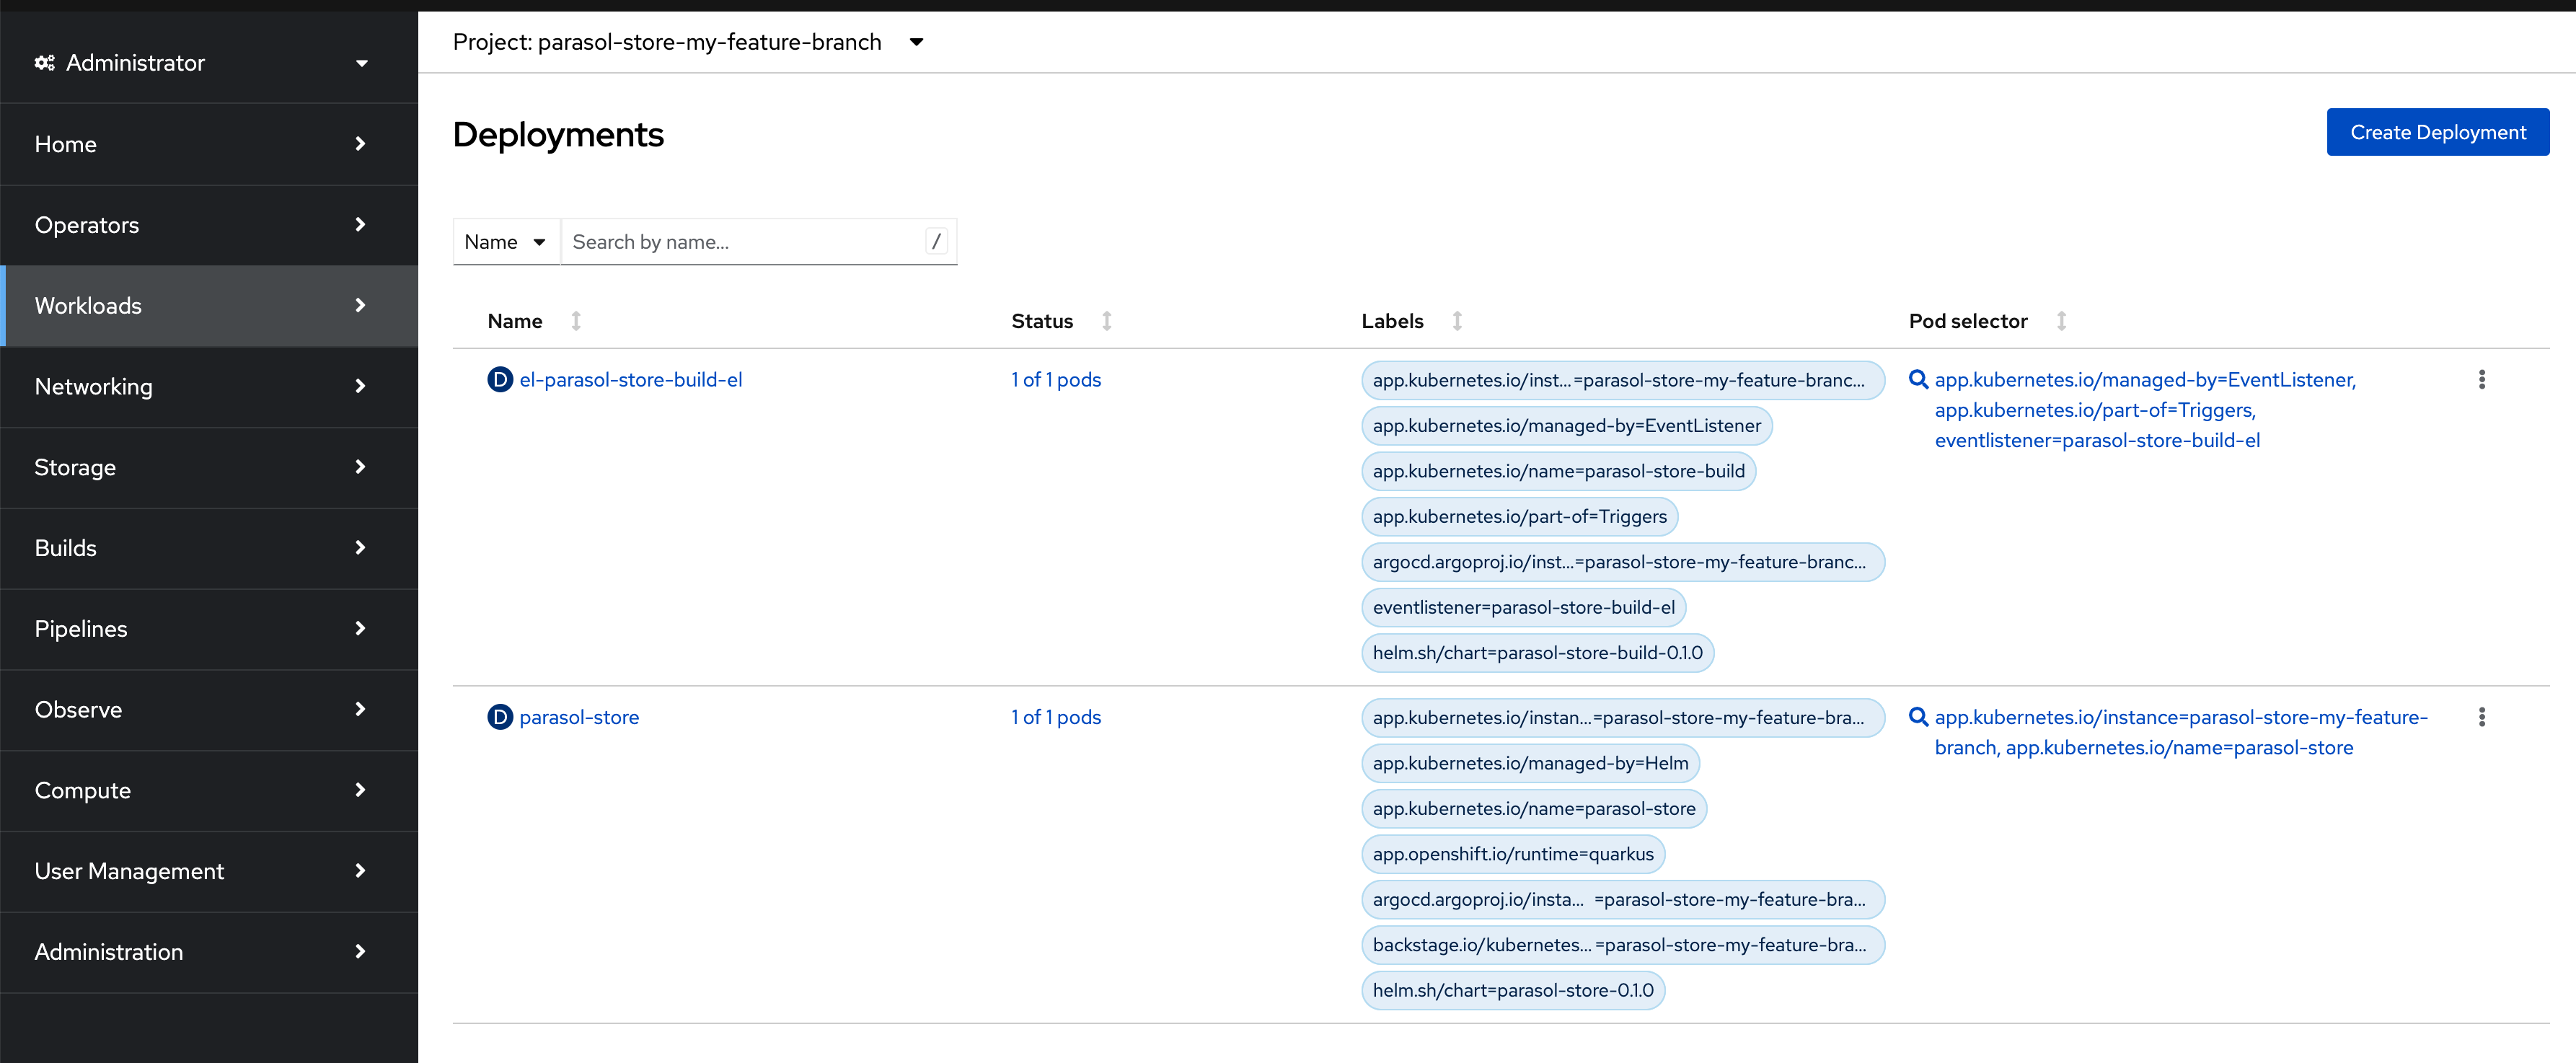
Add Features to the Application
-
Click on the < > View Source button on the Red Hat Developer Hub Component Overview page to access the source code repository.
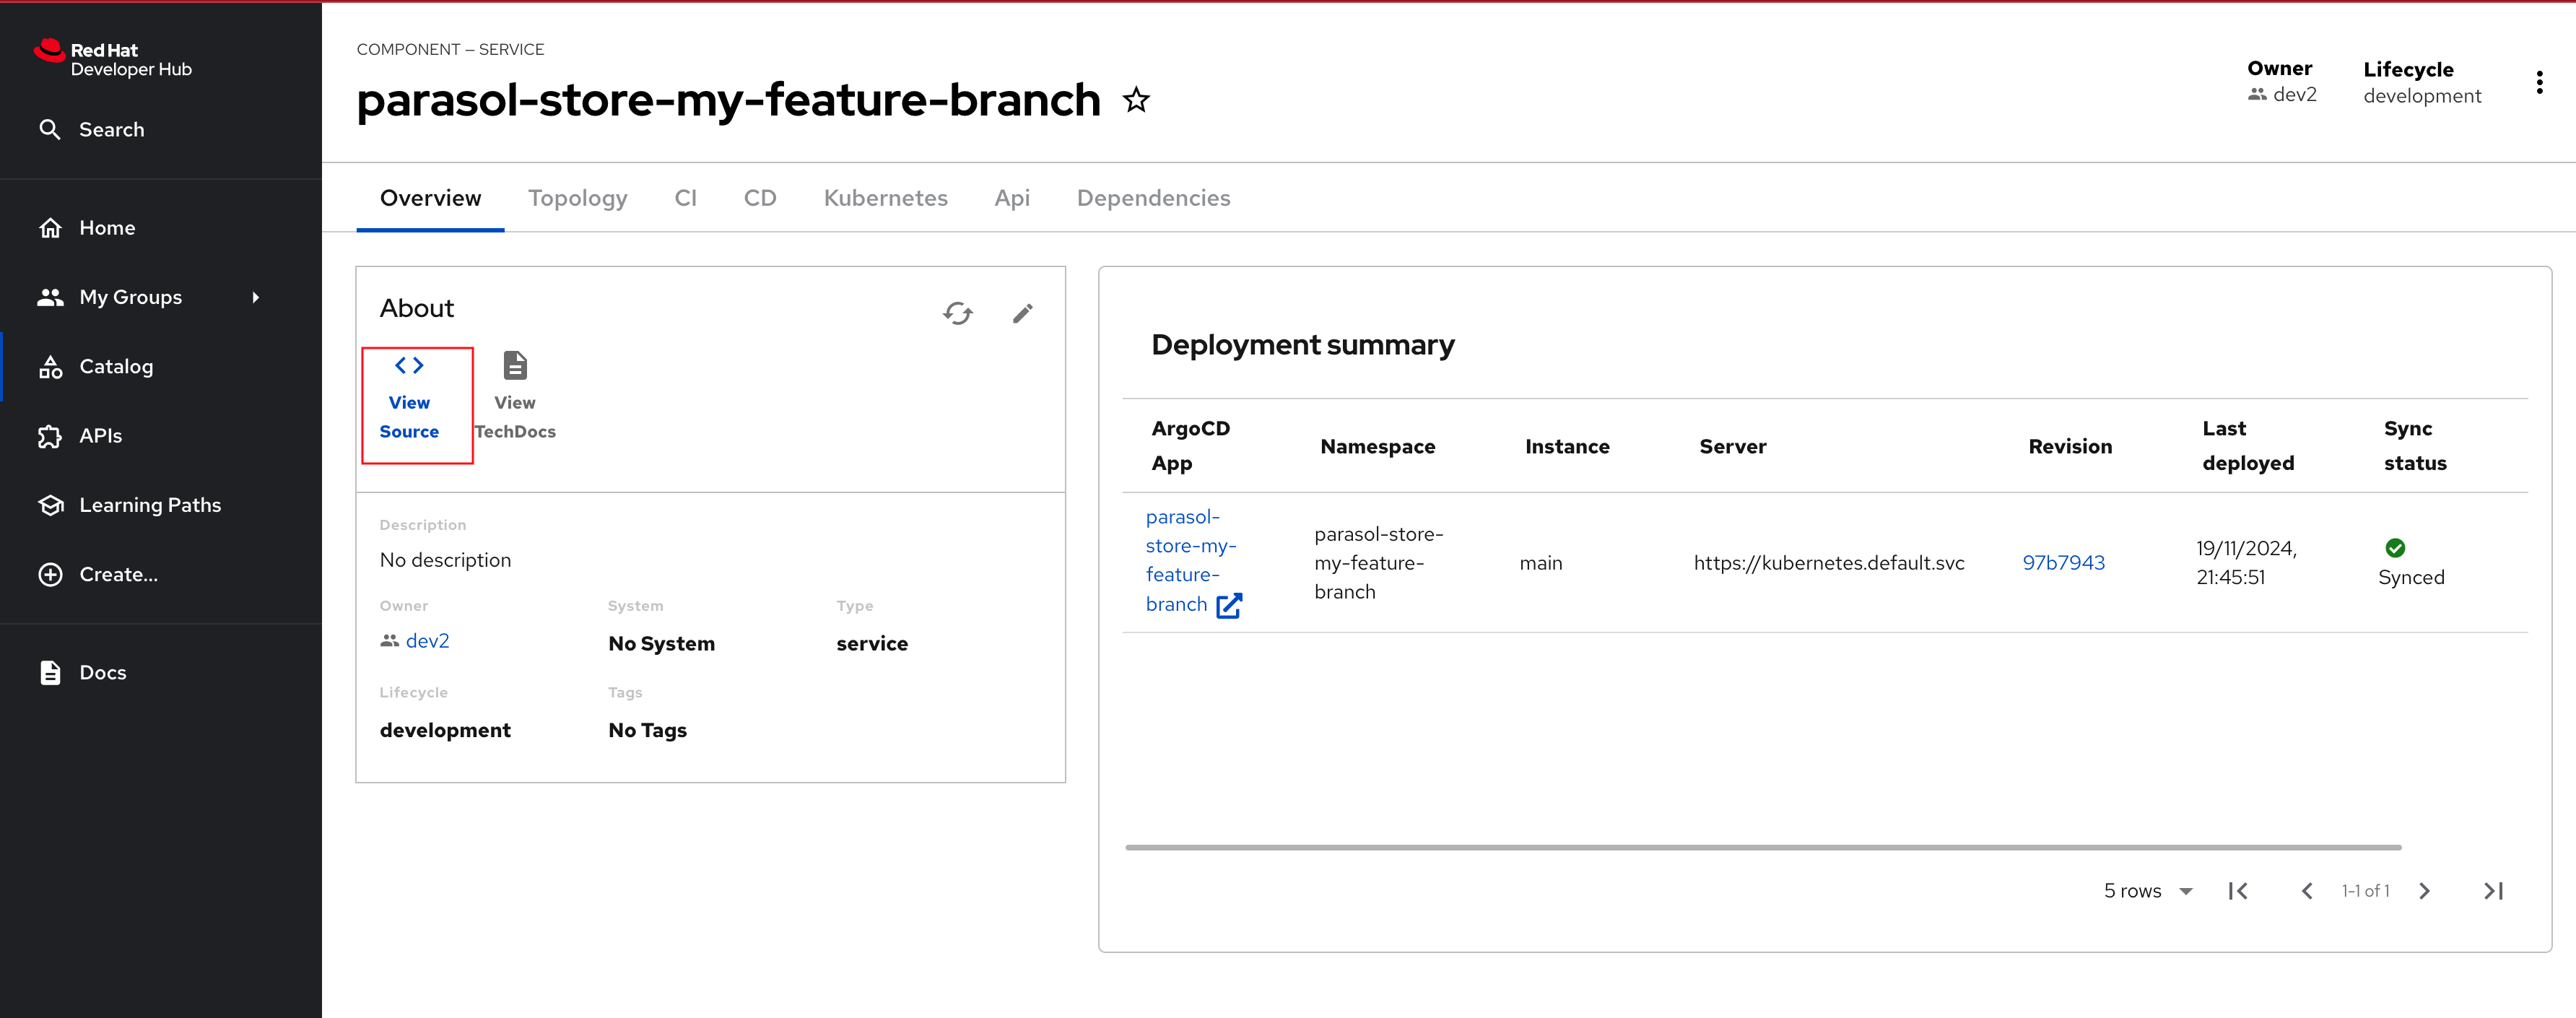
-
Switch to the my-feature-branch
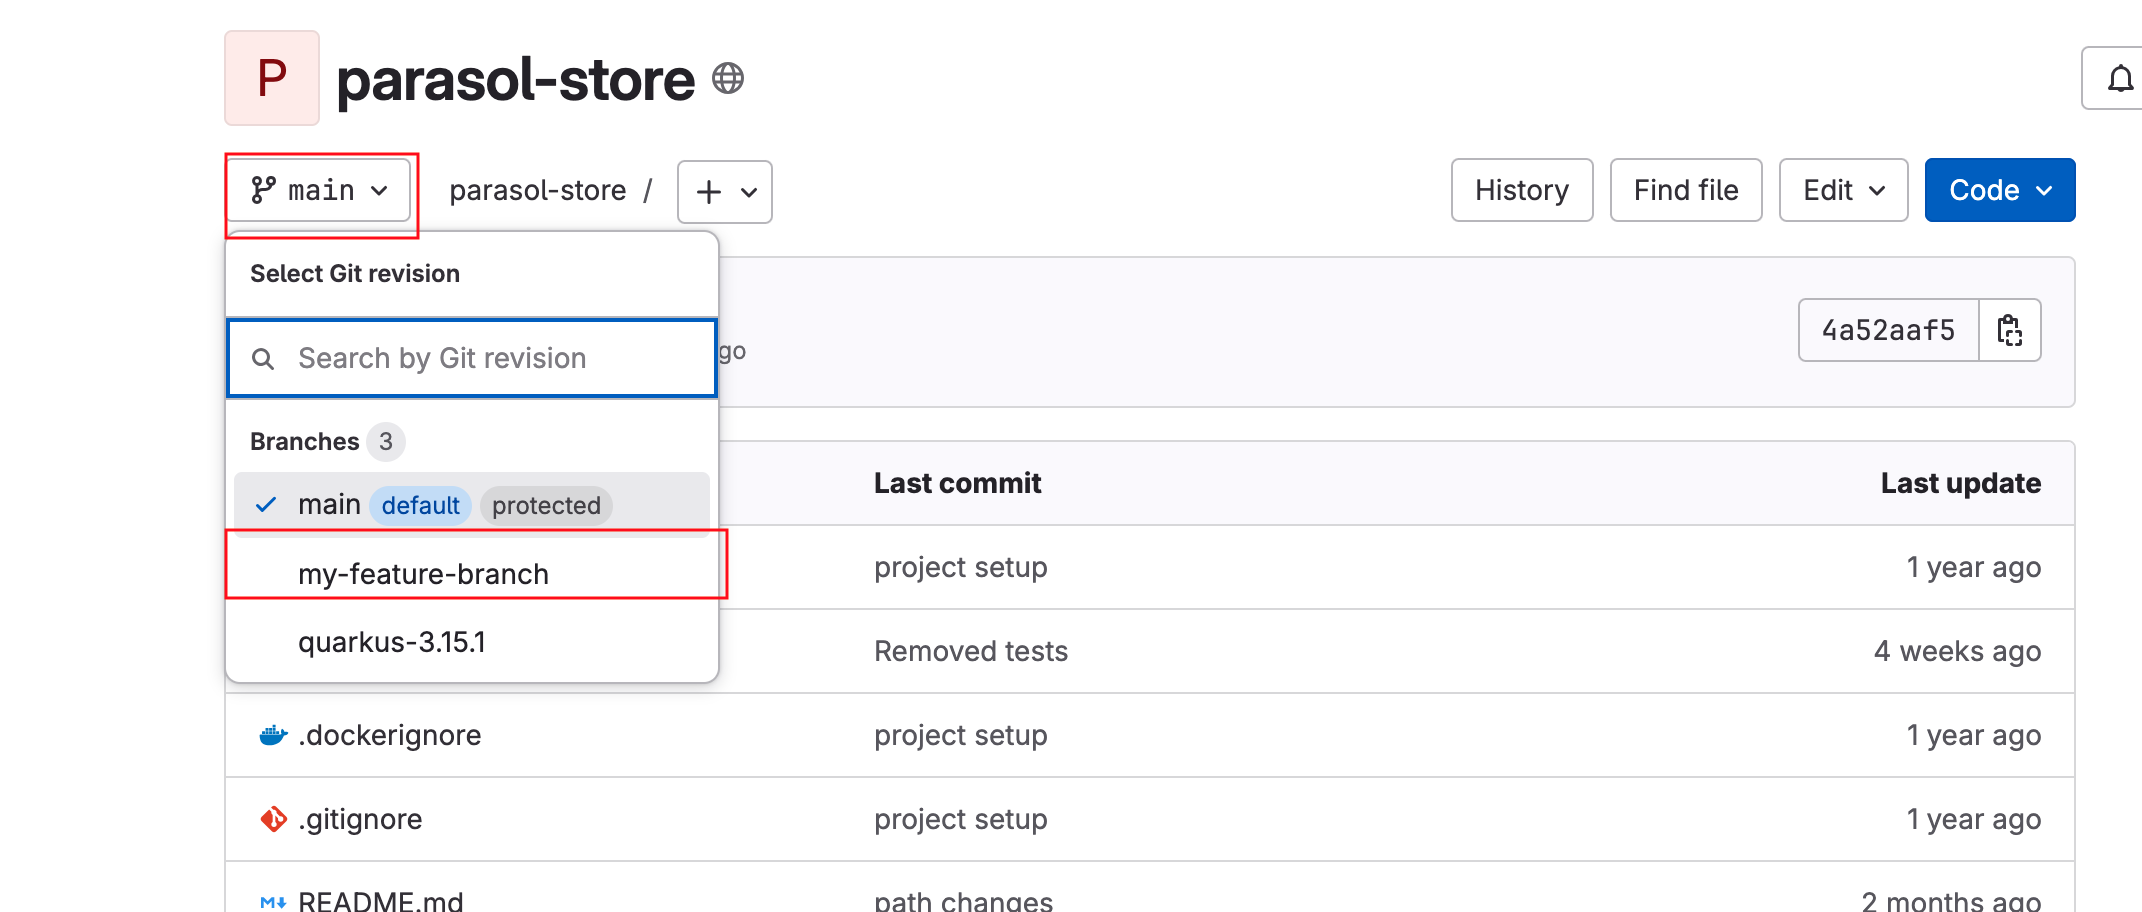
-
The feature request is to provide a REST API call endpoint that returns the total number of available products. For the purposes of this workshop, you will uncomment a block of code.
-
Changes are needed in the
parasol-store> src> main> java> org> parasol> retail> store> catalog> rest> CatalogResource.javafile. You can click here to directly access this file on GitLab. -
Select Edit > Edit single file. If prompted, login as
dev1/{common_password}.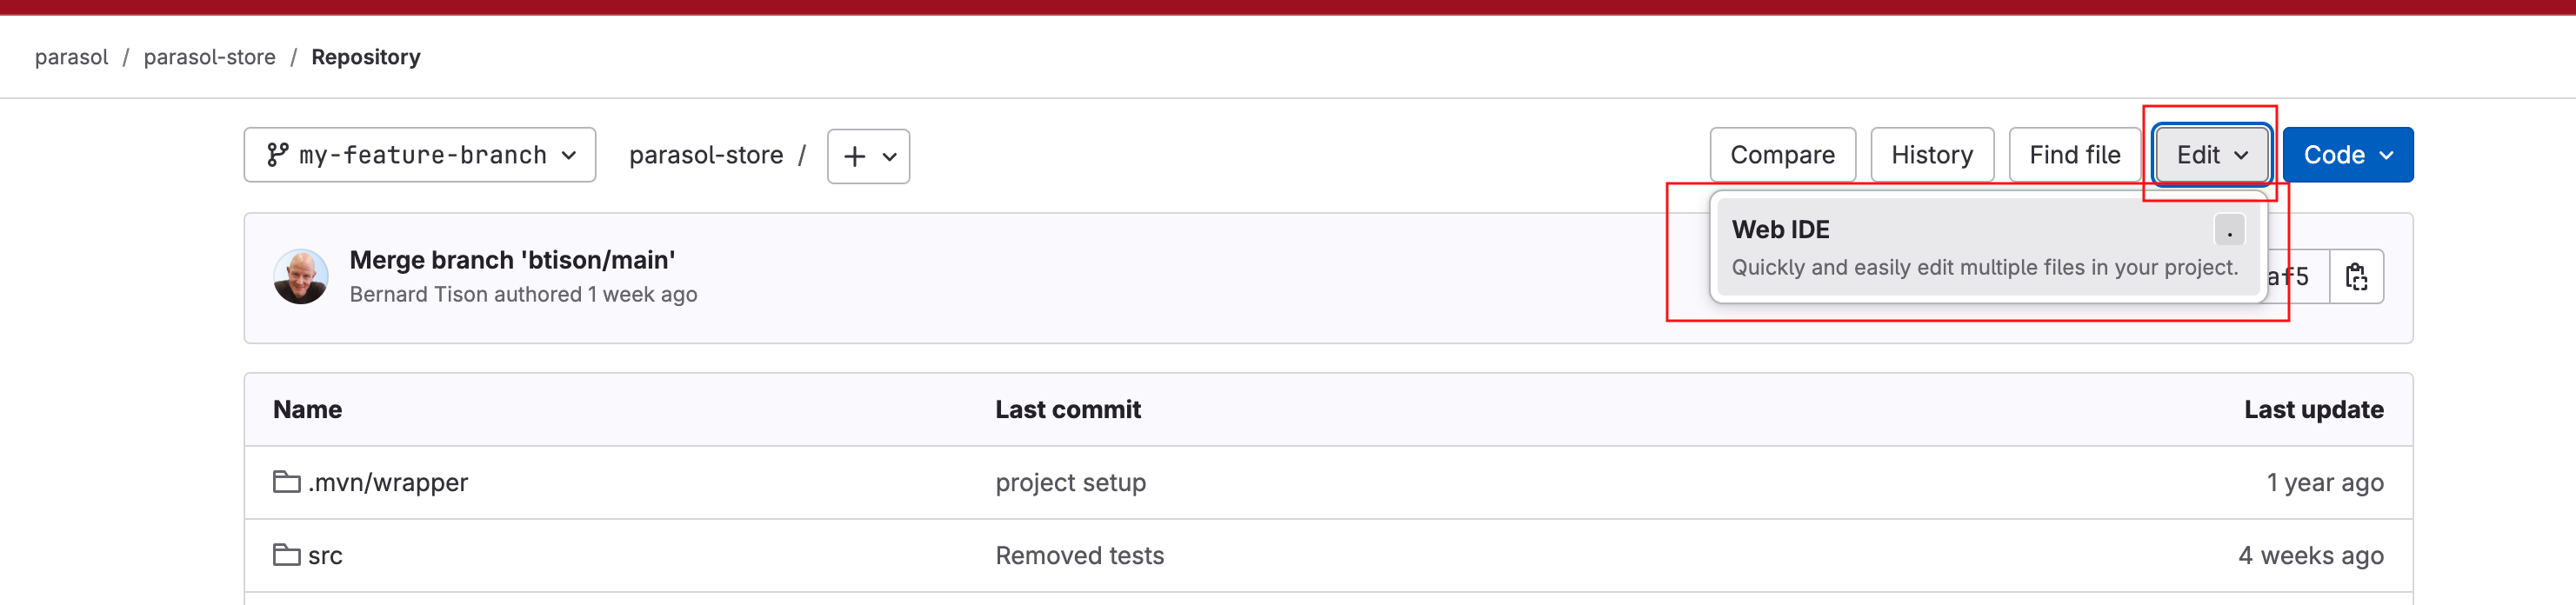
-
Right at the bottom of this file, you will find the
getProductCount()method that’s been commented out.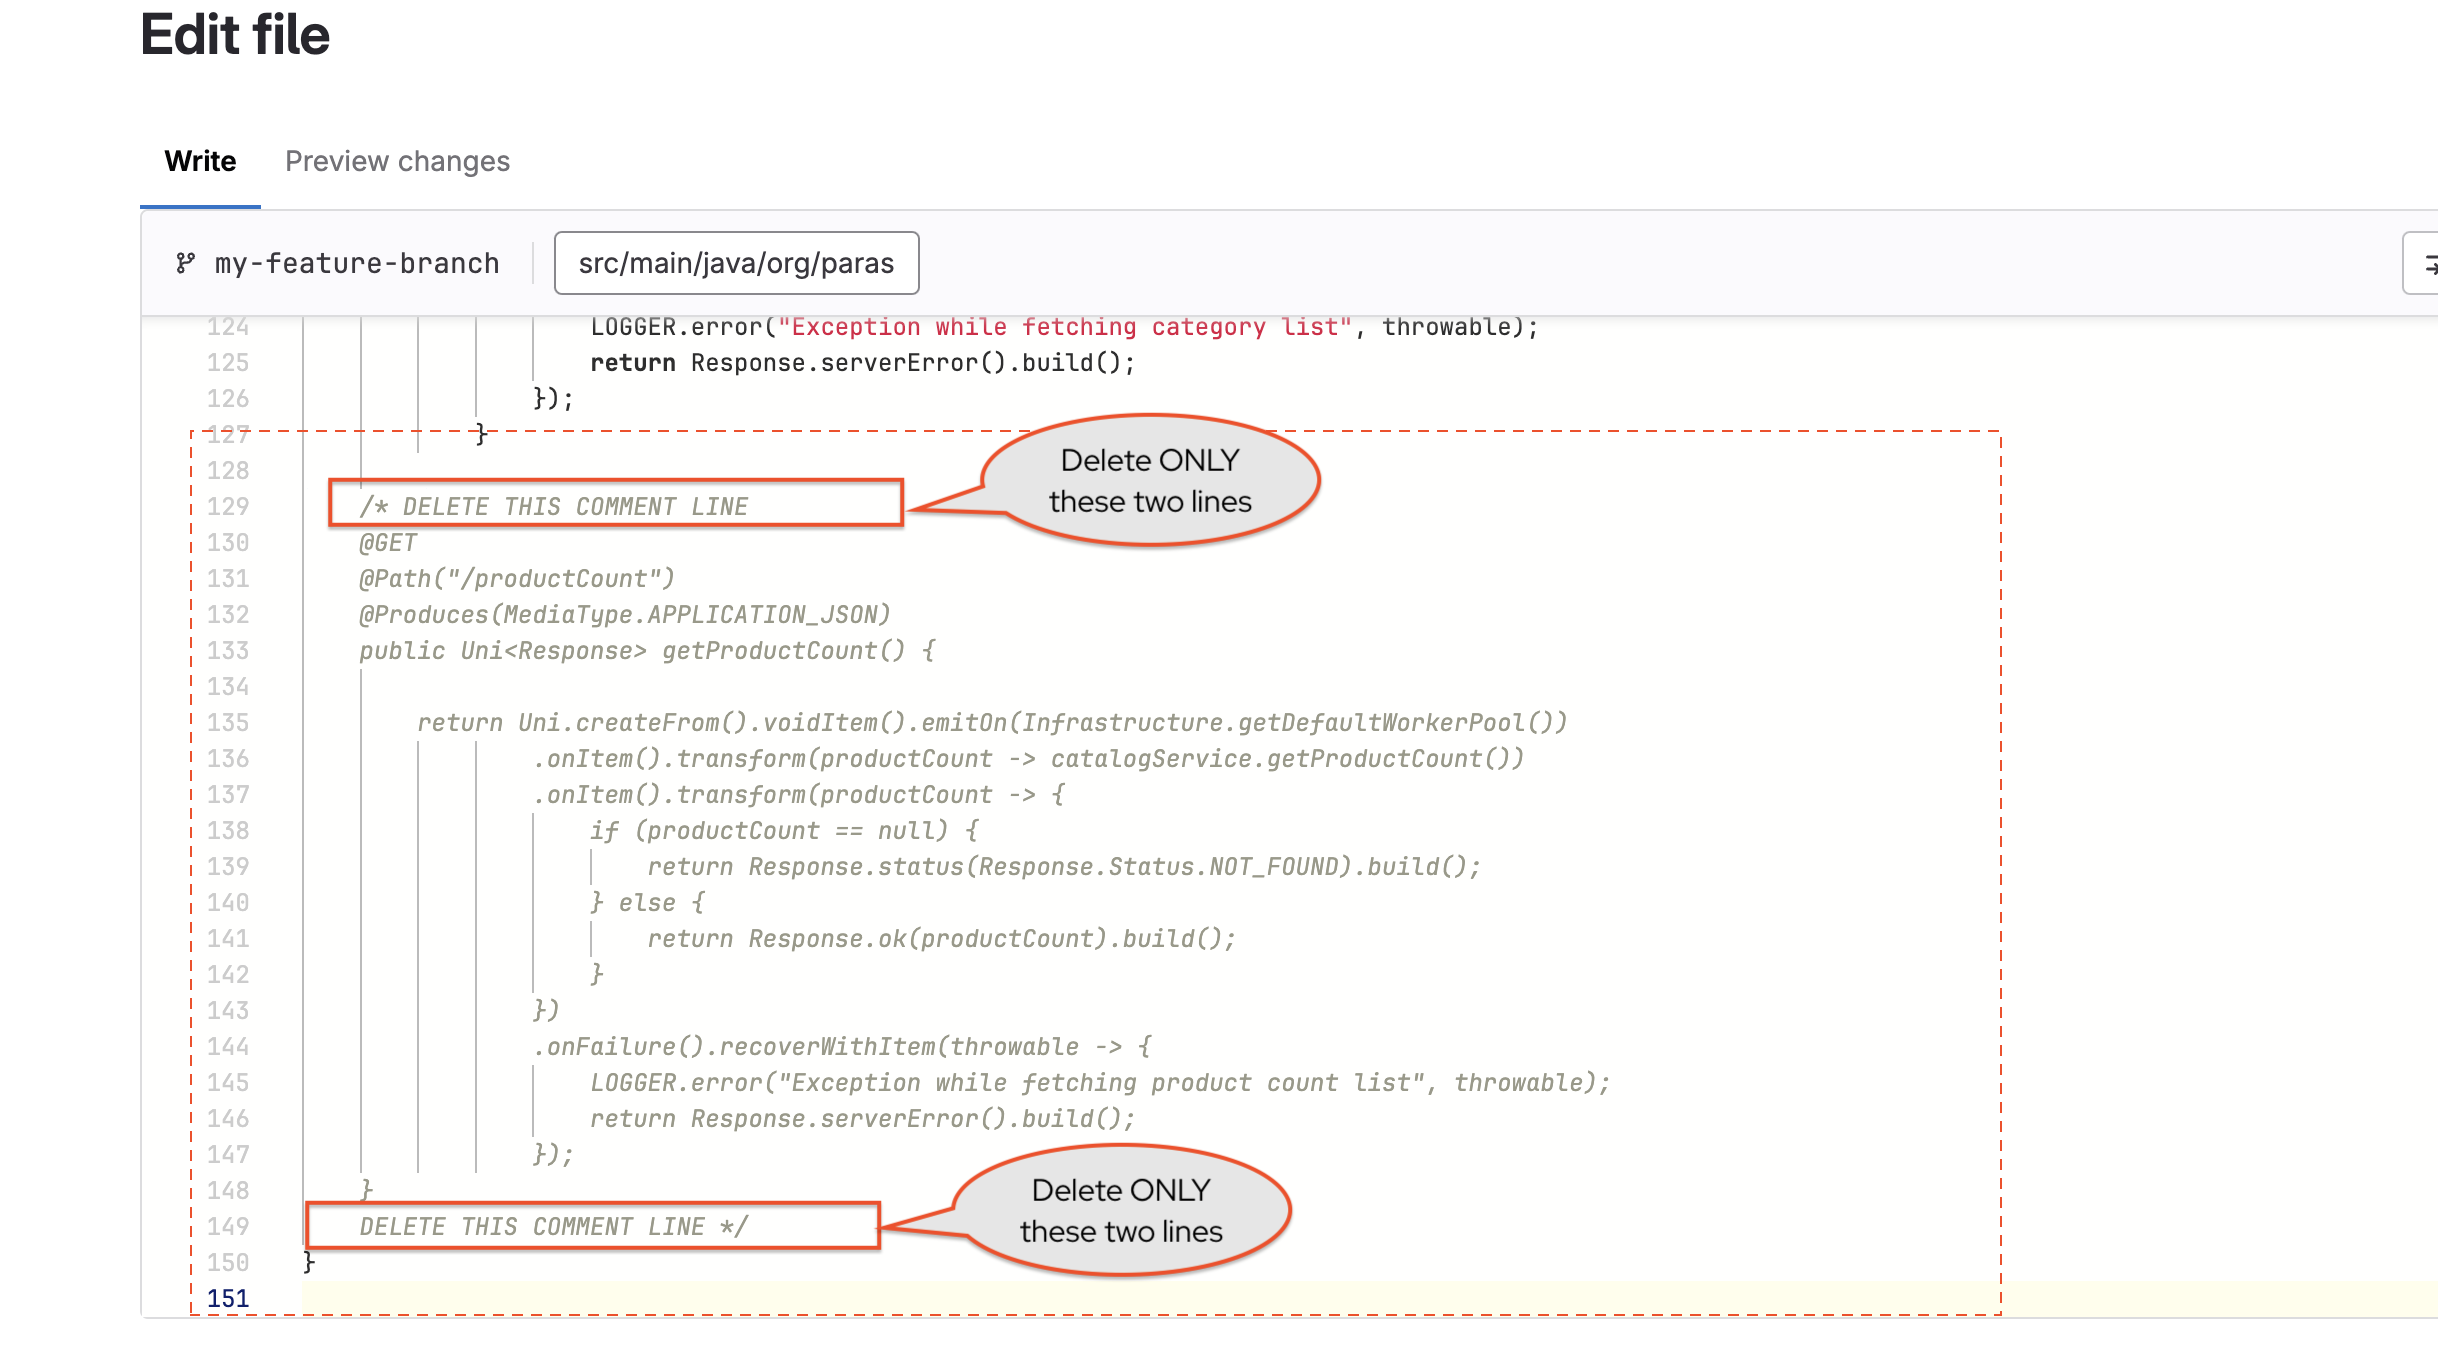
-
Carefully delete the these two lines:
/* DELETE THIS COMMENT LINEandDELETE THIS COMMENT LINE */. This will remove the comments. -
After deletion, the file should look like this
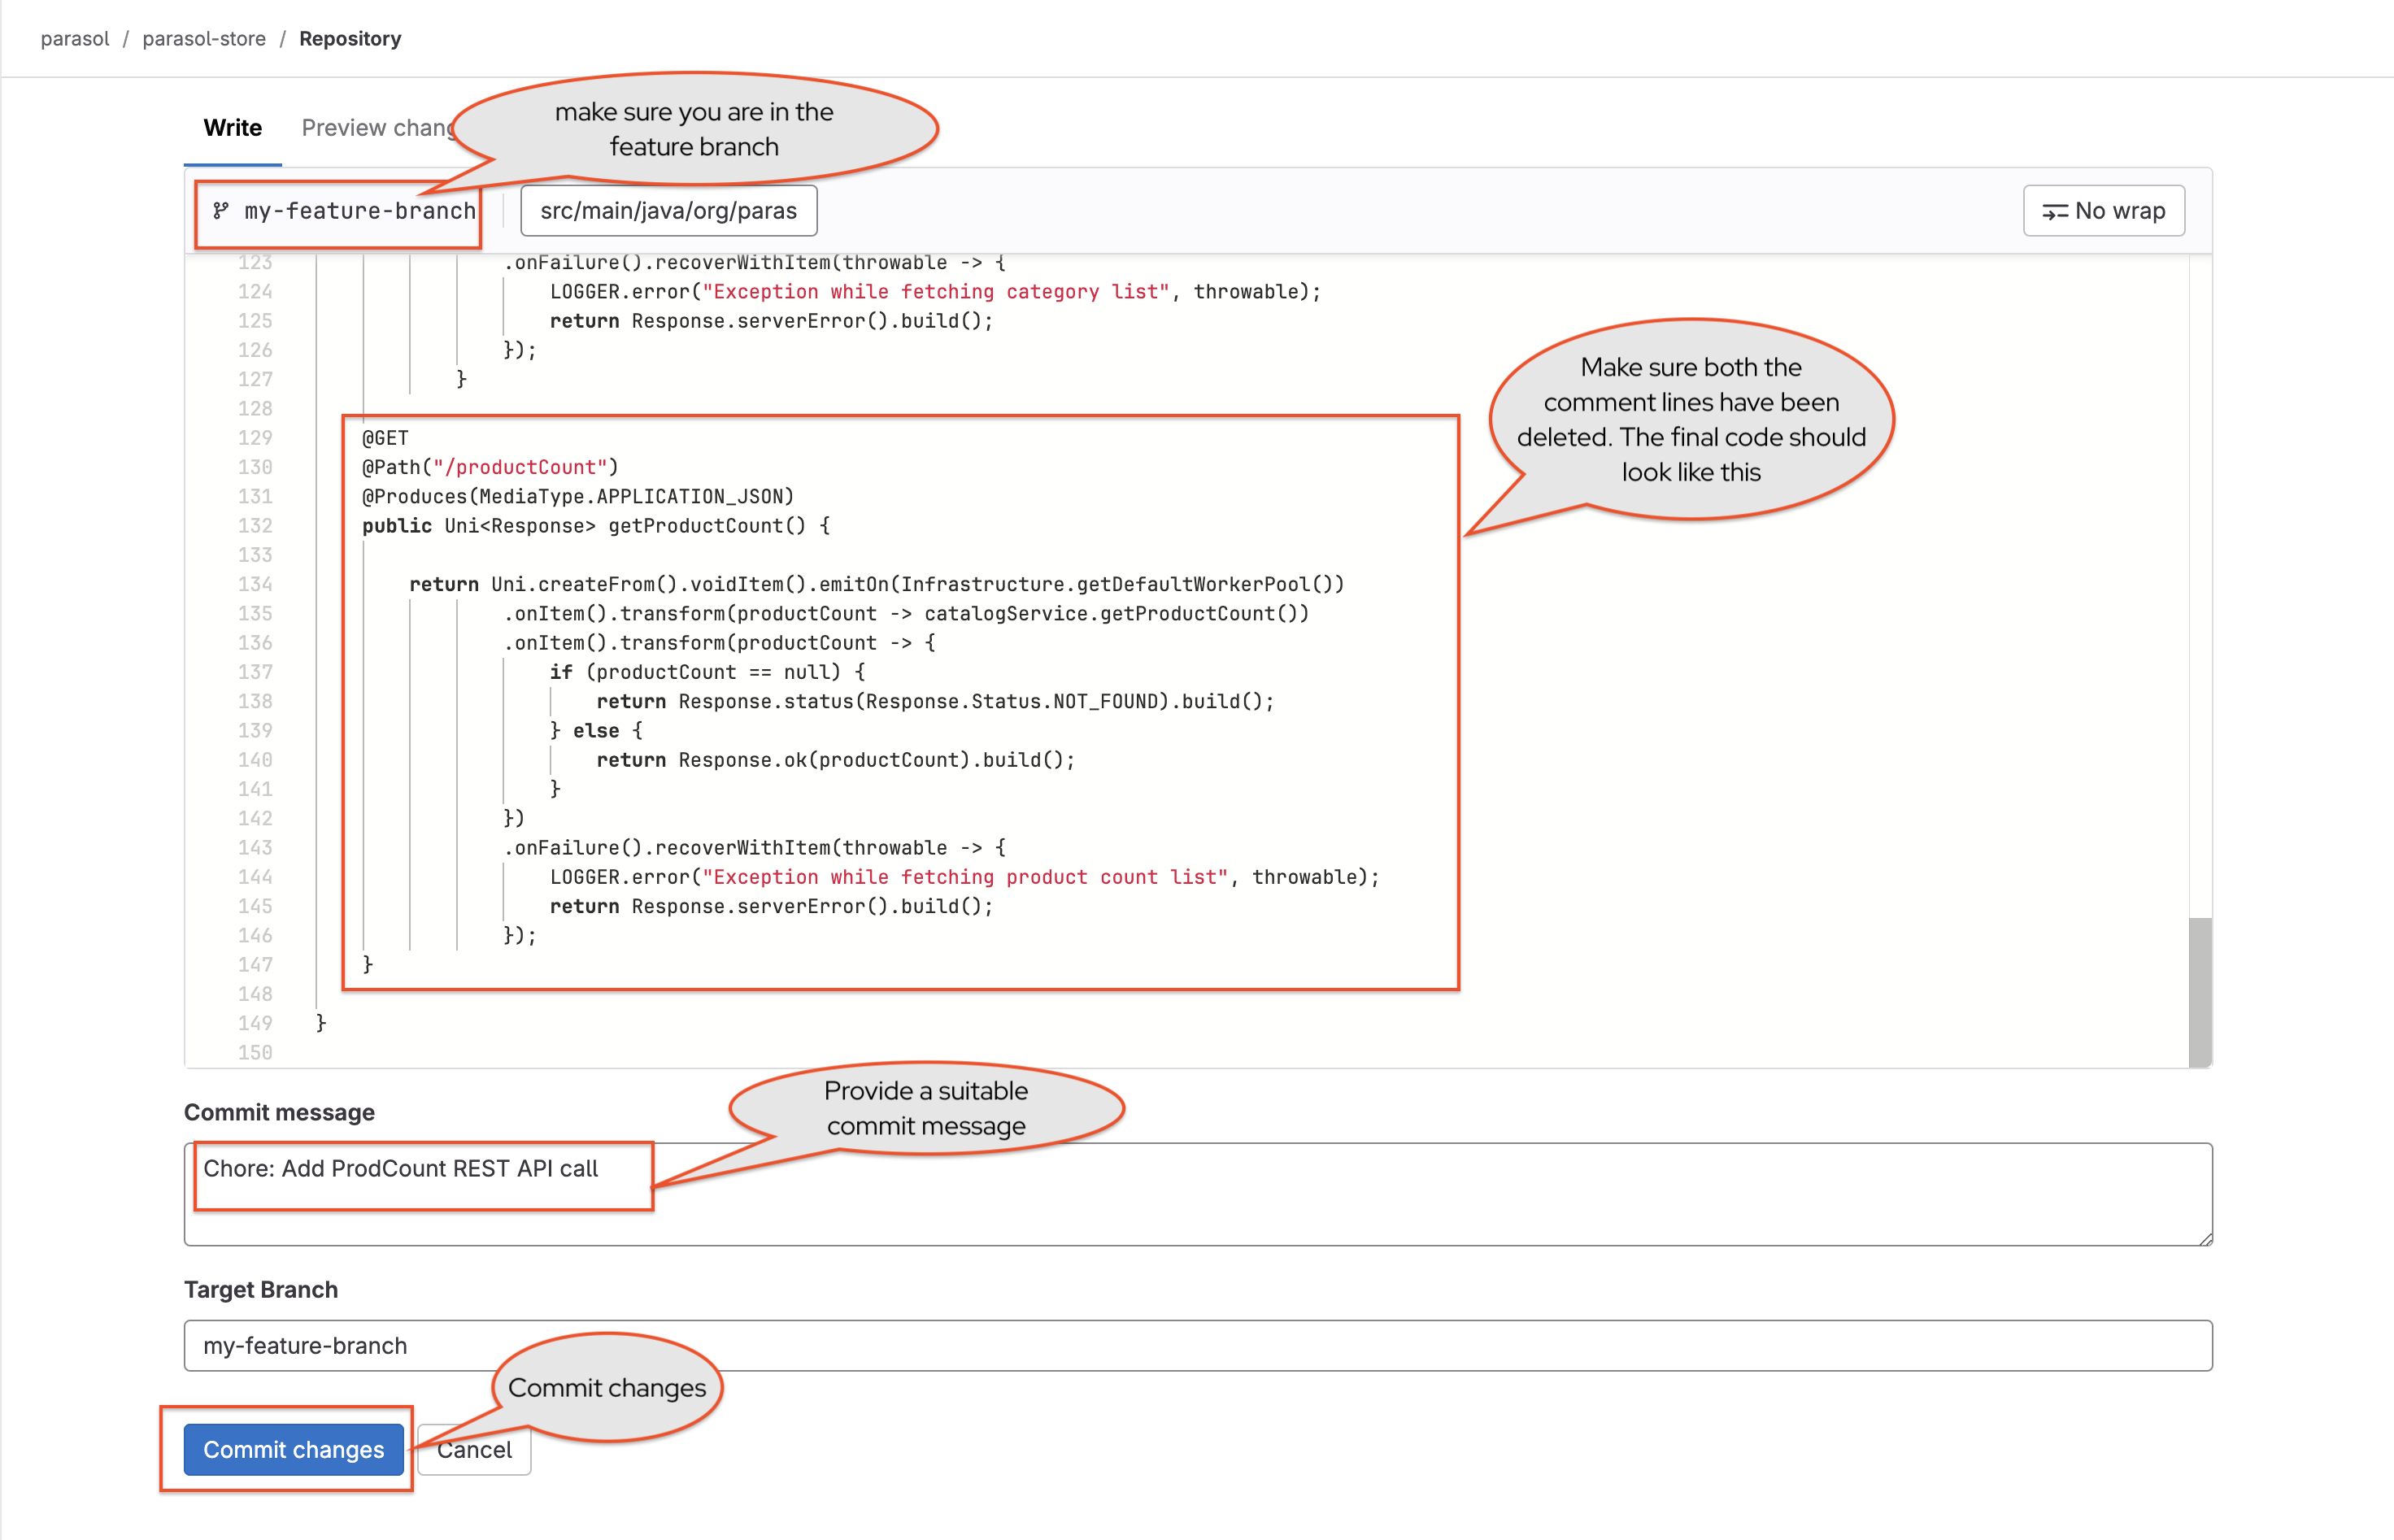
-
Add a Commit Message
Chore: Add ProdCount REST API callat the bottom of the page; make sure the Target Branch ismy-feature-branch; Click Commit changes -
You can now close the GitLab browser tab.
View parasol-store component on Red Hat Developer Hub
-
Navigate to
parasol-store-my-feature-branchcomponent from your Red Hat Developer Hub -
Access the CI tab to view the pipeline. You will see a new pipeline being triggered for the change you just made. Shortly, the pipeline will be marked as Succeeded
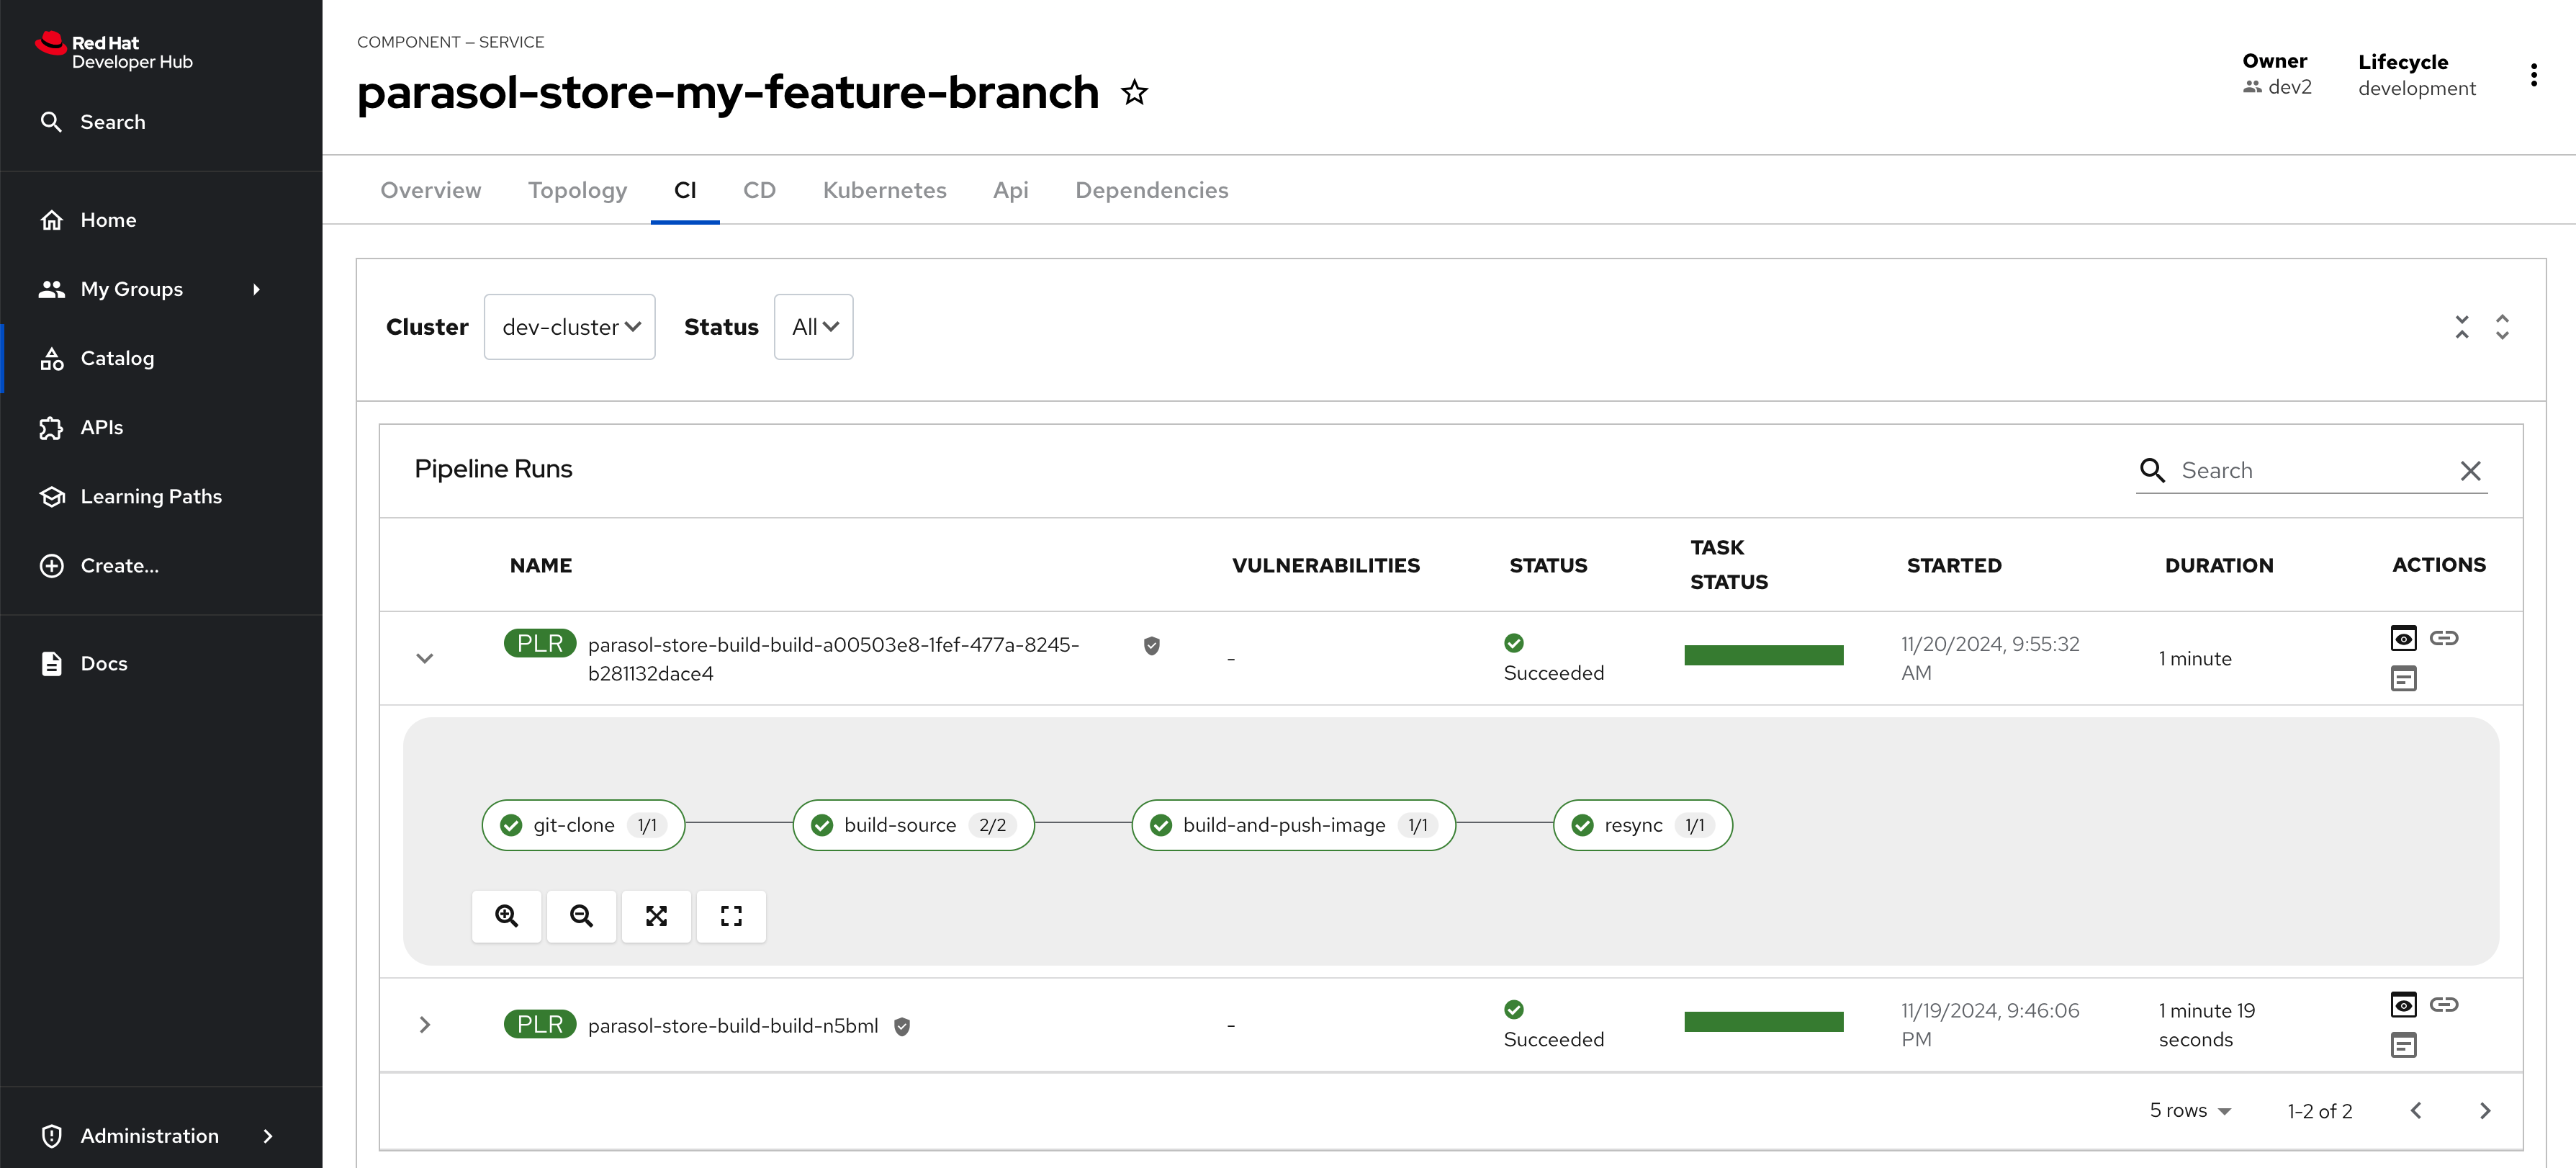
The first pipeline was triggered when you created this branch using the Software Template, and the next is by the Git commit.
Conclusion
In this module you learned how Software Templates and plugins can accelerate developer productivity. With Red Hat Developer Hub, developers have access to all the necessary tools via a single pane of glass, reducing cognitive load.
This marks the end of the inner loop within the ephemeral development environment. In the next section, you will create a merge request to the main branch to initiate the outer loop.
Module 5: Build, Test, & Deploy (Outer-Loop)
Overview
With the development inner-loop complete, the code running in the ephemeral environment’s feature branch namespace is now ready for deployment to Dev, Staging, and Production environments.
-
Platform Engineers set up production-grade CI pipelines to handle merge requests from Developer. OpenShift Pipelines, based on Tekton, makes it easy to build cloud-native pipelines that can be tailored to organizational need.
We use Tekton in this workshop, however all major CI providers are supported by Red Hat Developer Hub. -
When a developer submits a merge request from the feature branch to the main branch, a peer review process ensures code quality before merging.
-
Once merged, the pipeline updates manifests in the Dev and Staging environments to use the newly created container image. Additionally, it raises a merge request for the Production manifest.
-
Manifest updates and deployments to the Production environment require explicit approvals. In this case, production updates are triggered only by manually merging the PR raised by the post-merge pipeline.
Module objectives
-
To handle the outer-loop, Platform Engineer has built a production-level pipeline (pre and post merge) based on organization’s needs using Tekton.
-
When a developer creates a new merge request, the pre-merge pipeline is triggered via a GitLab webhook, initiating the image build process.
-
An application owner/team member reviews and approves the merge request.
-
This approval triggers a post-merge pipeline that updates manifests in the Dev and Staging environments.
-
The pipeline also generates a merge request for deploying to the Production environment.
-
Once this production merge request is accepted, the application is deployed to production using a GitOps process powered by OpenShift GitOps (Argo CD). :imagesdir: ../../assets/images
Developer Activity: Create Merge Request from feature branch
-
Navigate to the feature branch component you had created. If prompted, login as
dev1/{common_password}. -
Click on the View Source link to access the git repo of this Component.
-
You will see an alert asking you to create a merge request.

If you don’t see this alert, you can access this via the Code → Merge Requests left-hand menu and proceed to click on the New merge request button. -
In the New merge request page, create a merge request by clicking on the Create merge request button at the bottom of the page.
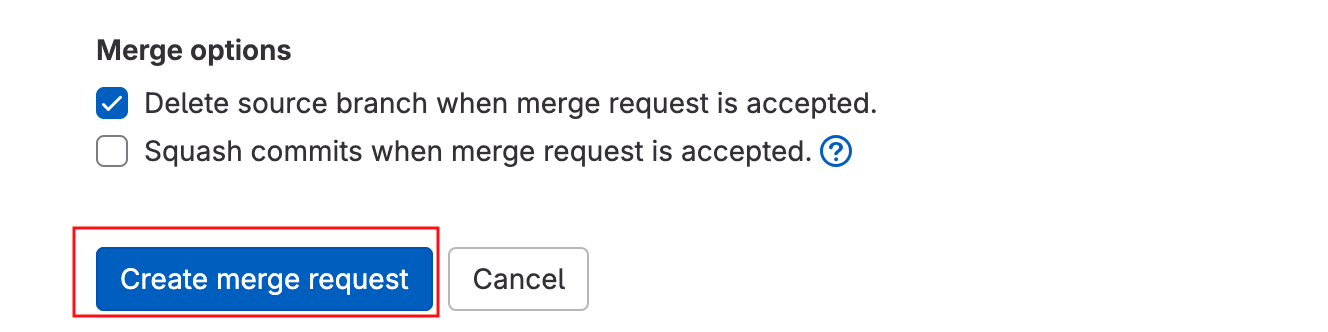
-
Since this merge request is to the
parasol-storeComponent, theparasol-store-build-pr-openpipeline gets triggered and can be viewed in theparasol-storecomponent.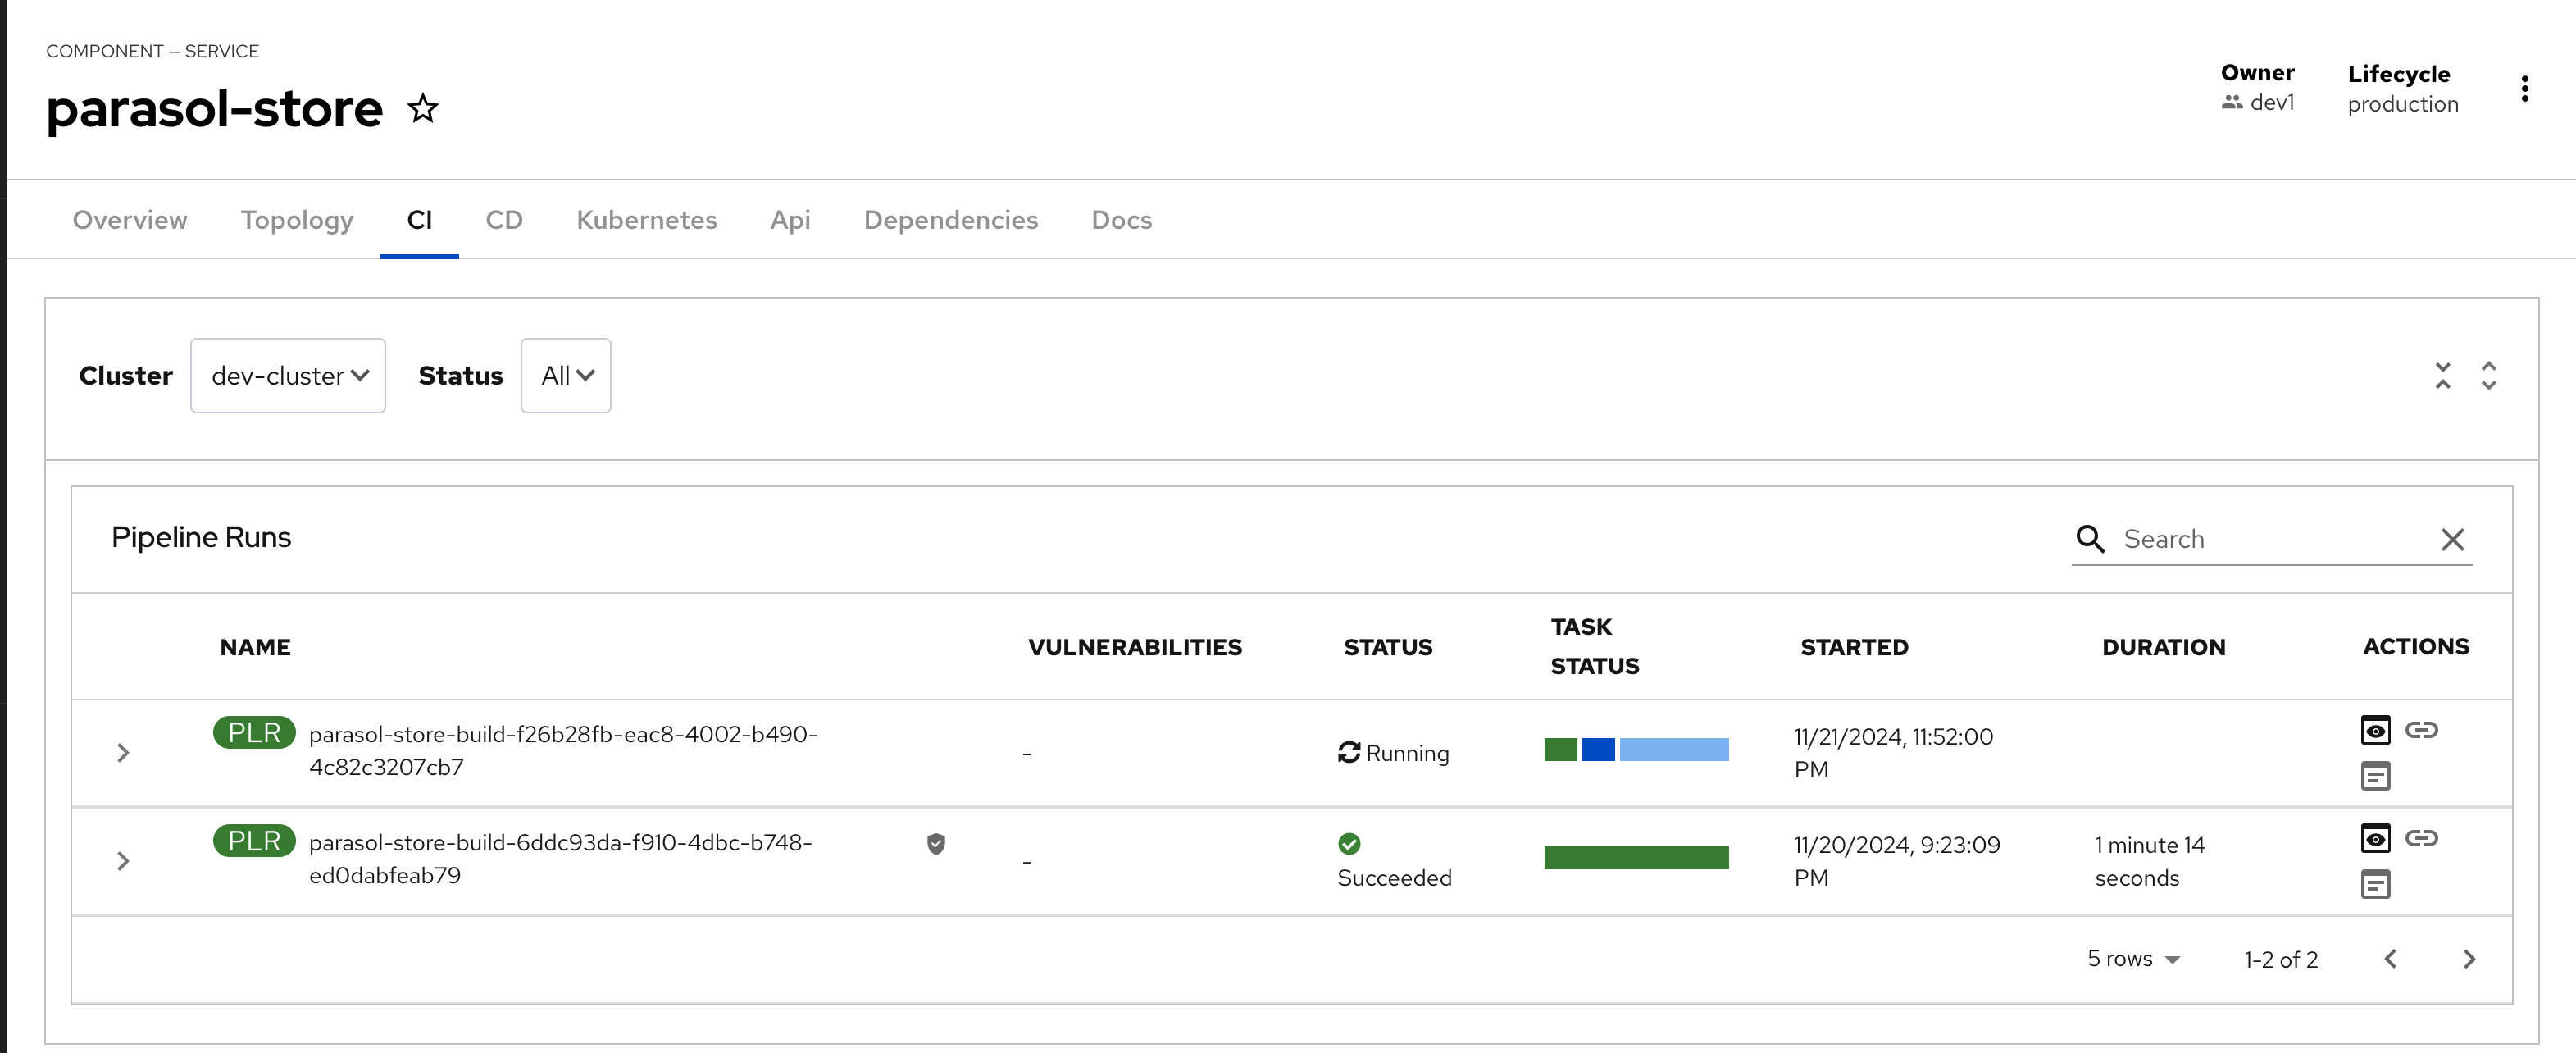
-
Once the pipeline completes, make note of the final task
gitlab-update-task, which updates GitLab’s Merge Request with the status of the pipeline.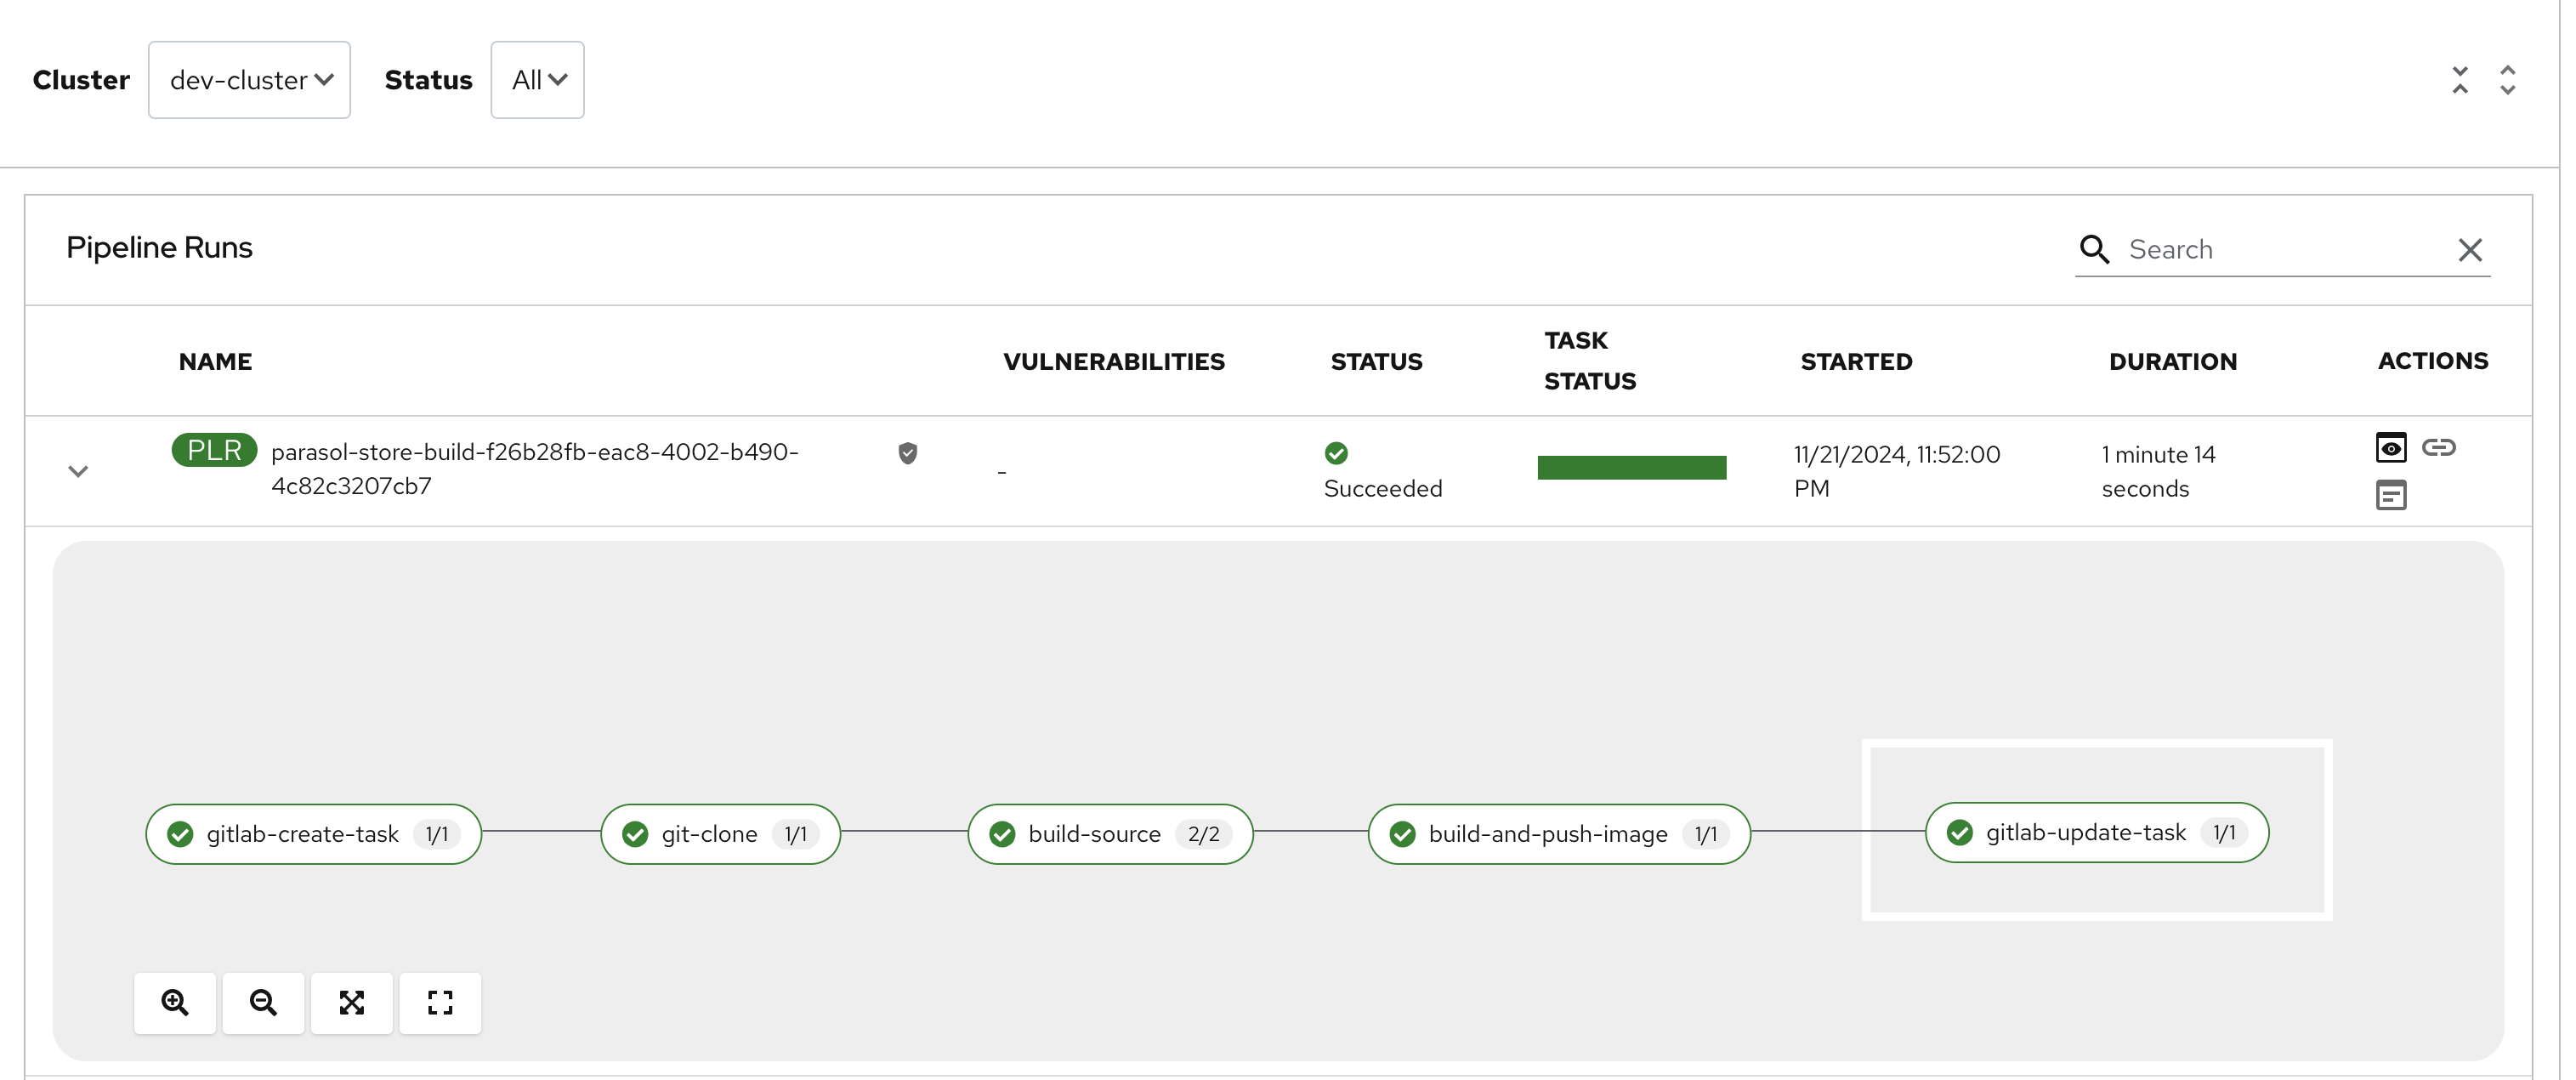
-
Click on the
gitlab-update-taskin the Tekton pipeline run.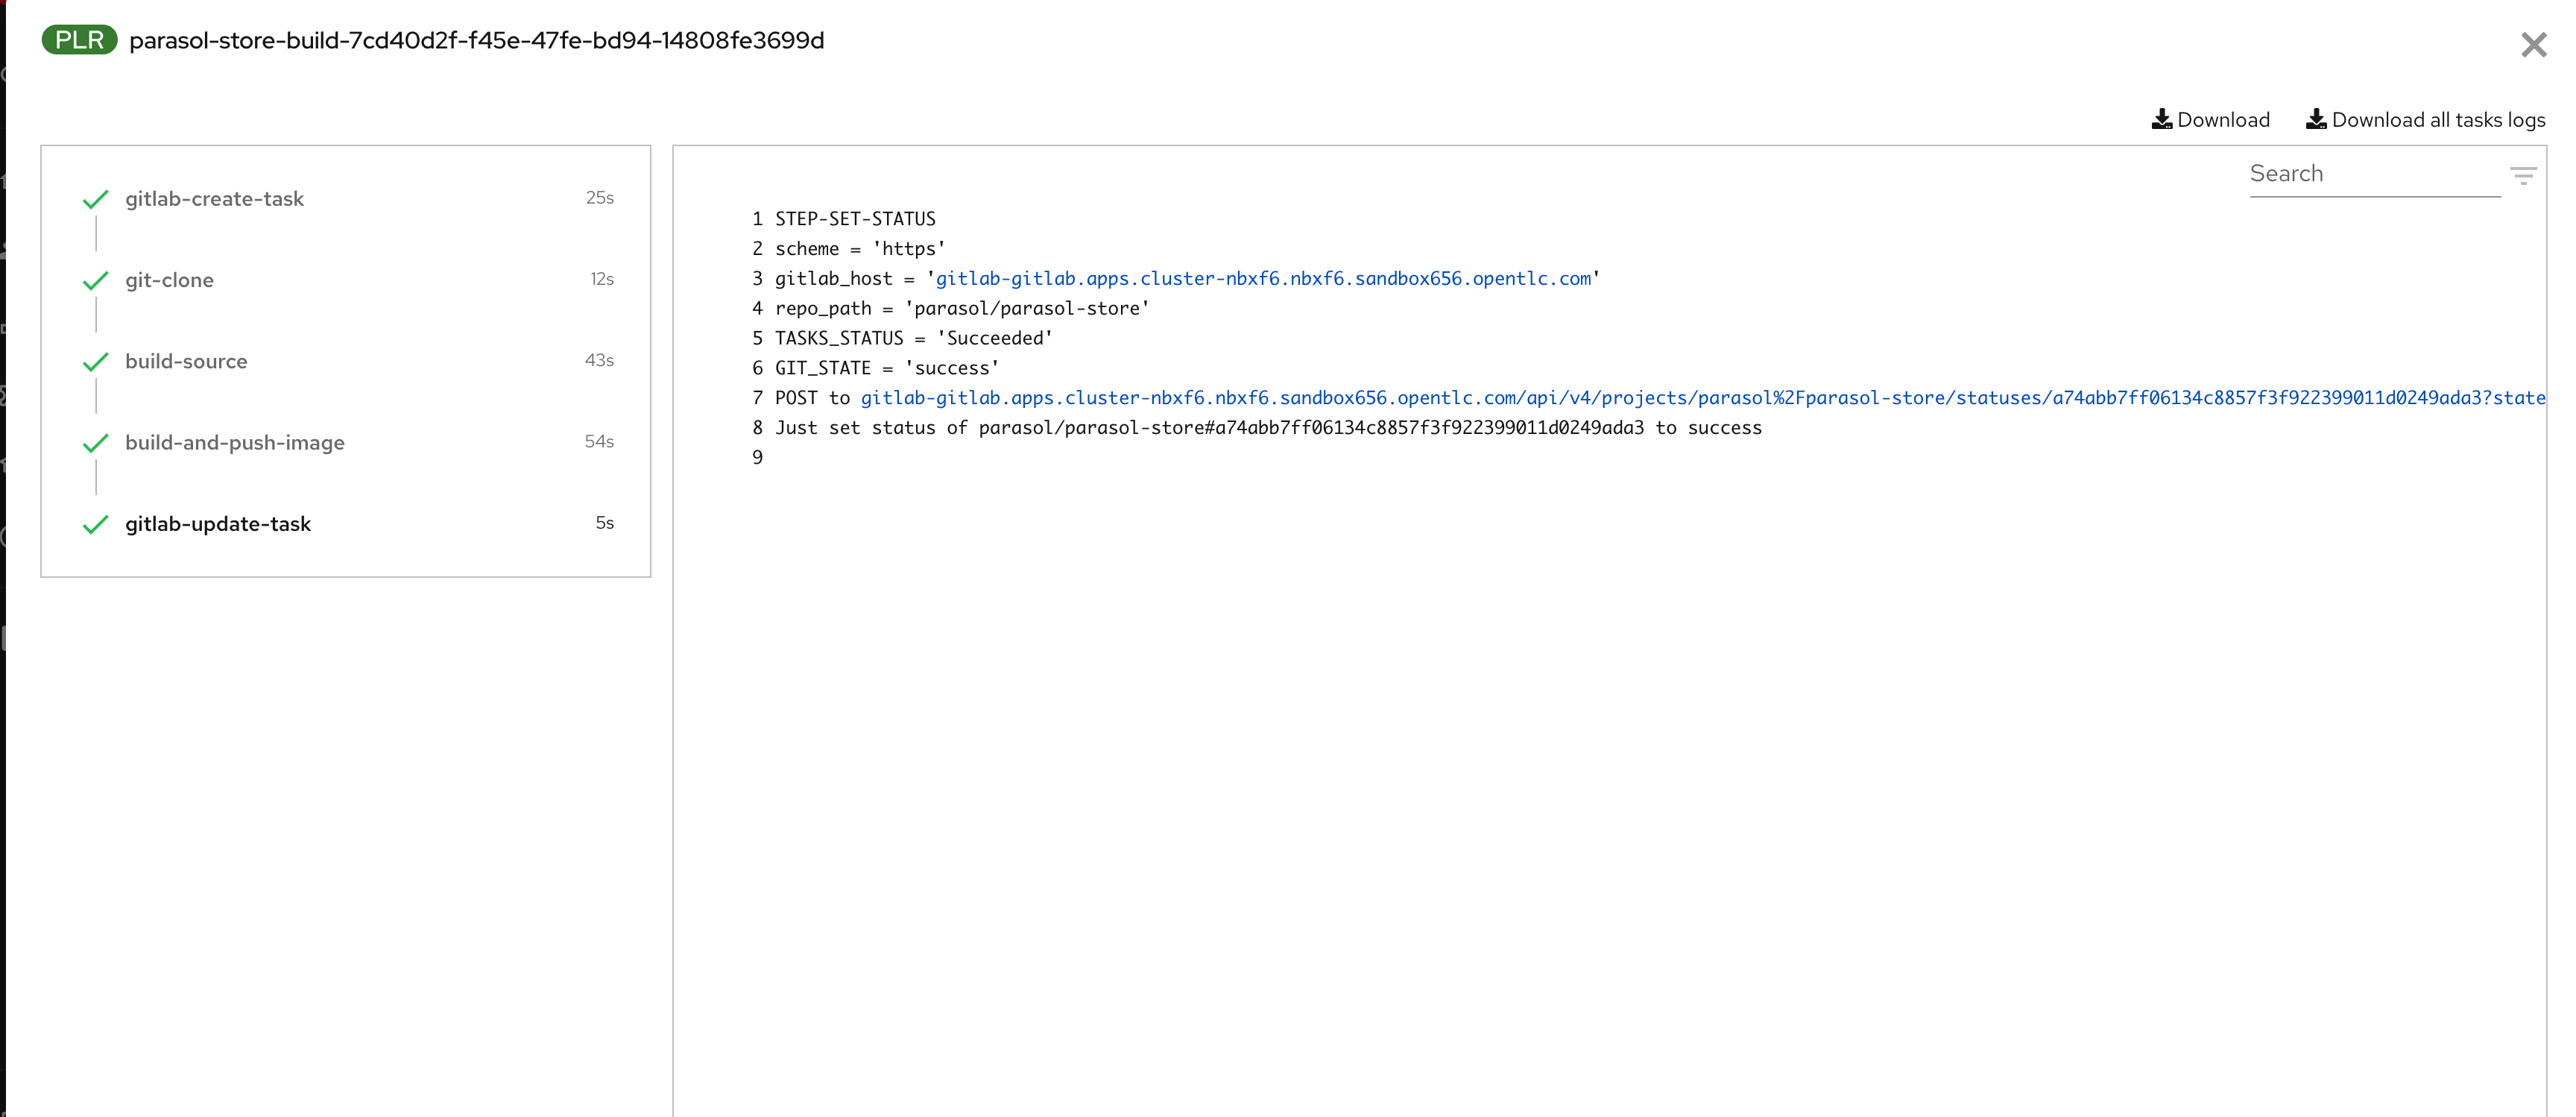 Note the POST call to GitLab. Scroll to the right of this request call, and you will note that the POST call sends
 state=successalong with the Commit ID which then marks that particular Merge Request as success. -
This status update can be seen in GitLab’s Merge Request page. Note that the Pipeline is marked as Passed and ready to be merged.
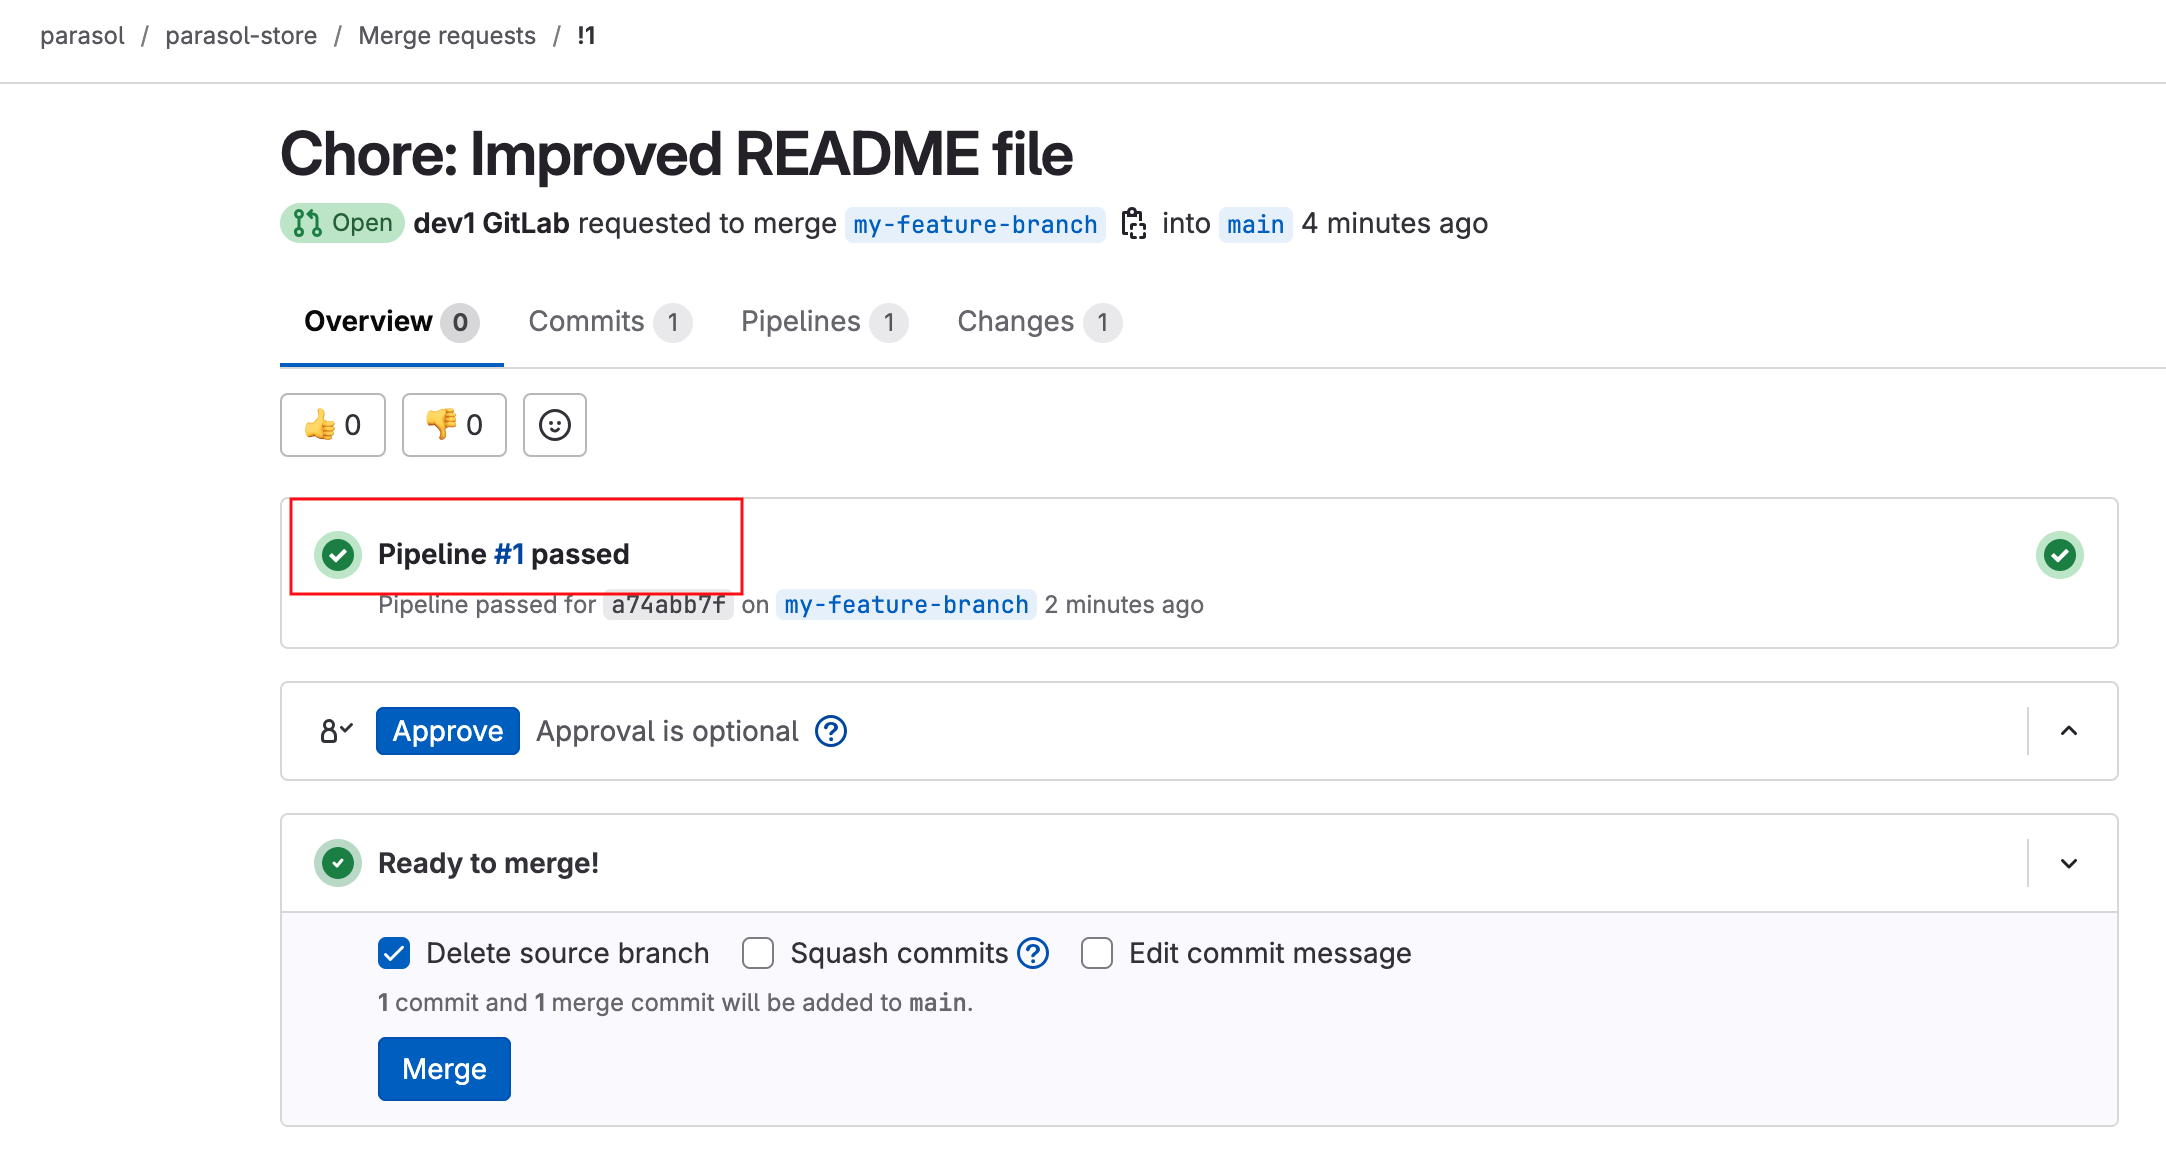
This handoff between the Tekton pipelines and GitLab is managed using webhooks. . In GitLab, navigate to parasol-store’s Webhooks page to view the Webhooks which have been setup as part of this workshop.
Developer Activity: Merge the Merge Request from feature branch
In reality, the merge would happen after a peer review, or a team lead would review and merge the PR. For the purposes of this workshop, let us go ahead and assume the role of a reviewer.
-
Navigate back to the Merge Request page and open the request that you created earlier; click on the Merge button.
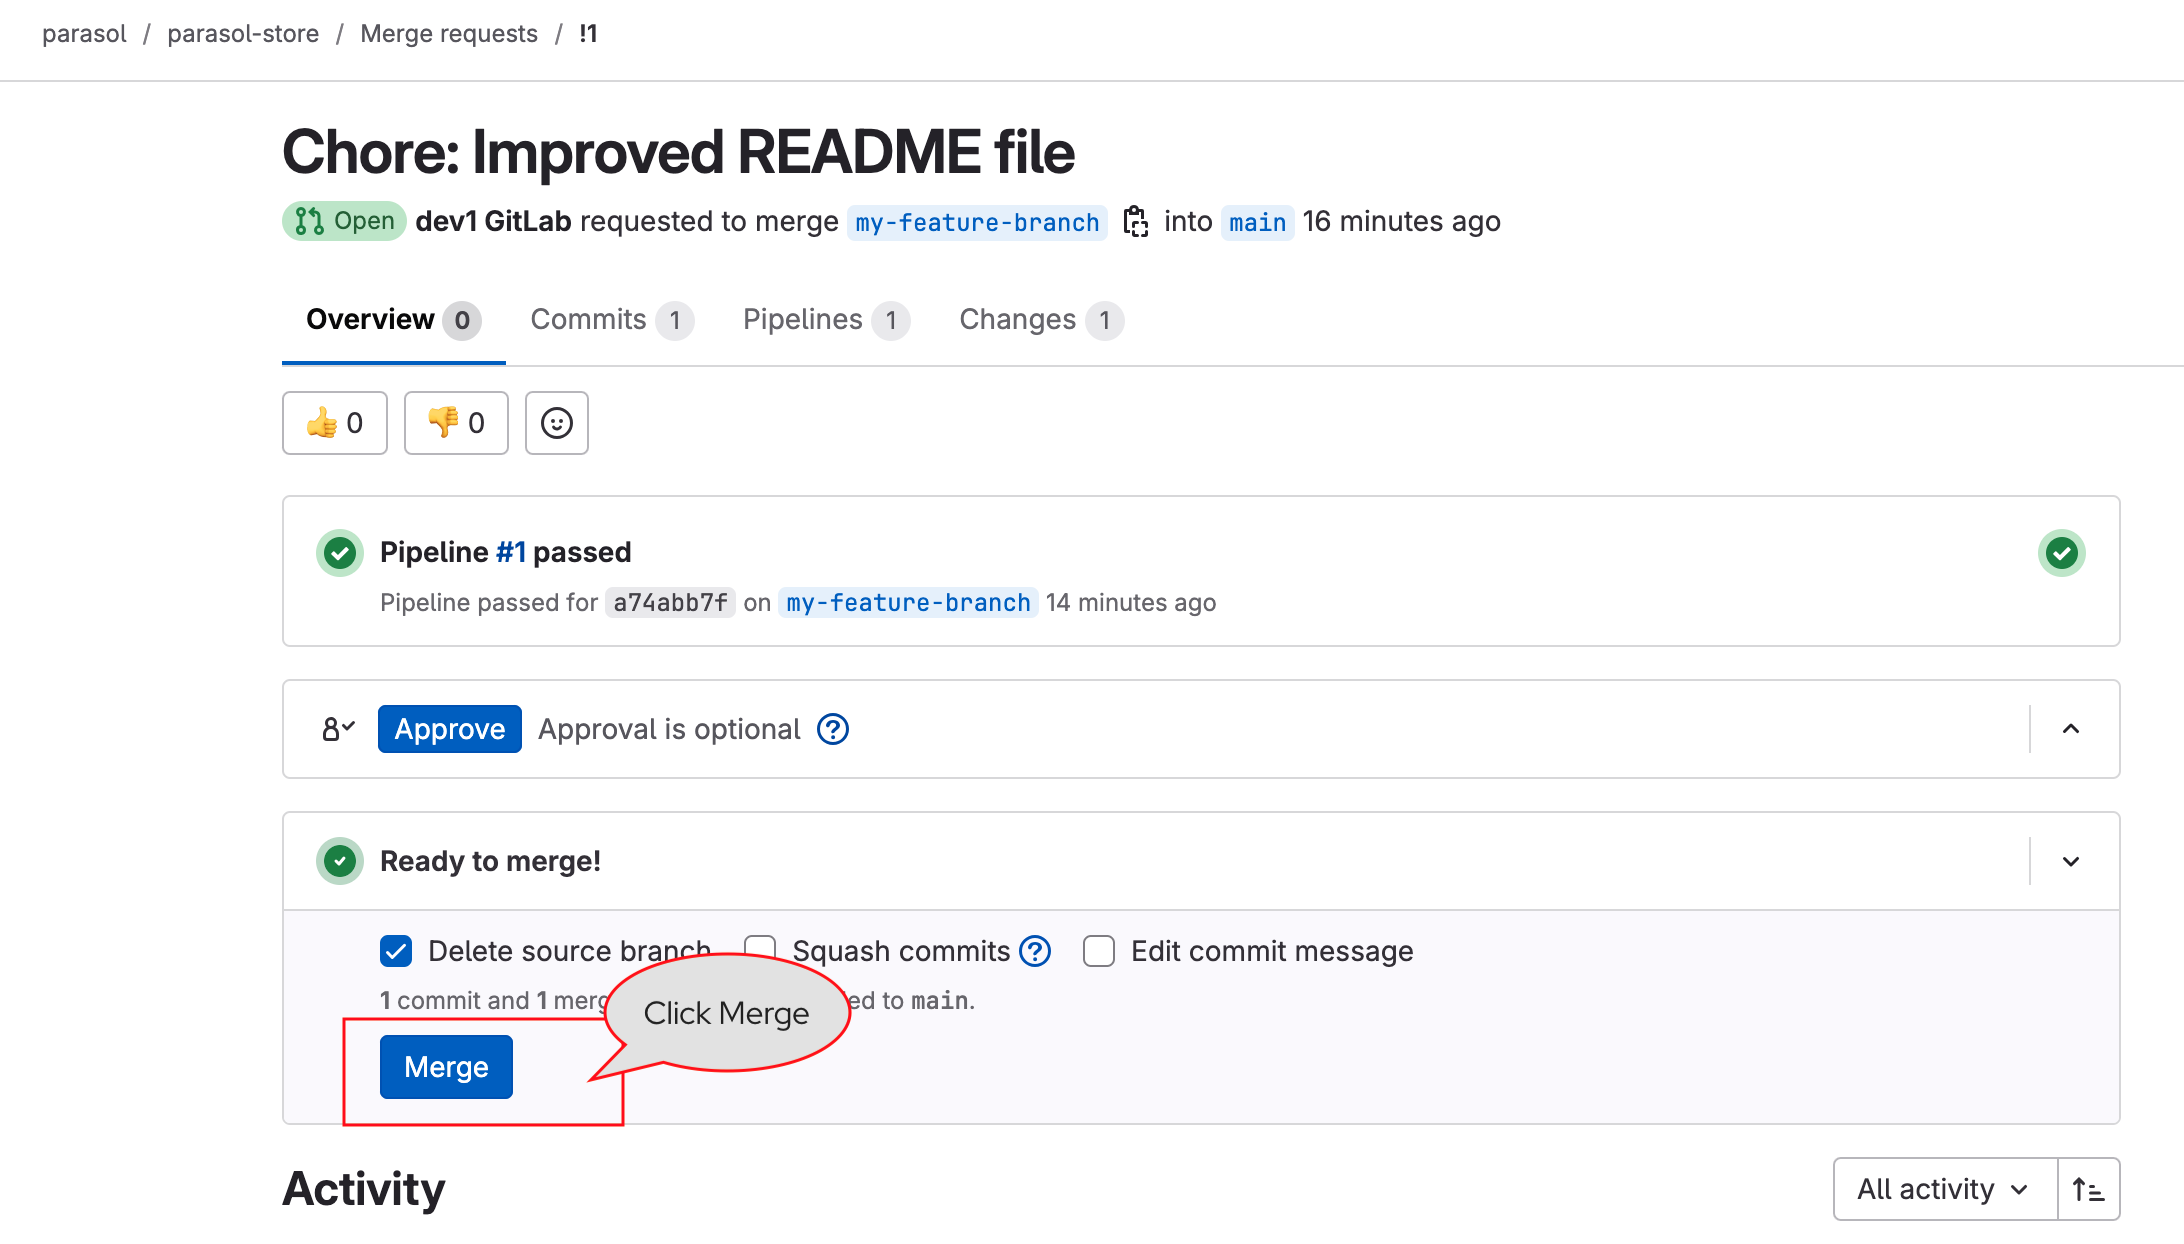
-
The
Mergeaction triggers another Pipeline in theparasol-storecomponent on Red Hat Developer Hub, which will update the Argo CD manifests with the new image tag.
-
When this Pipeline is complete, it will:
-
Update the Dev and Staging Argo CD manifests (deployment YAMLs are updated with the new image tag).
-
Create a Merge Request against the Production Argo CD manifests.
-

Dev and Staging Argo CD Manifest Updates
Let us now see what happened to the Dev and Staging Argo CD manifests updates.
-
In Red Hat Developer Hub, access the CD tab of the parasol-store component.
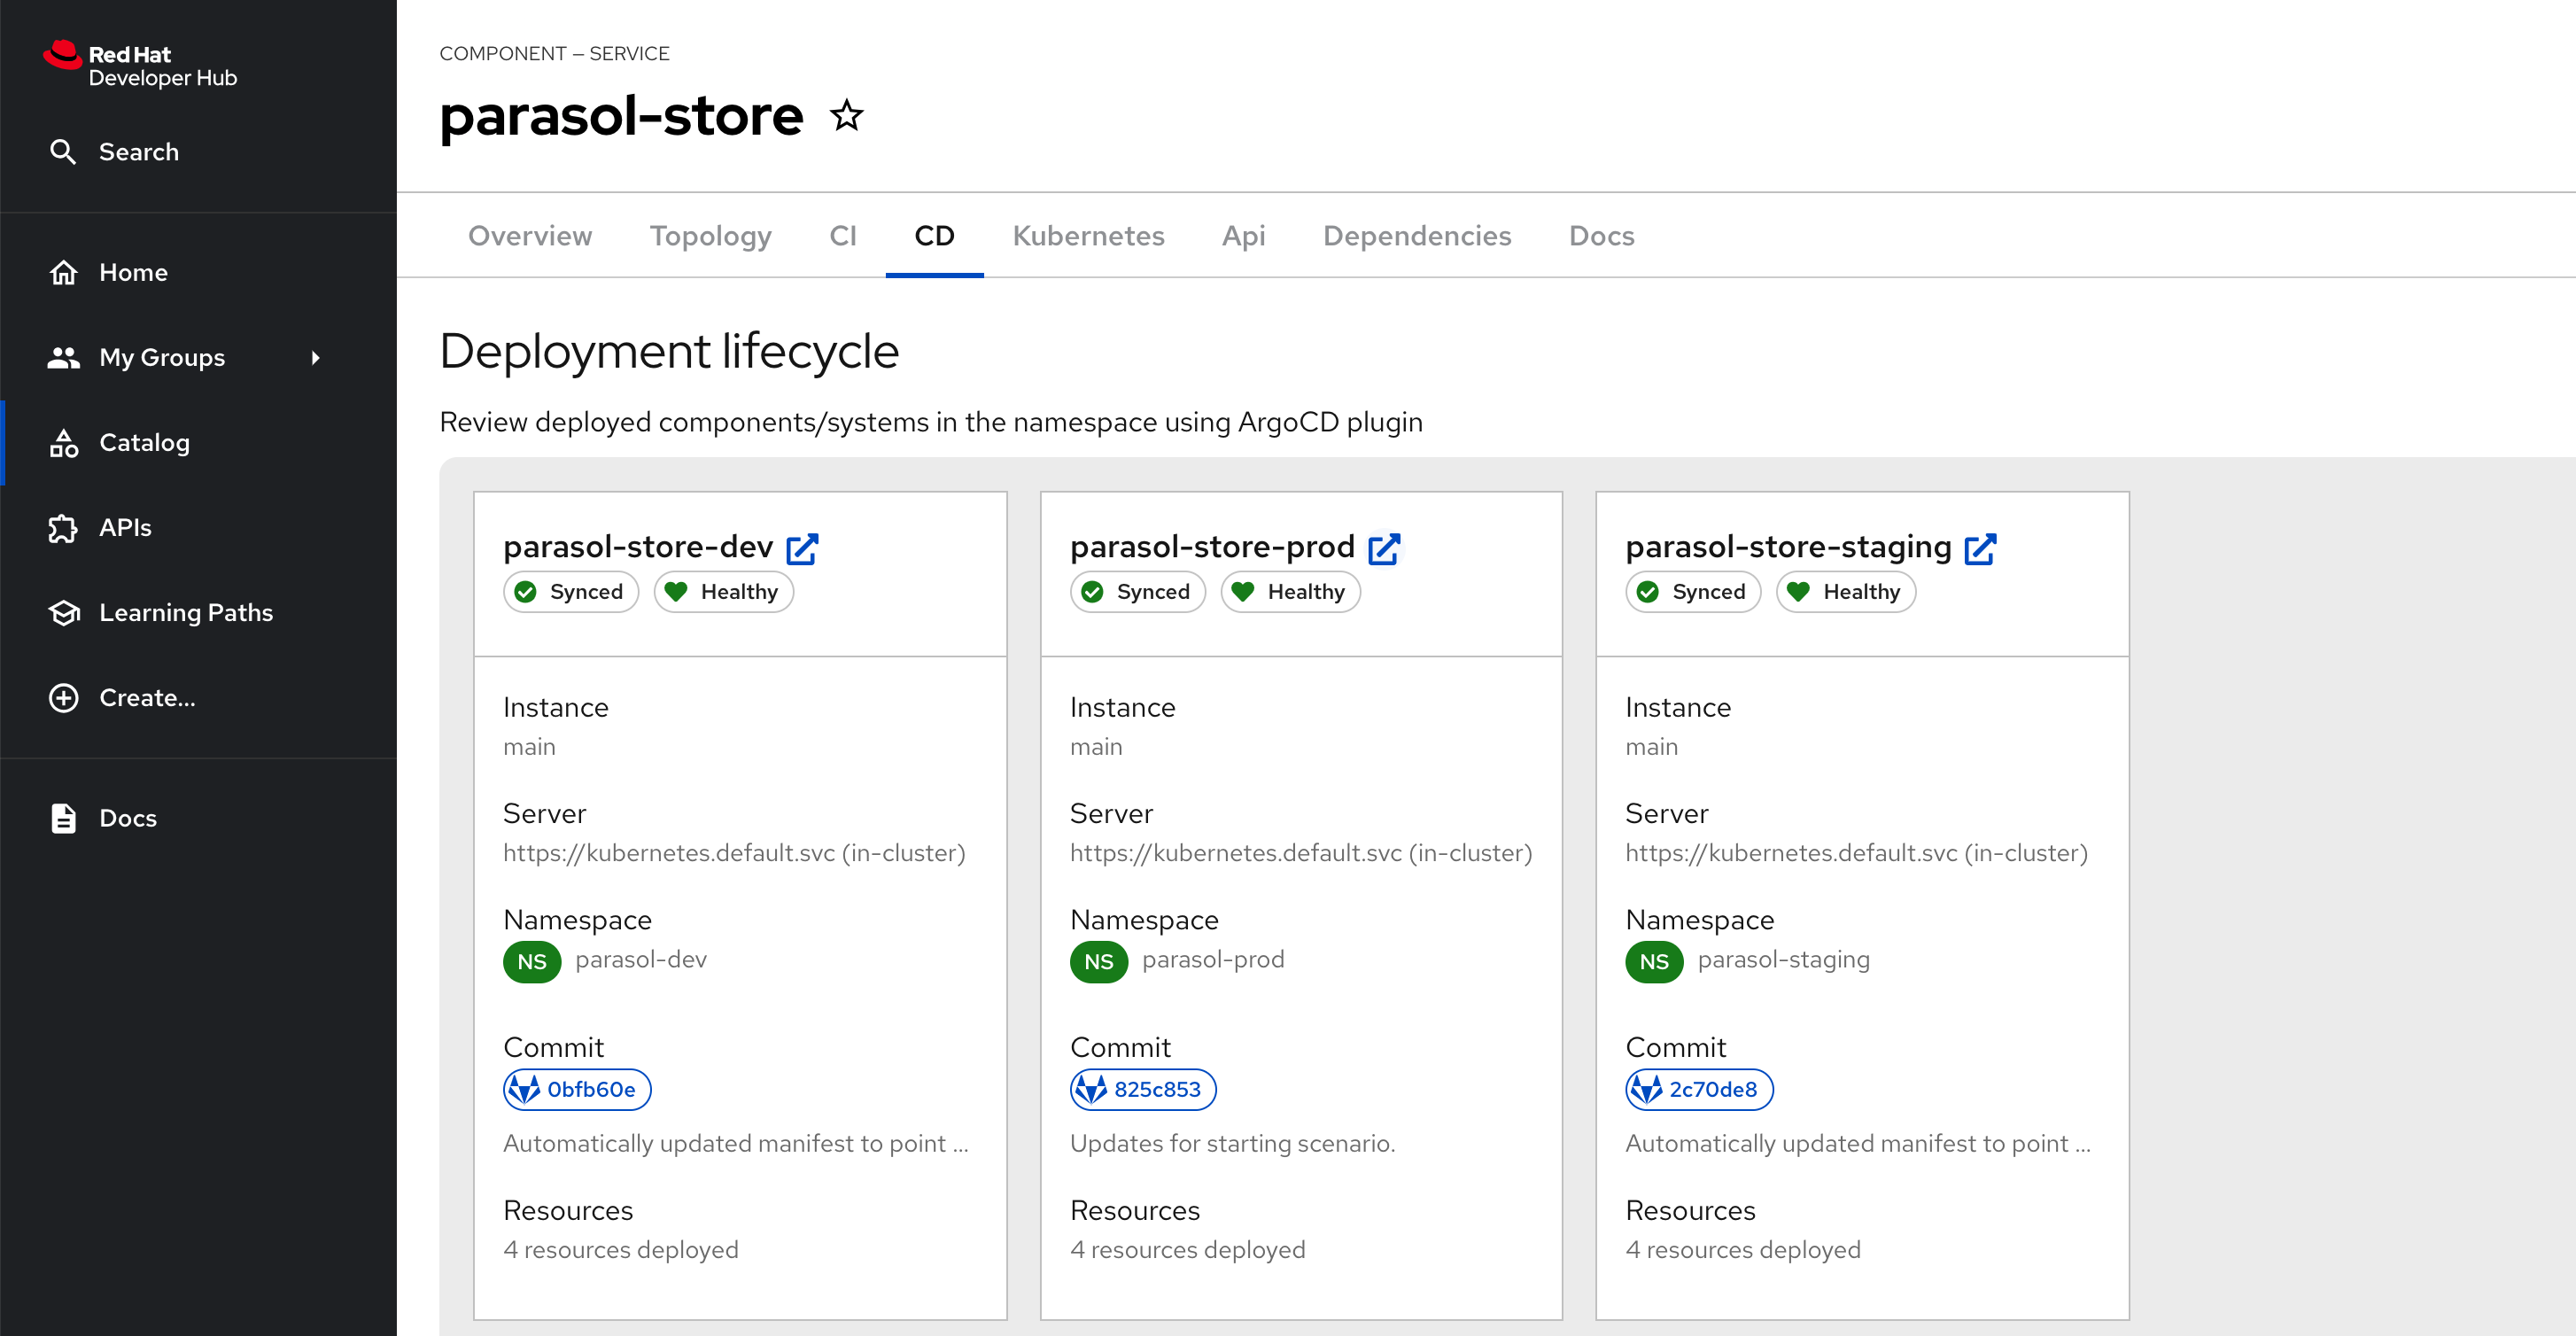
-
Click on the outgoing-arrow icon next to parasol-store-dev to access the rhdh-gitops instance of Argo CD that’s used to manage deployed applications. Login as
admin/{common_password}.This instance of Argo CD/OpenShift GitOps is meant only for applications. The other Argo CD you have accessed thus far is for configuring Red Hat Developer Hub and the platform related Argo CD applications. -
You will note that both dev and staging are tagged by the Tekton Pipeline to the same image tag. Hover the pointer over the Last Sync comment as shown in the screenshots below.
You may need to click the REFRESH button on the Argo CD Applications if you don’t see the updates reflected after a few seconds. -
Dev Argo CD: parasol-store-dev
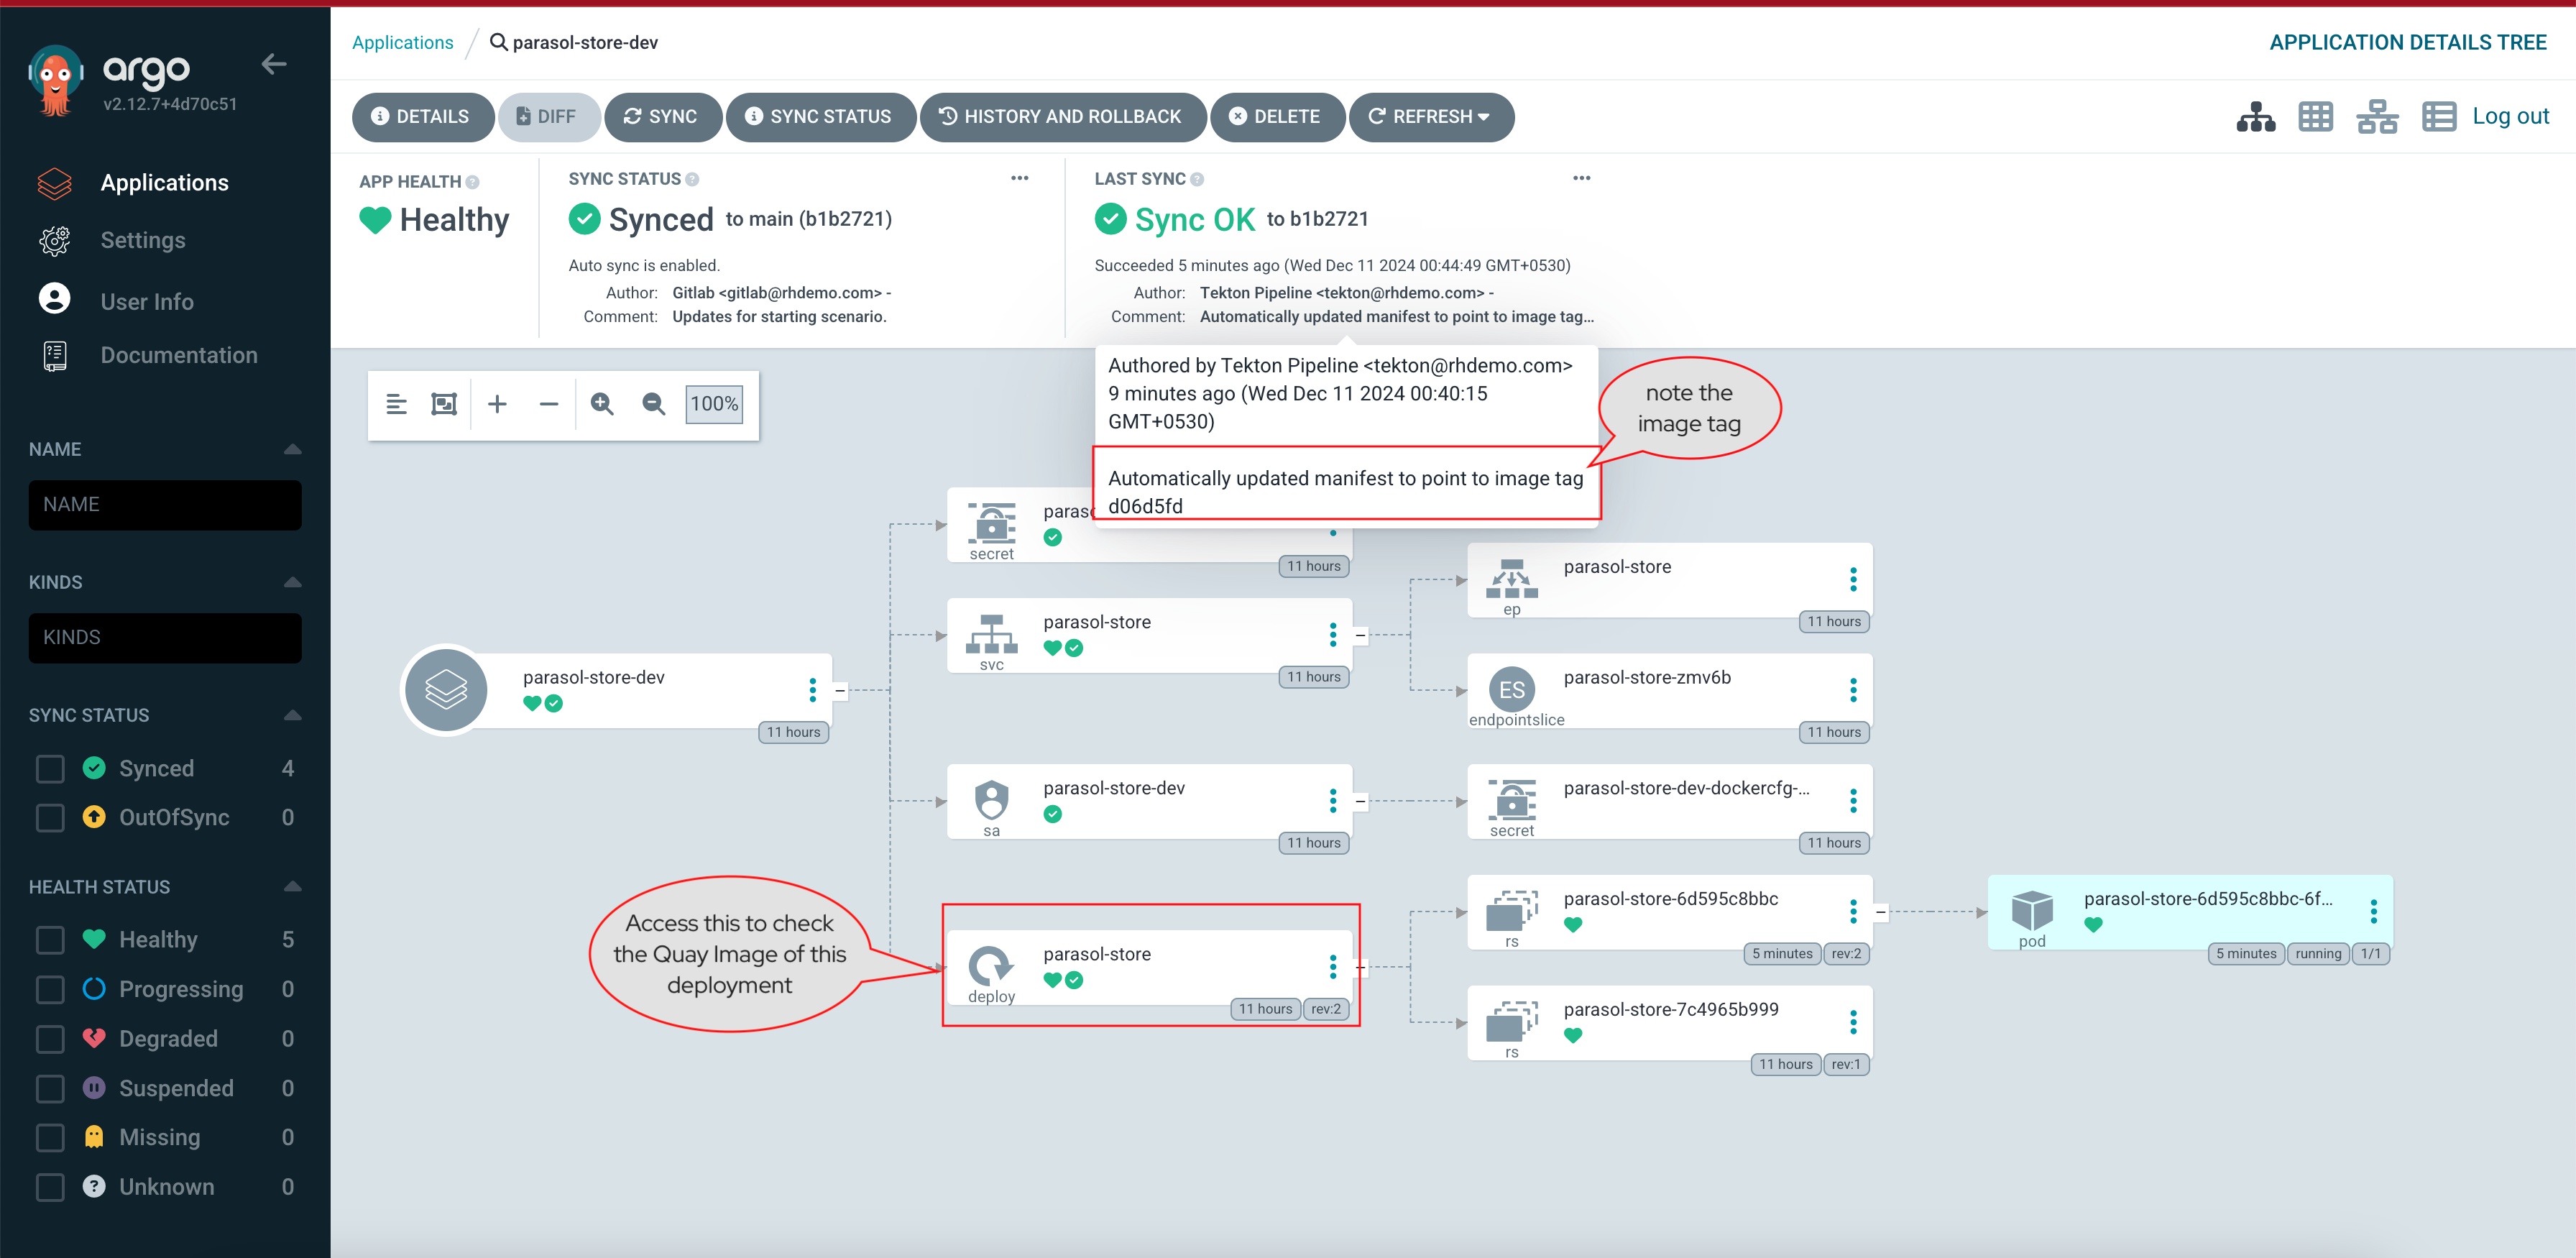
-
Staging Argo CD: parasol-store-staging
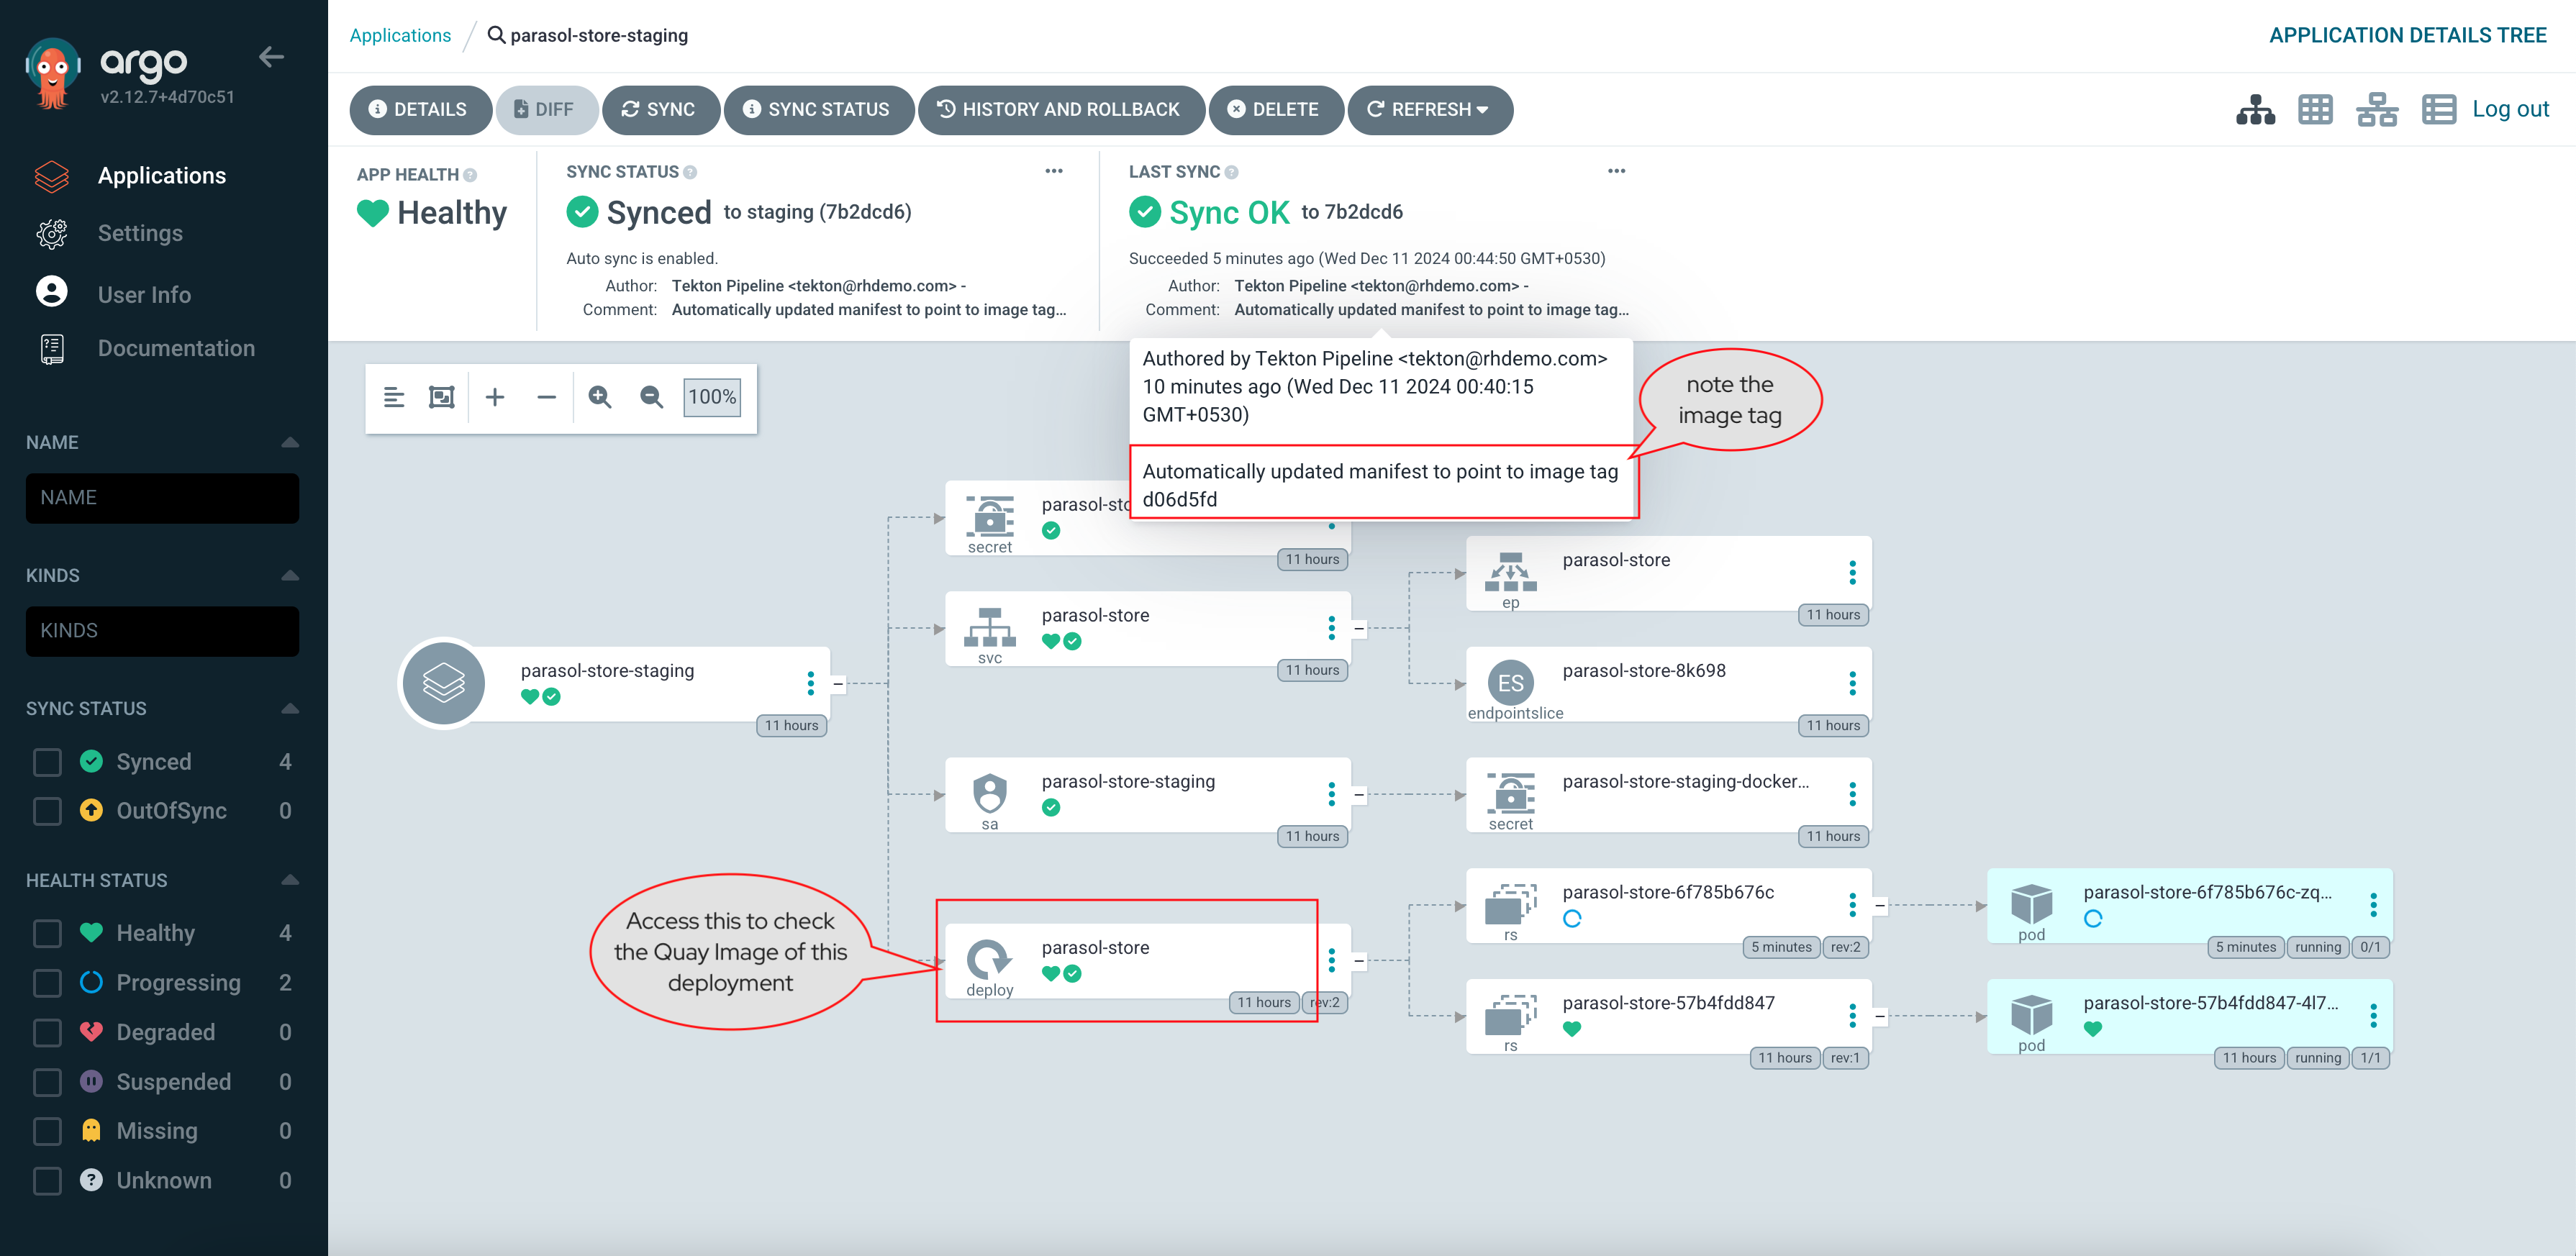
-
-
NOTE: You can click on the
parasol-storedeploy highlighted to view the deployment YAML of both dev and staging, and you can verify they are both pointing to the same Quay image.
In the next section, you will complete the Production Manifests merge. :imagesdir: ../../assets/images
Explore updates to Production Argo CD Manifests
-
In the previous section, we noted that a Merge Request has been raised on the Prod Argo CD manifest to update the prod image.
-
On Red Hat Developer Hub, in the
parasol-storecomponent’s Pull/Merge Requests page, you can view the a list of Gitlab Merge Request Statuses. -
Click on the Revision link shown for
parasol-store-prod. This will take you to theparasol-store-manifestsrepo showing the current commits to theparasol-store-manifestsrepository.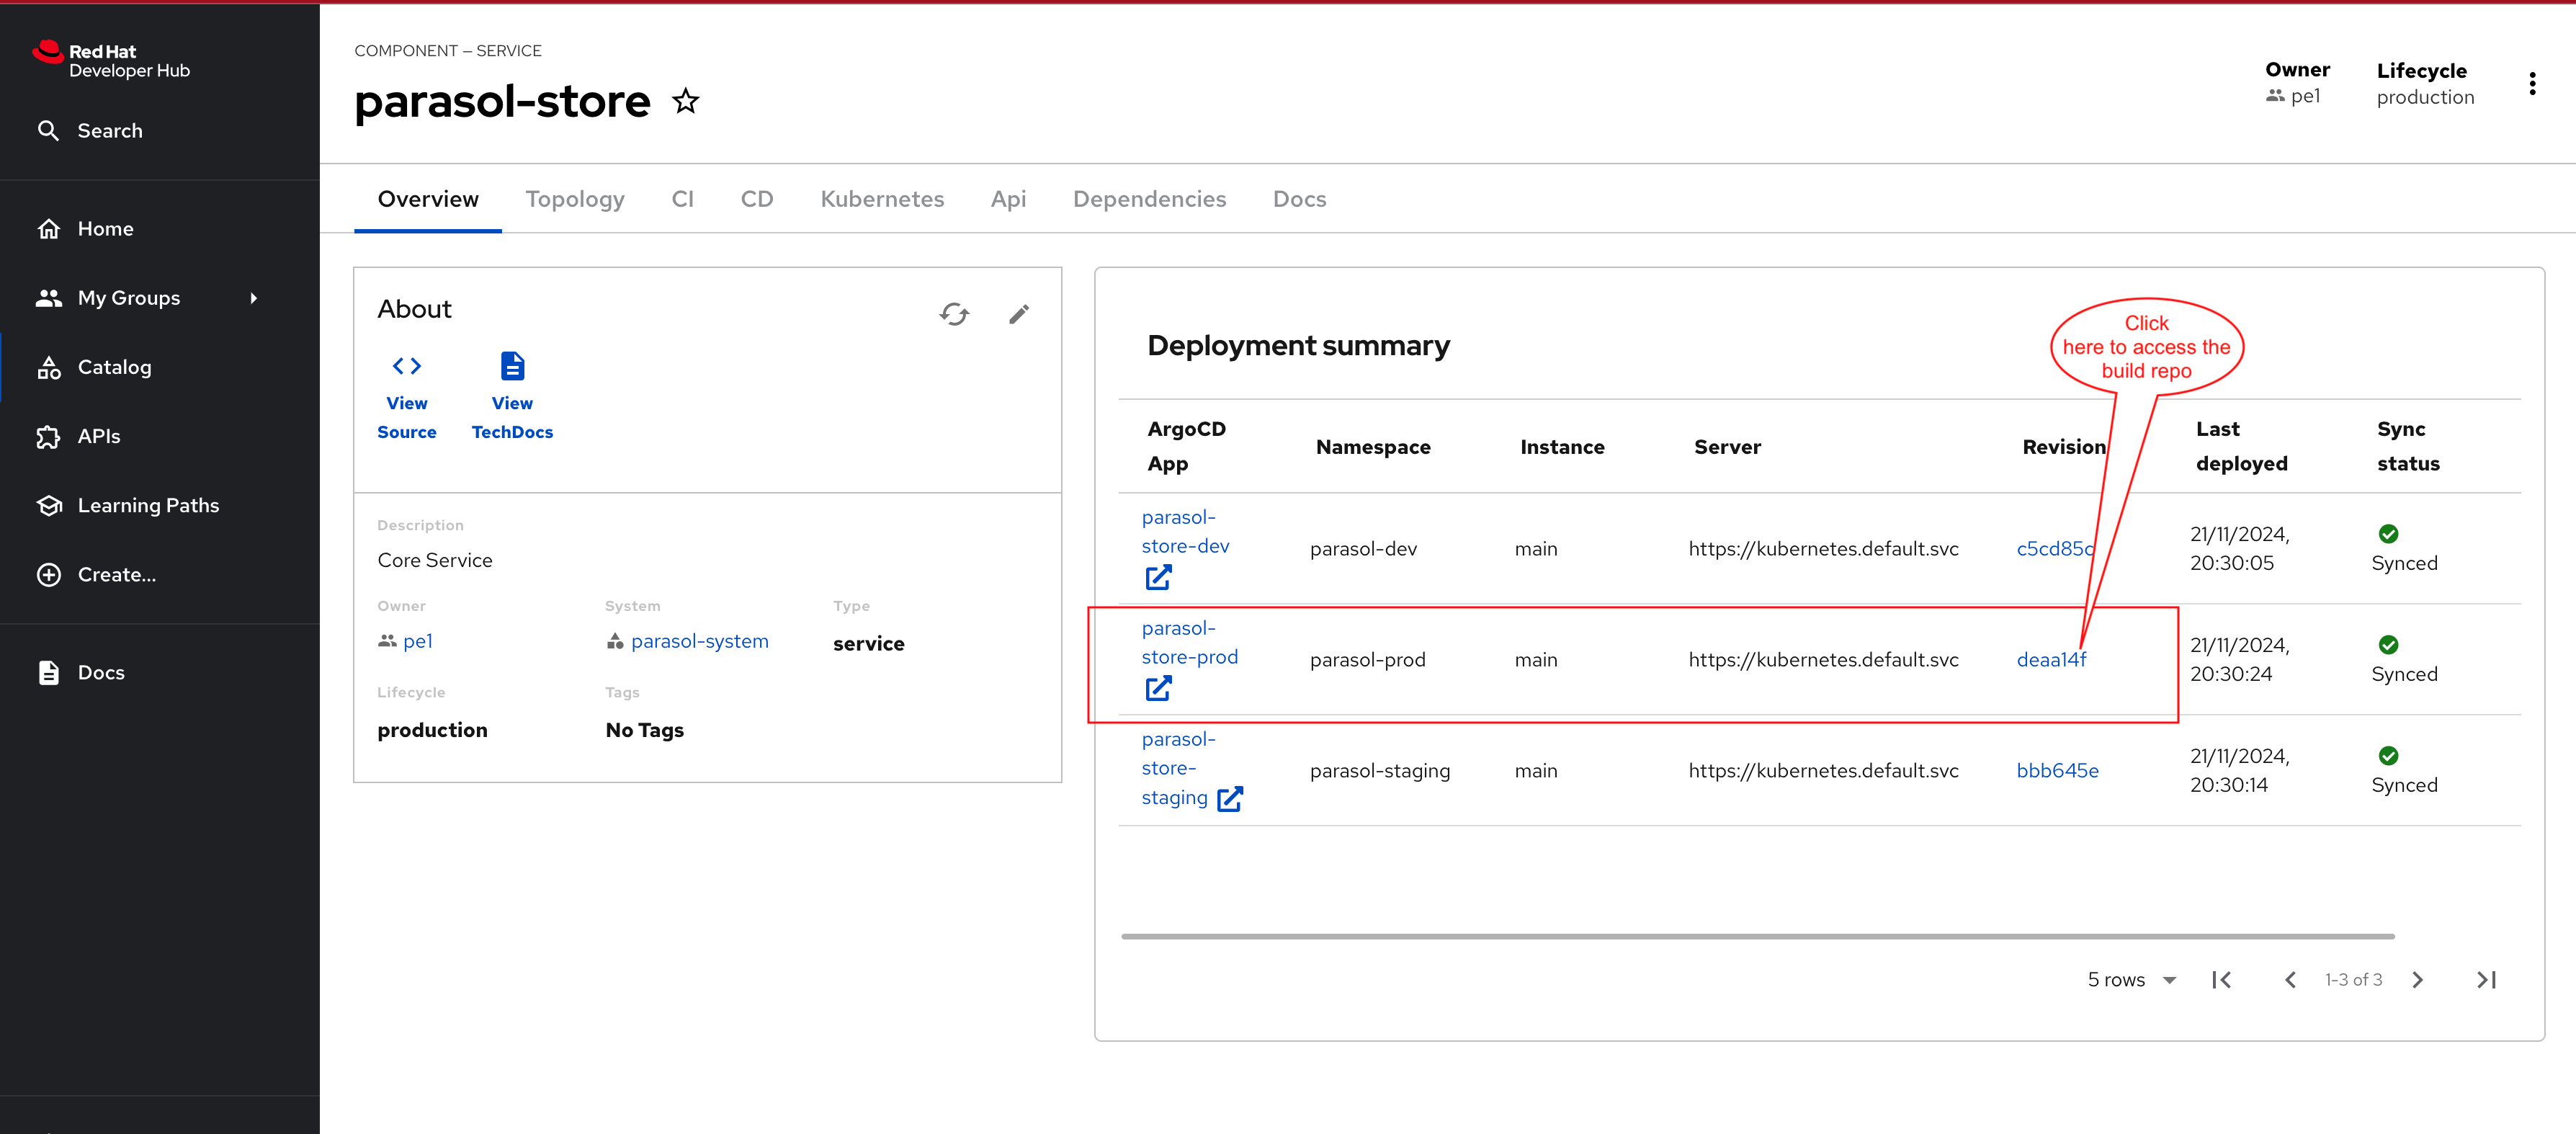
-
From the left-hand navigation, access the Merge requests menu. Or click here to navigate to the Merge requests page.
-
You can see the Merge Request created for the
parasol-store-manifestsrepo to update the prod image.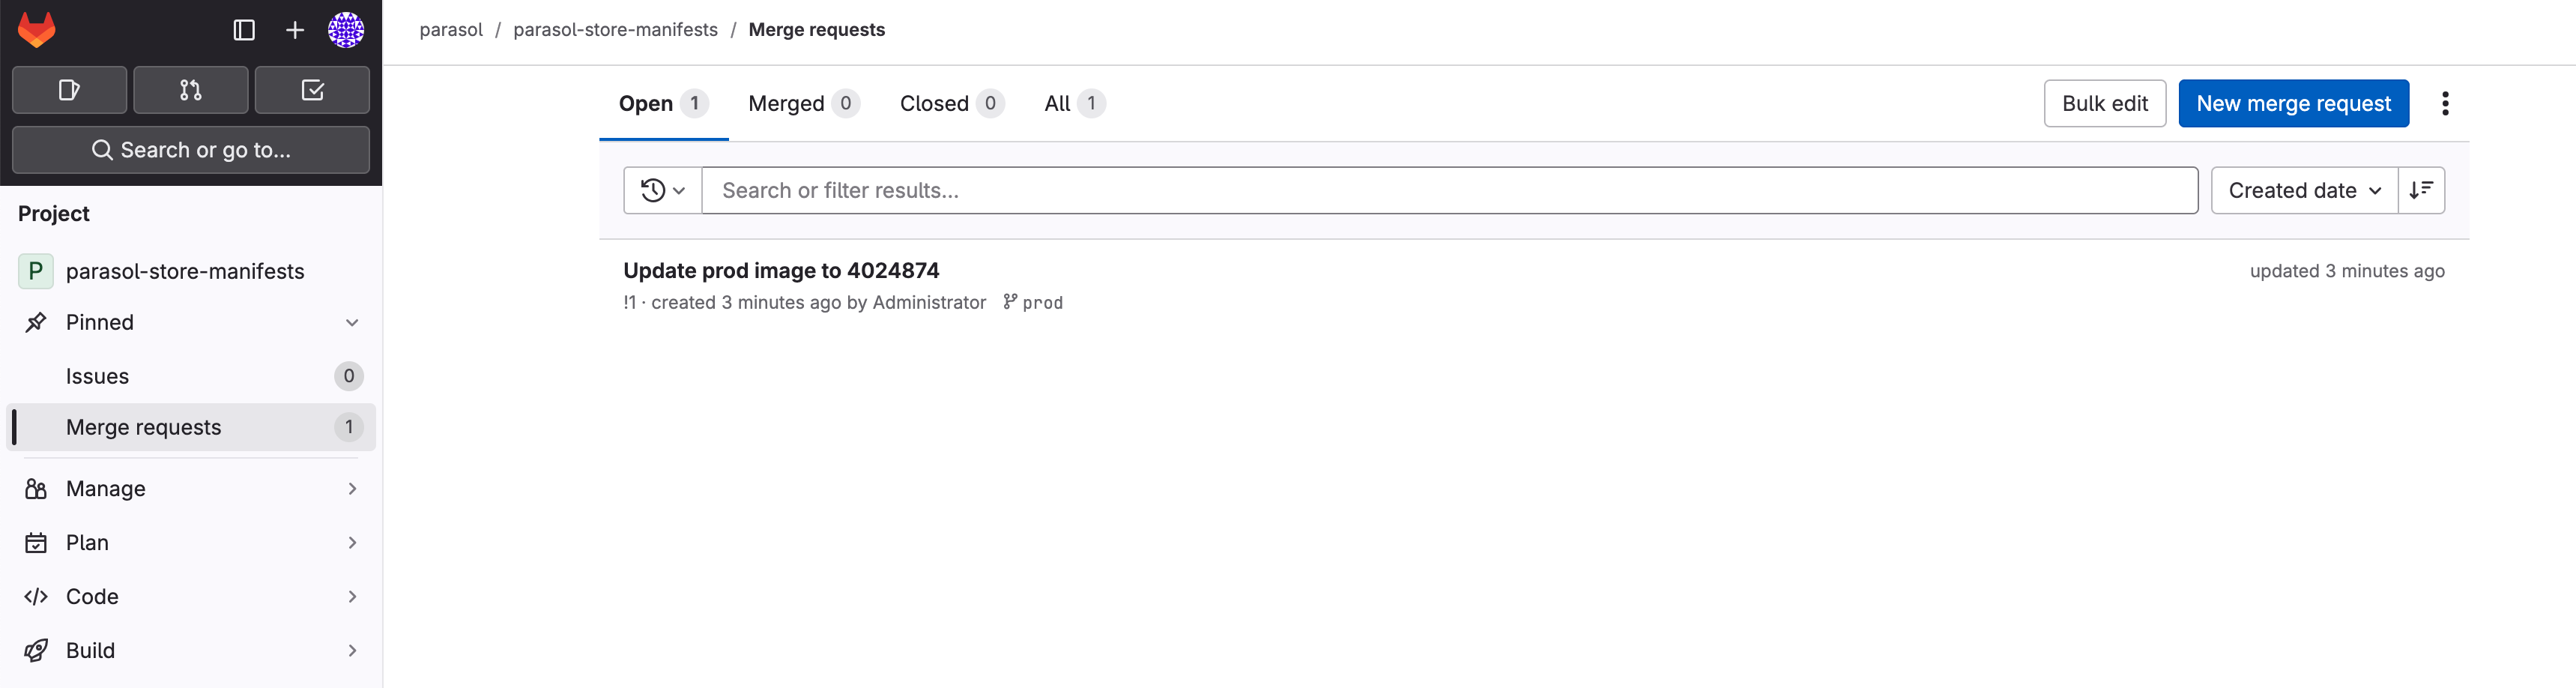
-
Click on the Changes tab, and you can see that the
value-prod.yamlfile is now updated to match the same image tag we noticed for the dev & staging deployments.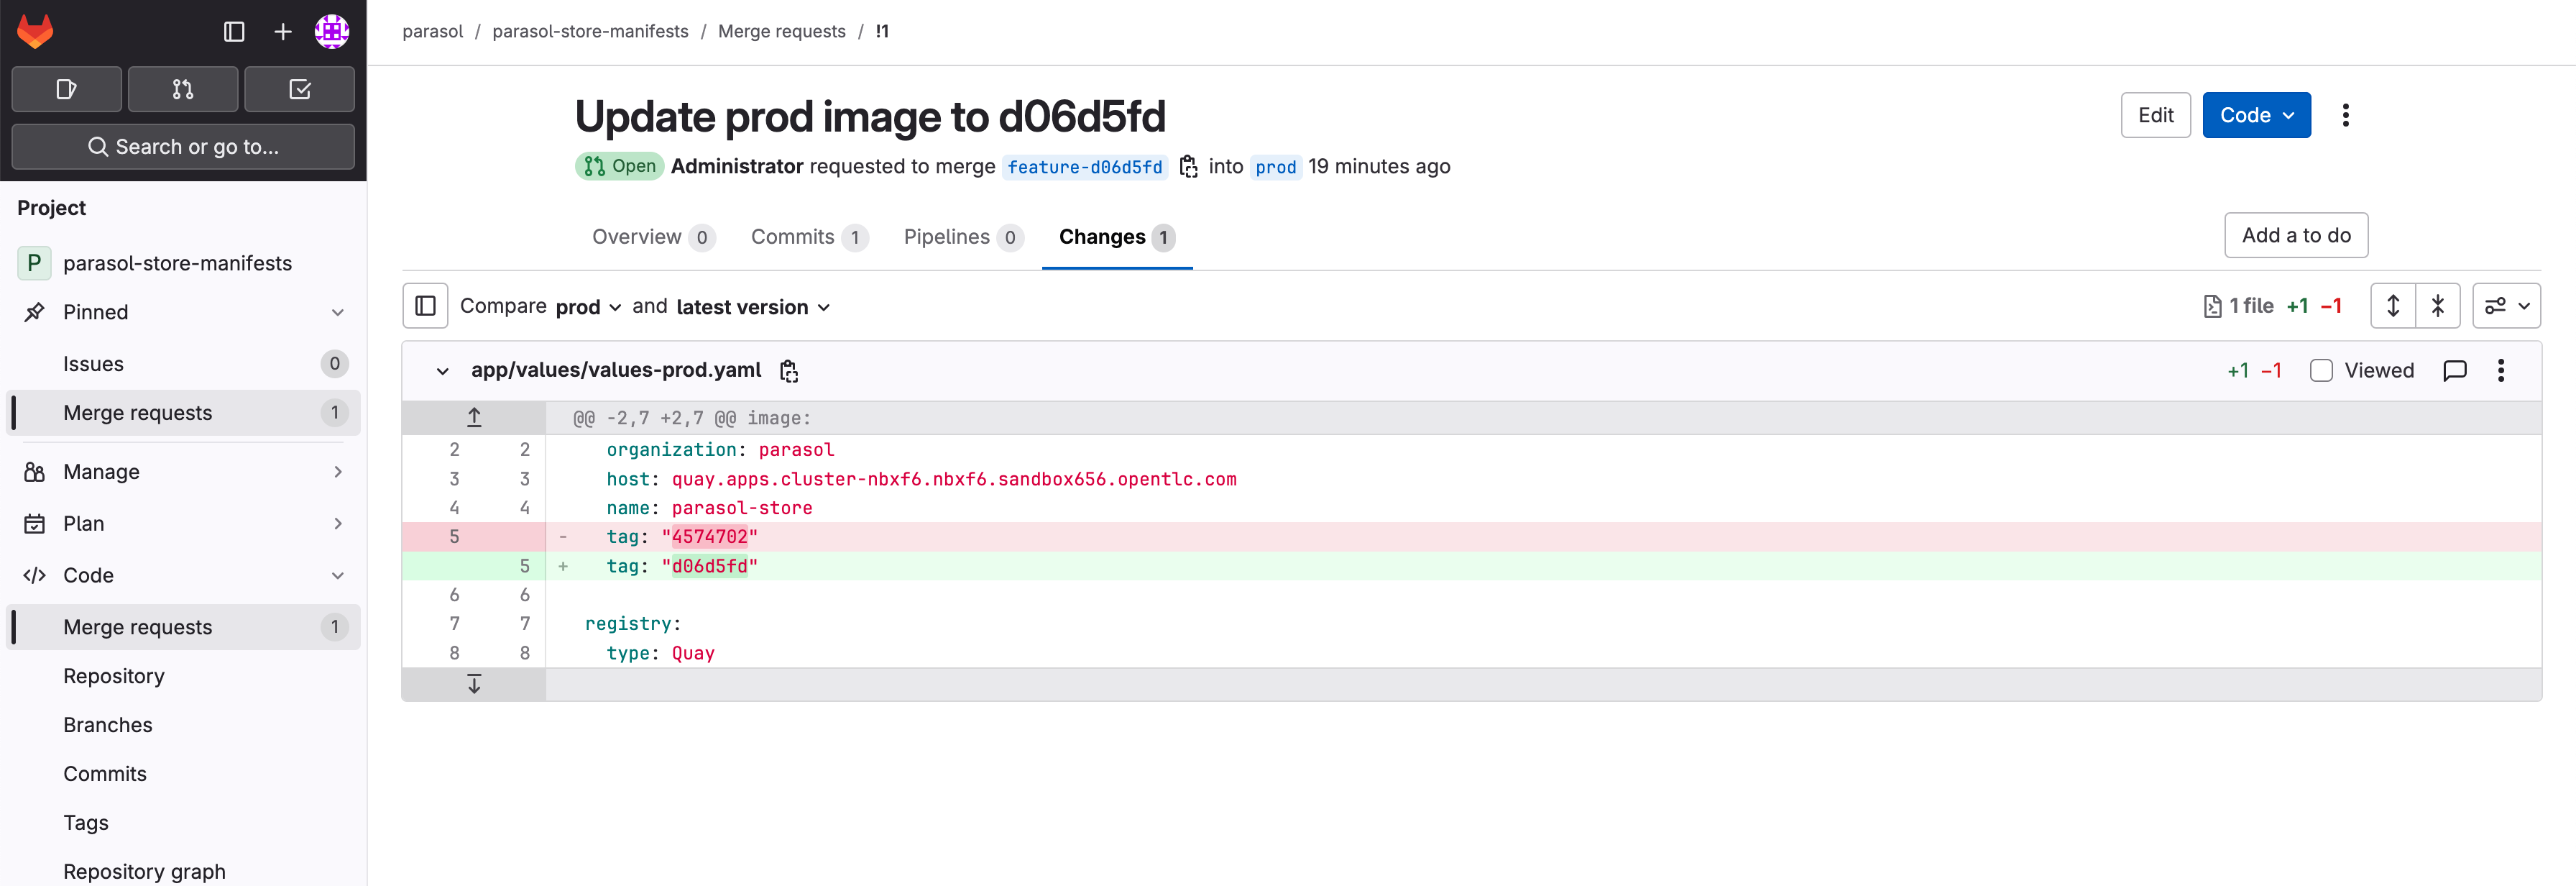
Merge updates to Production Argo CD Manifests
-
For the sake of the workshop, assume the persona of a release manager. Navigate back to the Overview tab of the Merge Request and proceed to Merge it.

-
Navigate to the Red Hat Developer Hub
parasol-storecomponent. From the CD tab, access theparasol-store-prodArgo CD app by clicking on the arrow.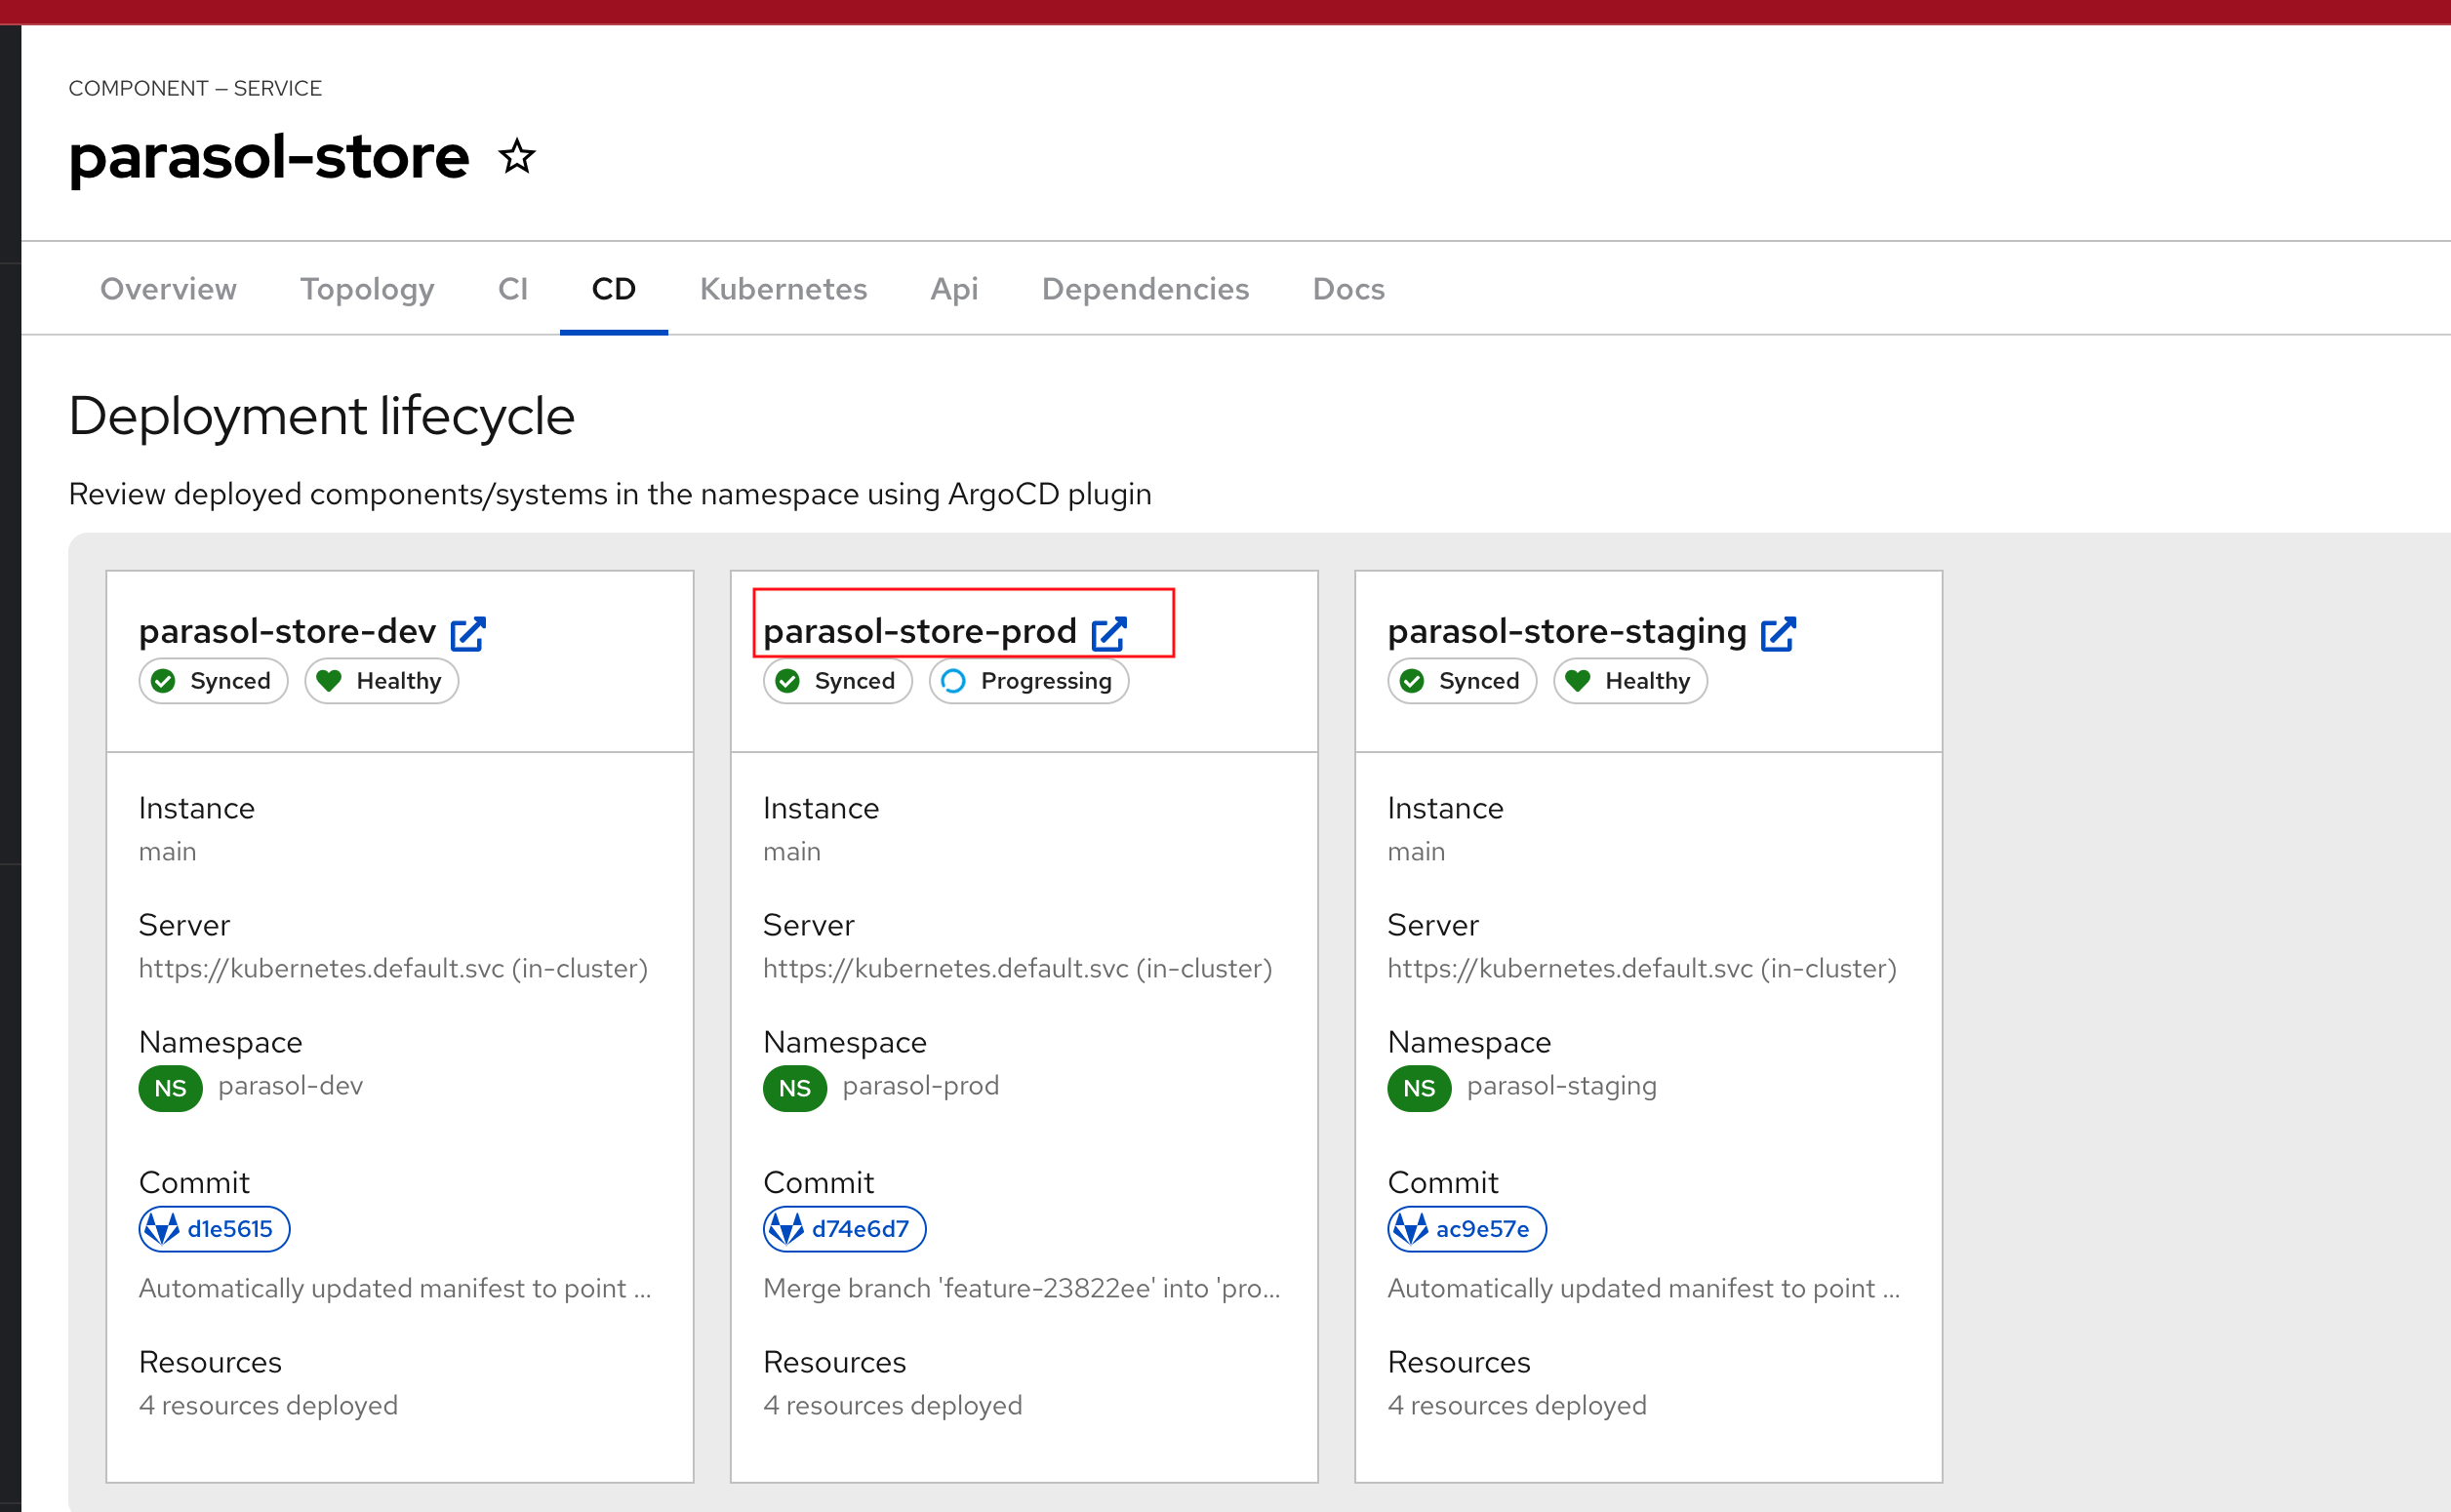
-
Click on the Refresh button. Login as (
admin/{common_password}) if prompted.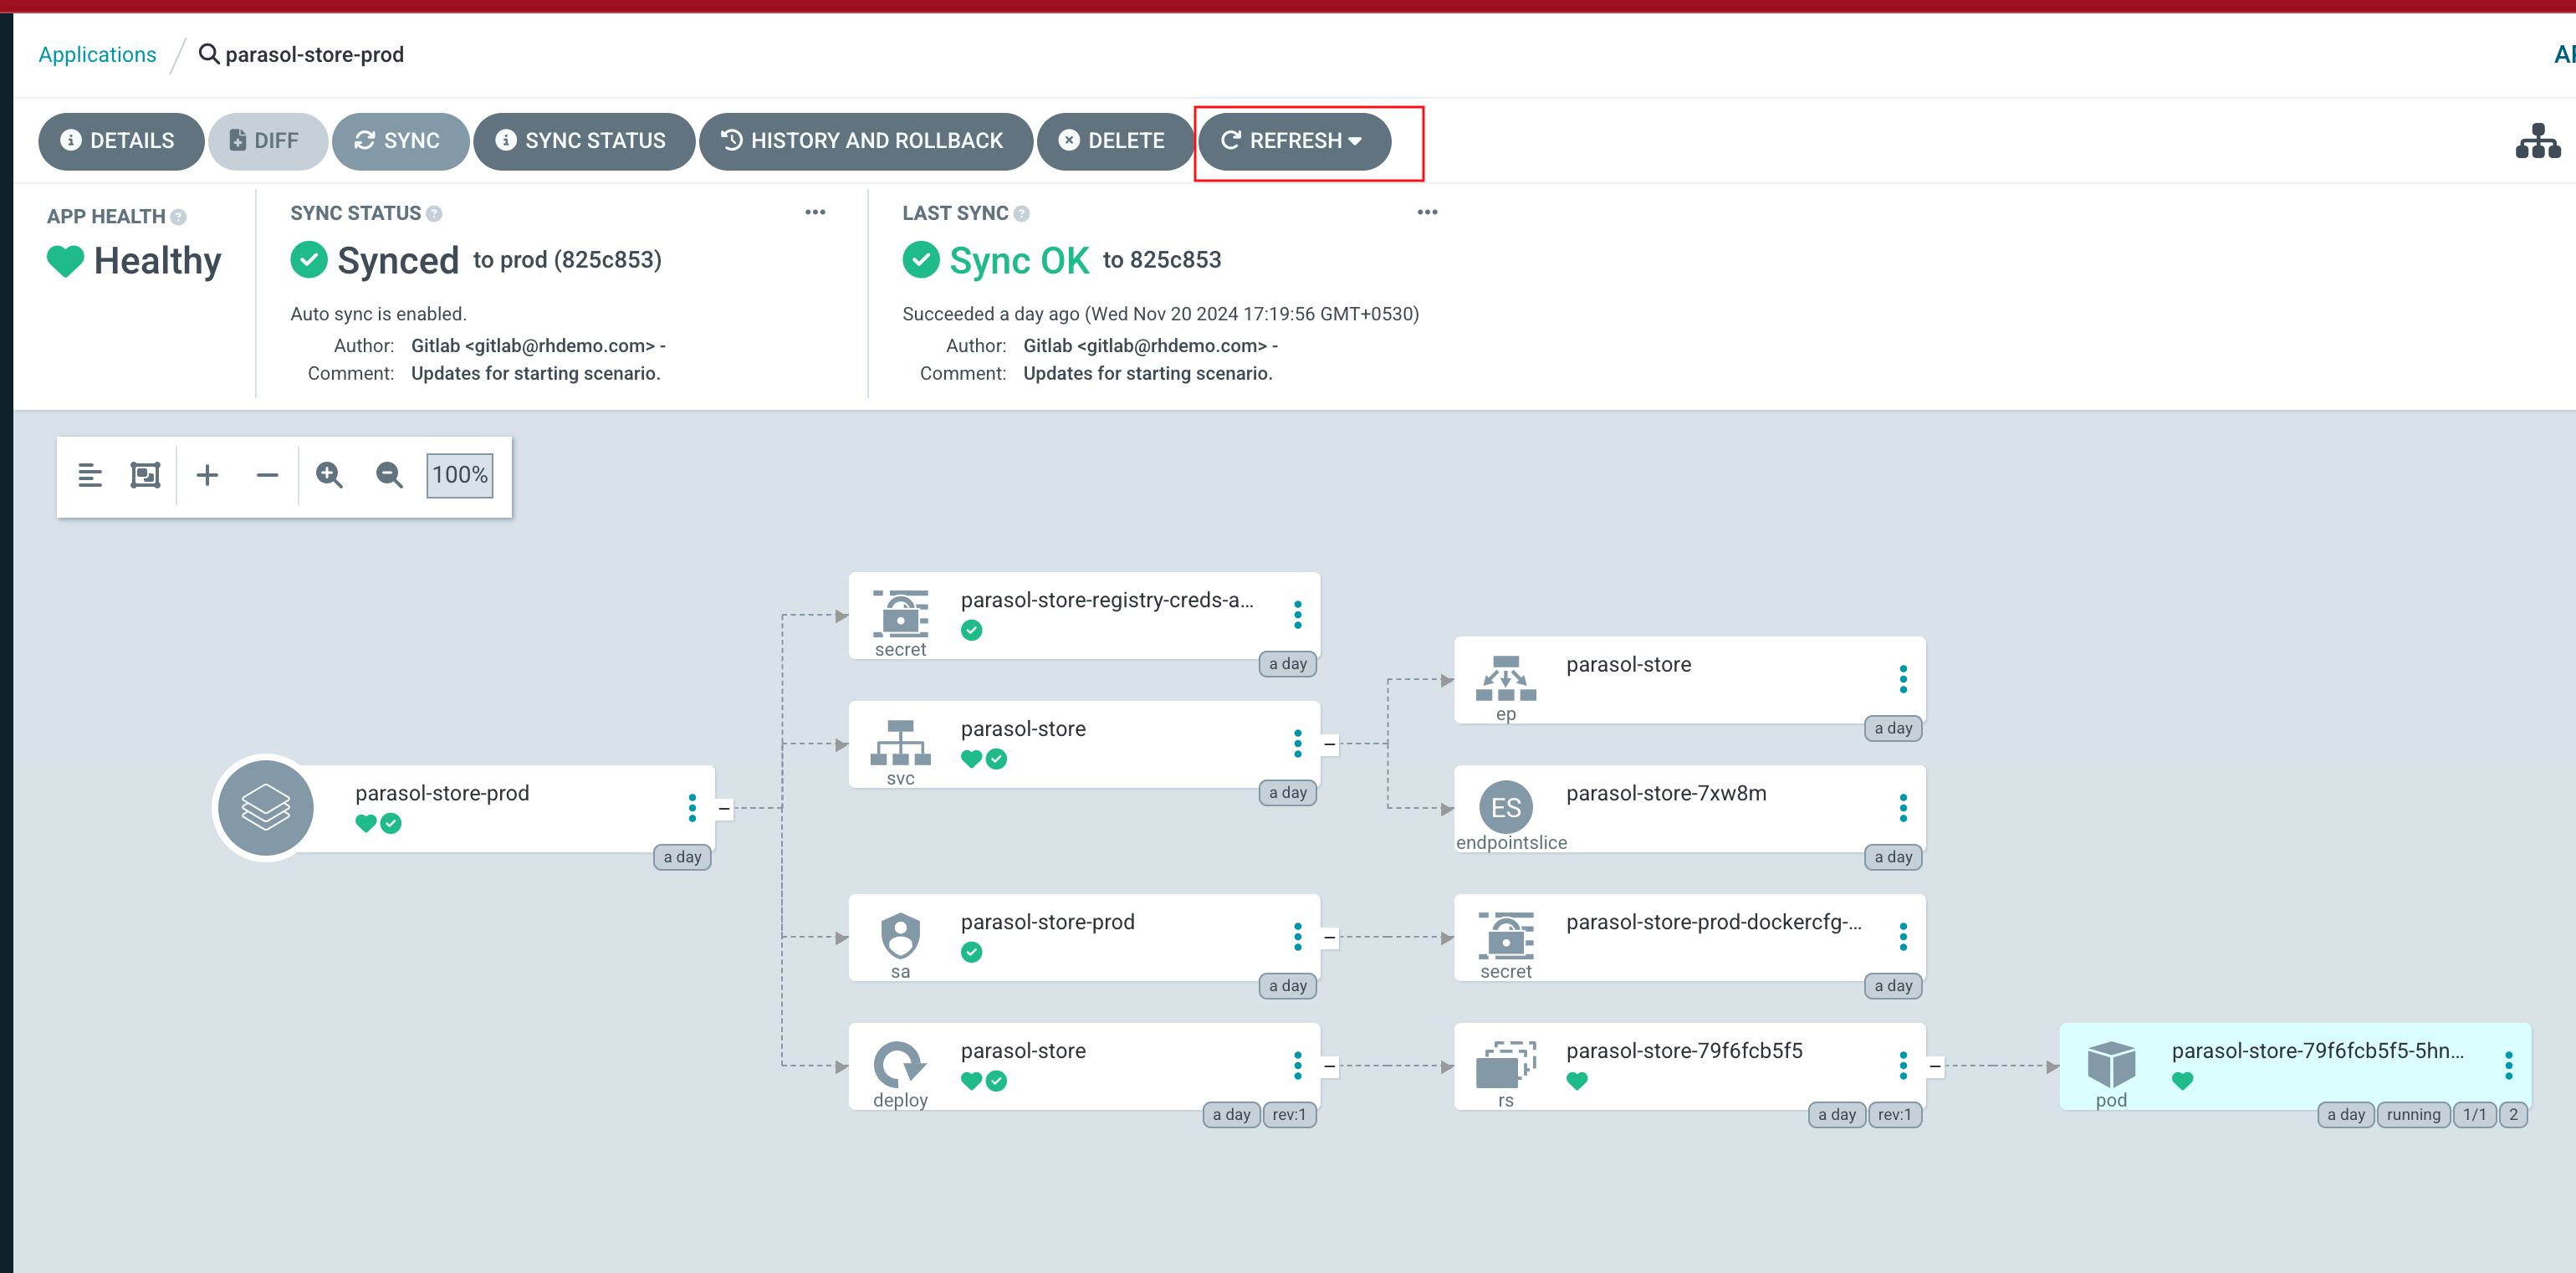
-
The Argo CD app will begin syncing.
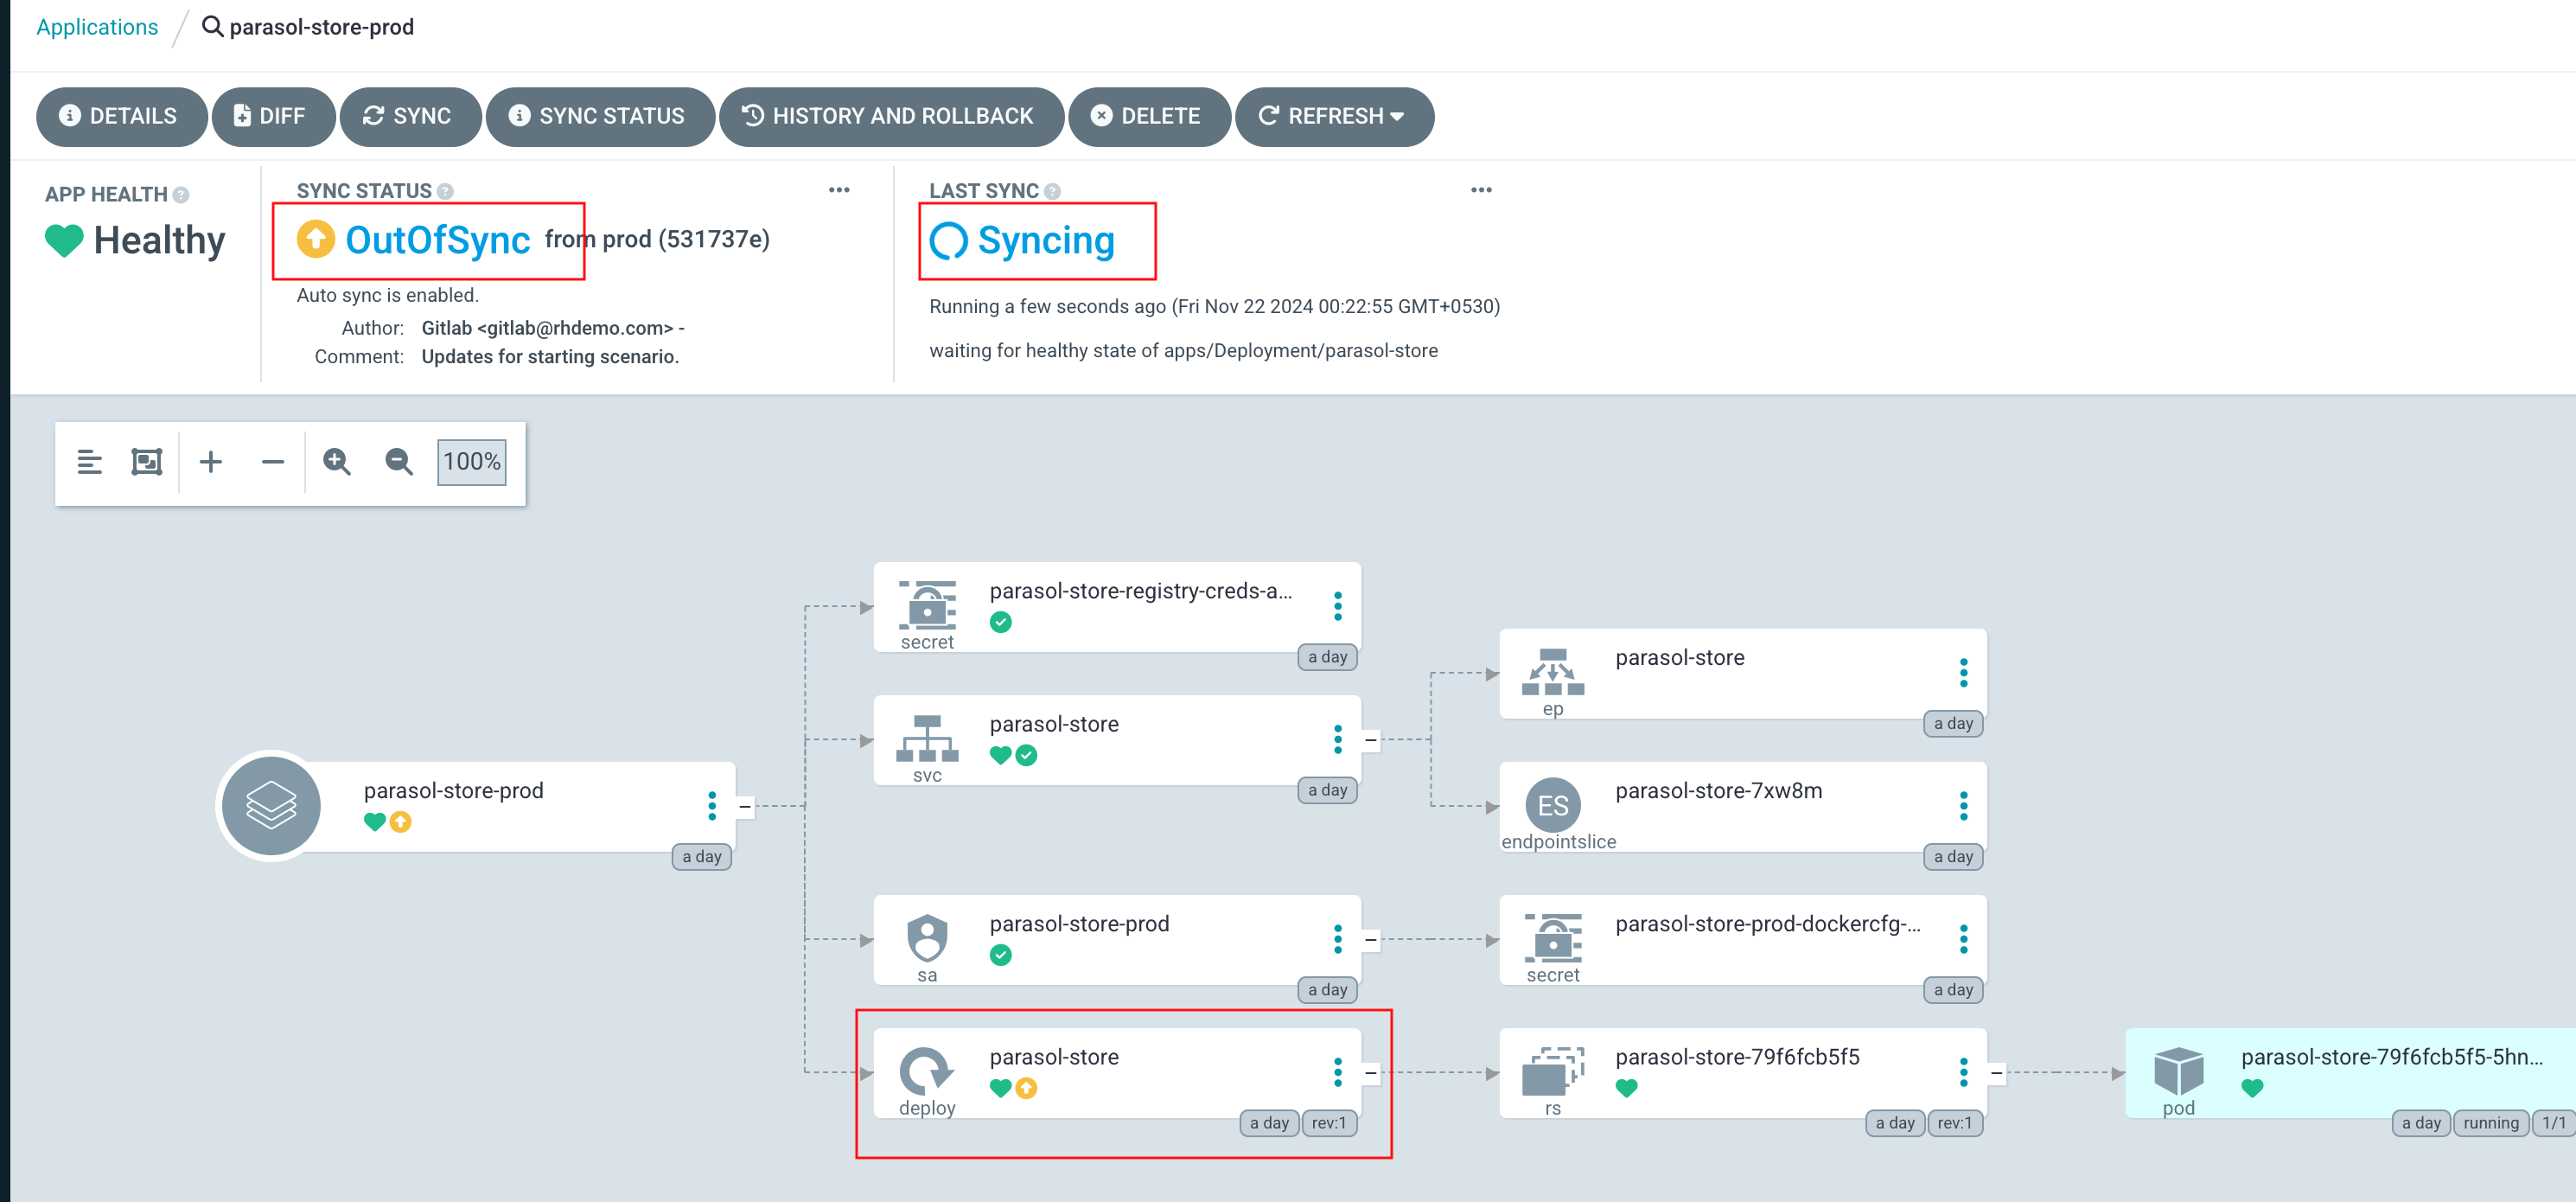
-
In less than a minute, the new image will be deployed on Prod as well.
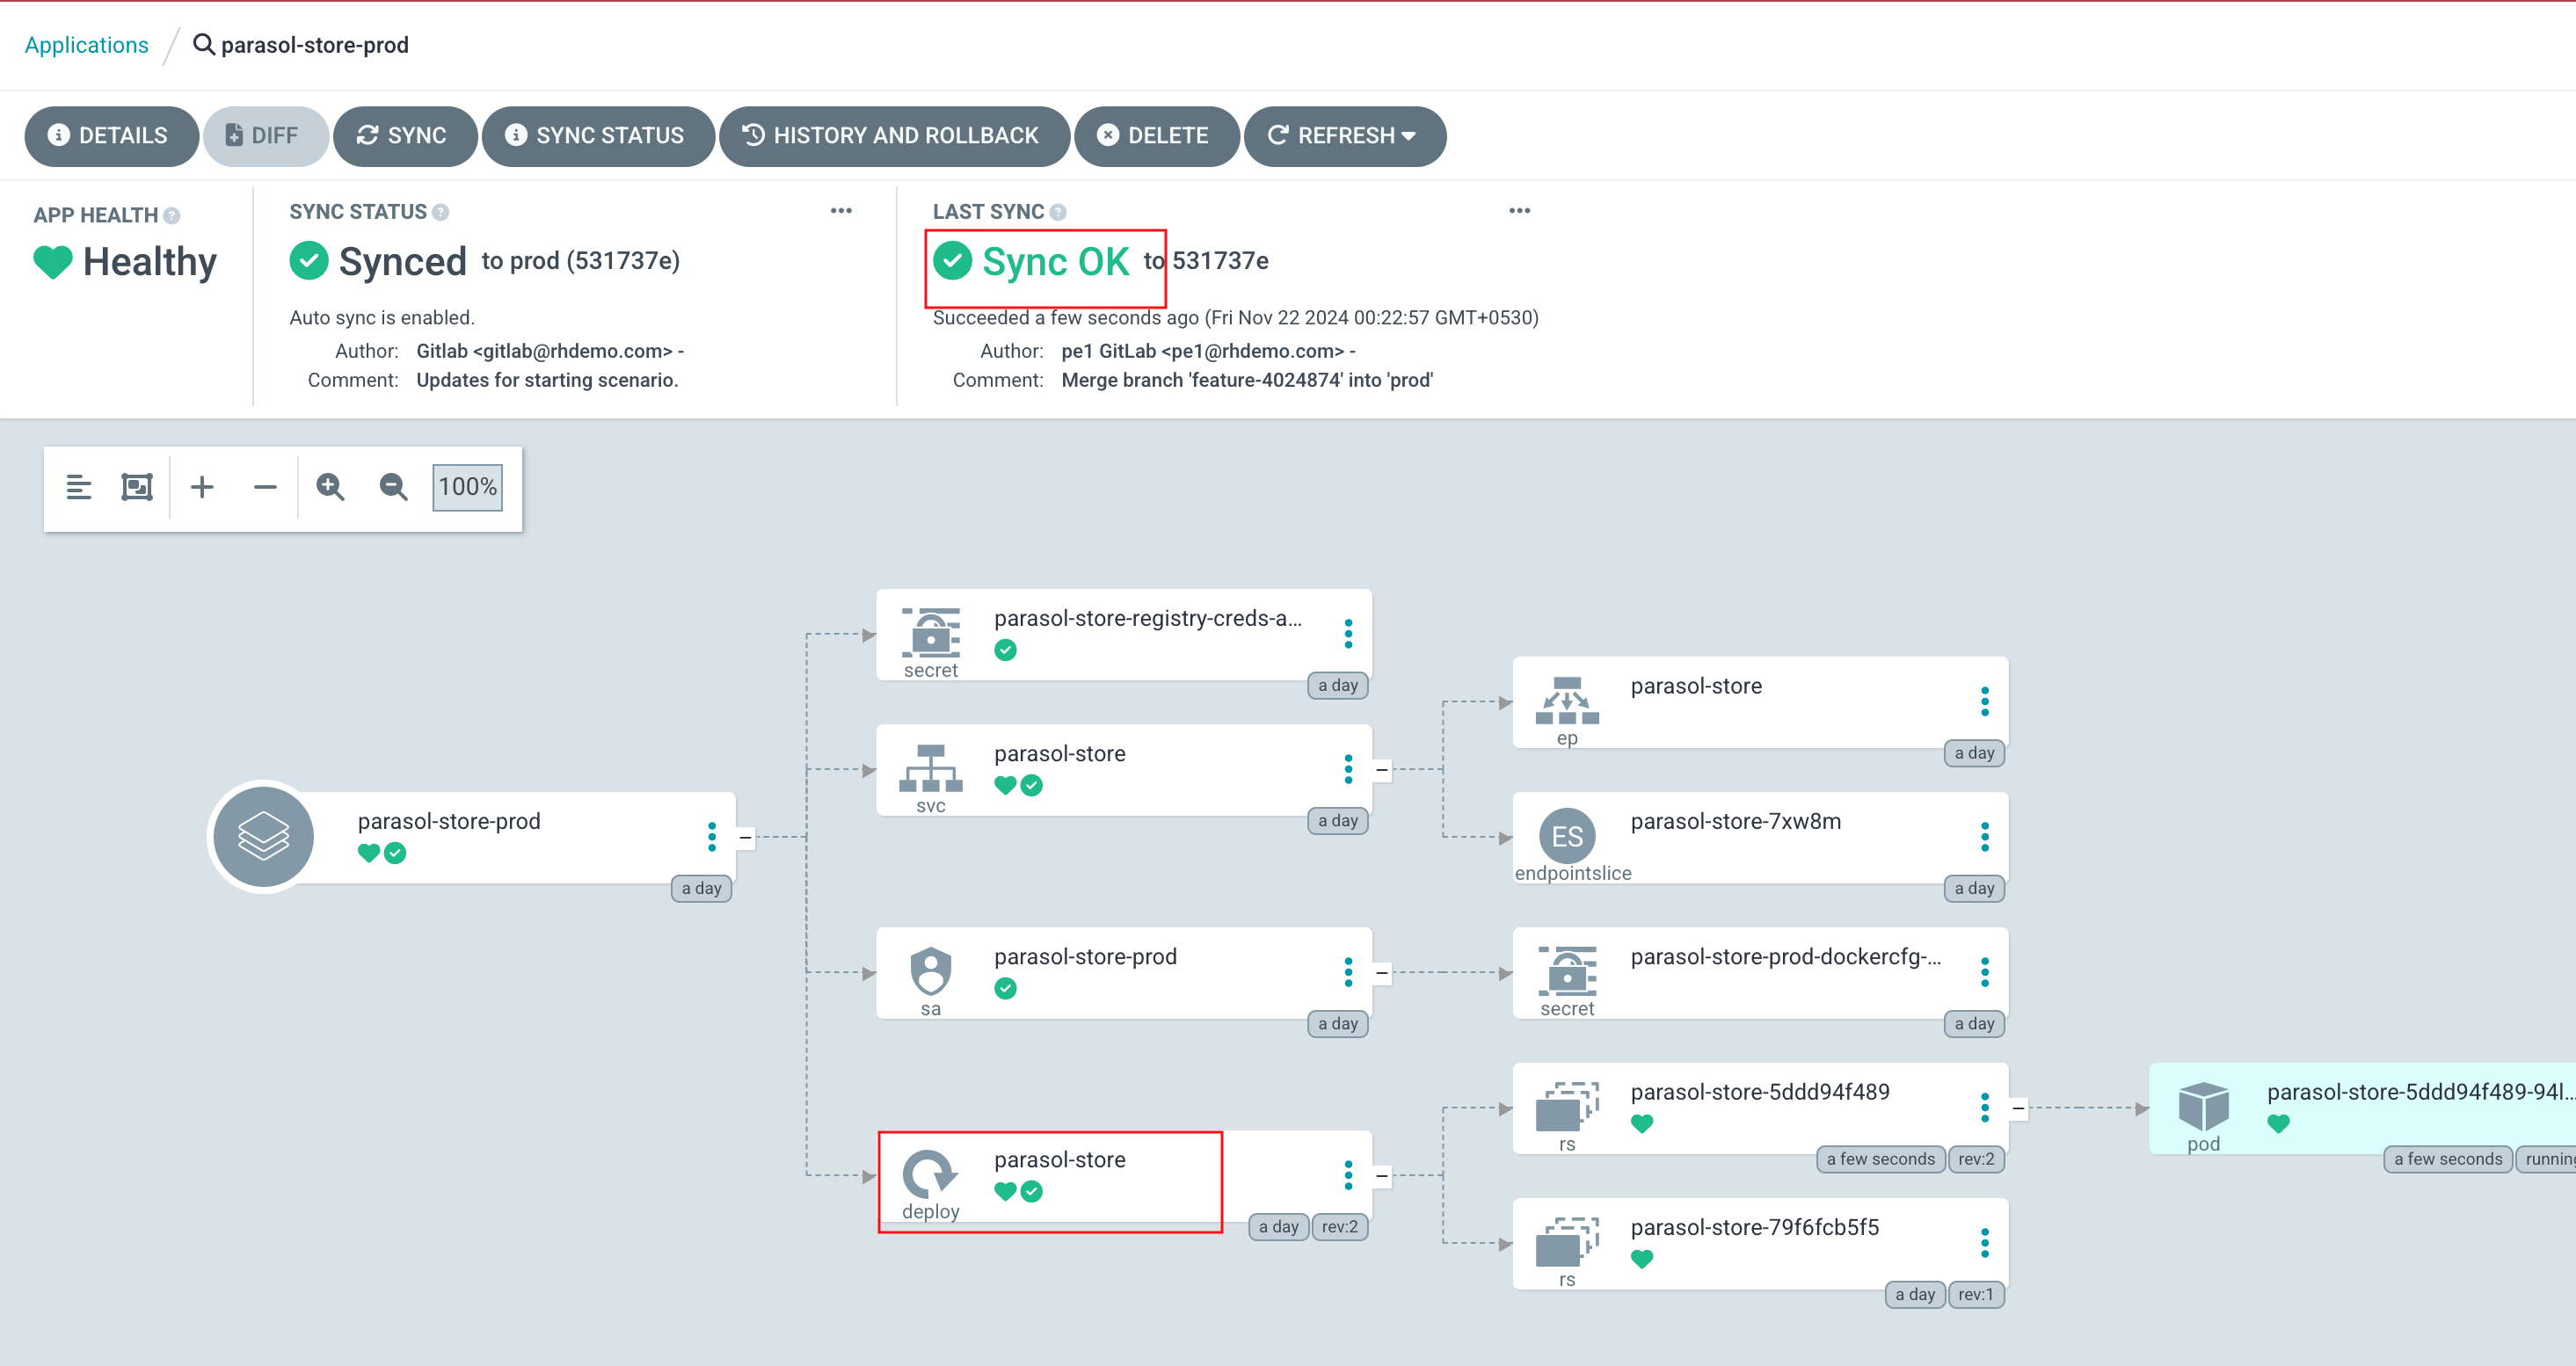
In Argo CD, open the parasol-store deployment, and you can validate that the image deployed on Prod is the same image as in Dev and Staging that we saw earlier.
Conclusion
A developer can effortlessly set up an ephemeral development environment, build and test their code, and seamlessly advance it to production with the necessary guardrails in place.
All of this is accessible through a single-pane-of-glass experience on Red Hat Developer Hub, eliminating the need to switch between multiple tools and platforms to track both inner-loop and outer-loop progress and statuses.
The dynamic plugins that you enabled in previous modules provide incredible value to this experience by integrating real-time insights and providing contextual visibility, ensuring a smooth and efficient development lifecycle, there by reducing developer cognitive overload and streamlining the development lifecycle.
Module 7: Continuous Platform improvements
Overview
In modern organizations, platform engineering is not a one-time effort but a continuous process of refinement and improvement. Static platforms struggle to keep up with evolving application architectures, security needs, and developer workflows. This module explores strategies to ensure platforms remain efficient, scalable, and user-friendly over time.
Objectives
This module addresses the following areas
-
Learn how to enable continuous platform improvements - Pitfalls of choosing the wrong platform approach, Platform drift and Sprawl, and Streamlined operations
-
Monitoring & Usage Statistics - Implementing monitoring tools to track platform usage, ensuring performance optimization and proactive issue resolution.
-
Self-Service for Developers - Enabling developers to manage their own needs through automated workflows, reducing dependencies on platform teams.
-
Feedback Loop with the Developer Community - Using Dynamic Plugins to incorporate real-time feedback, allowing continuous improvements aligned with developer needs. :imagesdir: ../../assets/images
Enable Continuous Platform Improvements
In Module 1, we looked at how a well-designed platform can support a wide range of user and application needs. However, user requirements evolve quickly. Platforms that do not adapt risk becoming bottlenecks. Agile, flexible platforms are crucial for platform engineers who must account for shifting technologies, security concerns, and business objectives. By continuously improving platform capabilities, teams keep pace with organizational goals.
This chapter examines why static platforms fall behind, how unchecked platform divergence happens, and how to keep your platform current. The aim is to guide platform engineers in avoiding unnecessary complexity and in delivering consistent value.
1. Pitfalls of the Wrong Platform Approach
When a platform remains static, it often struggles to match changing user requirements. As new development frameworks, security demands, and application patterns arise, a rigid platform may not accommodate them.
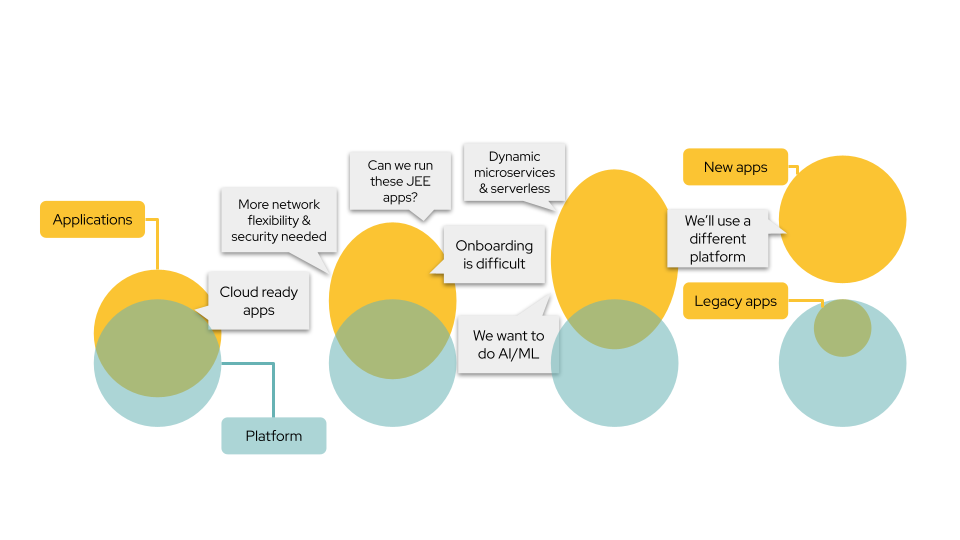
Multiple Needs and Requirements
The large overlapping circles and speech bubbles indicate various application demands. Some teams need support for legacy Java Enterprise Edition (JEE) applications, while others want to run artificial intelligence and machine learning (AI/ML) workloads or adopt dynamic microservices and serverless approaches. These diverging needs reflect how application requirements can shift and broaden over time.
Challenges with a Static Platform
The left side highlights the original platform, which was once suitable for “cloud ready” apps. However, as new security and networking needs emerge, or as developers experiment with different architectures, a single, unchanging platform struggles to accommodate them all. This often leads to difficult onboarding processes and delays in adopting new technologies.
Fragmentation Leads to Different Platforms
On the right, the diagram shows teams choosing separate platforms for new applications. Meanwhile, legacy apps may stay on the old platform. This splits resources and expertise, making it more complex to maintain consistent standards. Each new need or project risks introducing another independent solution, increasing overhead and inconsistency.
By not evolving the existing platform, organizations inadvertently encourage each group to find its own way. Over time, this “platform drift” becomes “platform sprawl,” where many platforms coexist, each requiring specialized upkeep. The picture illustrates how seemingly small decisions—such as onboarding difficulties or adding AI/ML capabilities—can drive teams to adopt new platforms rather than improve the existing one.
All this leads to several issues:
Limited Flexibility
Teams that cannot easily adopt new technologies or best practices may experience development slowdowns and become dependent on legacy systems. Over time, the platform may also fail to meet updated security standards or to support emerging frameworks. While a static approach might minimize the initial effort of implementing changes, it restricts growth and can increase maintenance challenges in the long term.
Fragmented User Experience
If teams cannot unify their approach, users end up working with outdated or incompatible tools that hamper productivity. Different groups may also adopt their own ad hoc solutions to fill gaps, causing inconsistencies. Although multiple toolsets can sometimes address unique needs, they often create friction when individuals move between projects or departments, leading to confusion about which processes to follow.
Higher Operational Costs
Maintaining older frameworks usually requires specialized support, which can drive up overall costs. Updates become more complicated, and troubleshooting requires deeper knowledge of systems that may no longer be widely used. Although sticking to a familiar platform can feel safe, these added expenses often outweigh any short-term savings from delaying upgrades.
2. Platform Drift and Platform Sprawl
When a platform does not evolve, various teams may choose their own solutions to fill gaps. This piecemeal adoption eventually leads to multiple platforms in the same organization.
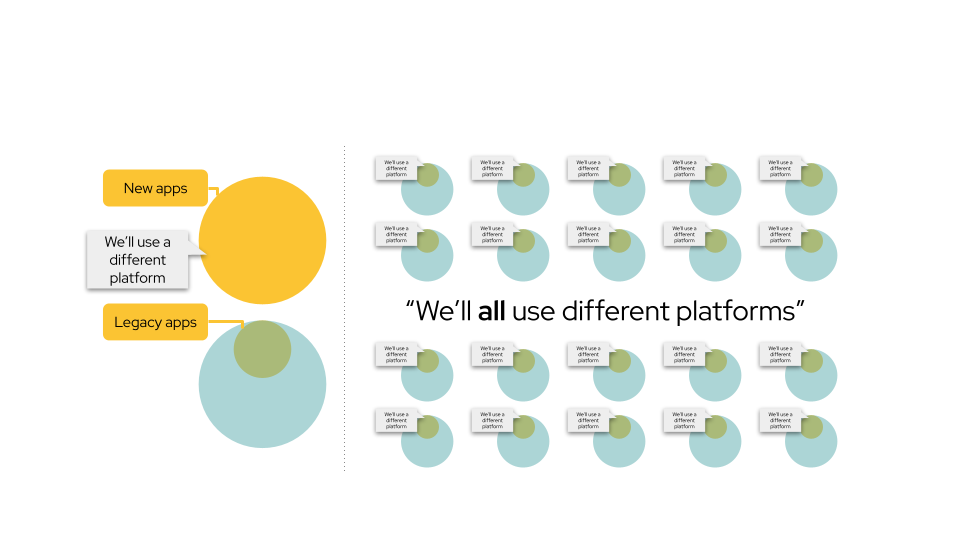
Multiple Platforms for Different Apps
Above image shows two large circles representing new apps and legacy apps. The speech bubbles indicate teams saying, “We’ll use a different platform.” This illustrates how, rather than adapting an existing platform, different groups often choose new solutions when they introduce or update applications.
Expansion into Many Independent Solutions
On the right, numerous circles repeat the statement, “We use a different platform,” highlighting the spread of multiple platforms across the organization. Each circle represents yet another group or project that opted to break away from the common infrastructure.
Consequences for the Organization
This repetition leads to “platform sprawl,” where every team manages its own platform or environment. Over time, this creates a patchwork of separate solutions, each with its own standards and support needs. Although teams might appreciate the autonomy, the organization faces higher operational costs, inconsistent security policies, and complex maintenance.
Instead of enhancing a single platform to handle emerging requirements, teams scatter to different tools, making it harder to unify practices or share knowledge. This fragmentation raises barriers to collaboration and undermines efficiency.
The resulting “platform drift” has several implications:
Redundant Infrastructure
Using several platforms that serve similar functions wastes resources on duplicate hosting, licensing, and maintenance. These overlapping systems may reduce performance efficiency, as each platform consumes time and attention from the operations team. While different platforms might appear beneficial for specialized uses, the overall organization ends up paying for repeated efforts.
Inconsistent Standards
Every new platform can bring its own security controls, compliance measures, and operational practices. Running multiple parallel environments complicates oversight, since each might require a separate auditing process. Though this allows teams some autonomy, it increases the risk of missed updates or overlooked vulnerabilities.
Increased Complexity
Adding platforms escalates administrative workloads, from user onboarding to system monitoring and disaster recovery planning. With more platforms, organizations face more potential failure points, making root-cause analysis harder. While specialized platforms can address niche needs, the cumulative effect is more operational overhead and a steeper learning curve for platform teams.
3. Continuously Evolving the Platform
A regularly updated platform remains aligned with today’s user requirements and prepares for tomorrow’s.
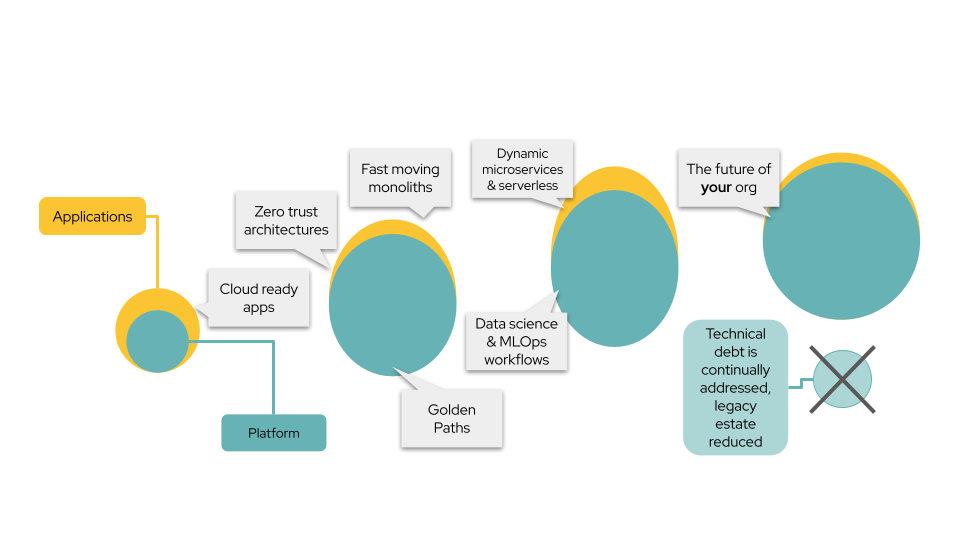
Evolving from Basic Capabilities to Advanced Workloads
The left side of the image shows a platform initially designed for simpler needs such as “cloud ready apps” and “zero trust architectures.” Over time, the platform expands to accommodate more demanding use cases like data science, machine learning, and dynamic serverless architectures.
Golden Paths for Development
The center highlights “fast moving monoliths,” “dynamic microservices,” and “data science & MLOps workflows.” The concept of “Golden Paths” refers to a set of recommended approaches that developers can follow without needing to configure everything from scratch. By providing these guidelines, the platform streamlines common tasks and ensures consistent practices.
Continual Improvement for Future Readiness
As the platform progresses, it not only addresses current demands but also anticipates future ones. The circle labeled “The future of your org” reflects this forward-looking stance. Meanwhile, the note “Technical debt is continually addressed, legacy estate reduced” emphasizes the importance of ongoing maintenance. By gradually phasing out outdated components and refining the platform’s features, organizations stay agile.
The image demonstrates how a single platform can grow and adapt instead of stagnating or fracturing into multiple independent solutions. It illustrates that through steady, iterative enhancements—covering everything from foundational security to cutting-edge workloads—a platform can remain aligned with evolving business needs while minimizing the pitfalls of drift and sprawl.
Maintaining a cycle of continuous improvement prevents drift and sprawl, producing clear benefits:
Streamlined Operations
Relying on a single, adaptable platform simplifies monitoring, patching, and user management. Standardizing tasks reduces the risk that changes in one environment unintentionally affect another. However, centralizing on a single platform means the entire organization depends on that platform’s reliability, so ongoing testing and maintenance are vital to preventing disruptions.
Improved User Satisfaction
Developers and operators are more likely to trust and embrace a platform that keeps pace with technology trends. This confidence can lead to higher productivity, as teams do not need to find or build workarounds. Still, continuous upgrades require clear communication and training, since abrupt changes can disrupt established workflows if not managed properly.
Long-Term Relevance
By refining both technical features and governance guidelines, platform teams reduce complexity and keep their systems from becoming outdated. This approach helps organizations swiftly accommodate emerging tools and practices. The main challenge lies in balancing frequent updates with stability, as each change can introduce new considerations for testing and integration.
Through measured, ongoing enhancements, a platform stays dependable for existing projects and flexible enough for future needs. This approach helps teams reduce costs, improve user satisfaction, and maintain a standard that evolves at the same pace as the organization.
Monitor Adoption and Usage
Measuring developer engagement and understanding their usage of your internal developer portal is critical to better serving their needs. Red Hat Developer Hub includes an Adoption Insights plugin that can be enbaled by platform engineering teams to view detailed analytics on adoption and engagement within the internal developer portal.
Key metrics available include:
-
Active users as a percentage of licensed users.
-
Top templates.
-
Top catalog entities.
-
Top plugins.
-
Top TechDocs.
-
Popular searches.
| The Adoption Insights plugin is current in Developer Preview. Refer to the Adoption Insights documentation for more information related to support. |
Platform Engineer Activity: Configure Adoption Insights
Adoption Insights is enabled by default as of Red Hat Developer Hub v1.8. This plugin requires additional configuration to display accurate user metrics. Specifically, the licensedUsers configuration is used to provide accurate insight into the usage of Red Hat Developer Hub by actual versus licensed number of users.
-
Open your values.yaml file.
-
Make sure you’re logged in to GitLab as
pe1/{common_password}. -
Select Edit > Edit single file.
-
Scroll down in the values.yaml file and find the
--- ADOPTION INSIGHTS ---block in theappConfig.appconfiguration.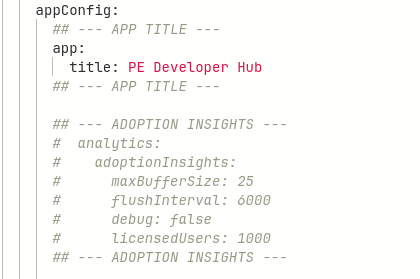
-
Highlight and uncomment the configuration in this block of YAML.
-
Scroll down and enter a commit message:
feat: enable adoption insights plugin -
Click the Commit changes button.
As you’re familiar with by now, you can refresh the backstage Application in OpenShift GitOps and to deploy the new Red Hat Developer Hub configuration. The Adoption Insights plugin will be available from Administration > Adoption Insights when the deployment has finished, but no data is available yet.
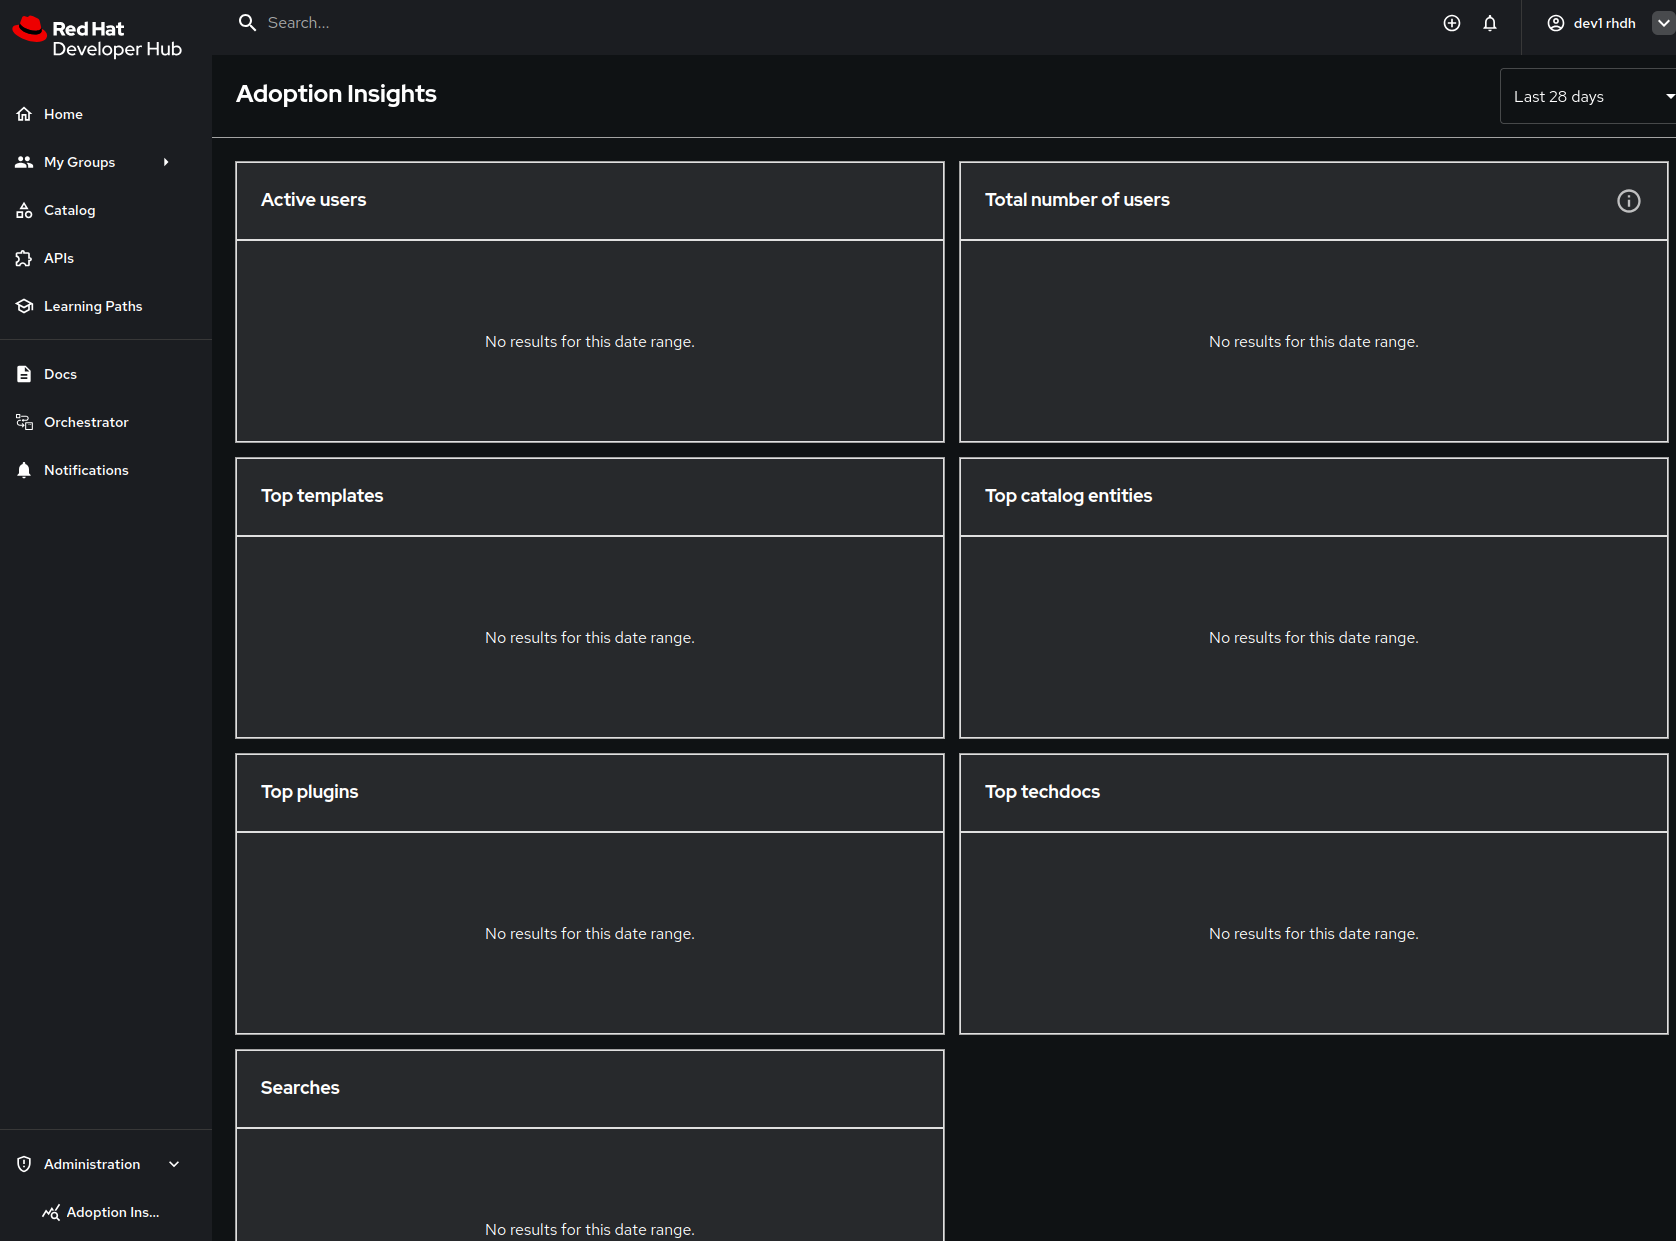
Developer Activity: Generate Additional Data for Adoption Insights
Once the new deployment has finished you’ll need to interact with Red Hat Developer Hub to generate events that the Adoption Insights dashboard can display. There are a few ways to do this:
-
Open a private browsing session and login as user
dev1using the password{common_password}. -
While logged in as
dev1anddev2: -
Use the Search Bar in the top navigation menu to find APIs and Components.
-
Visit the Docs page and view the documentation for your Quarkus application.
-
Generate a new application using the Quarkus Software Template.
Perform multiple searches and view multiple APIs and Components to generate sufficient data for the next step. Logout and perform the same steps using the dev2 user.
Platform Engineer Activity: View Adoption Insights
Now that you’ve generated some events, login to Red Hat Developer Hub as the pe1 user. Expand the Administration section in the side menu and click the Adoption Insights link.
Conclusion
Understanding usage patterns and engagement with your internal developer portal can help you better tailor your application platform to address developer needs, and demonstrate to stakeholders that the portal is a valuable developer productivity tool. The Adoption Insights plugin provides you with the data you need for both of these use cases. :imagesdir: ../../assets/images
Observability
As a Platform Engineer and Red Hat Developer Hub administrator, you can track user activities, system events, and data changes with Developer Hub audit logs. These logs are accessible through the Red Hat OpenShift Container Platform web console, where administrators can view, search, filter, and manage log data.
Monitoring and logging
In OpenShift Container Platform, metrics are exposed through an HTTP service endpoint under the /metrics path. You can create a ServiceMonitor custom resource (CR) to scrape metrics from a service endpoint in a user-defined project.
Set up monitoring for user-defined projects
To begin, create create the cluster-monitoring-config ConfigMap object:
-
Navigate to the OpenShift console. Login as admin/{common_password} if prompted.
-
Select the
icon on the top navigation bar of OpenShift Console to create a new resource.
-
In the YAML editor, input the following ConfigMap. Setting the
enableUserWorkloadparameter totrue, enables monitoring of user-defined projects in the OpenShift cluster.apiVersion: v1 kind: ConfigMap metadata: name: cluster-monitoring-config namespace: openshift-monitoring data: config.yaml: | enableUserWorkload: true -
Click the Save button to create this ConfigMap.
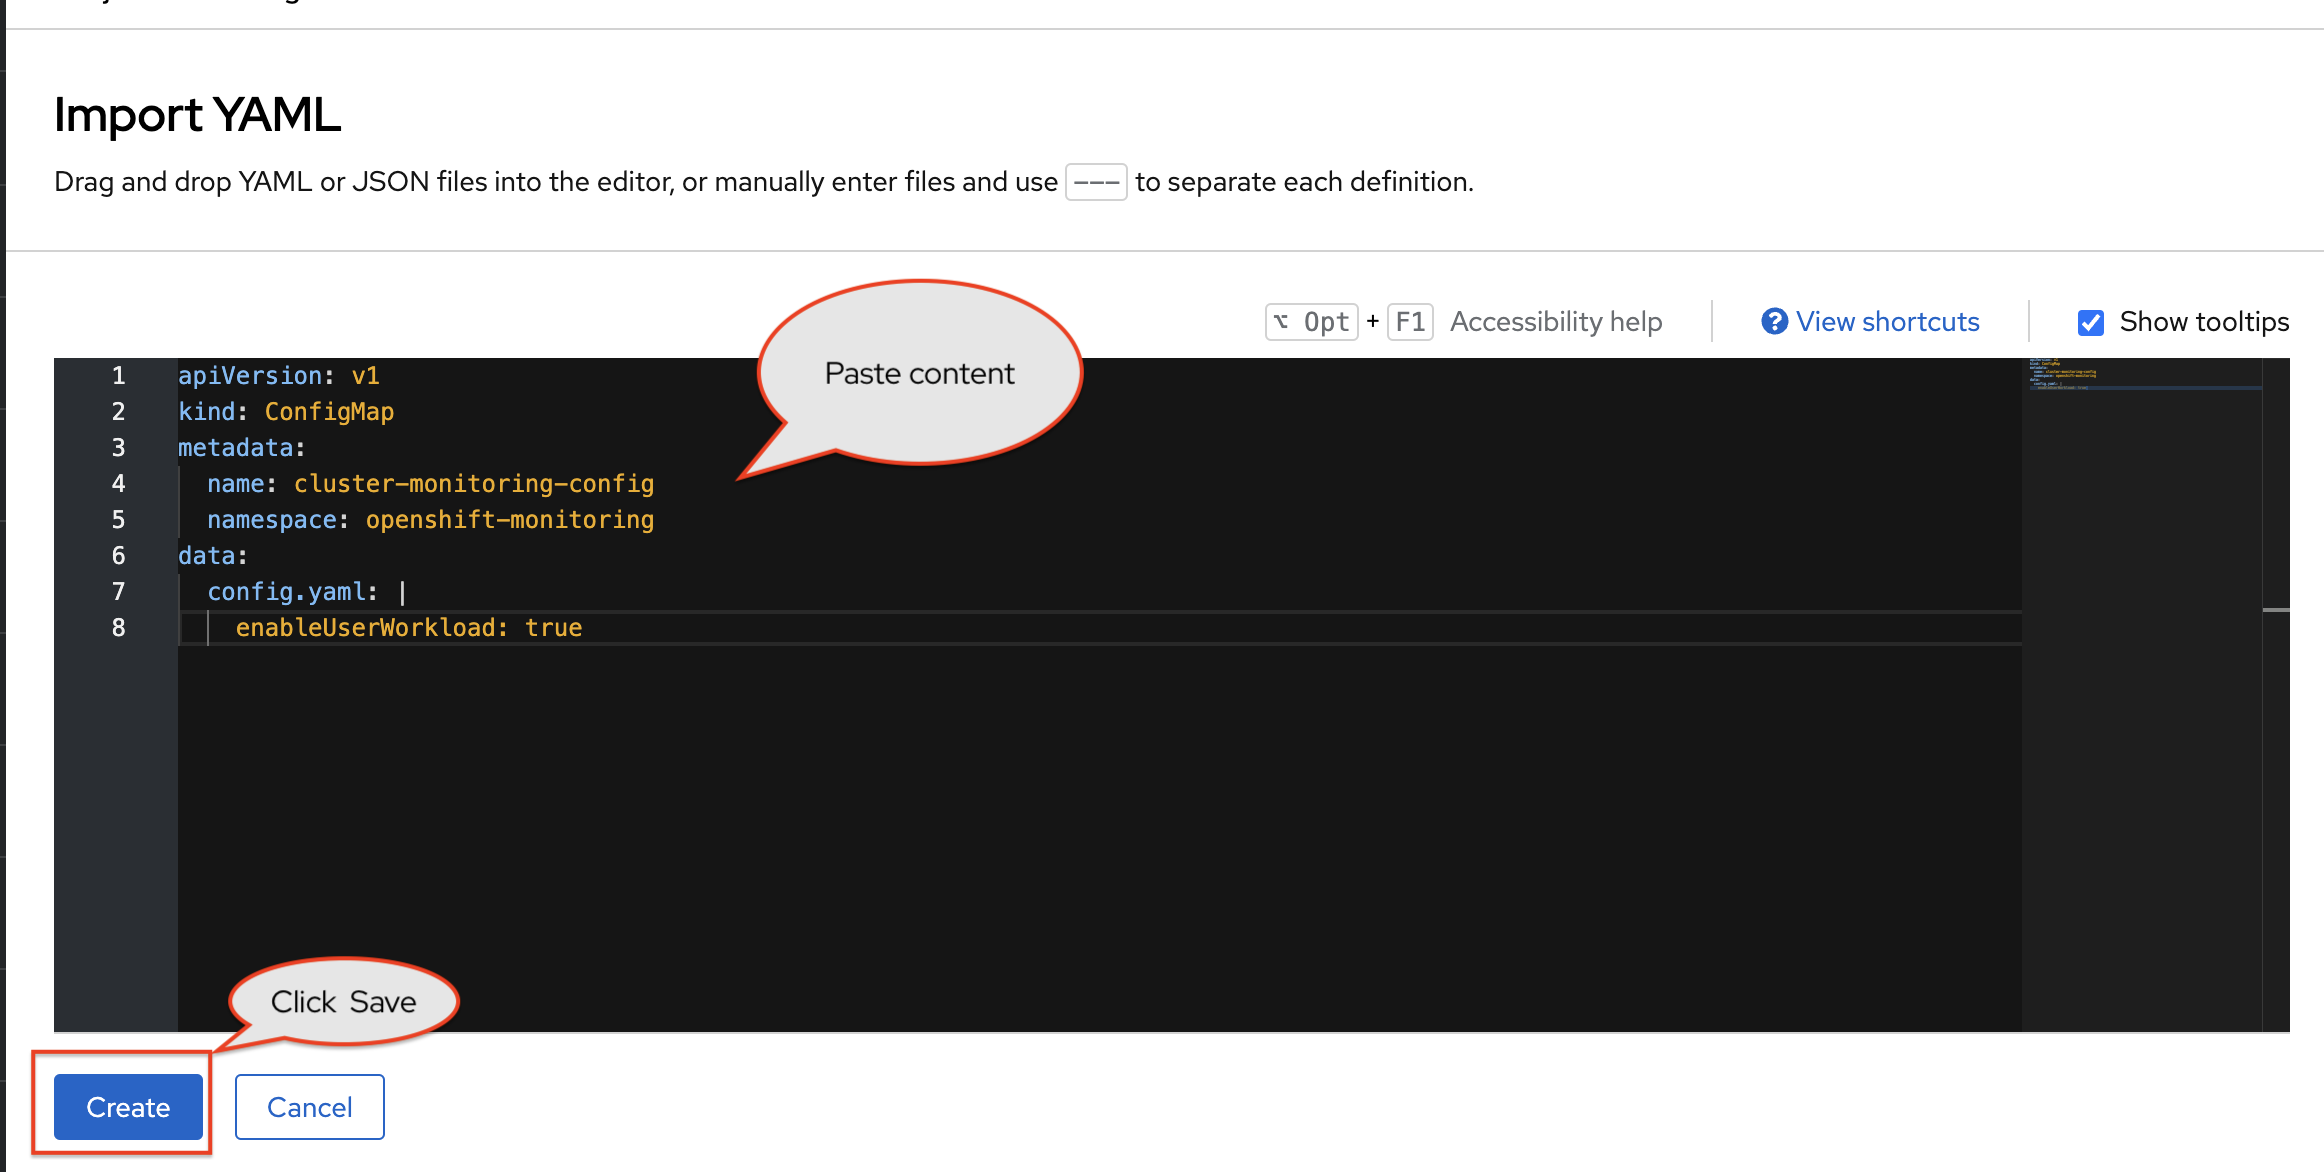
Enable metrics monitoring on OpenShift
Next, enable metrics monitoring for Red Hat Developer Hub.
-
Open your values.yaml file.
-
Select Edit > Edit single file. Login as a Platform Engineer with
pe1/{common_password}when prompted. -
Find the YAML surrounded by
--- MONITORING ---and uncomment this section by highlighting the lines, and pressingCMD + /orCTRL + /.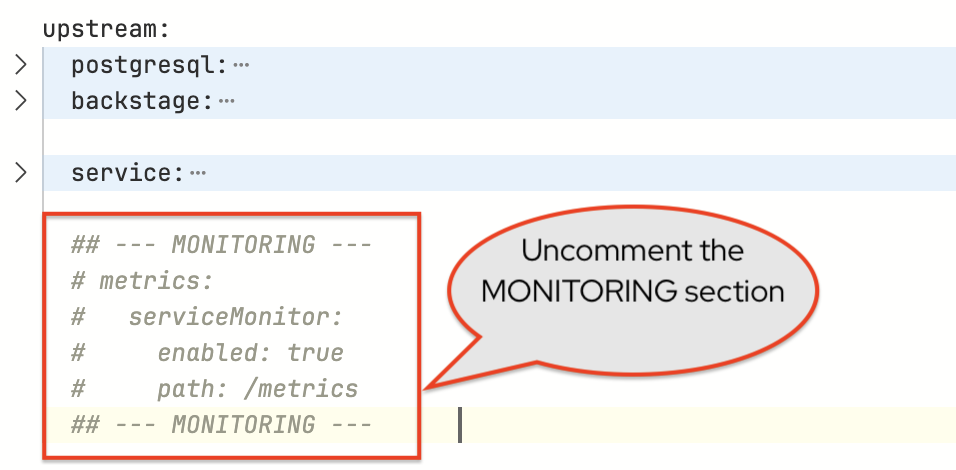
-
Scroll down and enter a commit message
feat: Enable monitoring. -
Click the Commit changes button.
Refresh the backstage Argo CD application
To apply the changes
-
Navigate to view the
backstageArgo CD Application in OpenShift GitOps. Login asadmin/{openshift_gitops_password}if prompted. -
Click the Refresh button for the
backstageArgo CD application. -
Wait until the Application status is Healthy.
-
A new
servicemonitorfor Red Hat Developer Hub should now be created. You can verify this by viewing thebackstageArgo CD application.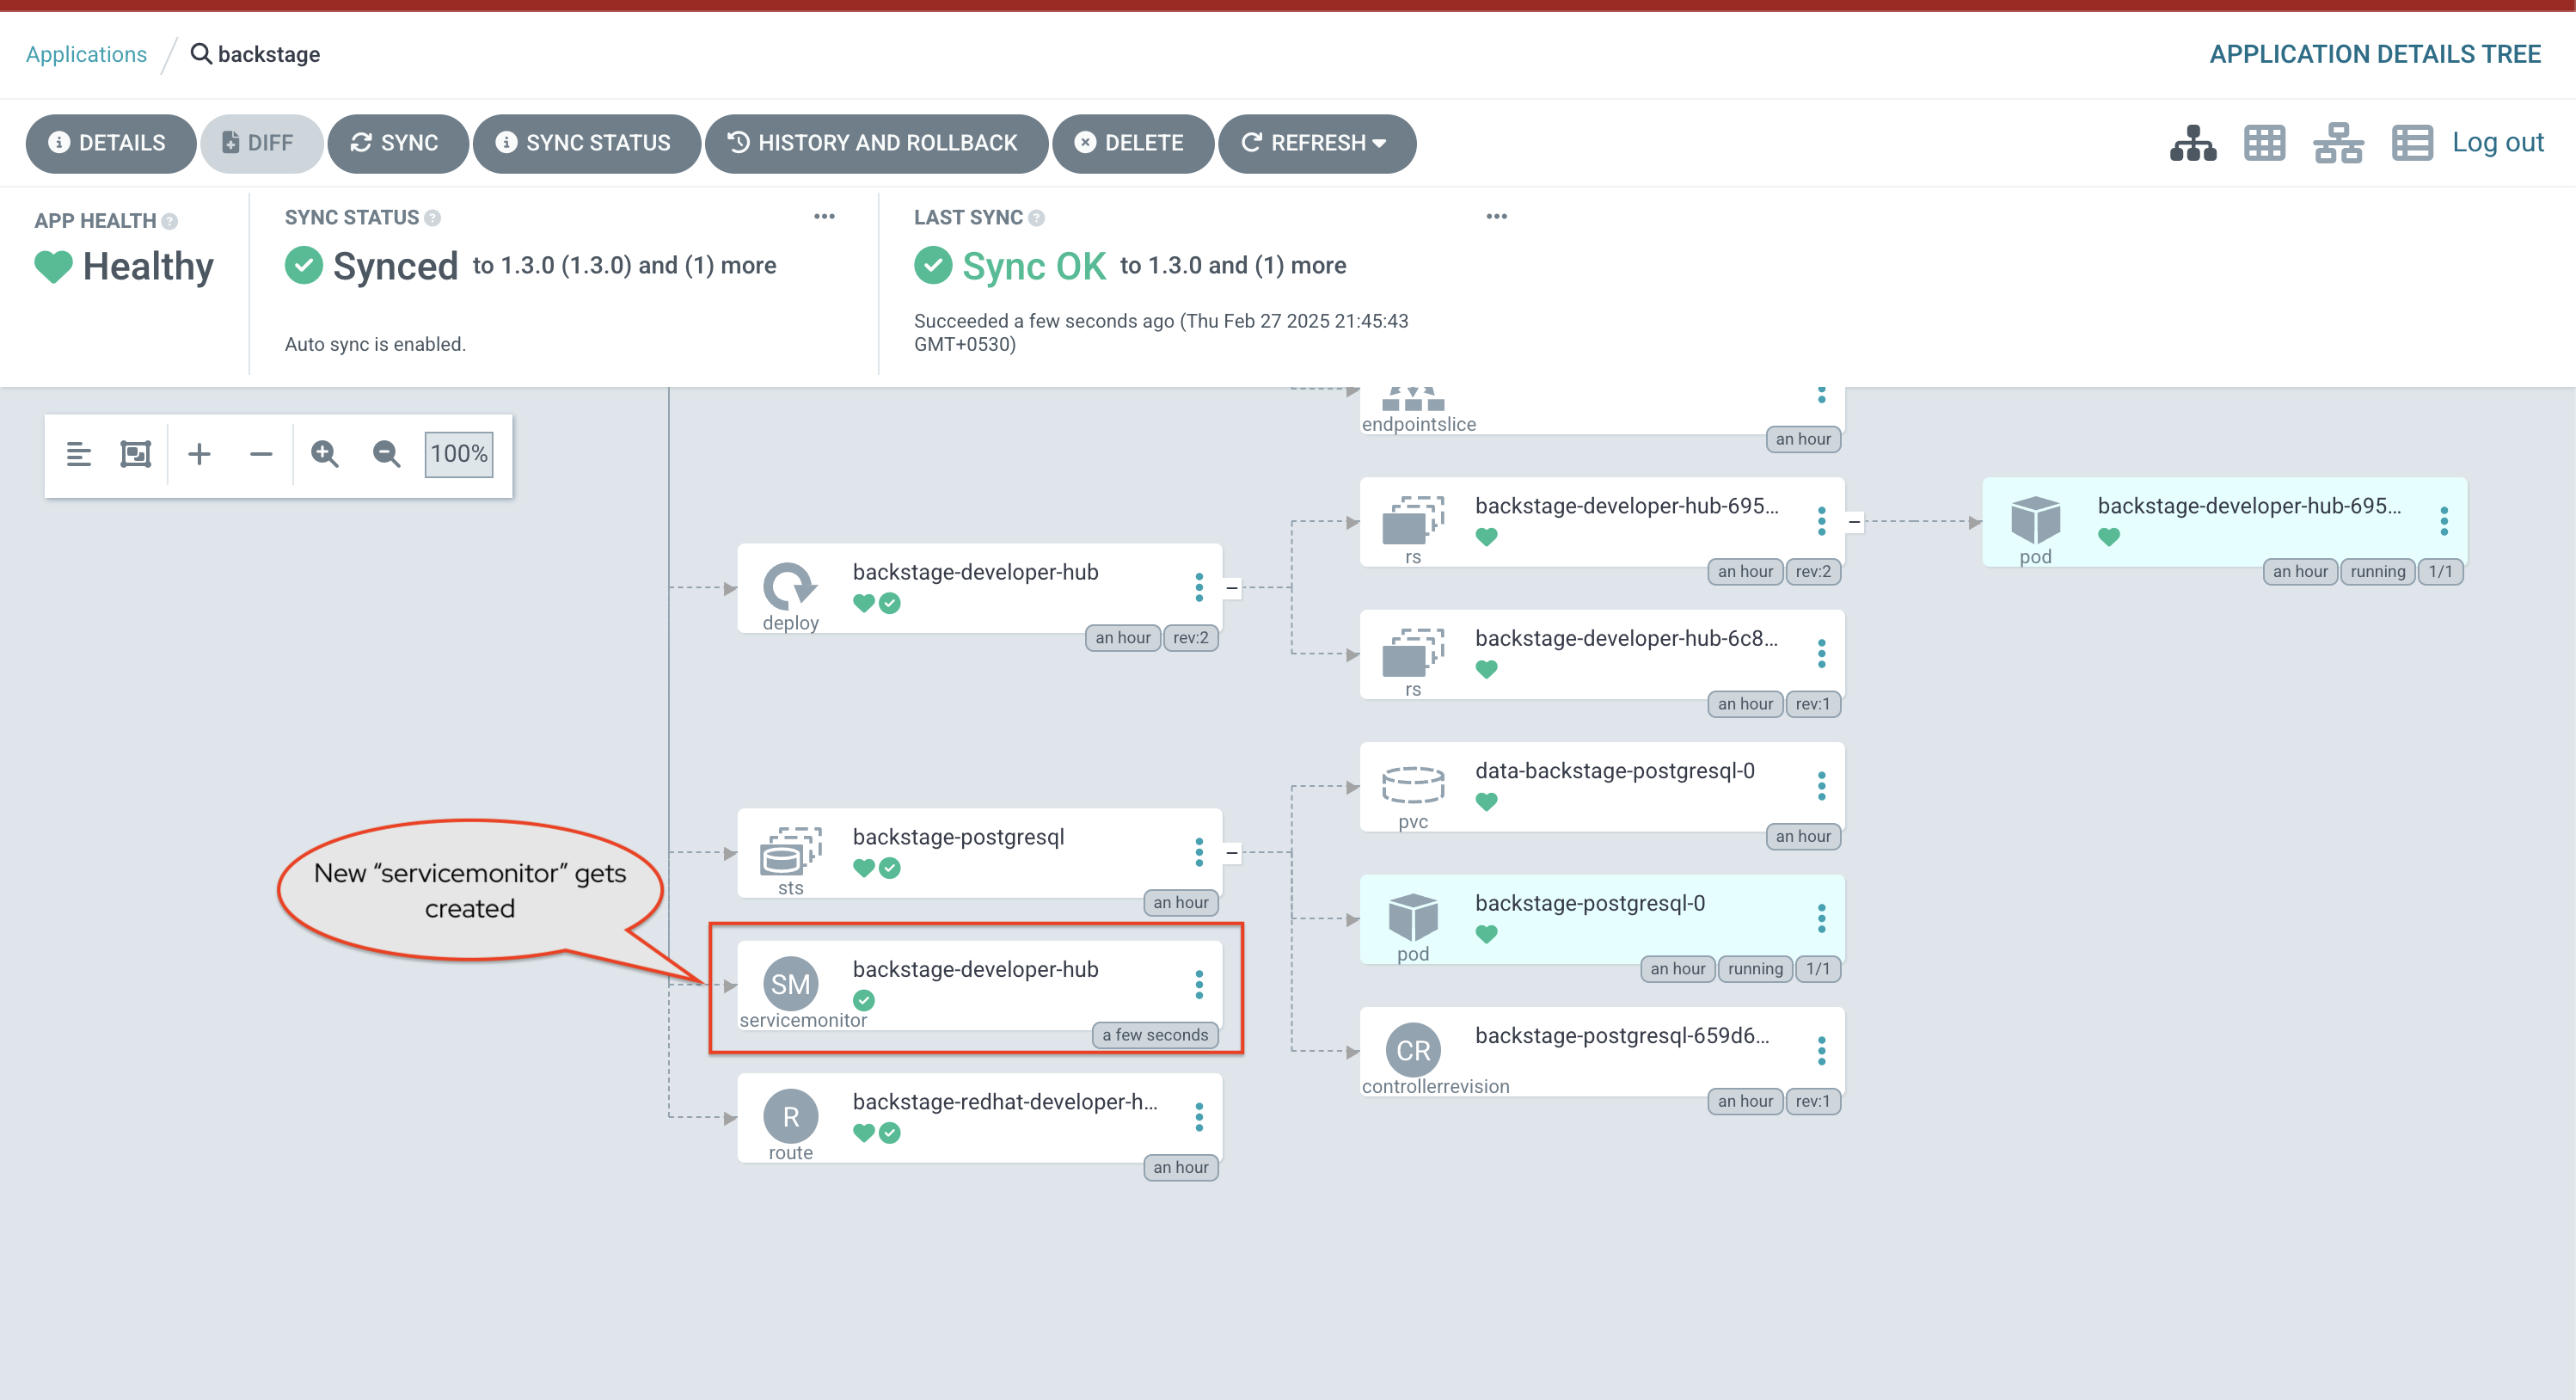
View Red Hat Developer Hub metrics on OpenShift
You can view the Red Hat Developer Hub’s metrics from the Developer perspective of the OpenShift web console within the backstage namespace
-
Visit the metrics page to view this Observe menu on OpenShift
-
Click the Metrics tab, and from the
Select querydrop down, chooseCustom query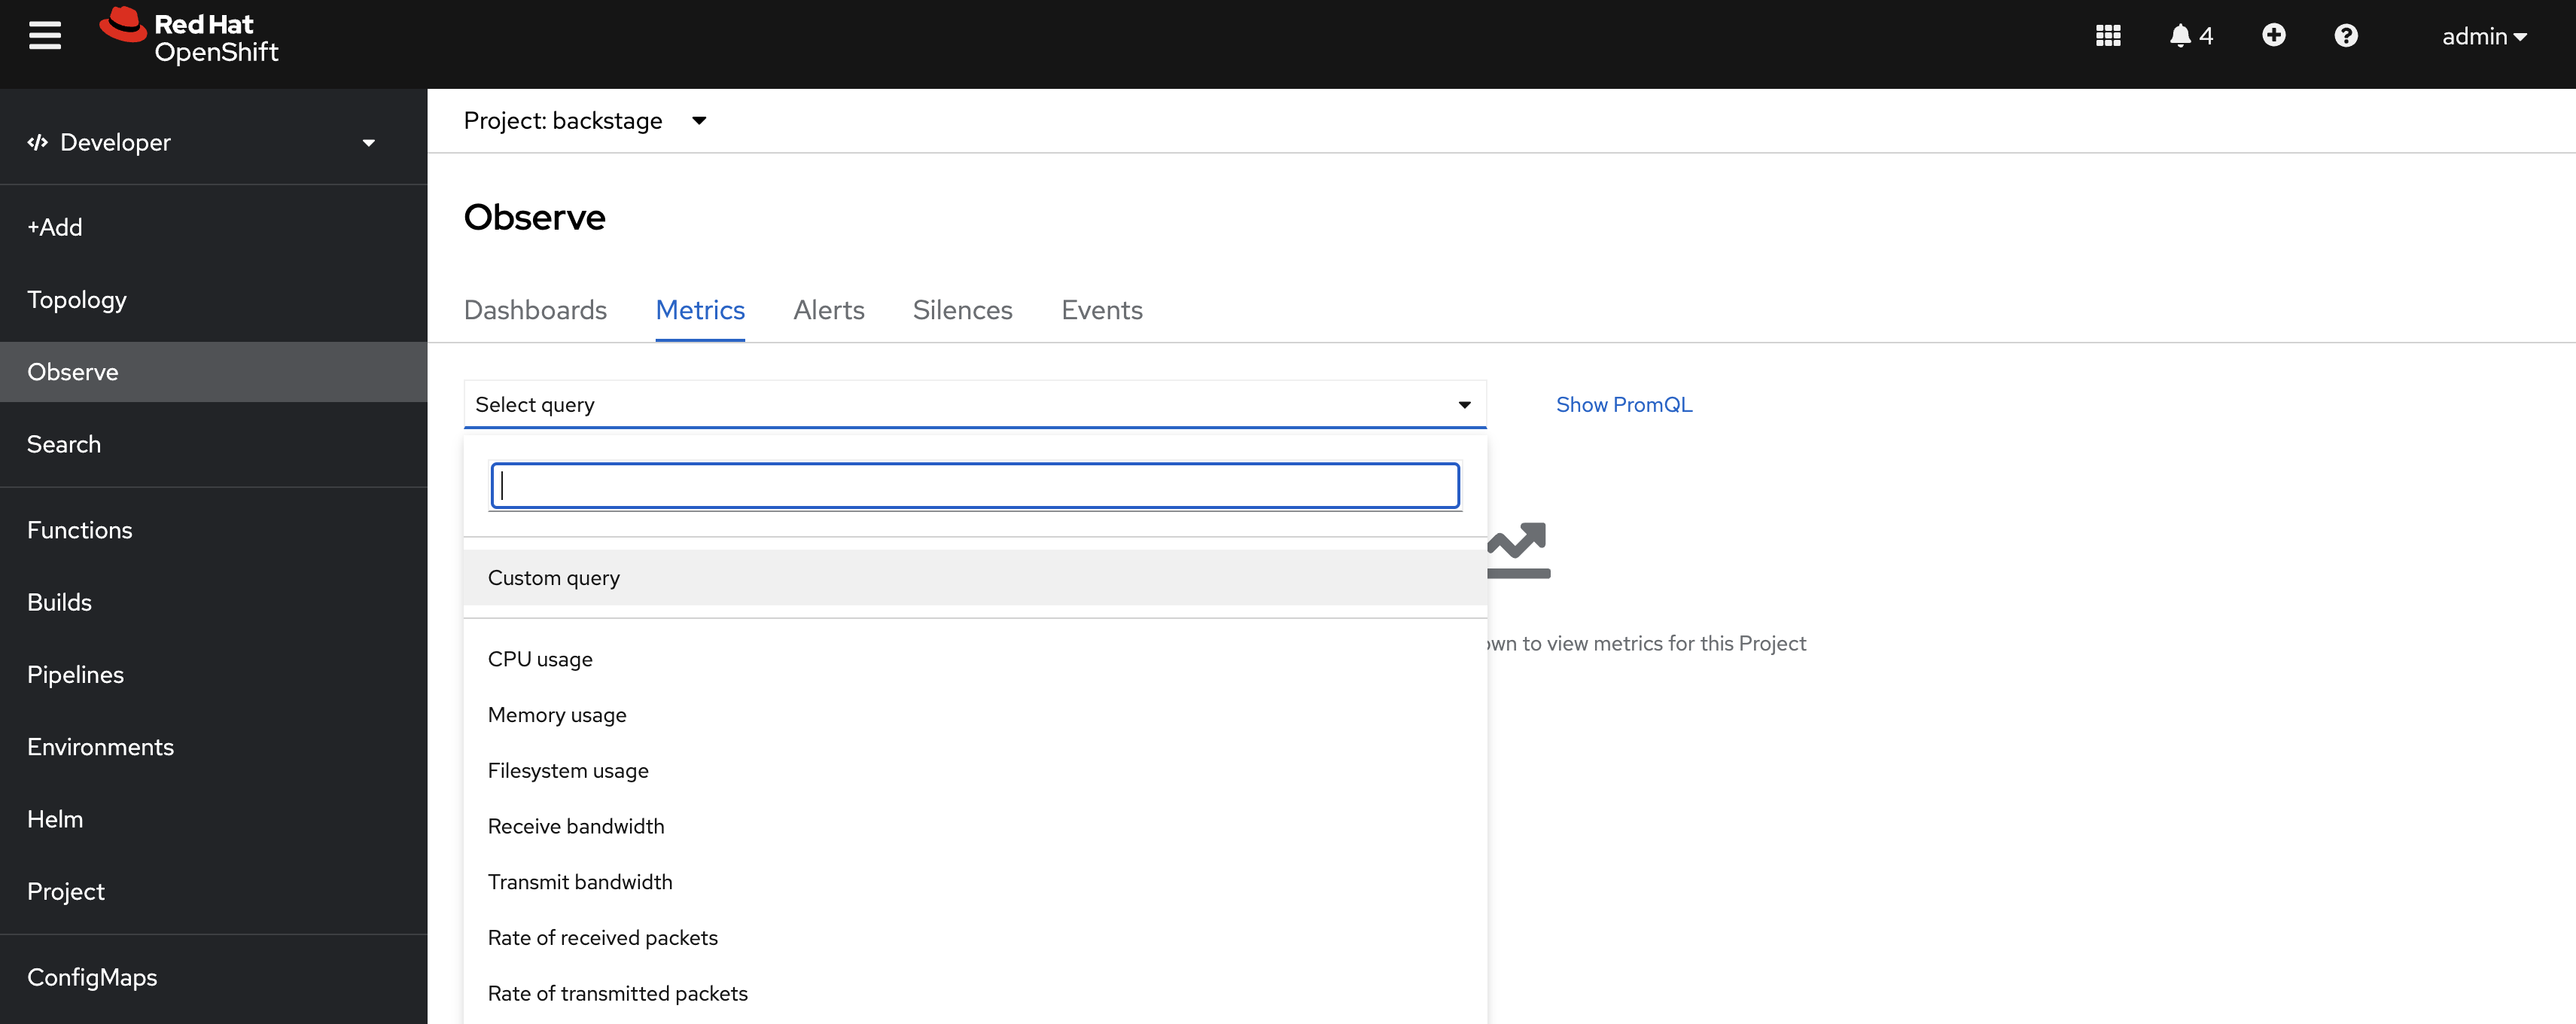
-
You can query a number of parameters by entering a query into the the
Expressiontext area,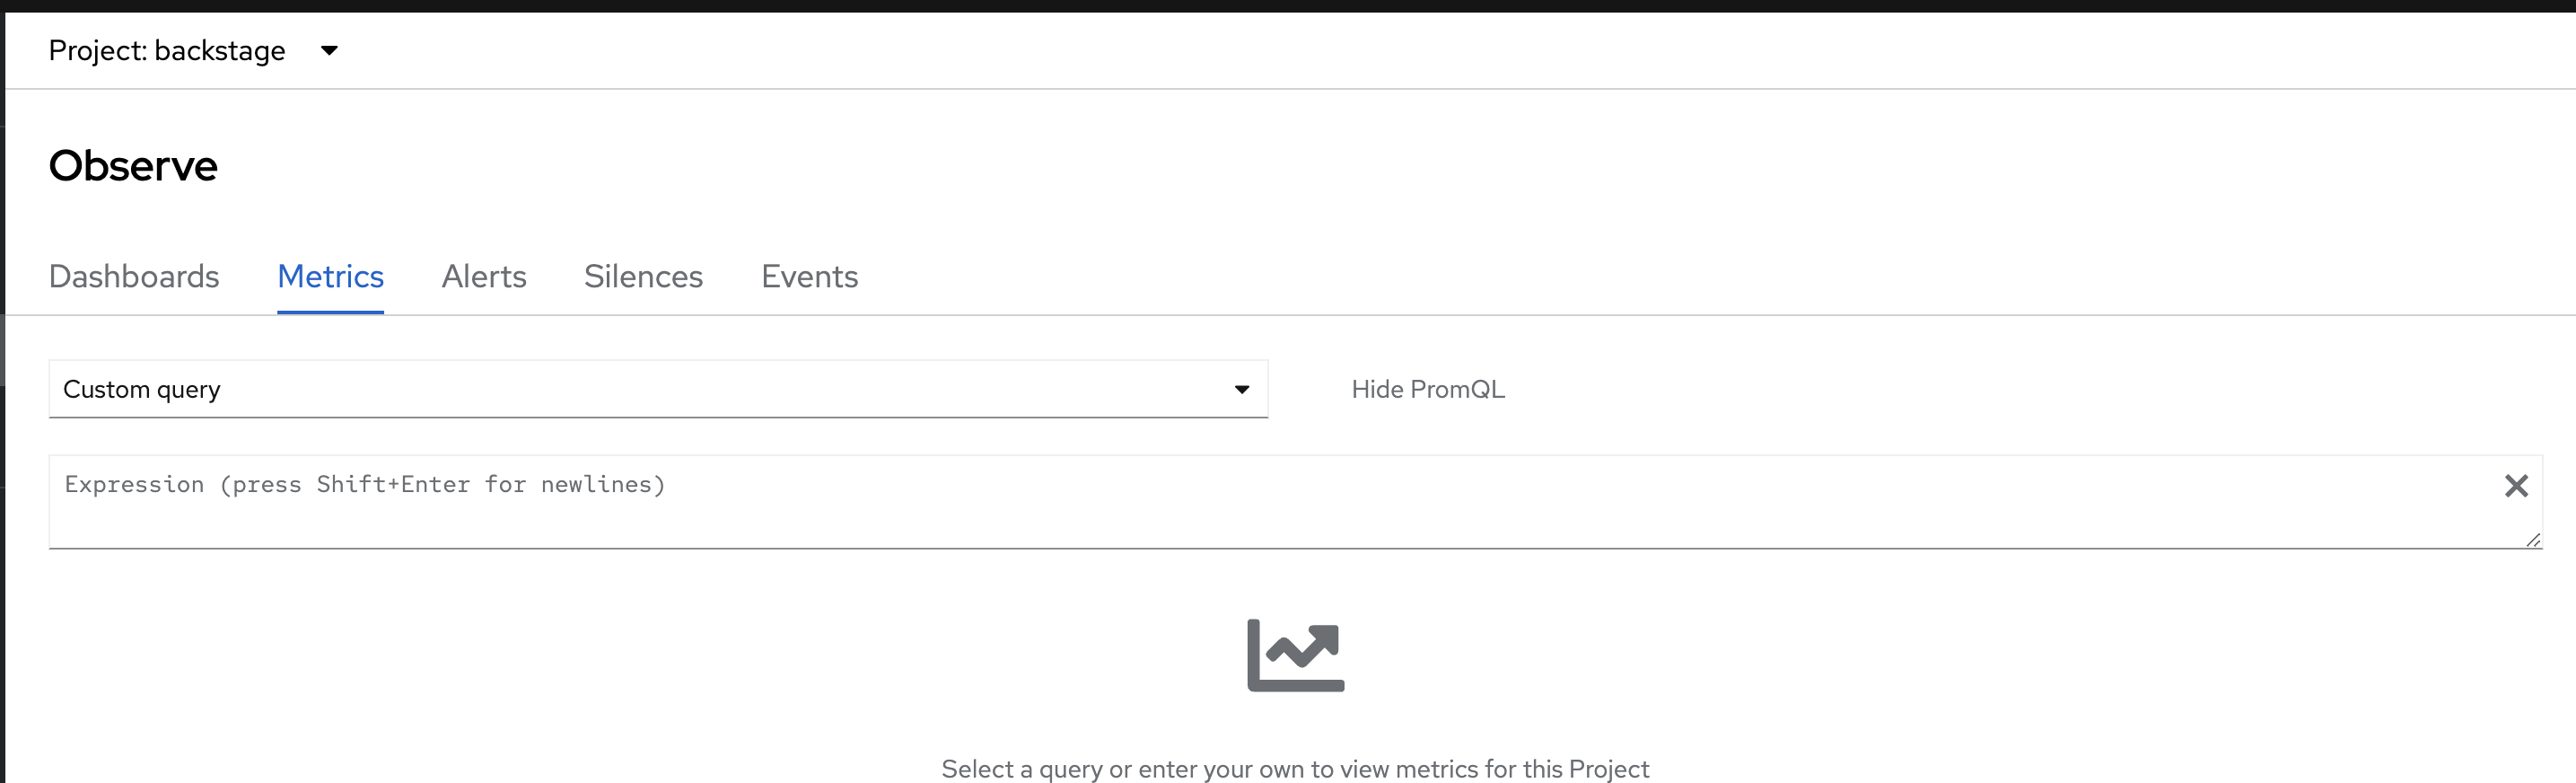
-
Enter
catalog_entities_countinto the textarea and hitEnterto view metrics such as how many components, users, templates etc are present in the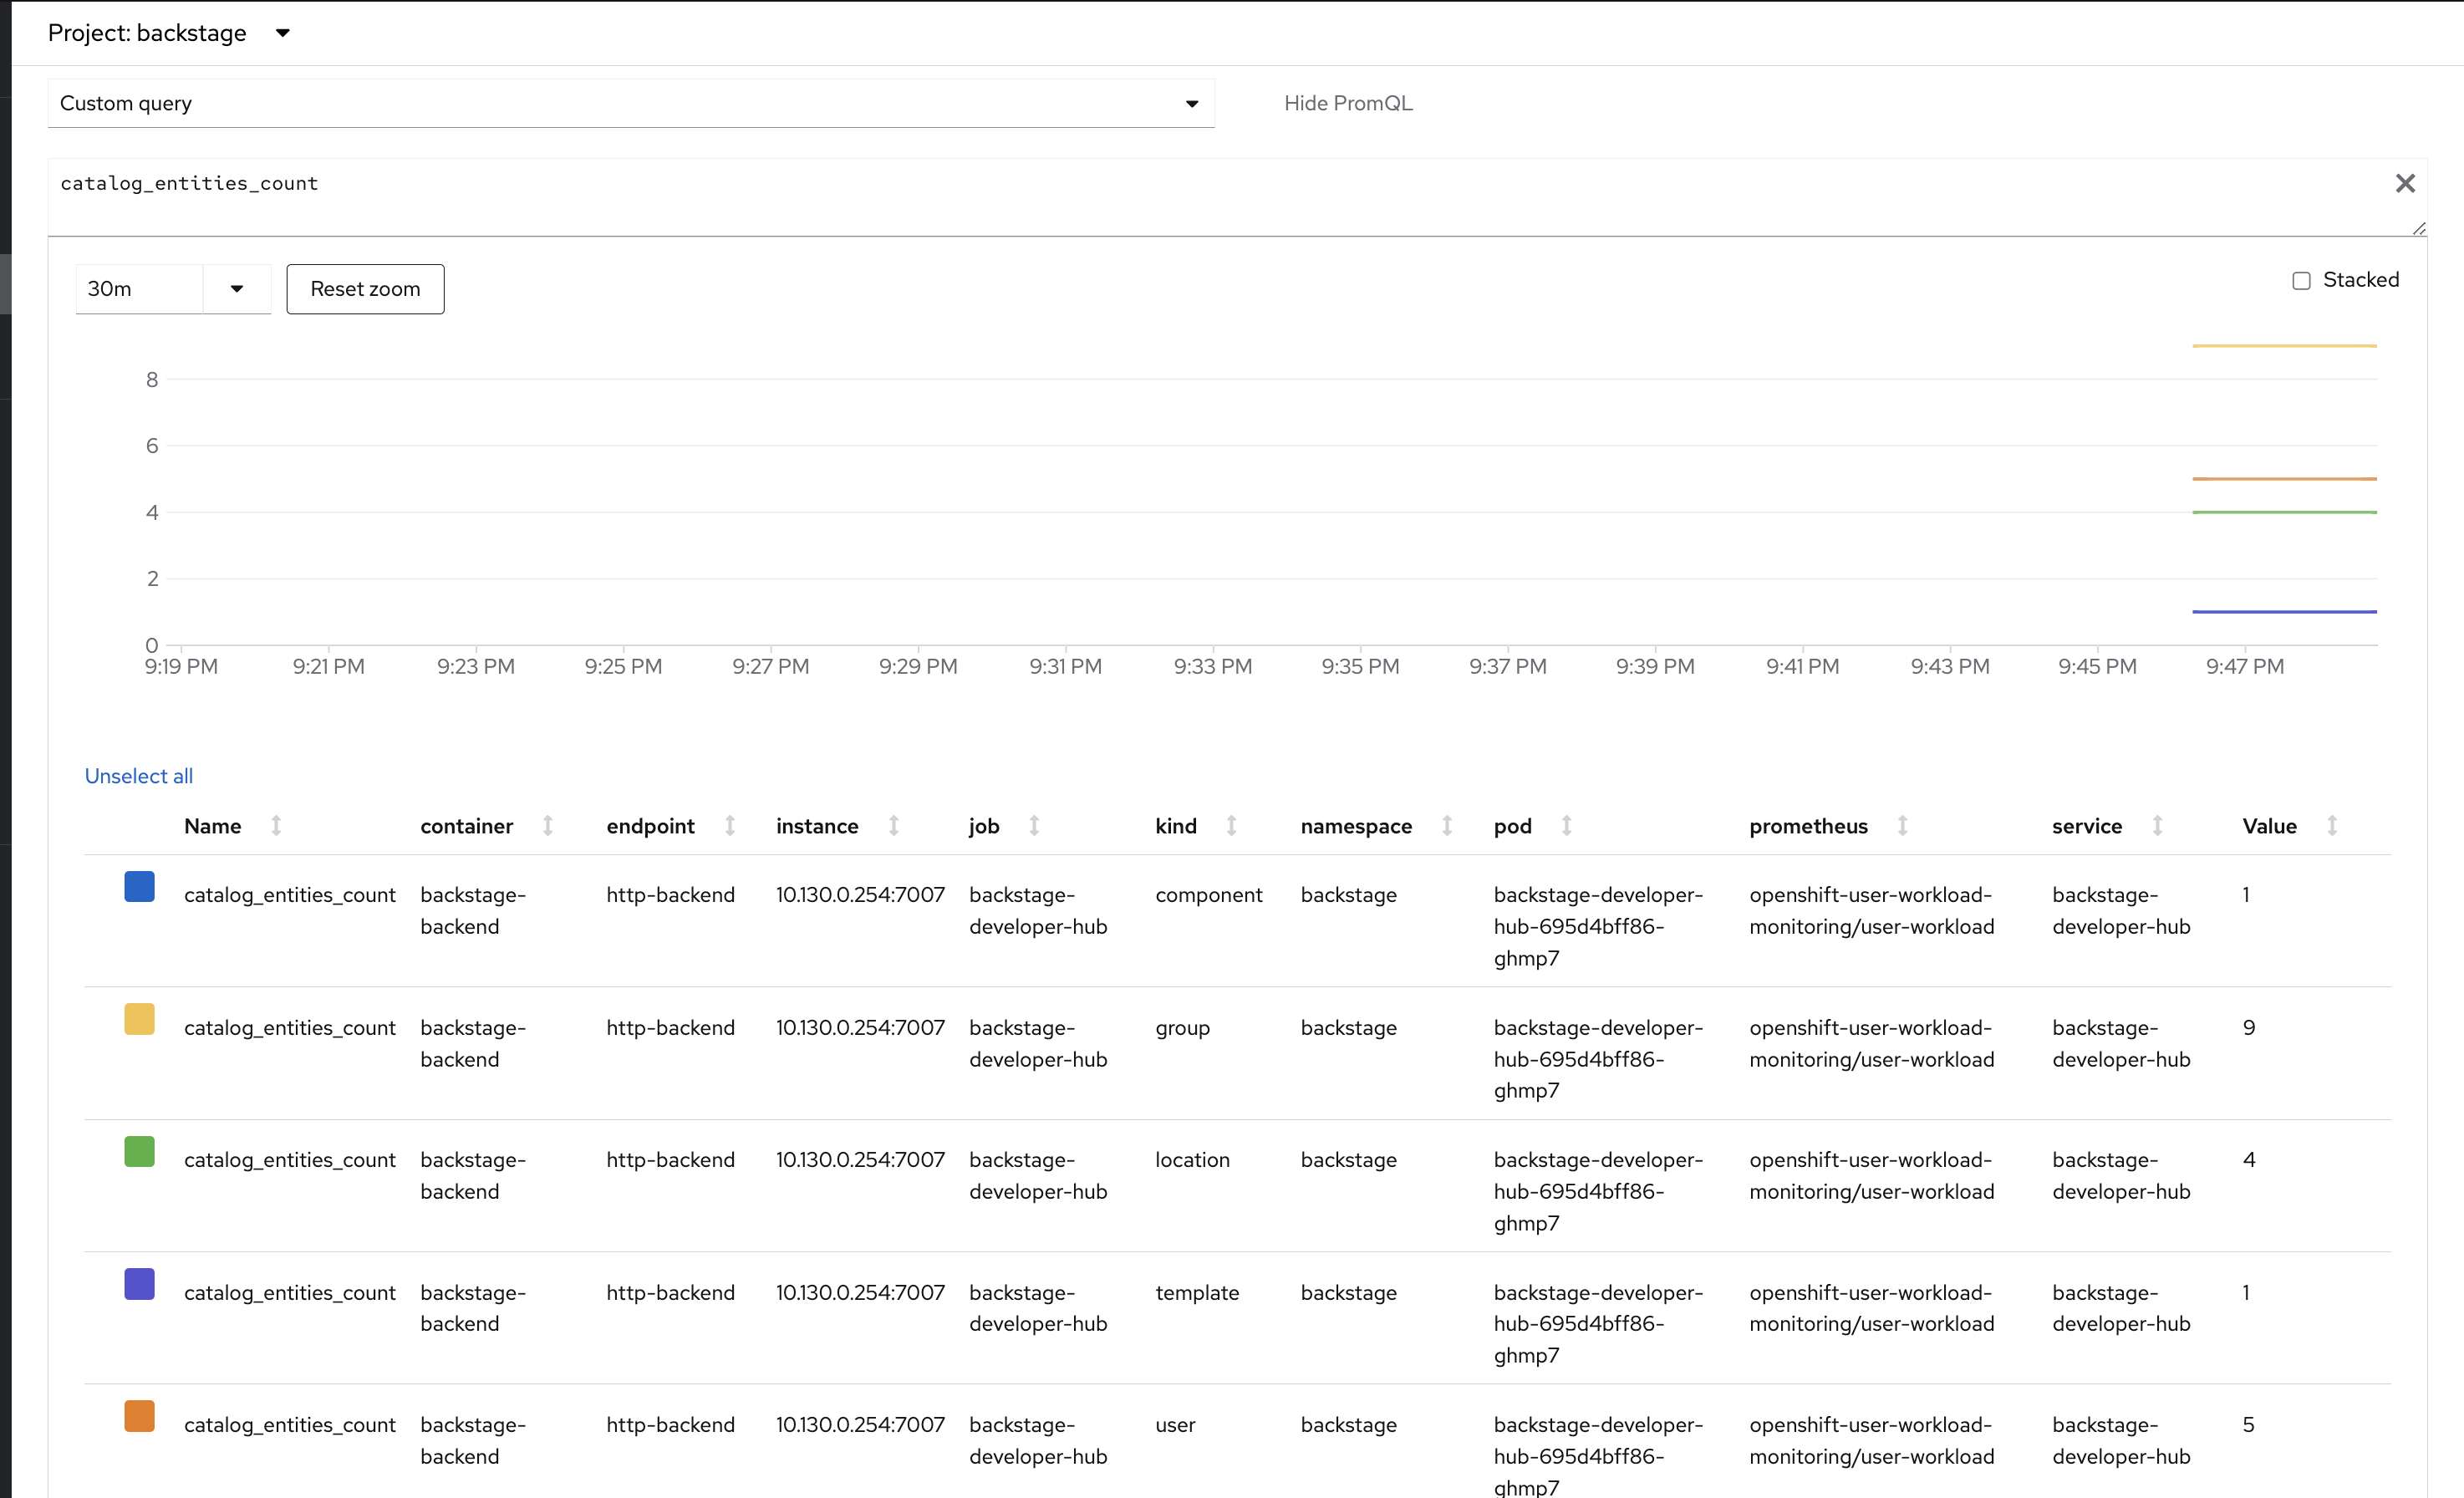
-
scaffolder_task_countresults in the count and user details
-
Other examples are
scaffolder_step_count,scaffolder_task_countcan yield interesting info about the template usage as well. The below screenshot shows output forscaffolder_step_count
-
-
You can leverage the metrics to build custom Grafana dashboards to visualise them as well.
Audit logging and Telemetry
You can monitor user activities, system events, and data changes with Developer Hub audit logs. Telemetry data collection supports collecting and analyzing telemetry data to enhance Red Hat Developer Hub experience.
These topics are beyond the scope of this workshop, but you can explore them further in the Observability section of Red Hat Developer Hub product documentation. :imagesdir: ../../assets/images
Platform Engineer Activity: Enable The Orchestrator Plugin and Developer Self-Service
Until now we have discussed Software Templates as a means for developers to accelerate their daily inner-loop activities. But Software Templates can do a lot more, like allowing developers to provision and deploy infrastructural components (like virtual machines and even complete OpenShift clusters) and application middleware components like message brokers and databases.
Software templates can achieve this through custom plugins that interact with tools like Ansible and OpenShift API servers.
But, in real life, these developer self-service requests might require more than what a Software Template can provide. For example, for certain activities an approval step might be required. This is where the Orchestrator plugin comes in.
The Orchestrator plugin acts as an interface between Red Hat Developer Hub and Serverless Workflow. Serverless Workflow is a cloud-native workflow engine which allows to design, deploy and execute arbitrarily complex workflows which can integrate with external systems through several mechanisms.
The Orchestrator plugin is also integrated with the Notifications plugin, which allows users or groups to be notified of milestones in the workflow execution.
This is a high level architectural overview of the Orchestrator:
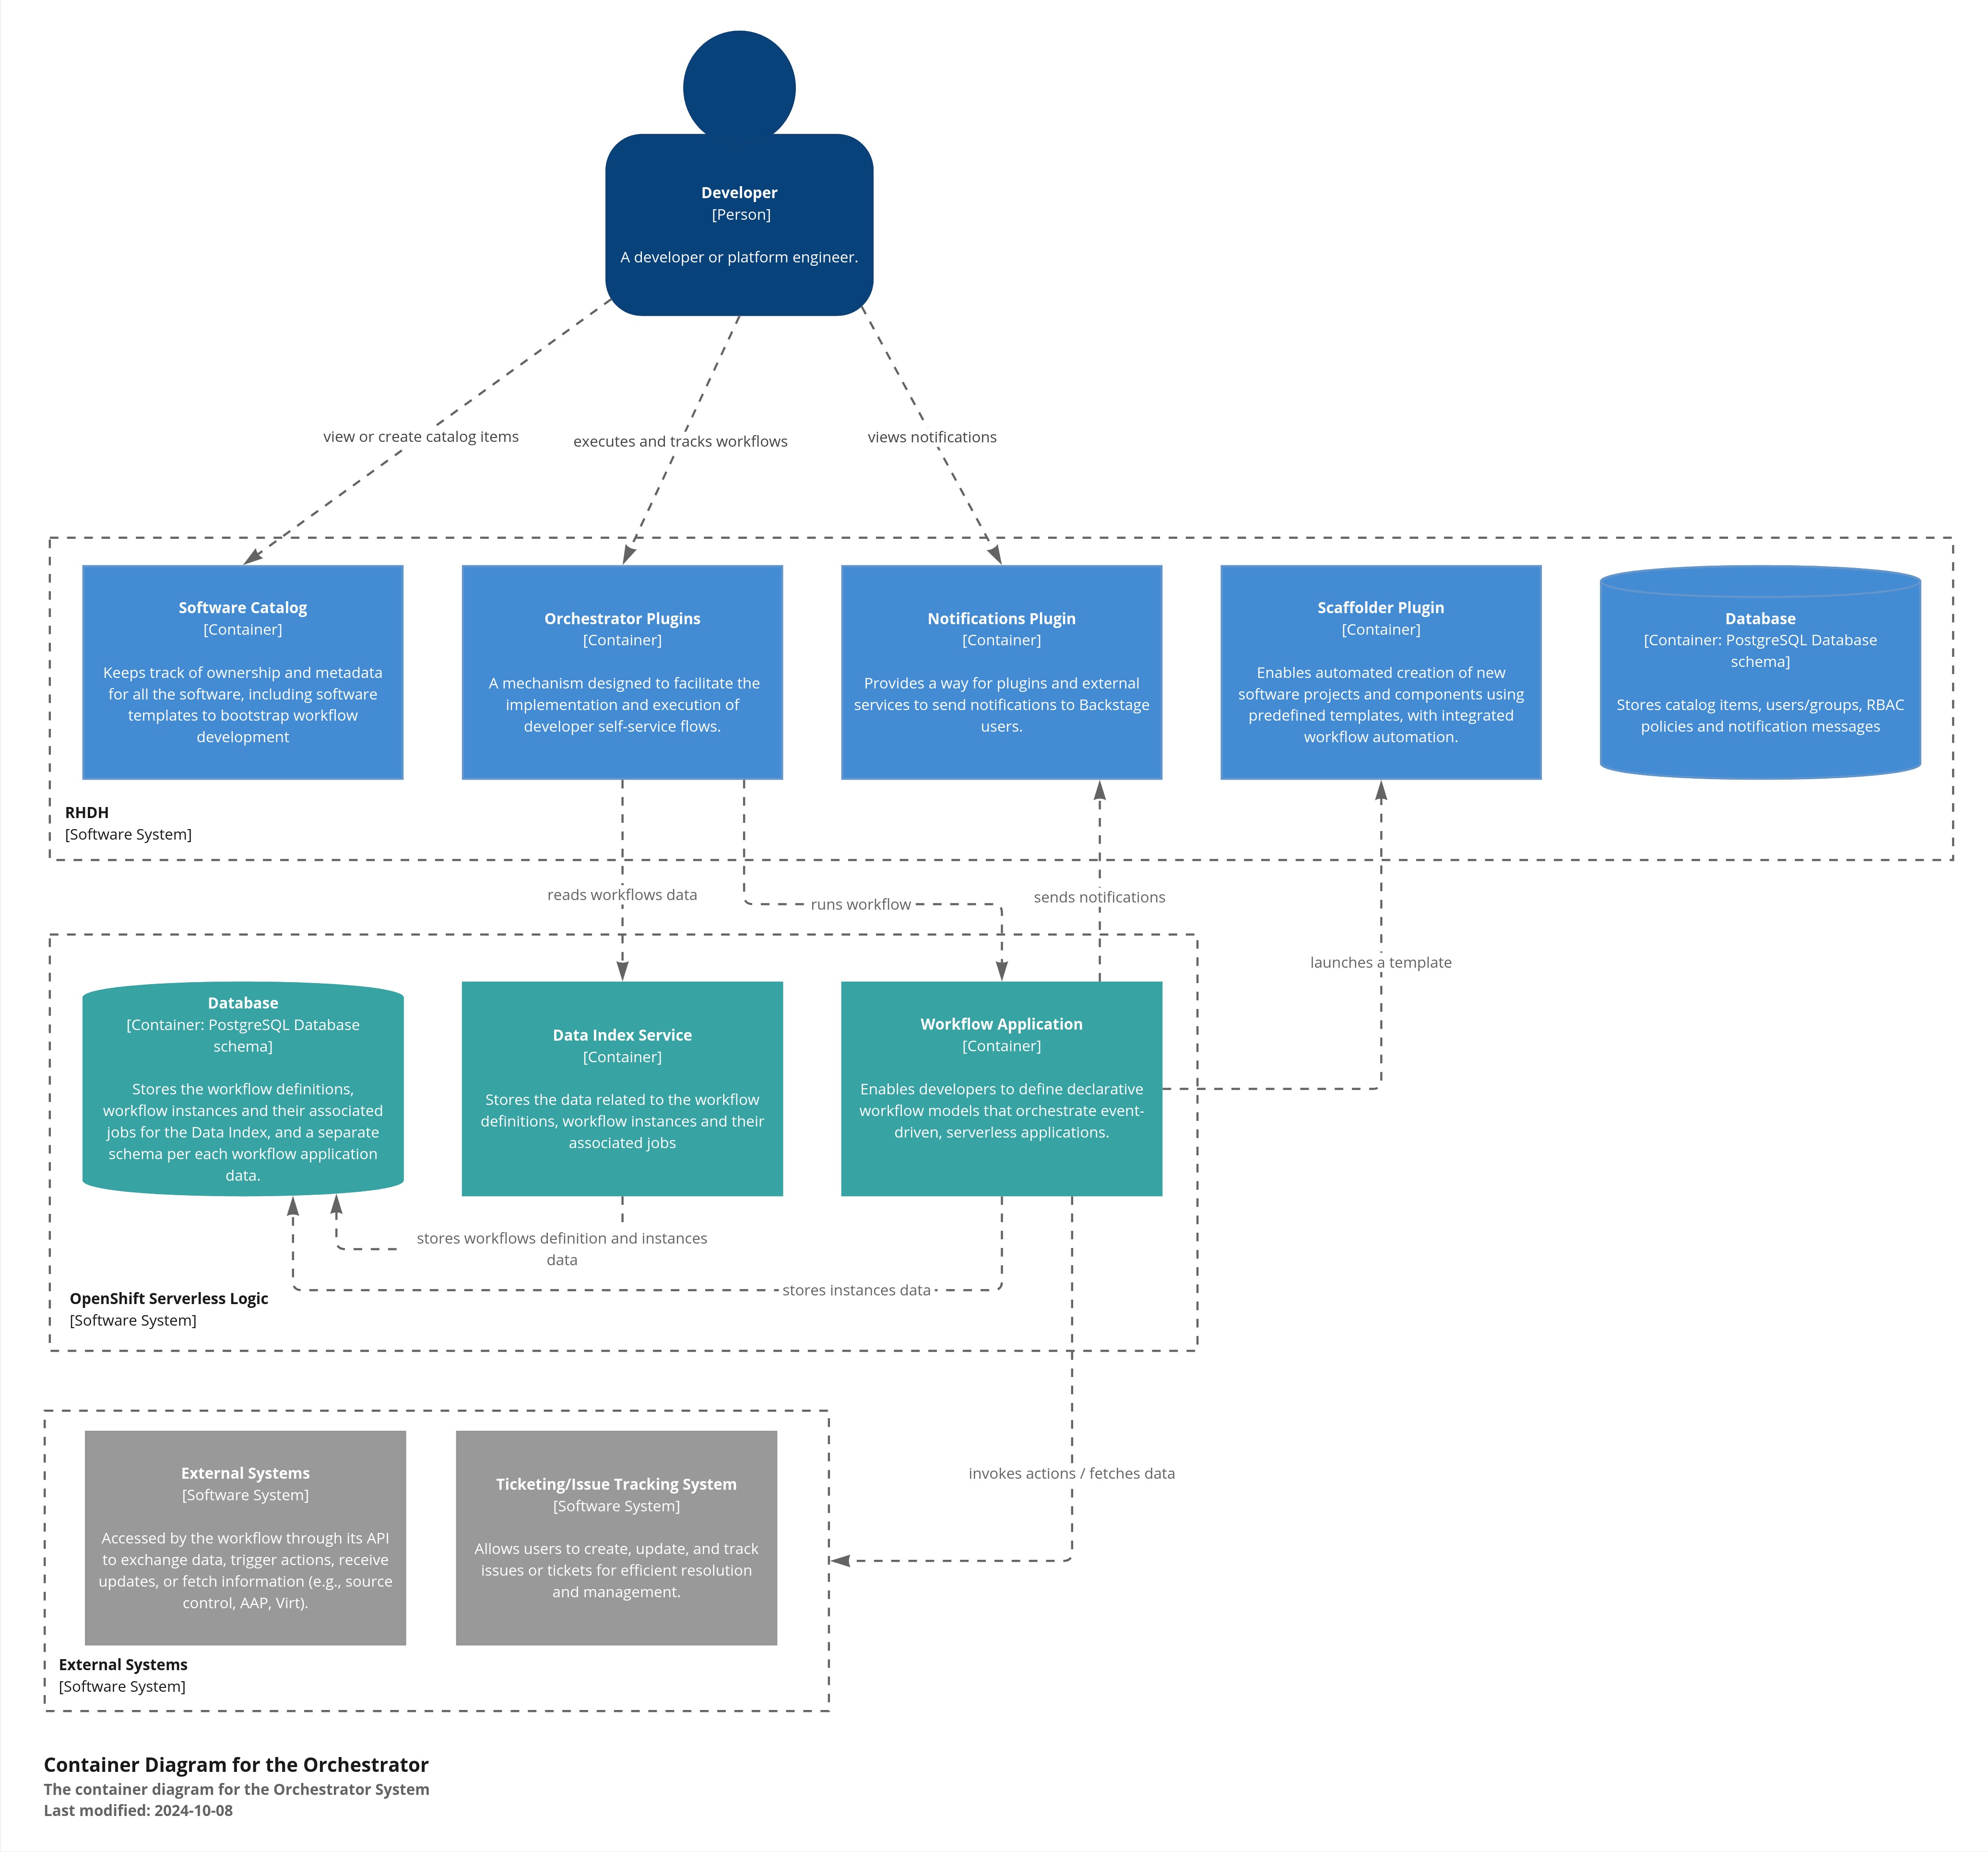
As a use case for Developer Self-Service we are going to look at a pretty simple use case: a Developer can request a namespace on an OpenShift cluster. The namespace has limited resources, defined by resource quota and limit ranges. In our case, the namespaces come in two sizes, small and large. Large namespaces however require an approval.
Please make sure to log in as a Platform Engineer with pe1 / {common_password}. Refer to the below guide for assistance.
|
Click to learn how to login as a Platform Engineer
Login as Platform Engineer
You will perform this activity as a Platform Engineer. Please follow the below steps to logout from Red Hat Developer Hub and GitLab, and login back as a Platform Engineer (pe1 / {common_password})
-
Logout from Red Hat Developer Hub
-
Sign out of Red Hat Developer Hub from the Profile dropdown as shown in the screenshot below.
-
-
Logout from GitLab
-
Click on the Profile icon, and Sign out from the dropdown as shown in the screenshot below.
-
-
Login back as a Platform Engineer to Red Hat Developer Hub and GitLab using the credentials
pe1/{common_password}
Configure the Orchestrator Plugin
-
Visit your rhdh/developer-hub-config repository on GitLab.
-
Open the
values.yamlfile, then select Edit > Edit single file. -
Uncomment the
--- ORCHESTRATOR FEATURE ---section in the YAML, to enable the Orchestrator.
-
Next find the
--- ORCHESTRATOR ADDITIONAL PLUGINs ---section, and uncomment the lines within to enable the notifications plugin(s) that are used in the workflow in this section.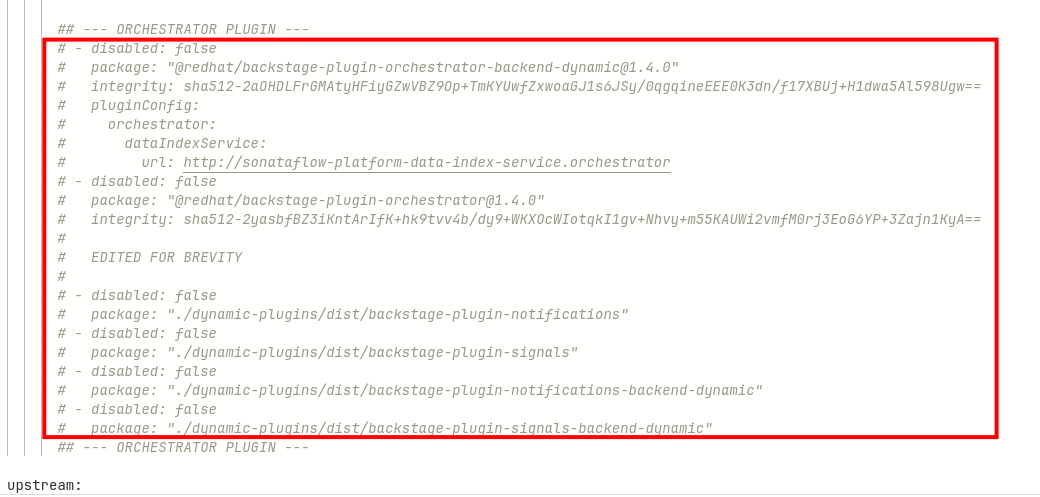
-
Look for the YAML between the
--- ORCHESTRATOR ---block further down in the file and uncomment it.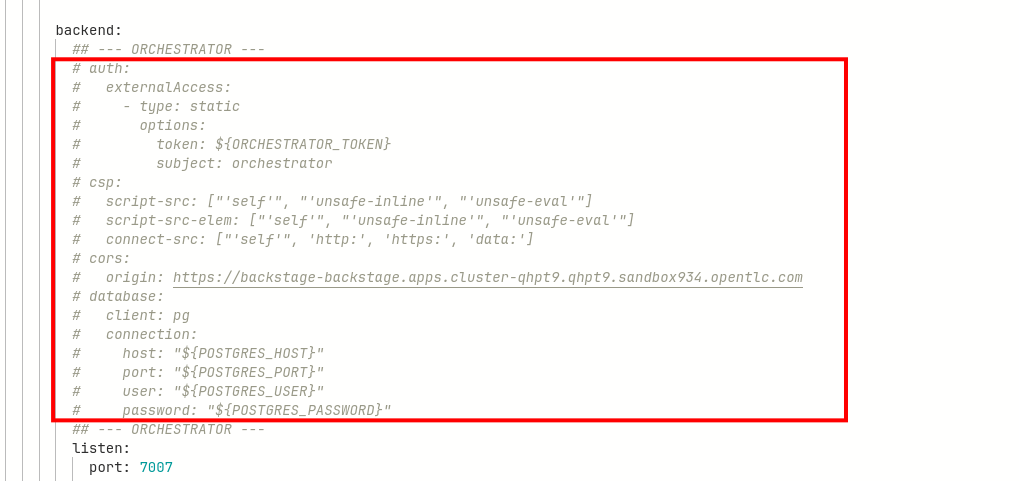
This section contains configuration for the orchestrator plugin.
-
Commit your changes with the message
feat: enable orchestrator plugin. -
Click the Refresh button on the
backstageApplication in OpenShift GitOps.
Verify that the Orchestrator and Notification plugins are enabled
-
After a few moments your new Red Hat Developer Hub configuration will finish rolling out. Visit your instance of Red Hat Developer Hub and view the Home page. Note two new menu items in the left-hand side menu, Orchestrator and Notifications.
-
Select Orchestrator from the left-hand side menu.
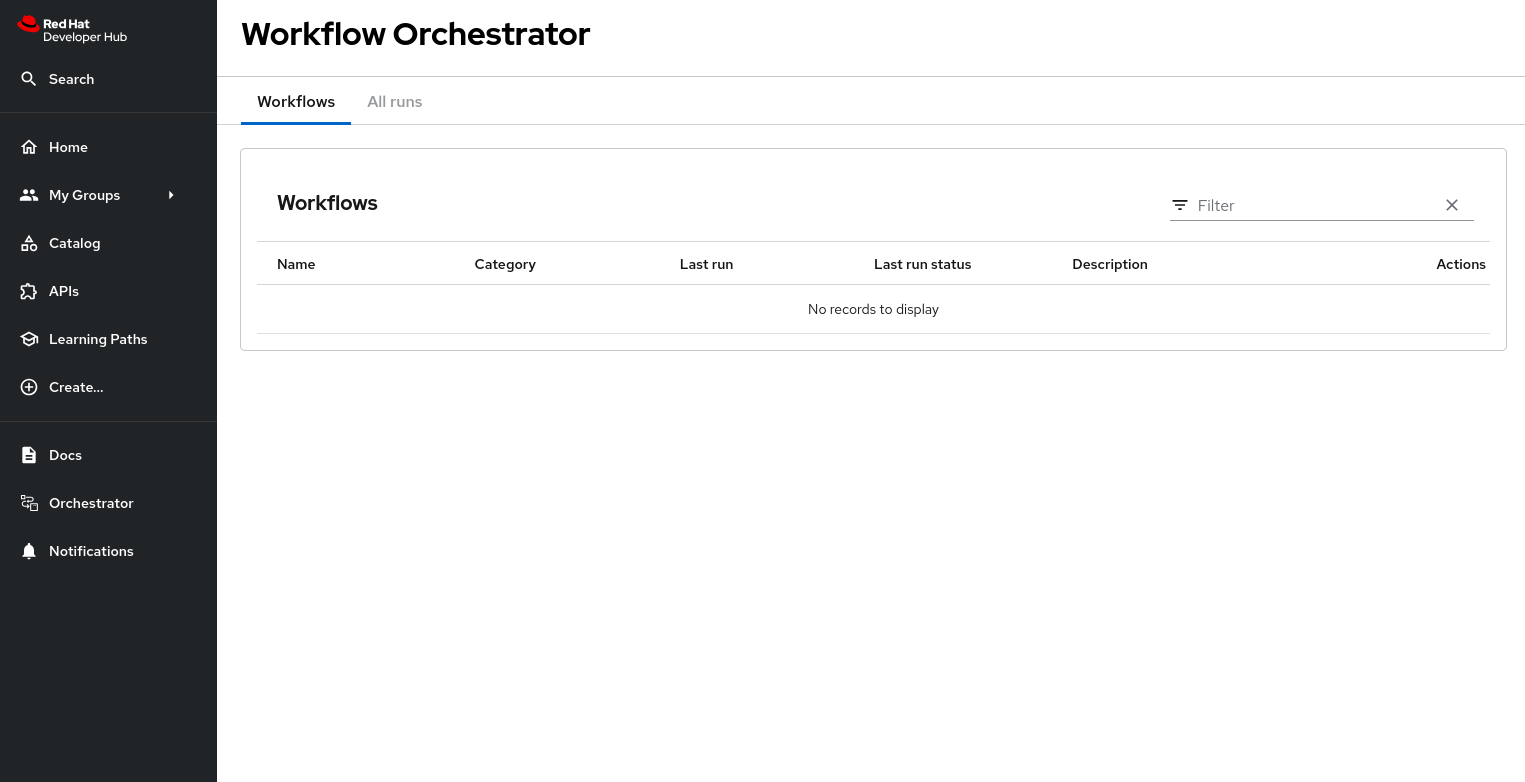
This page shows the list of workflows that are available to the Red Hat Developer Hub users. As expected, the list is empty because no workflows have been deployed yet. You will do so later in this chapter.
-
Select Notifications from the side menu.
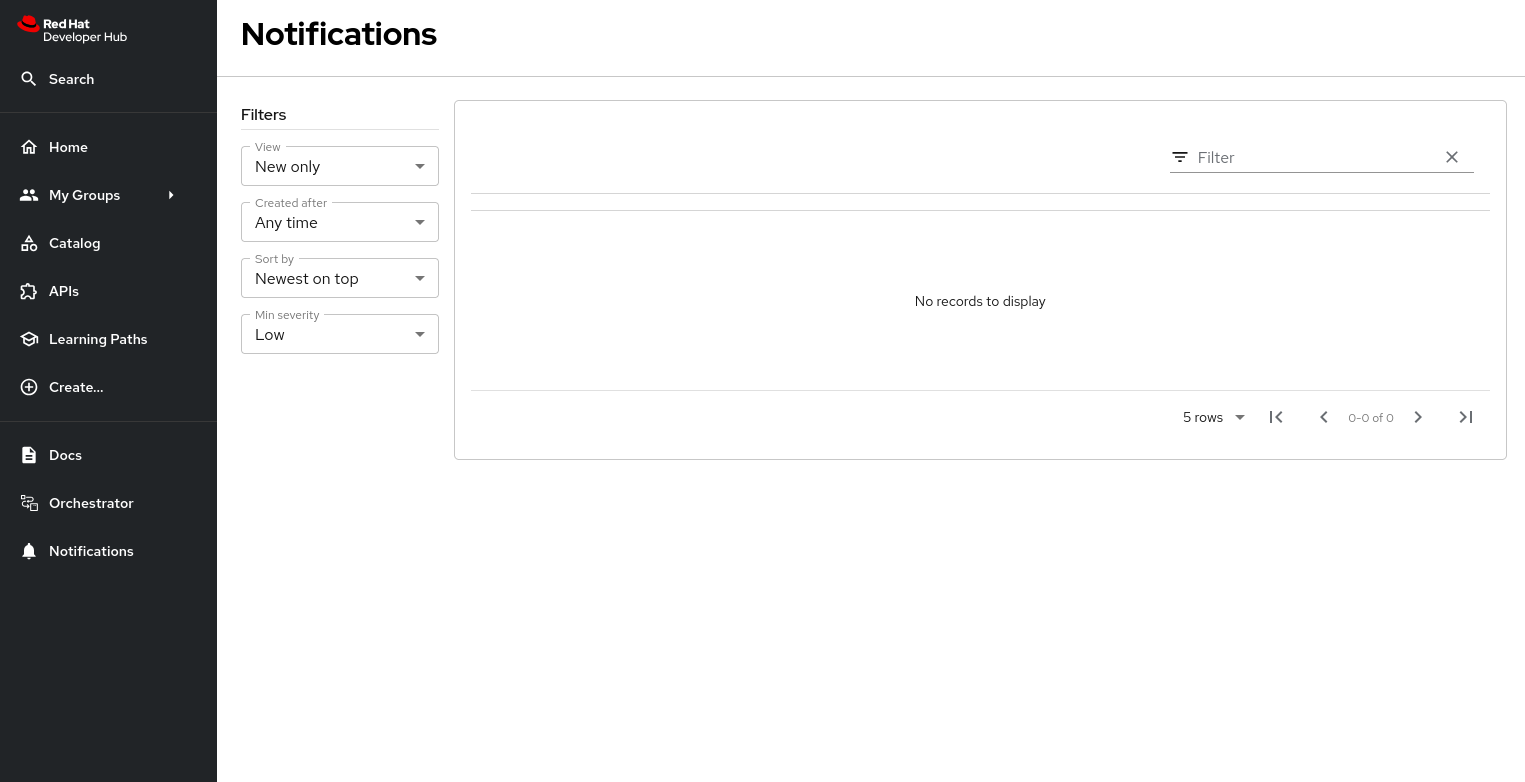
This page shows the notifications for the logged in user. As expected, the list is empty, as no notifications have been emitted yet.
Import Software templates for Developer Self Service.
To illustrate the possibilities of the Orchestrator plugin, let’s imagine the following use case: a developer requests a namespace in an OpenShift cluster. Namespaces are limited with resource quota and limits. They come in two sizes, small and large, where the large namespace enables more resources. The large namespace requires approval.
The workflow instance that will be deployed later in the lab launches a software template, eventually after approval, to create a namespace for the user.
So before deploying the workflow itself, we need to import the software templates to create the namespace.
The Software Templates for Developer Self Service are referenced in the location.yaml file in the rhdh/template-developer-self-service repository in GitLab.
Register this template using the Red Hat Developer Hub UI:
-
Login to your instance of Red Hat Developer Hub as the
pe1user with password{common_password}. -
Select the
icon on the top navigation bar to access the Self-service menu. -
Click the Register Existing Component button.
-
Enter the following URL in the Select URL field and click Analyze:
https://gitlab-gitlab.{openshift_cluster_ingress_domain}/rhdh/template-developer-self-service/-/blob/main/location.yaml?ref_type=heads -
You’ll be asked to review the entities being imported, as shown:
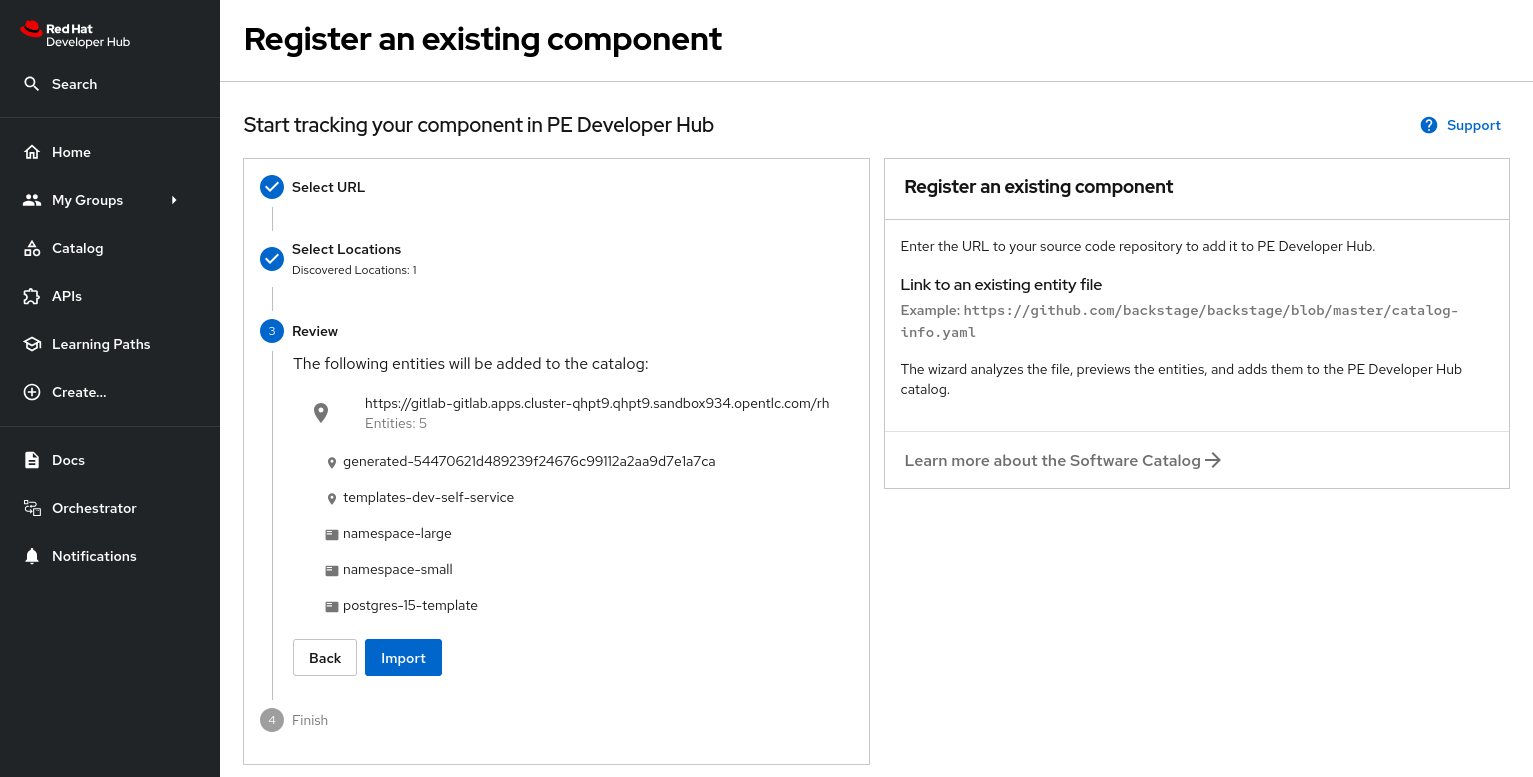
Three Software Templates will be imported:
namespace-small,namespace-largeandpostgres-15-template. The first two create a small or large namespace, the last one deploys a PostgreSQL instance in a namespace created by the namespace templates. -
Click Import when prompted.
-
Select the
icon on the top navigation bar to see the new templates.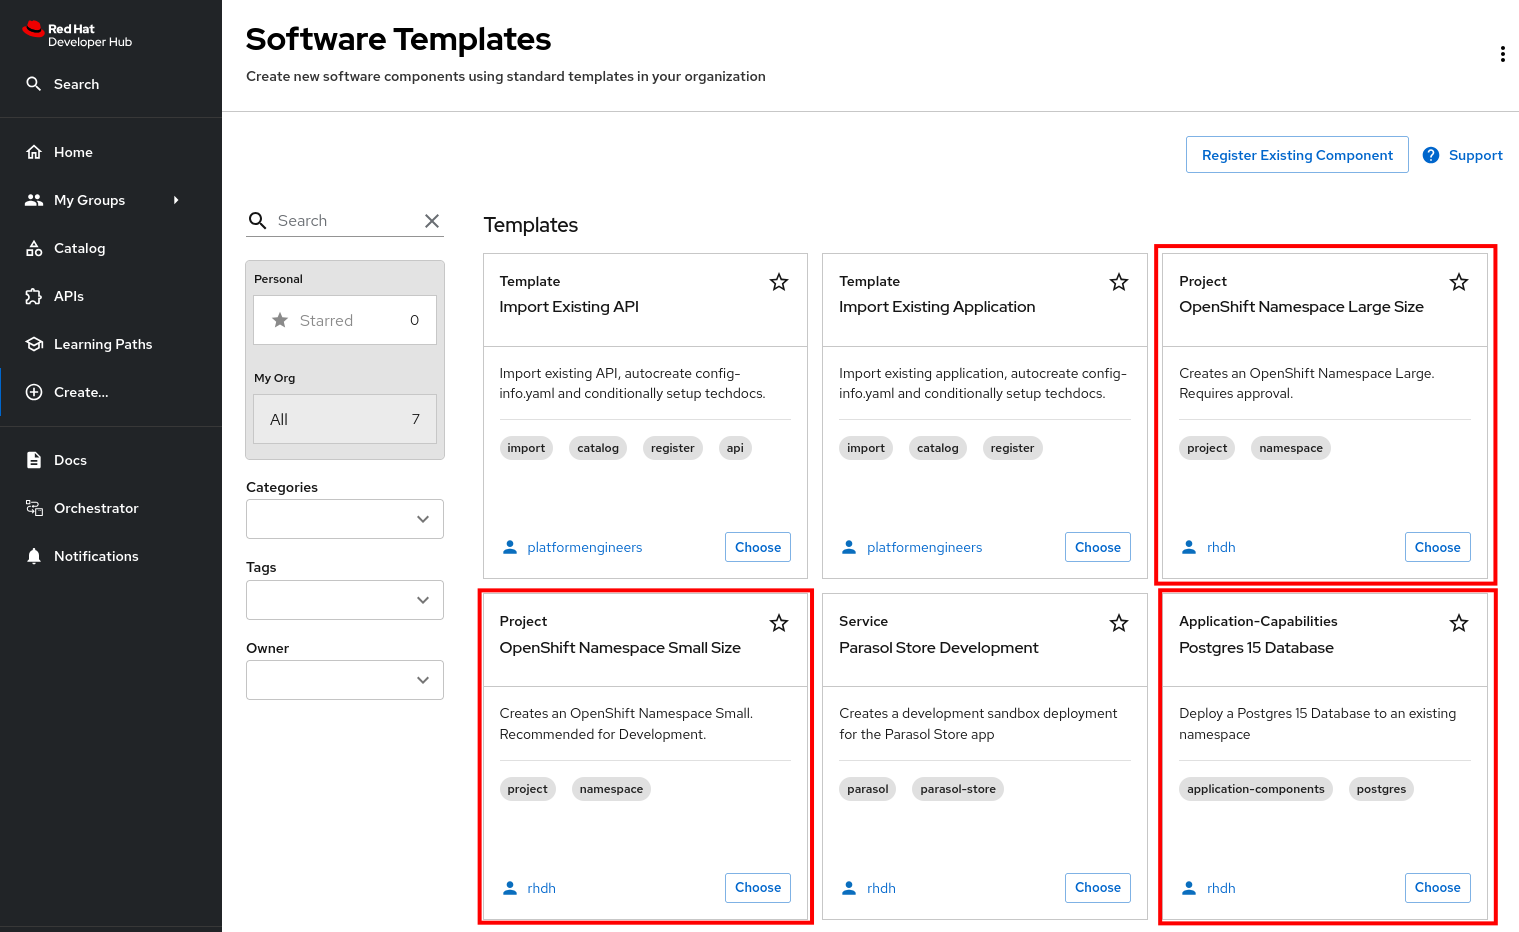
The Software Templates to create namespaces are not meant to be used directly, but rather through an Orchestrator Workflow. So while they are visible (and usable) to members of the Platform Engineering group, they are not accessible for developers.
To demonstrate this:
-
Logout from your pe1 user, and log back in as a developer with
dev1/{common_password}. -
Select the
icon on the top navigation bar. -
Note that the
OpenShift Namespace Large Sizeand theOpenShift Namespace Small SizeSoftware Templates do not appear in the Software Template screen.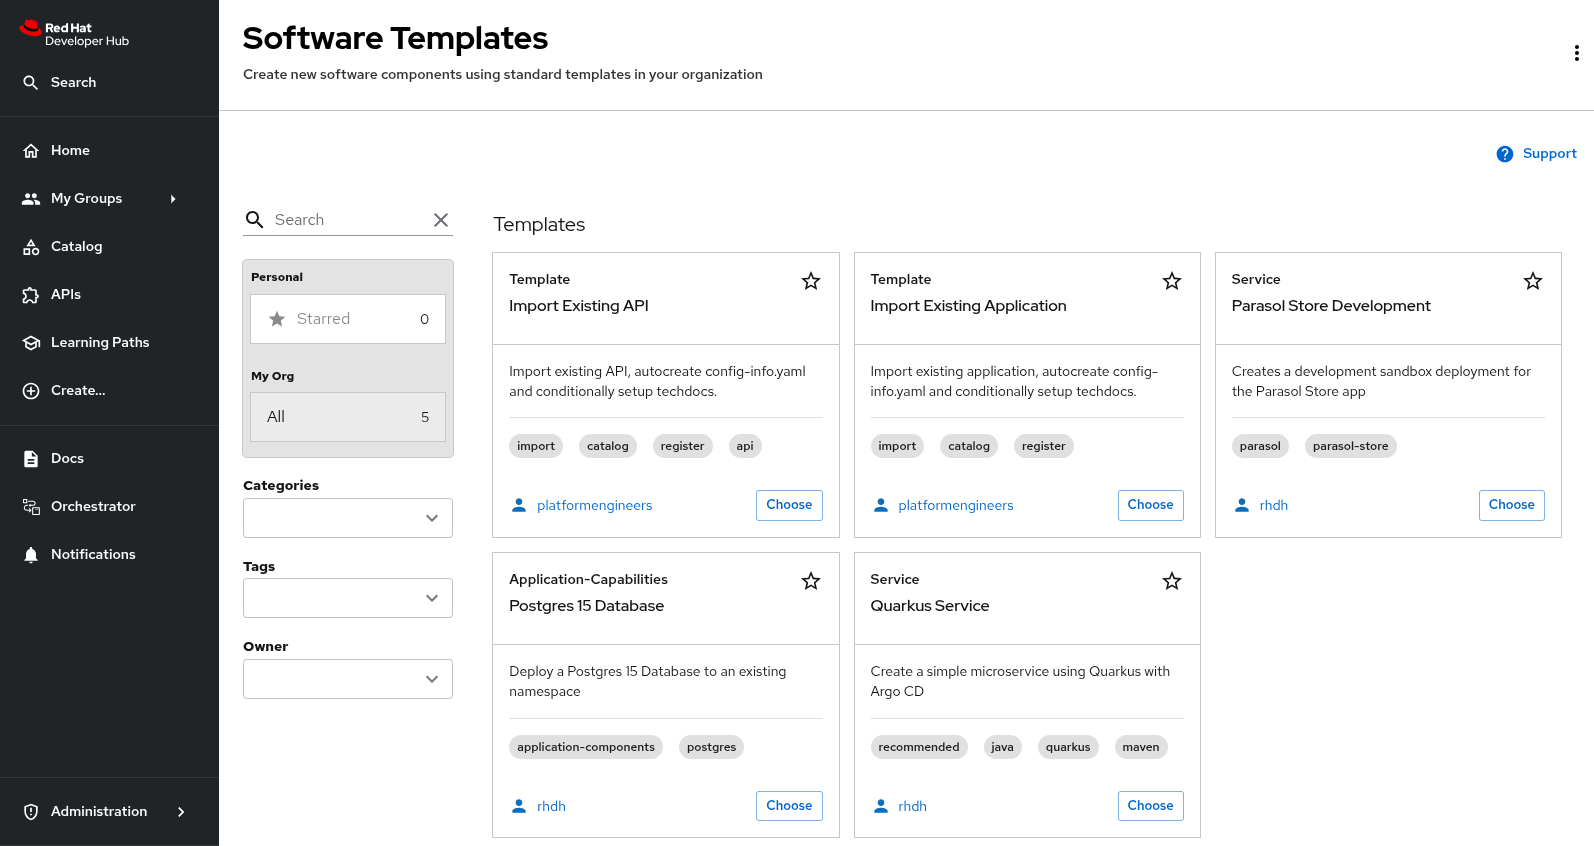
This is accomplished by applying conditional RBAC rules.
The OpenShift Namespace Large Size and the OpenShift Namespace Small Size Software Templates are annotated with the backstage.io/managed-by: orchestrator annotation, as can be seen in the Template file in GitLab file.
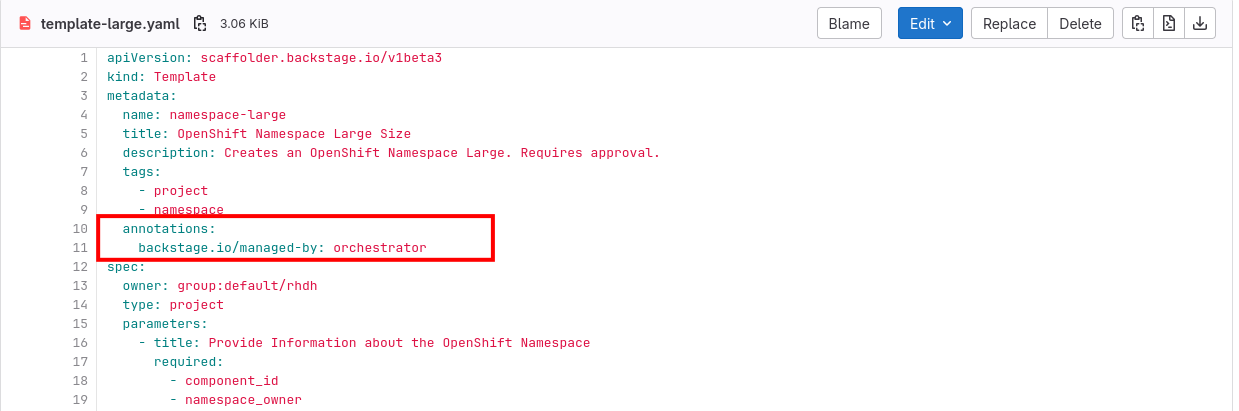
The rbac-conditional-policies.yaml file in the Configmap with RBAC rules (if needed, login with admin/{common_password}) contains the following conditional rule:
conditions:
  not:
    params:
      annotation: backstage.io/managed-by
      value: orchestrator
    resourceType: catalog-entity
    rule: HAS_ANNOTATION
permissionMapping:
- read
pluginId: catalog
resourceType: catalog-entity
result: CONDITIONAL
roleEntityRef: role:default/location_read_developer
This rule states that users with the role default/location_read_developer can see all catalog entities, except those with an annotation backstage.io/managed-by and value orchestrator. The developers group (to which the dev1 user belongs) has the role default/location_read_developer as can be seen in the rbac-policy.csv file in the Configmap.
Deploy the Serverless Workflow
A Serverless Worflow is deployed through a SonataFlow Custom Resource. As with the other deployments in this workshop, we use GitOps and ArgoCD to deploy the Serverless Workflow.
-
Click on the Copy file contents button on the top right menu.
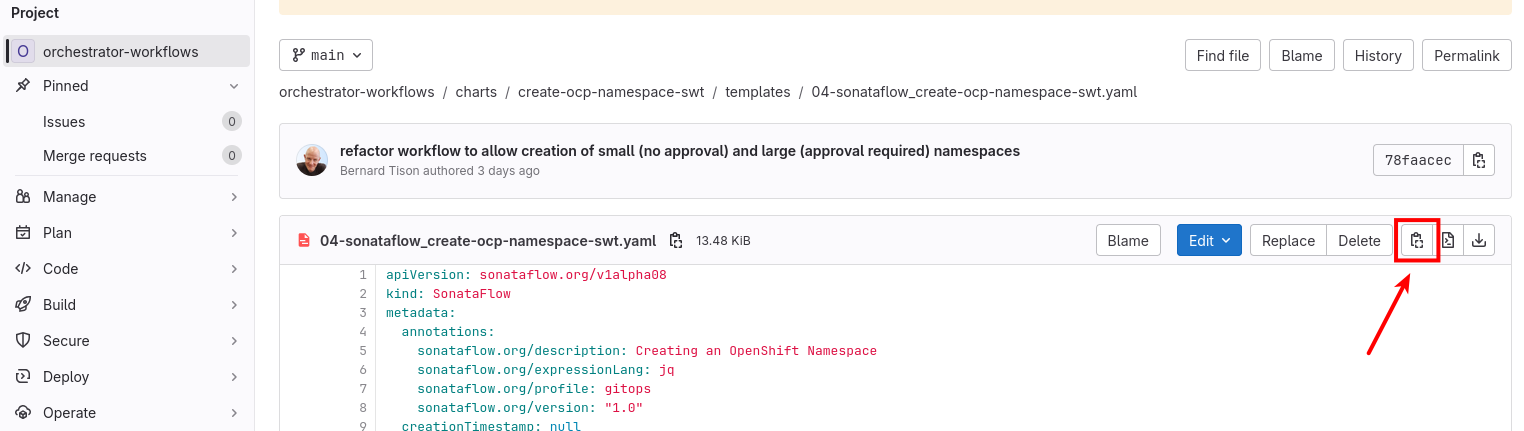
-
Visit the OpenShift console in your OpenShift cluster. If needed, login as
admin/{common_password} -
Click the import button on the top right menu
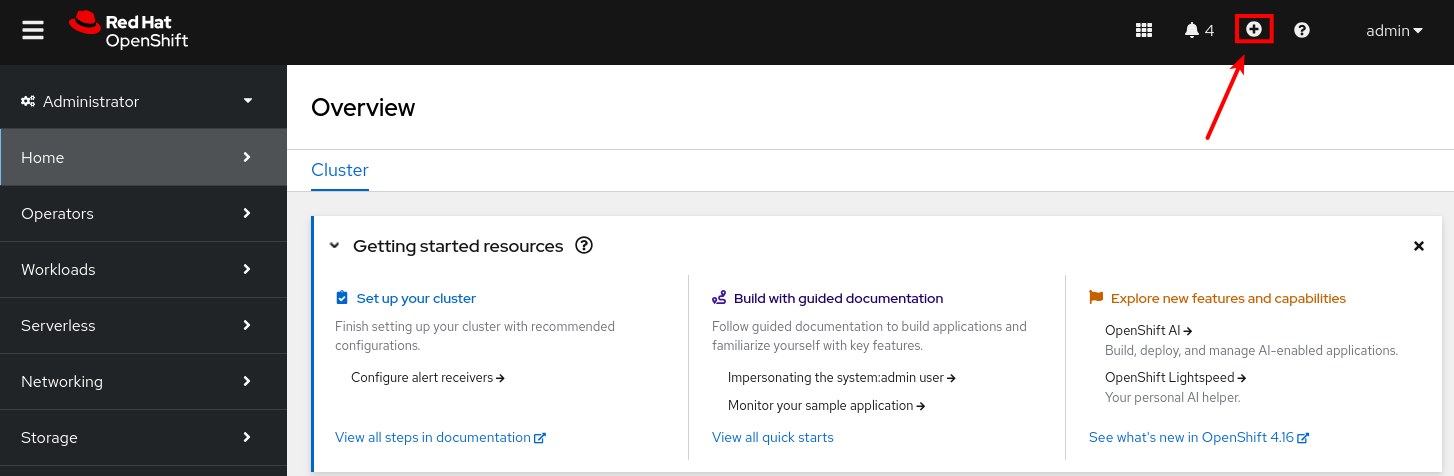
-
Paste the ArgoCD manifest in the editor. Click the Create button.
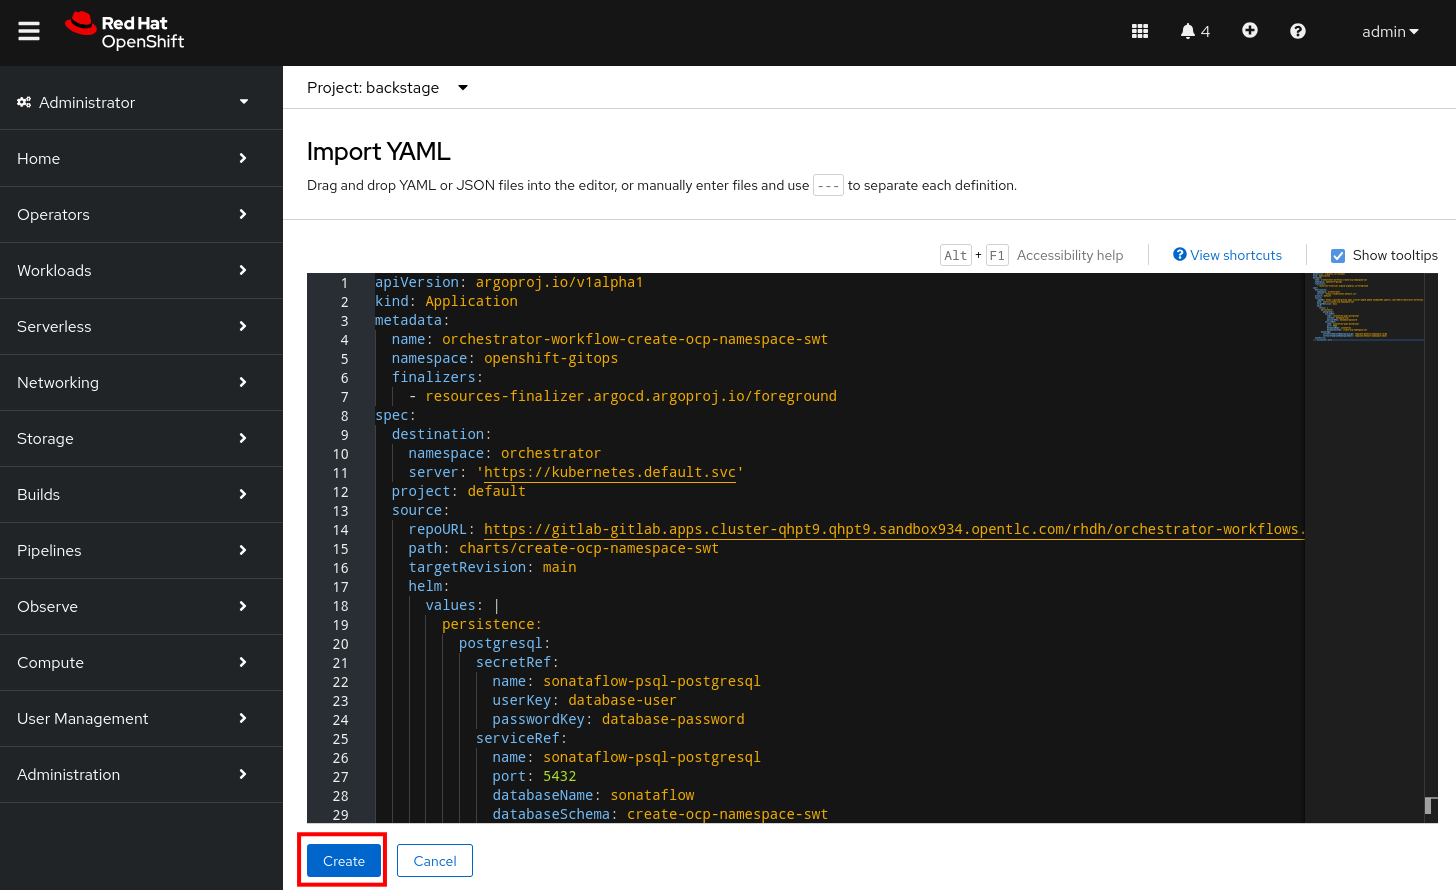
-
Verify in the Backstage namespace in OpenShift that a pod is created for the Serverless Workflow instance. The pod name starts with
create-ocp-namespace-swt.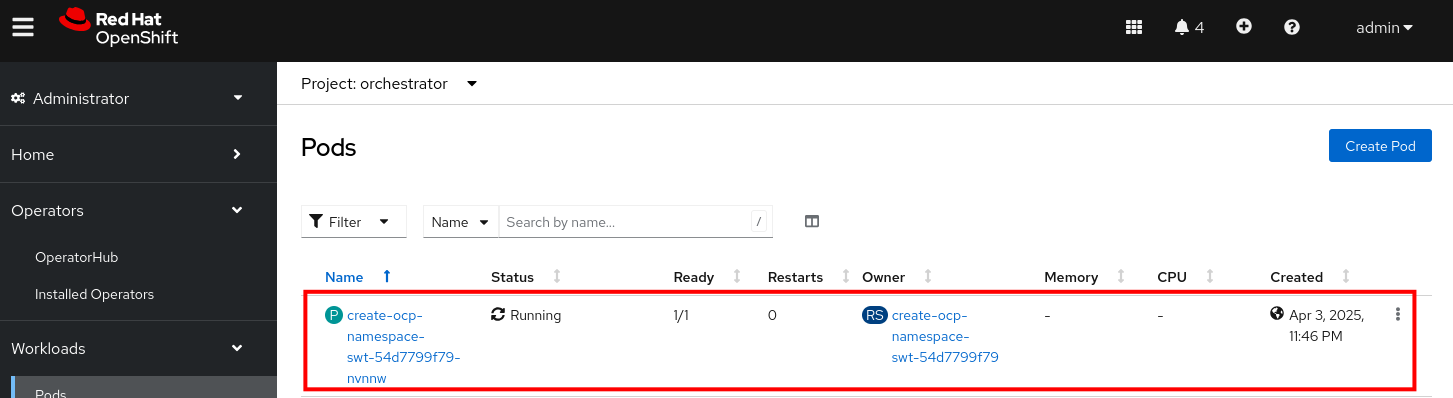
-
Visit your instance of Red Hat Developer Hub. Ensure you’re logged in as a Platform Engineer.
Click to see how
-
Navigate to Red Hat Developer Hub’s Settings screen and check the logged-in user’s name under the Profile section.
-
If you are not logged in as a Platform Engineer (
peuser), Click on Sign Out. -
Log in as
pe1/{common_password}.
-
-
Select the Orchestrator item in the left-hand menu.
-
Notice that the
Create OpenShift NamespaceWorkflow is available.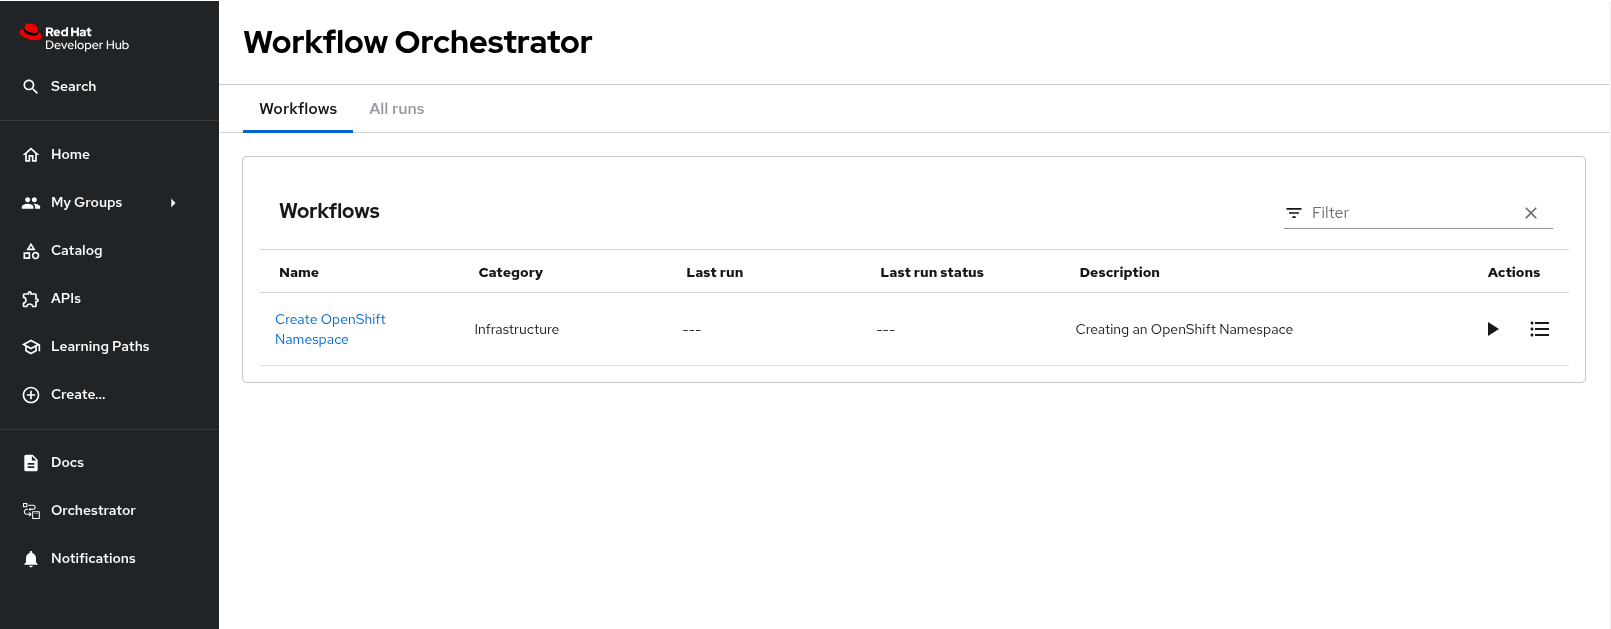
Developer Activity: Execute the Serverless Workflow
Log out of Red Hat Developer Hub and log in again as a Developer with dev1 / {common_password}.
Click to learn how to login as a Developer
Login as Developer
-
You will perform this activity as a Developer.
-
Logout from Red Hat Developer Hub
-
Click the dropdown in the top-right of Red Hat Developer Hub, then click on the Logout link.
-
-
Logout from GitLab
-
Click on the Profile icon, and Sign out from the dropdown as shown in the screenshot below.
-
-
Login back as a Developer to to Red Hat Developer Hub and GitLab using the credentials
dev1/{common_password}
-
Select the Orchestrator item in the left-hand menu.
-
Click on the Create OpenShift Namespace workflow.
-
Expect to see the workflow definition and a graphical representation of the workflow.
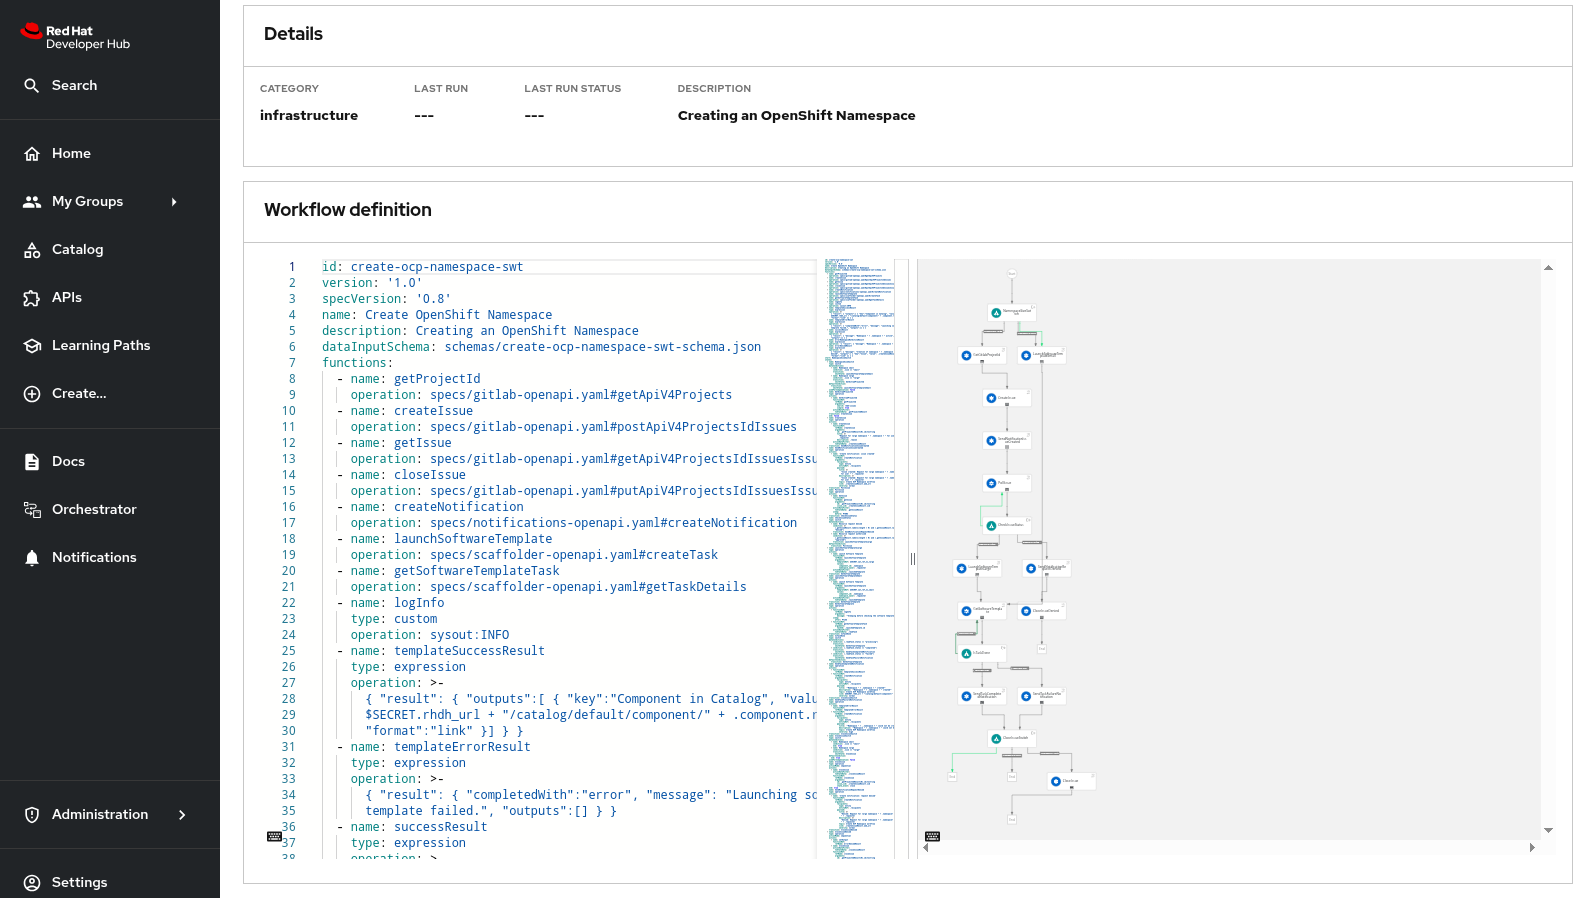
The workflow itself is pretty simple: if the user requests a small namespace to be created, the workflow launches the relevant software template (no approval required). It checks the state of the software template execution and notifies the user of success or failure.
If a large namespace is requested, the request needs to be approved. For simplicity reasons, we use issues in a GitLab repo as a ticketing system (in real life that would probably be ServiceNow or Jira or an equivalent system). If the request is approved, the software template is executed and the user notified. If the request is denied, the user is notified as well, but no namespace is created.
-
Click on the Run button at the top right of the screen to start an instance of the workflow.
-
You are presented with a form to enter the details of your request. Let’s start with a request for a small namespace. Fill in the form as follows:
-
Namespace name:
dev1-small-1 -
Requester:
dev1 -
Size:
small -
Reason: type any message you like here
-
Recipients:
user:default/dev1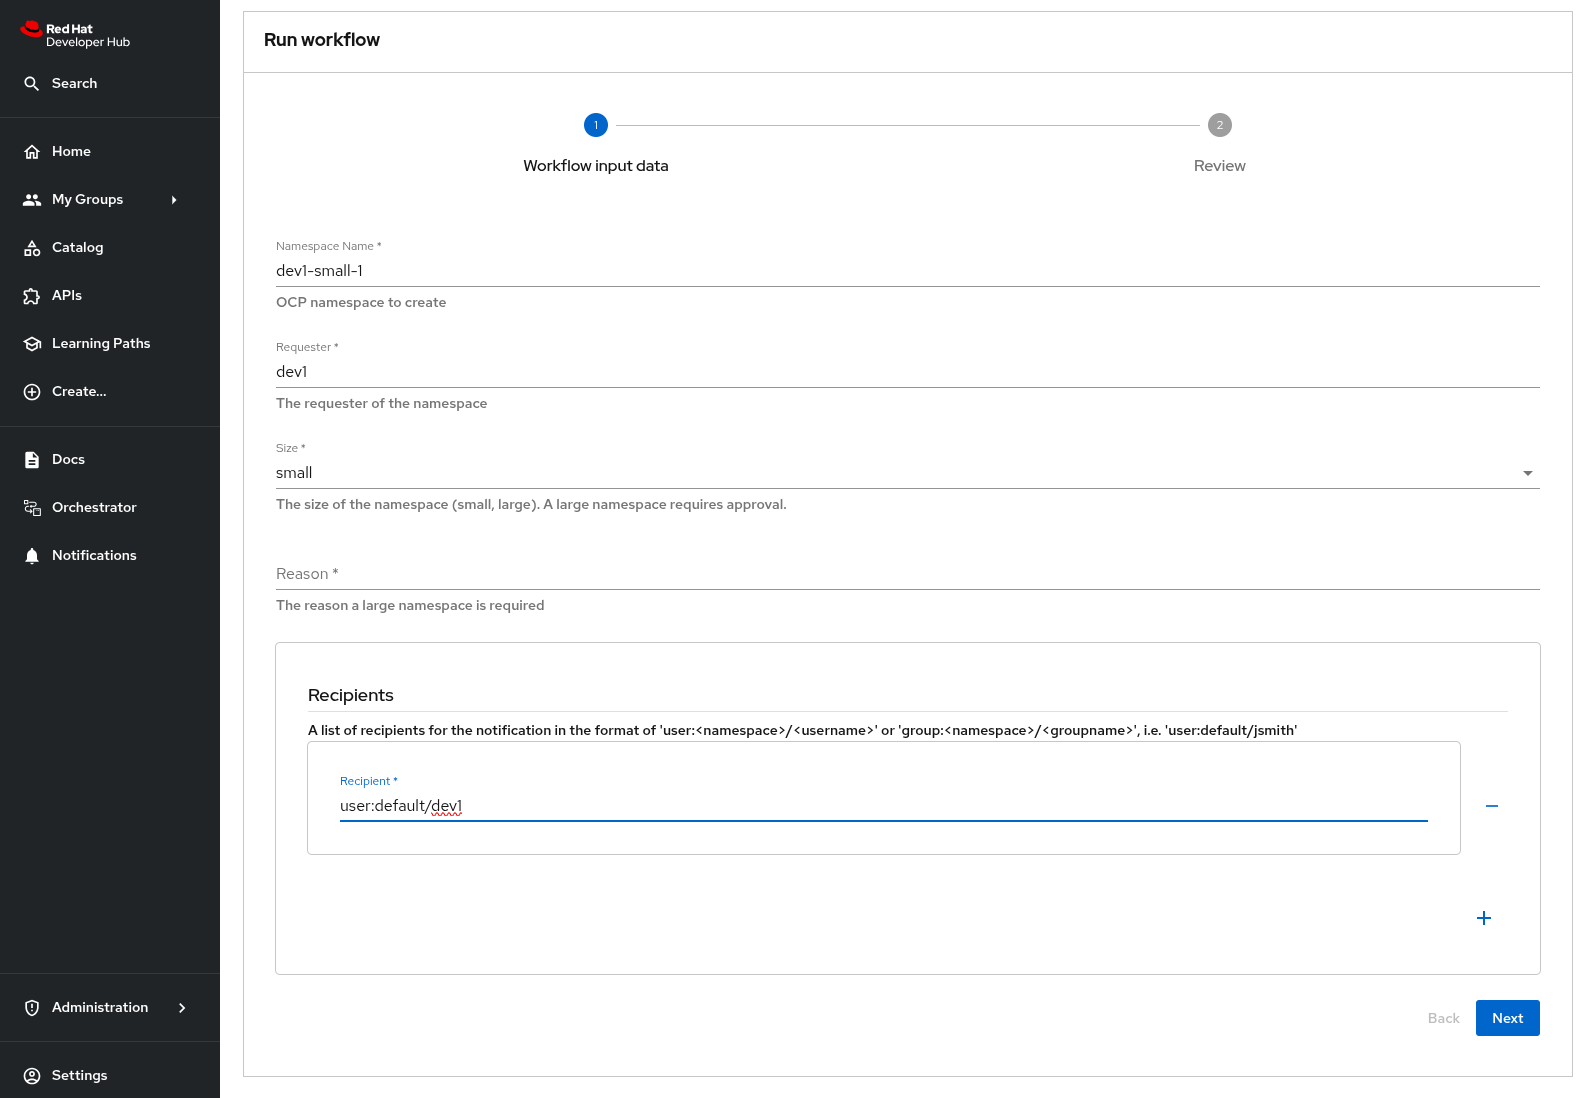
-
-
Click on Next. Expect to see an overview of your request.
-
Click on Run to start the workflow execution.
-
After a few seconds the status of the workflow moves to Run completed.
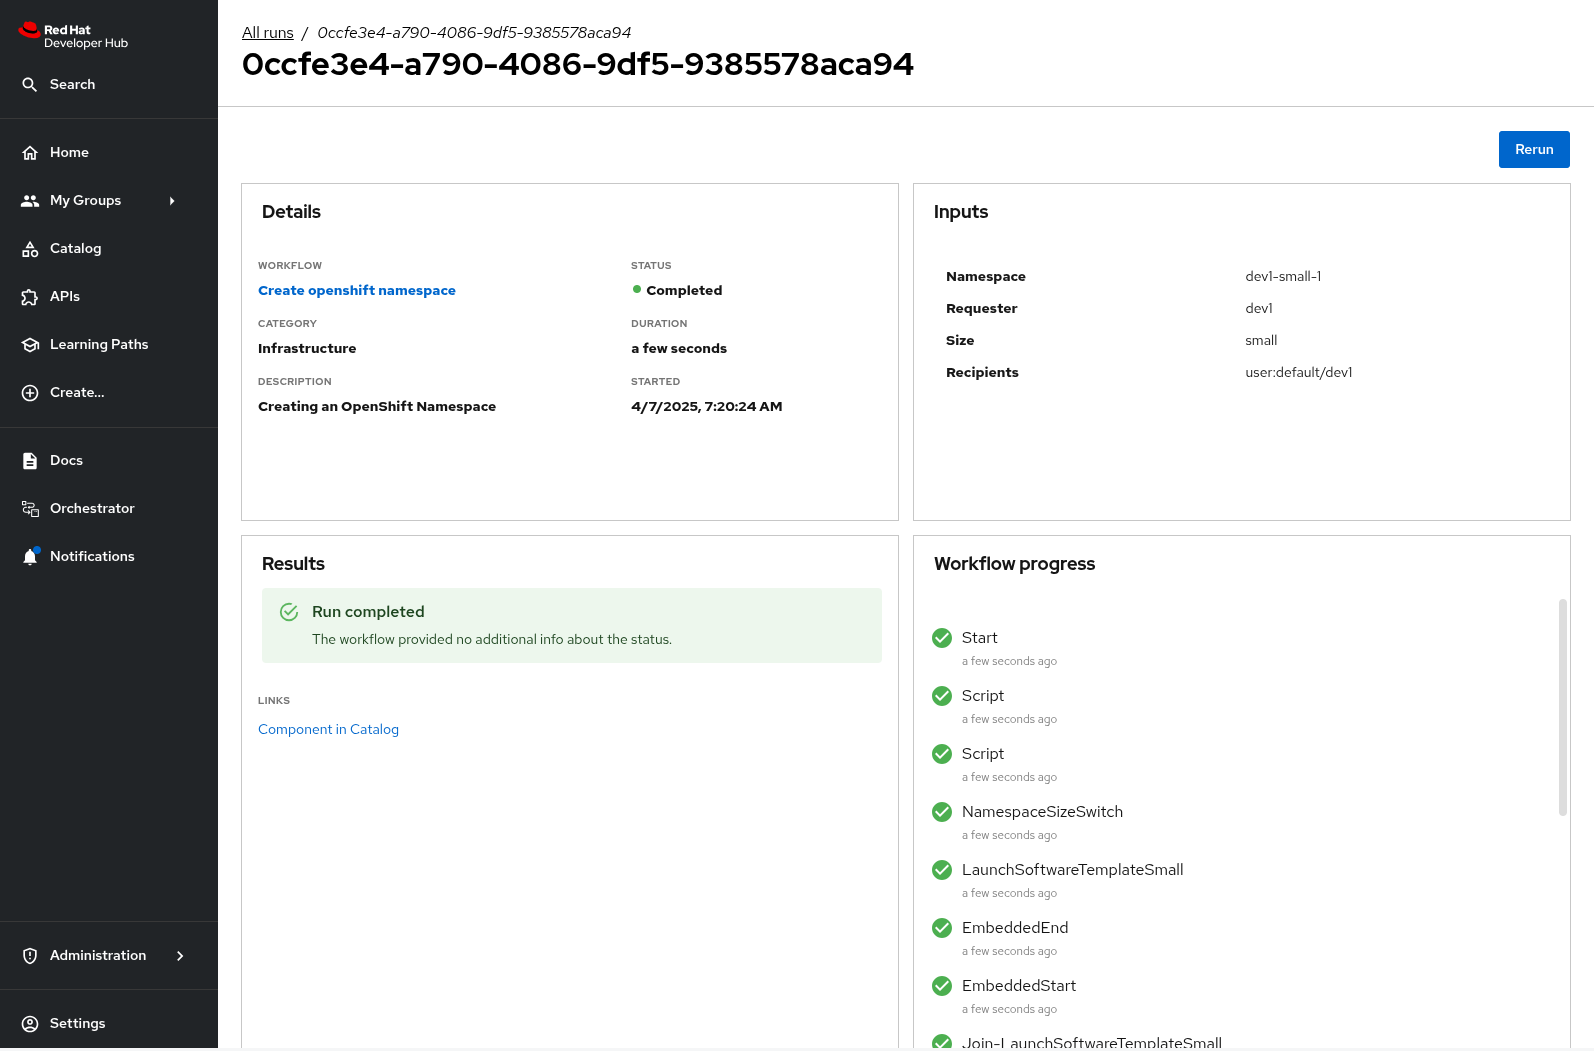
-
Select the Notifications item in the left-hand menu.
-
Notice a notification that the namespace
dev1-small-1has been created.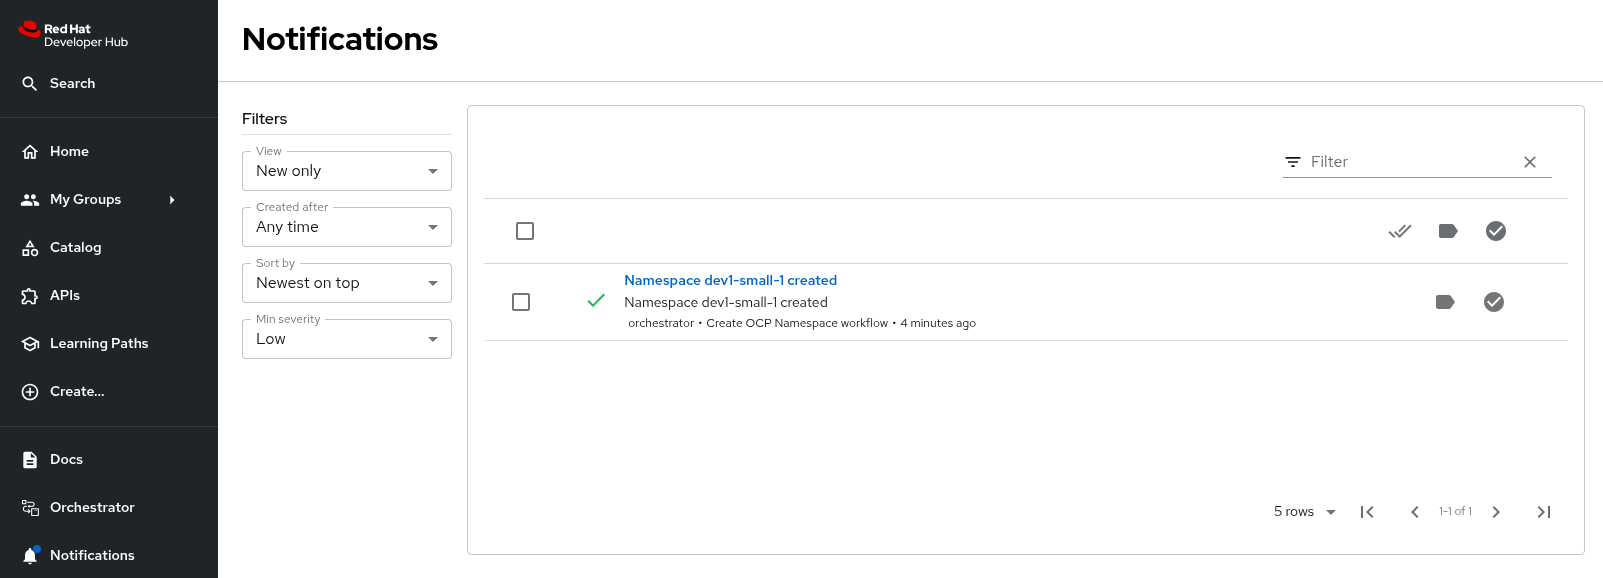
-
If you click on the notification link, you will see the component that was created as a result of the execution of the software template.
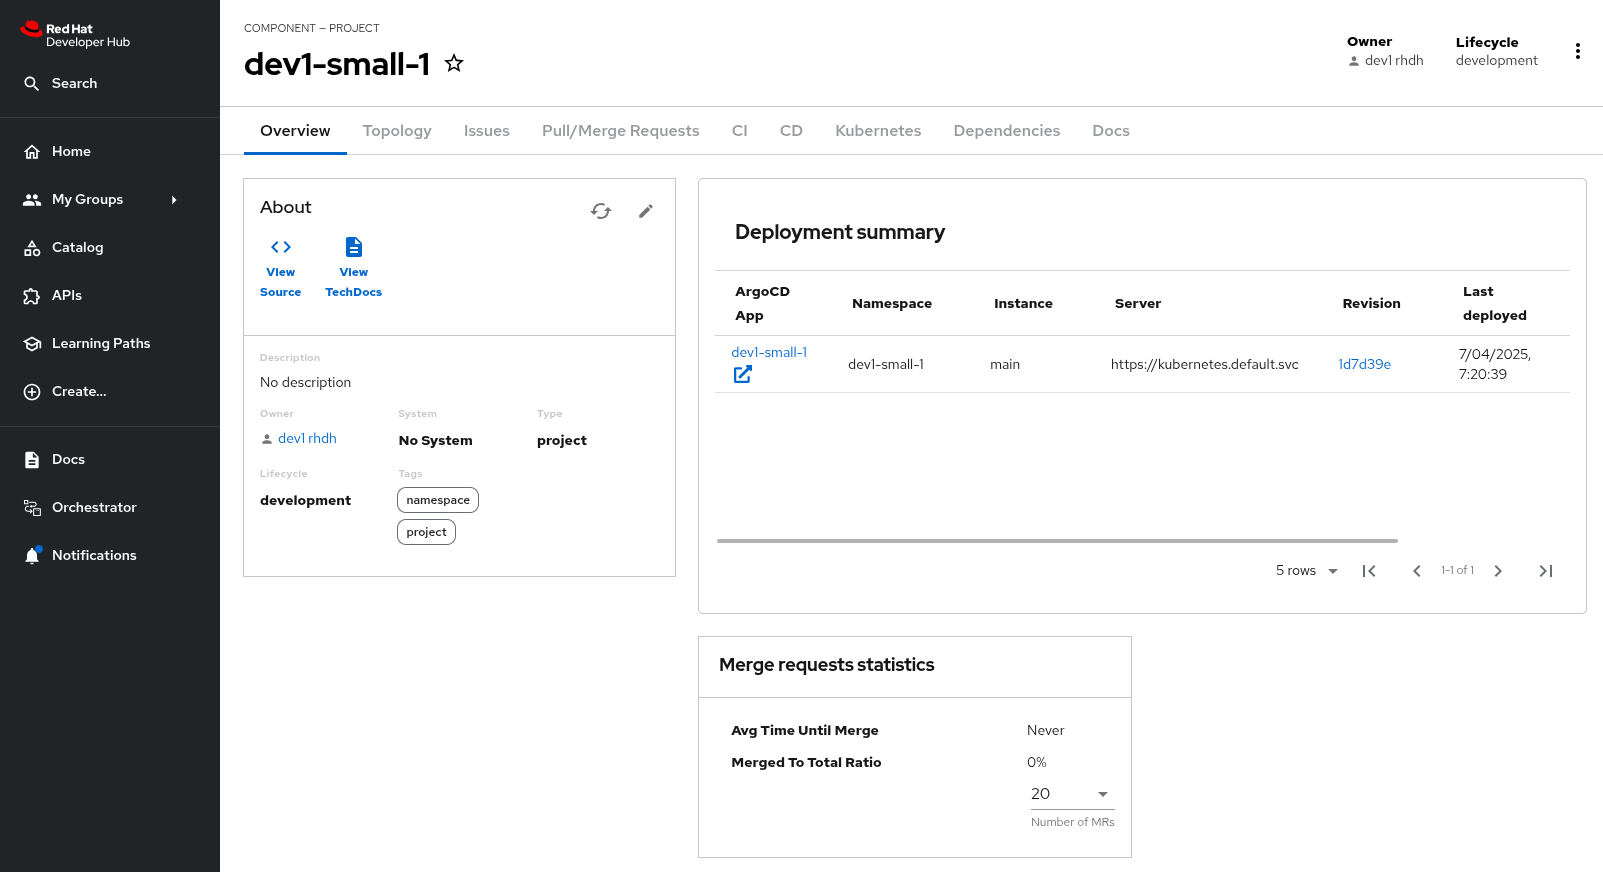
-
Visit the Namespace in the OpenShift console in your OpenShift cluster. If needed, login as
admin/{common_password}. Click on Administration/ResourceQuotas and Administration/LimitRanges on the left-hand side menu to see the resource quota and limit ranges defined as part of the creation of the namespace. -
Return to the tab of Red Hat Developer Hub to run another instance of the workflow, this time for a large namespace request.
-
Select the Orchestrator item in the left-hand menu.
-
Click the Run icon on the left of the workflow name.
-
Fill in the form as follows:
-
Namespace name:
dev1-large-1 -
Requester:
dev1 -
Size:
large -
Reason:
I need this for my project -
Recipients:
user:default/dev1
-
-
Click on Next and Run to start the workflow.
-
Select the Notifications item in the left-hand menu. After a couple of seconds you will see a notification that an issue has been created in GitLab.
-
Click on the link of the notification. This opens the issue in GitLab.
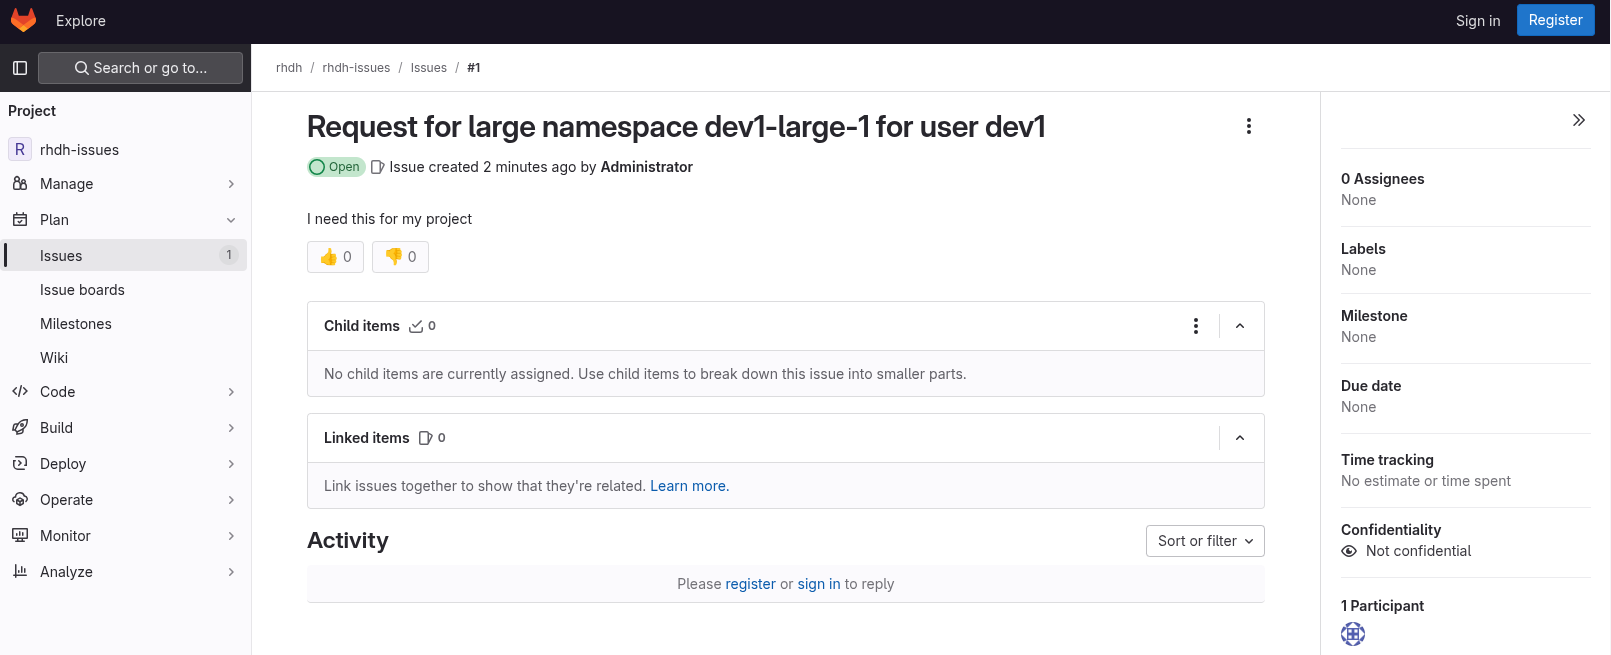
-
GitLab is not a ticketing system. To mimic the behaviour of a ticketing system, we use labels on the issue to mark the request as approved or denied.
-
Make sure you are logged in into GitLab as
pe1/{common_password}. -
Click on the Edit button next to Labels on the right.
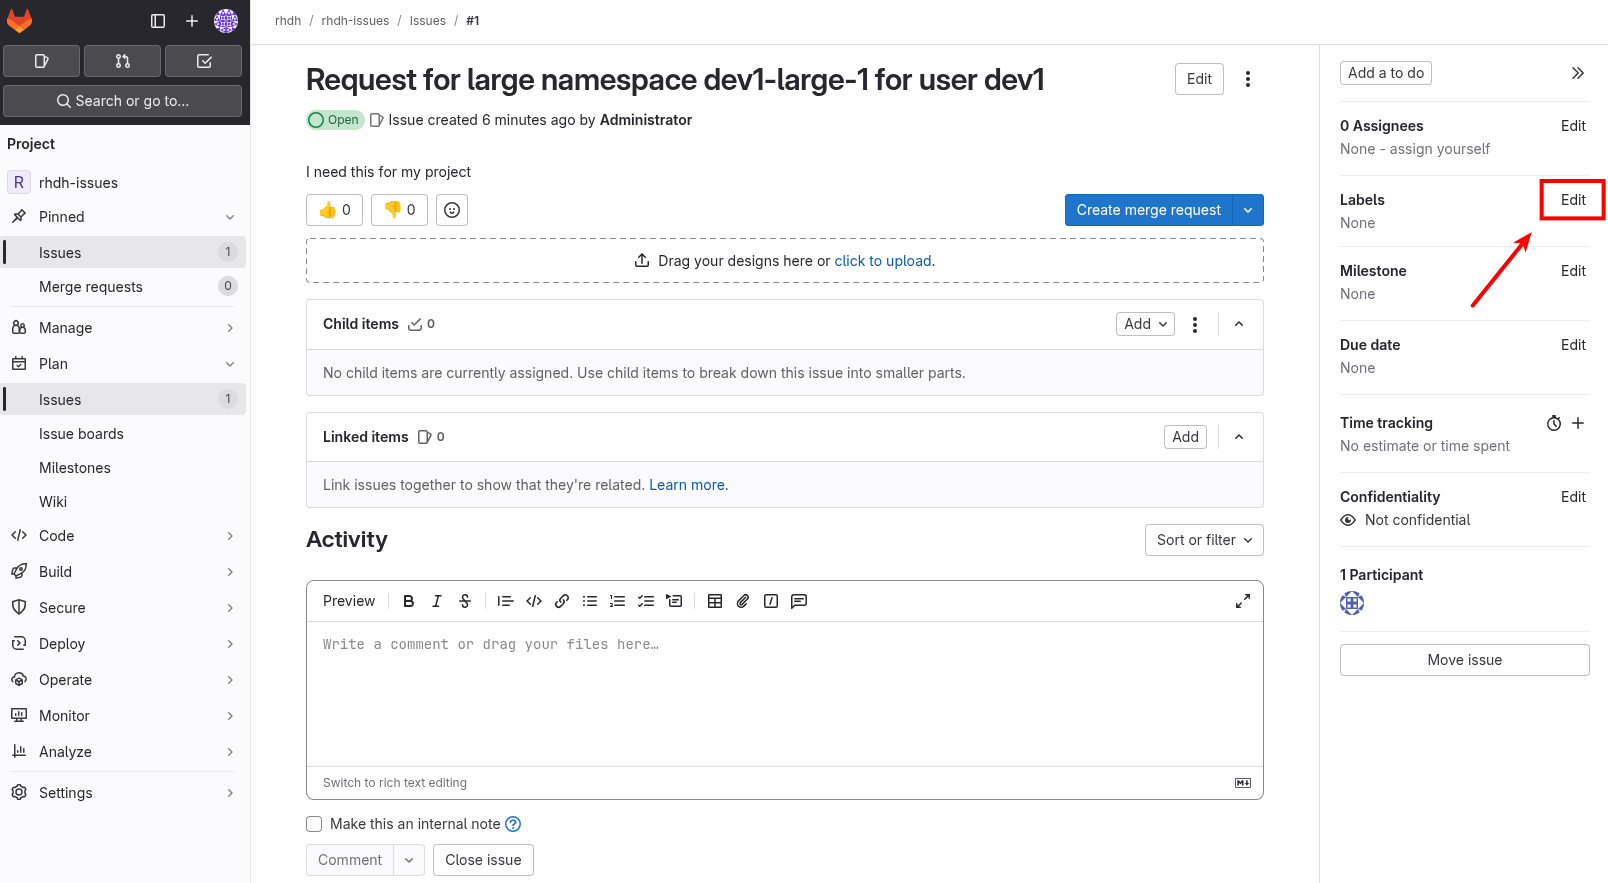
-
Select the Approved label.
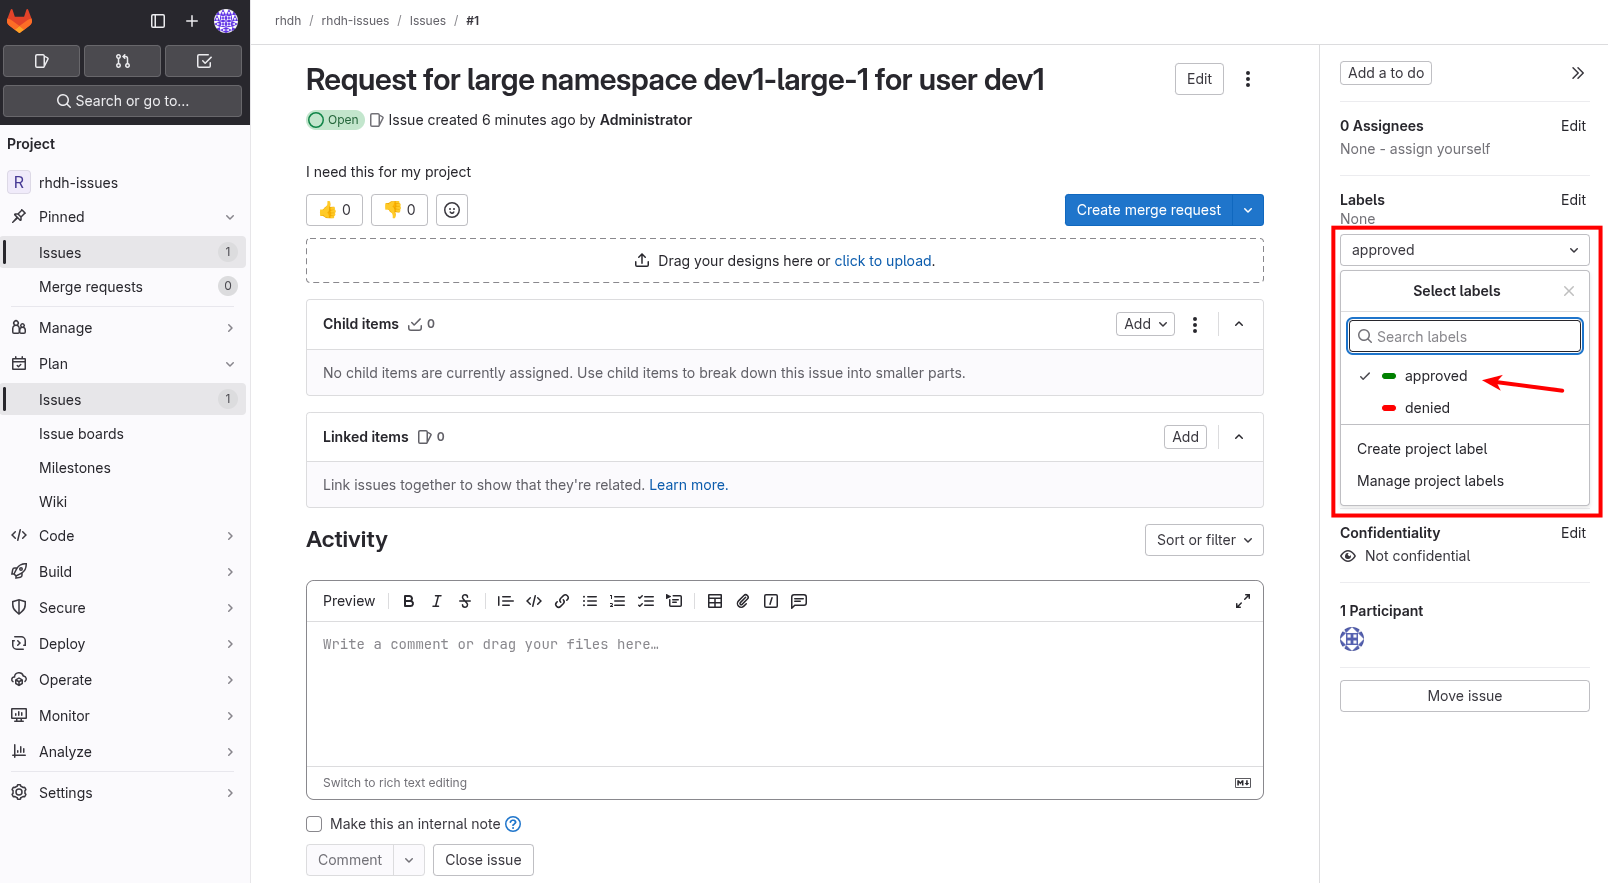
-
To actually add the label, you need to click on a different area of the page, outside of the Labels area.
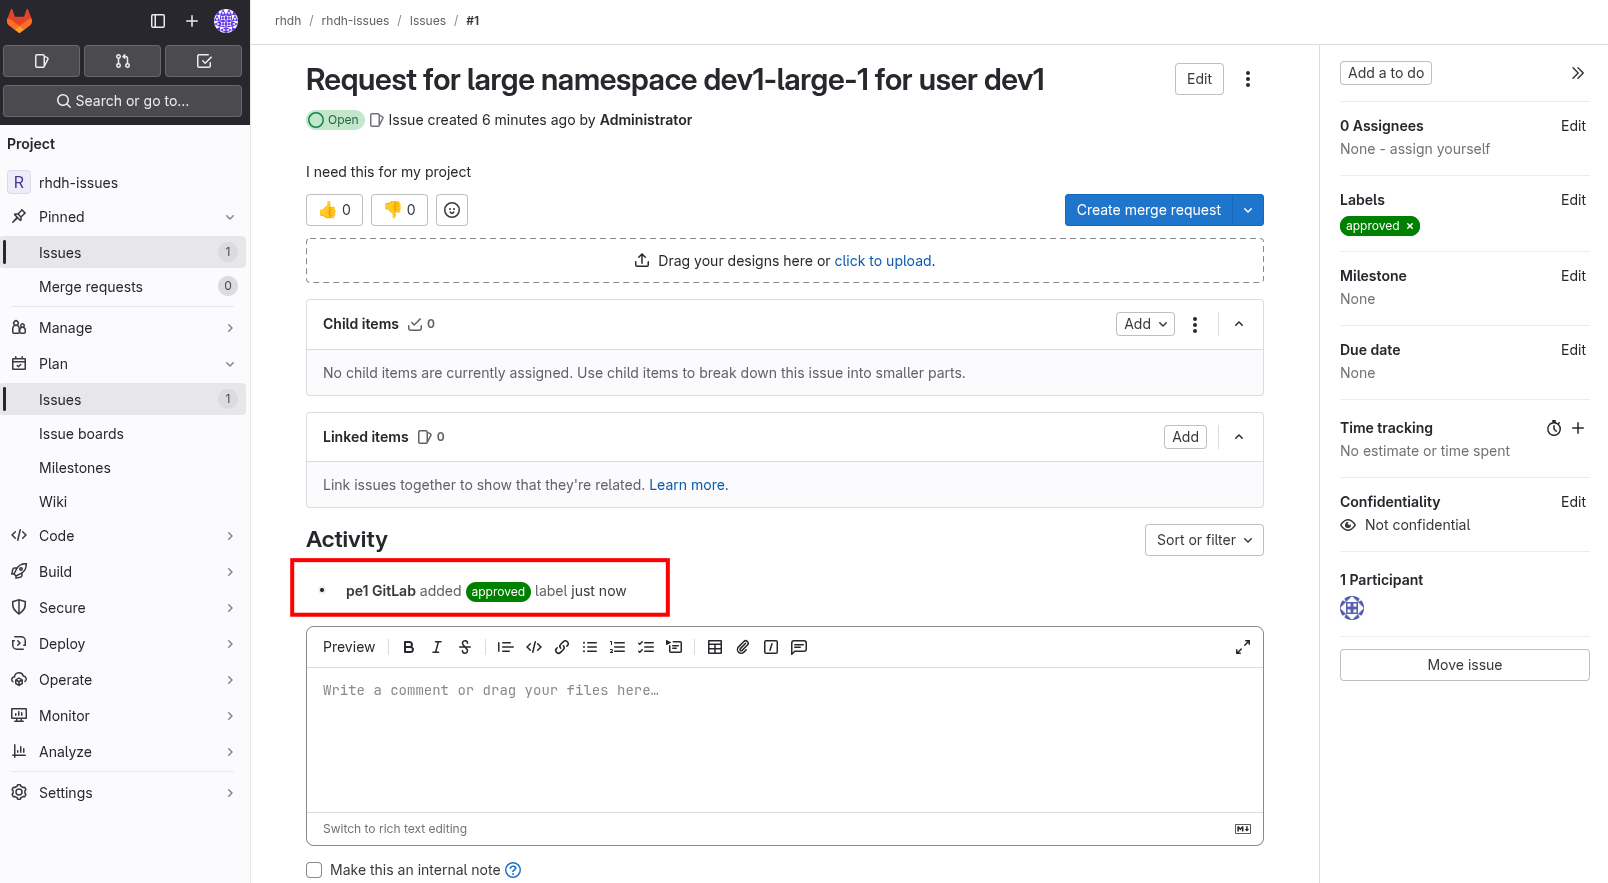
-
-
Return to the tab of Red Hat Developer Hub. After a while you should see a notification that the namespace
dev1-large-1has been created.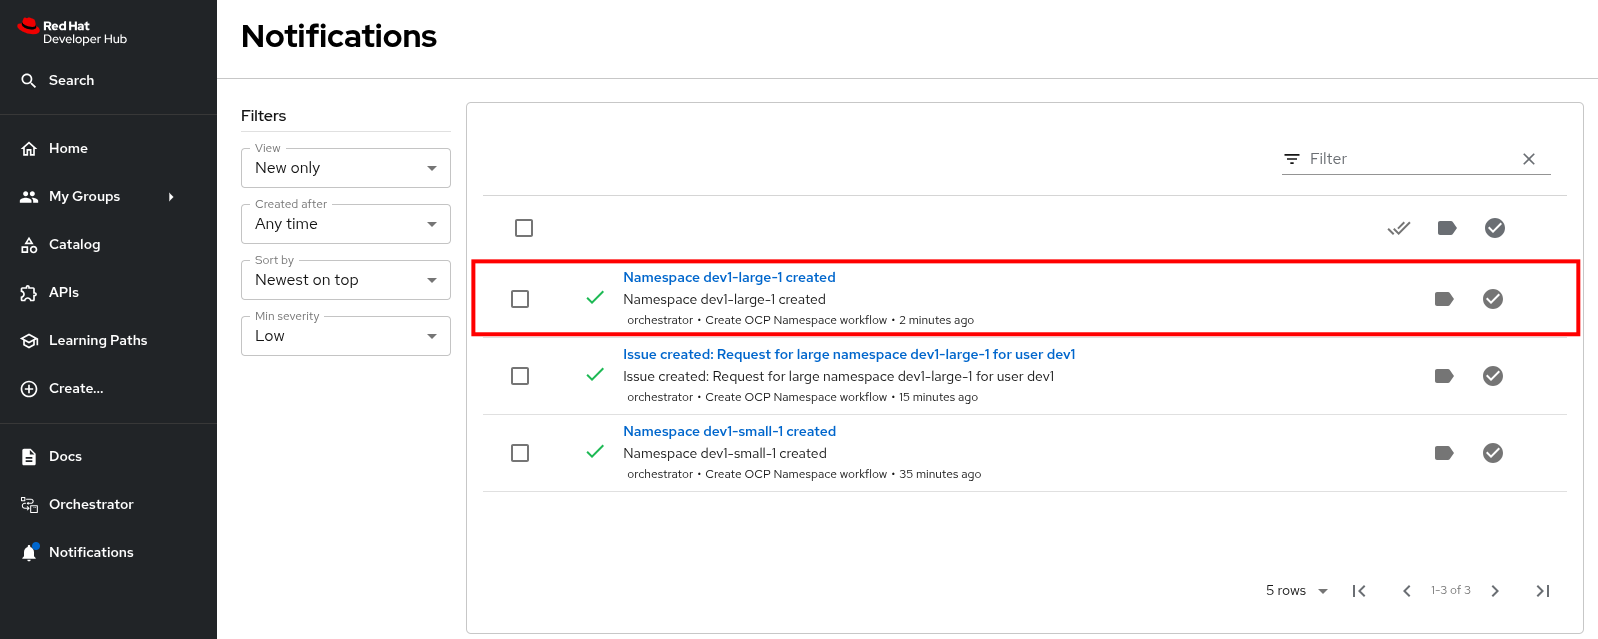
The workflow instance checks the status of GitLab issue at a regular interval (every 60 sec. in this case). When the workflow detects the Approved label on the issue, it proceeds to create the namespace and closes the ticket afterwards.
-
You can check the Namespace in the OpenShift console in your OpenShift cluster.
Also notice that the Issue in GitLab has been closed by the workflow.
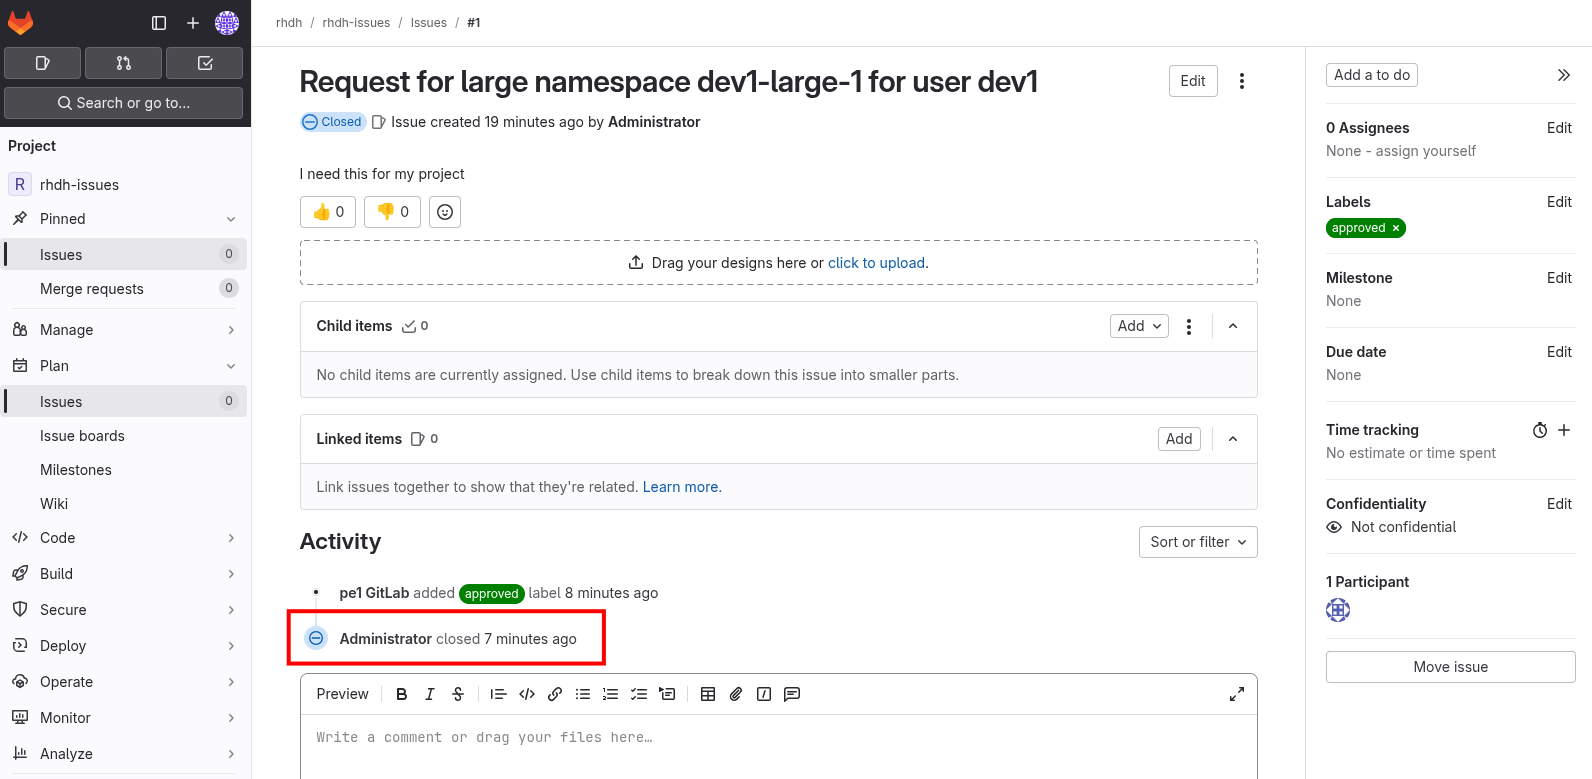
-
Feel free to create another request for a large namespace, but this time label the issue as Denied. In this case, you should see a notification in Red Hat Developer Hub that the request was denied, and there should be no namespace created in OpenShift.
Conclusion
In this module you learnt how the Red Hat Developer Hub Orchestrator plugin, in combination with Serverless Workflow on OpenShift enables more complex workflows that go beyond what Software Templates can do. The possibilities are endless, and in this module we illustrated these possibilities with a relatively simple example that involves approval and notification as part of a developer self-service experience.