Concepts of Keyless Signing & Verification
As Platform Engineers, our goal is to provide our developers and our company with a secure development process (in other words, a secure software supply chain). In the previous chapter, we discussed how we can "shift left" - how we can give developers access to vulnerability information and recommendations regarding their used dependencies.
Now that developers are building code, want to add another security guardrail - signing code commits. This way, we can be sure that the code that is being built comes from legitimate developers and hasn’t been tampered with.
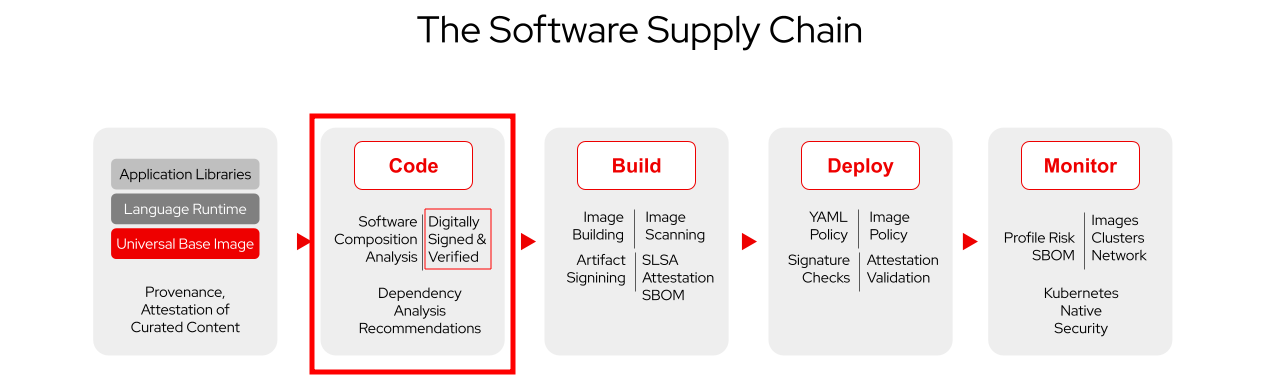
In this chapter, we will discuss how developers can sign their code commits, proving authenticity and integrity of their code. This is not a new concept and has been around for quite some time. So, let’s take a moment to compare "traditional" signing (and verification) with the "keyless" approach:
Before we dive into code commit signing and verification, we talk about the general principles - because it doesn’t matter if I want to sign a code commit, a container image or any other artifact (e.g. a .jar file) - from a signing perspective.
|
Without going too deep into details, one can see that the "traditional" public/private key pair-based signing comes with a lot of challenges:
| "Traditional" Signing & Verification | Challenges |
|---|---|
|
|
Result: Well known but rarely used at scale in an enterprise environment. |
|
With Keyless Signing, using Red Hat Trusted Artifact Signer - based on the sigstore project - this has been massively simplified:
-
Instead of a static private key for signing, we use ephemeral keys, valid only for a few minutes
-
The keys are issued by a Certificate Authority ("fulcio") - after a configured OIDC provider has authenticated the signing identity (user, process,…)
-
The signing event is stored in a write-only database ("rekor"), with the certificate tied to the OIDC identity
-
Verification can be done online by querying the rekor database, which also contains the public key issued by fulcio
| "Keyless" Signing & Verification | Your artifact is: |
|---|---|
The Sigstore project
|
Benefits
|

Supporting Developers: Signing Code Commits - without the hassle
Ok, after all this theory, let’s get practical - how can we support our developers by providing them with an easy to use code signing approach without slowing them down?
First of all - developers use git, either directly via command line or indirectly from within their IDE. With that said, before we start we need to setup our console environment.
Since this workshop is targeted at Platform Engineers, we will focus on a quick demonstration here using our workshop environment. Similar to the previous chapter - if you’d like to try it out locally, just expand the section below, but having an IDE and git installed is not a prerequisite for this workshop.
|
Expand to try it out locally
0) git clone
1) Script to get environment variables and git settings (via terminal)
2) Endpoints to get cosign/gitsign
3) Set environment variables and git configuration
4) Open IDE & commit
5) Auth
Setup
You’ll use a terminal provided in the OpenShift Web Console. This has been preinstalled in your OpenShift environment using the Web Terminal Operator.
1. Open the Terminal
-
Open the {openshift_cluster_console_url}/terminal[Terminal^, window="terminal"] logging in as
adminand{common_password} -
Click Start to use the default configuration.
2. Terminal Setup
Since the default terminal doesn’t come with the binaries (cosign, gitsign) and a git without any configuration, we have prepared a script that:
-
downloads the binaries from the cluster itself (the Trusted Artifact Signer Operator installs a basic server with all the binaries needed in matching versions)
-
configures your git environment
-
configures environment variables with the appropriate endpoints for
fulcio,rekorand the OIDC system (in our case the Red Hat Build of Keycloak, but any OIDC compliant provider would work)
Feel free to inspect the script on GitHub before executing it in the terminal session you just opened:
It’s a Linux terminal, so use <ctrl><shift><v> to paste., or <cmd><shift><v> on macOS.
|
source <(curl -fsSL https://raw.githubusercontent.com/redhat-tssc-tmm/security-roadshow/main/ocp_terminal_setup.sh)Before we continue to clone a repository, modify code and sign our commits, let’s take a quick look at what the script has done:
Aside from downloading the cosign and gitsign binaries that are needed (more below), we have configured our git environment to sign each commit via gitsign:
git config --global --list...
commit.gpgsign=true
tag.gpgsign=true
gpg.x509.program=gitsign
gpg.format=x509
...This section tells git to use gpg-style signing (similar to the "traditional" private key based signing), the format (x509) and which program should provide the key/certificate. In our case, this is gitsign (that we just downloaded and put into the path).
...
gitsign.fulcio=https://fulcio-server-trusted-artifact-signer.apps.cluster-m4r82.m4r82.sandbox56.opentlc.com
gitsign.issuer=https://sso.apps.cluster-m4r82.m4r82.sandbox56.opentlc.com/realms/backstage
gitsign.rekor=https://rekor-server-trusted-artifact-signer.apps.cluster-m4r82.m4r82.sandbox56.opentlc.com
gitsign.clientid=trusted-artifact-signer
...
This section tells gitsign where the various endpoints are, so it can request a signing certificate and where it can store the signing event metadata.
We have chose this path for convenience - with this configuration, git will automatically sign every commit (and tag) we create. For sake of completeness - we could also just commit without signing and then sign the commit later, using the cosign binary directly, using the commit hash.
|
The last command the script issued was cosign initialize - this downloads the current root certificate from the "TUF" (The Update Framework) endpoint and displays what it downloaded and validity / expiration information. This is the so-called "Trust Root" that is needed to e.g. verify that a valid signature’s certificate is also part of the trusted certificate chain, that the signed timestamp’s signature (and thus the timestamp itself) is valid, etc. This is all managed through "TUF" - in other words, you don’t have to worry about all that.
...
Root status:
 {
        "local": "/home/user/.sigstore/root",
        "remote": "https://tuf-trusted-artifact-signer.apps.cluster-m4r82.m4r82.sandbox56.opentlc.com",
        "metadata": {
...| In a production environment you could specify a custom Web Terminal container image that includes these tools out of the box. The same applies to a web-based development environment such as OpenShift Dev Spaces. |
Developer Activity: Create a branch, git clone
Since we want to sign code commits, we need some code to work on.
As Developers, let’s go back to the parasol-store app, clone it and create a branch to work on. If you like, you can go back to parasol-store on GitLab, create a branch and copy the https URL manually - but we can also do it quickly via command-line:
git clone https://gitlab-gitlab.{openshift_cluster_ingress_domain}/parasol/parasol-store.git
cd parasol-store
git checkout -b new-feature-with-signed-commits
The result should look like this:
bash-5.1 ~ $ git clone https://gitlab-gitlab.{openshift_cluster_ingress_domain}/parasol/parasol-store.git
cd parasol-store
git checkout -b new-feature-with-signed-commits
Cloning into 'parasol-store'...
remote: Enumerating objects: 414, done.
remote: Total 414 (delta 0), reused 0 (delta 0), pack-reused 414 (from 1)
Receiving objects: 100% (414/414), 62.17 KiB | 15.54 MiB/s, done.
Resolving deltas: 100% (118/118), done.
Switched to a new branch 'new-feature-with-signed-commits'
Developer Activity: Modify code, commit (and sign!)
Now we make a small modification so that we have something that we can commit. Feel free to modify any file (as long as it doesn’t break the build later) using vim or nano.
For sake of simplicity, we’ll just add an empty file and then use git add . to stage any modification for commit:
touch this-is-an-empty-file.txt
git add .
git status
bash-5.1 ~/parasol-store $ touch this-is-an-empty-file.txt
git add .
git status
On branch new-feature-with-signed-commits
Changes to be committed:
(use "git restore --staged <file>..." to unstage)
new file: this-is-an-empty-file.txtNow we can commit our change with an appropriate commit message (you can of course modify the commit message if the one below is too bland):
git commit -m "added an empty file to test commit signing"And here something unexpected happens (if you have used git on the command-line before) - you’re asked to copy a URL to a browser…
bash-5.1 ~/parasol-store $ git commit -m "added an empty file to test commit signing"
error opening browser: exec: "xdg-open": executable file not found in $PATH
Go to the following link in a browser:

         https://sso.apps.cluster-m4r82.m4r82.sandbox56.opentlc.com/realms/backstage/protocol/openid-connect/auth?access_type=online&client_id=trusted-artifact-signer&code_challenge=[...]OAJzPGn0p
Enter verification code:
This is because here in the workshop the gitsign binary is running in a shell that doesn’t have a browser installed (error opening browser: exec: "xdg-open": executable file not found in $PATH).
If you ran this on your machine, it would directly open your favourite browser.
But either way - the point is that you need to prove who you are - by simply logging into e.g. your company SSO. Depending on your SSO (OIDC) system, this could be username and password, as in our example - or a hardware key or whatever you are using on a daily basis to prove that you are who you say you are.
So, copy the full URL into a browser window (depending on your browser, you might see "open in new tab" after selecting the full URL in the terminal).
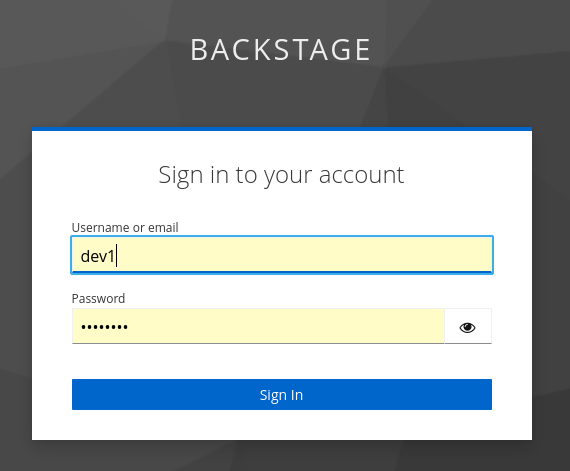
Use dev1 and {common_password} to authenticate.
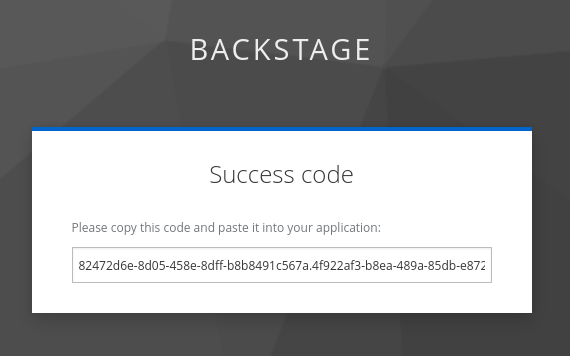
Now copy the full code (best to use <ctrl><a> or <cmd><a> since the code is longer than the field) and paste it back into your terminal session (and remember, developers don’t have to do that unless they are working on a remote ssh session).
gitsign doesn’t echo the password (verification code) - so just paste (ctrl-shift-v or cmd-shift-v) and hit enter. If you get an error (error getting signer: oauth2: "invalid_grant" "Code not valid") don’t worry, just use the upward arrow to recall the last command (git commit) and do it again - since you couldn’t successfully prove your identity, nothing has been committed yet.
|
tlog entry created with index: 0
[new-feature-with-signed-commits 1b2d5cc] added an empty file to test commit signing
 1 file changed, 0 insertions(+), 0 deletions(-)
 create mode 100644 this-is-an-empty-file.txt
WE HAVE SIGNED OUR COMMIT 😃👏
Now we just need to push it (including the new branch) to our repository:
git push -u origin new-feature-with-signed-commitsbash-5.1 ~/parasol-store $ git push -u origin new-feature-with-signed-commits
Username for 'https://gitlab-gitlab.apps.cluster-m4r82.m4r82.sandbox56.opentlc.com': dev1
Password for 'https://dev1@gitlab-gitlab.apps.cluster-m4r82.m4r82.sandbox56.opentlc.com':
Enumerating objects: 4, done.
Counting objects: 100% (4/4), done.
Delta compression using up to 32 threads
Compressing objects: 100% (2/2), done.
Writing objects: 100% (3/3), 1.38 KiB | 1.38 MiB/s, done.
Total 3 (delta 1), reused 1 (delta 0), pack-reused 0
remote:
remote: To create a merge request for new-feature-with-signed-commits, visit:
remote: https://gitlab-gitlab.apps.cluster-m4r82.m4r82.sandbox56.opentlc.com/parasol/parasol-store/-/merge_requests/new?merge_request%5Bsource_branch%5D=new-feature-with-signed-commits
remote:
To https://gitlab-gitlab.apps.cluster-m4r82.m4r82.sandbox56.opentlc.com/parasol/parasol-store.git
* [new branch] new-feature-with-signed-commits -> new-feature-with-signed-commits
branch 'new-feature-with-signed-commits' set up to track 'origin/new-feature-with-signed-commits'.Verifying Code Commits
One key use case for signing code commits is to strengthen the integrity of our software supply chain - in other words, making sure that we’re building our applications from source code and developers that we can trust.
"But I have access controls in place for my git system", you might ask.
Yes, that is of course a good practice and highly recommended - Access controls answer: "Who can push code right now?"
Signed commits answer: "Who actually wrote this code, and has it been tampered with since?"
Why Access Controls Alone Aren’t Enough
-
Credentials Get Compromised: Developer accounts can be hijacked through phishing, credential stuffing, or malware. When this happens, malicious commits appear completely legitimate from the repository’s perspective - they came from an authorized account.
-
The Insider Threat: A disgruntled employee or compromised insider account can inject malicious code. Without signing, it’s nearly impossible to prove later that specific commits weren’t actually made by the account owner.
-
Historical Verification: Access controls only work at the moment of push. Six months later, when auditing code or investigating an incident, you can’t verify whether a commit genuinely came from the claimed author or if the repository history has been tampered with.
-
Supply Chain Attestation: In today’s world of software supply chain attacks, customers and auditors increasingly want cryptographic proof of who wrote what code. "Trust us, we have access controls" doesn’t meet compliance requirements like SLSA Level 2+ (we’ll deal with SLSA later).
What Commit Signing Adds
With Sigstore keyless signing specifically, you get:
-
Non-repudiation: Developers can’t deny they wrote specific code, and conversely, they can prove they didn’t write malicious commits attributed to them
-
Tamper Detection: Any modification to signed commits, even by someone with admin access, breaks the signature
-
Time-stamped Proof: Sigstore’s transparency log provides immutable evidence of when commits were signed
-
Identity Binding: Commits are tied to developer identity (via OIDC), not just to SSH/GPG keys that could be stolen
Manual verification
Before we augment our pipelines to block unsigned commits, let’s look at some manual way to look at the authenticity and metadata associated with a signed code commit.
1) via GitLab UI
-
Open the branch we just created in GitLab
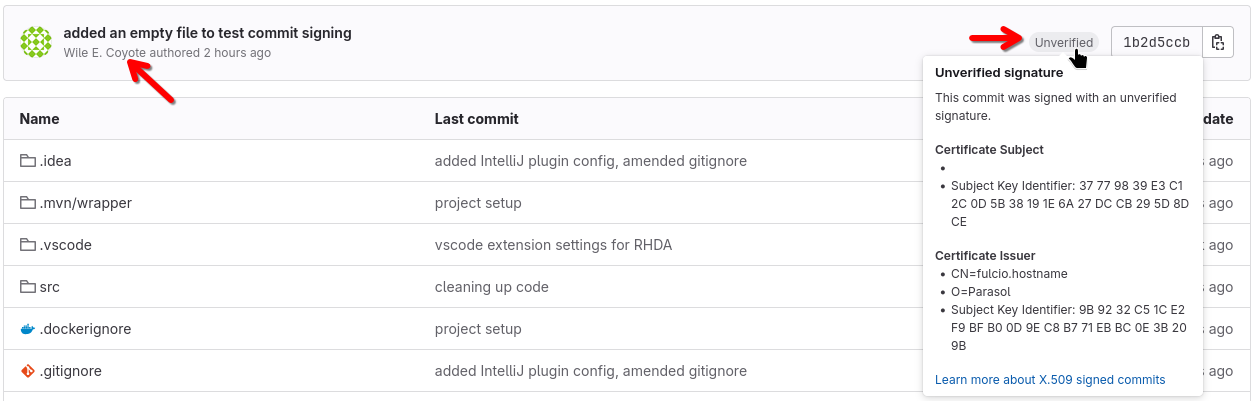
You will notice that
-
Even through we authenticated as
dev1when we pushed the commit - the author is "Wile E. Coyote", who we set as author in yourgit config. So, how do we know if it really wasdev1instead? -
GitLab by itself recognizes the signature, but can’t verify it - hence the
unverifiedtag. (However, with the popularity of the sigstore project, the community behind GitLab is working on that - and so are other vendors)
2) via git log --show-signature
git log --show-signatures shows us all git commits, including signature metadata.
git log --show-signaturebash-5.1 ~/parasol-store $ git log --show-signature
commit 61cac444aef9ed40da2c000e66af0953aa4c729d (HEAD -> new-feature-with-signed-commits, origin/new-feature-with-signed-commits)
tlog index: 1
gitsign: Signature made using certificate ID 0xcab55164c8a9ff5a43ad228b28e7592c7f6c6a90 | CN=fulcio.hostname,O=Parasol
gitsign: Good signature from [dev1@rhdemo.com](https://sso.apps.cluster-m4r82.m4r82.sandbox56.opentlc.com/realms/backstage)
Validated Git signature: true
Validated Rekor entry: true
Validated Certificate claims: false
WARNING: git verify-commit does not verify cert claims. Prefer using `gitsign verify` instead.
Author: Wile E. Coyote <boom@acme.com>
Date: Sat Aug 30 11:36:46 2025 +0000
added an empty file to test commit signing3) via gitsign verify
As the output above tells us, git verify-commit or the git log command verify that the signature is valid - but they don’t validate the claims embedded in the certificate for additional security. In our case, the signer identity and the OIDC system that verified the identity:
gitsign verify --certificate-identity dev1@rhdemo.com --certificate-oidc-issuer $OIDC_ISSUER_URL HEADbash-5.1 ~/parasol-store $ gitsign verify --certificate-identity dev1@rhdemo.com --certificate-oidc-issuer $OIDC_ISSUER_URL HEAD
tlog index: 1
gitsign: Signature made using certificate ID 0xcab55164c8a9ff5a43ad228b28e7592c7f6c6a90 | CN=fulcio.hostname,O=Parasol
gitsign: Good signature from [dev1@rhdemo.com](https://sso.apps.cluster-m4r82.m4r82.sandbox56.opentlc.com/realms/backstage)
Validated Git signature: true
Validated Rekor entry: true
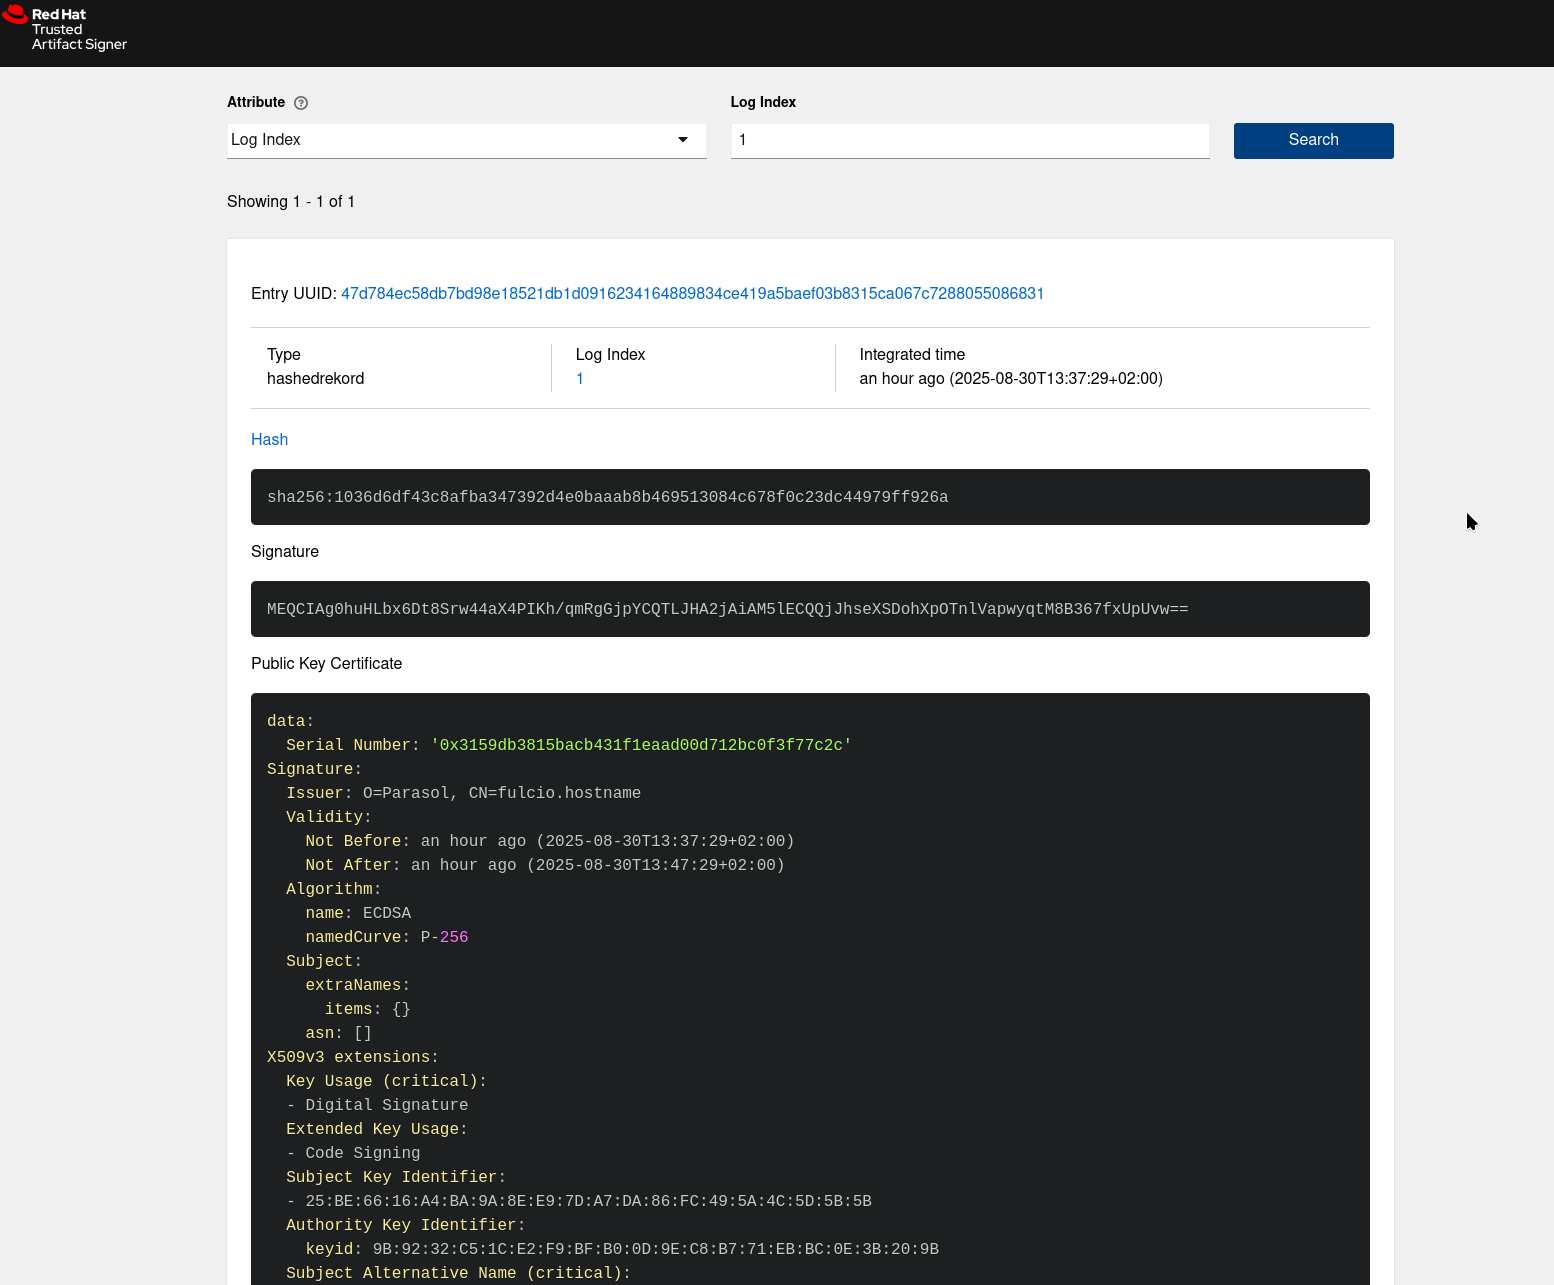
Validated Certificate claims: true4) via the Transparency Log (rekor)
While mostly being used by the various CLI tools for storing and verifying signing events, you can open the Rekor UI and search for signer’s emails, uuids - or the index (you have seen entries like tlog index: 1 during signing and verification. tlog is the Transparency Log a.k.a. Rekor)
Activity: Verifying Signatures in the build pipeline
Ok, now that we have seen how developers would sign their commits - it’s time to think about to leverage that as a security guardrail:
1.) In Chapter 4.4, we imported a software template that creates a dev environment for developers so that they can start working on a parasol-store feature branch. This template includes a pipeline that builds the feature branch code and patches the ArgoCD deployment to immediately deploy what the developer has just built (see Chapter 4.5):
How about we added a check if the commit had been signed?
We don’t want to break the build necessarily, but here’s the thing:
-
if we are lenient here and tolerate unsigned commits here, these commits are part of the commit history and will ultimately be merged into the parasol code.
-
when we’re breaking later builds for production images because they contain unsigned commits - the developer will have to go back and sign his commits, which might be cumbersome.
-
however, this is an opinionated approach - if and how you want to enforce it (or just warn if there are unsigned commits) is completely up to you
So, let’s add that task:
As mentioned above, the pipeline is provisioned by the "Parasol Store Development" template - since it is our responsibility as Platform Engineers to continuously evolve those templates based on developer requirements and company policies - we’ll do the following:
1) We have prepared a template that adds the commit verification - as Platform Engineers, you could also evolve the existing template and add functionality to it. For this workshop, we’ll take the easy path (instead of modifying an existing template).
2) We’ll use the branch with our signed commits that we created earlier and instantiate a new development environment with that new template
3) We’ll add another signed commit and see what happens.
For the next steps (a PE Activity) please make sure to log in as a Platform Engineer with pe1 / {common_password}. Refer to the below guide for assistance.
|
Click to learn how to login as a Platform Engineer
Login as Platform Engineer
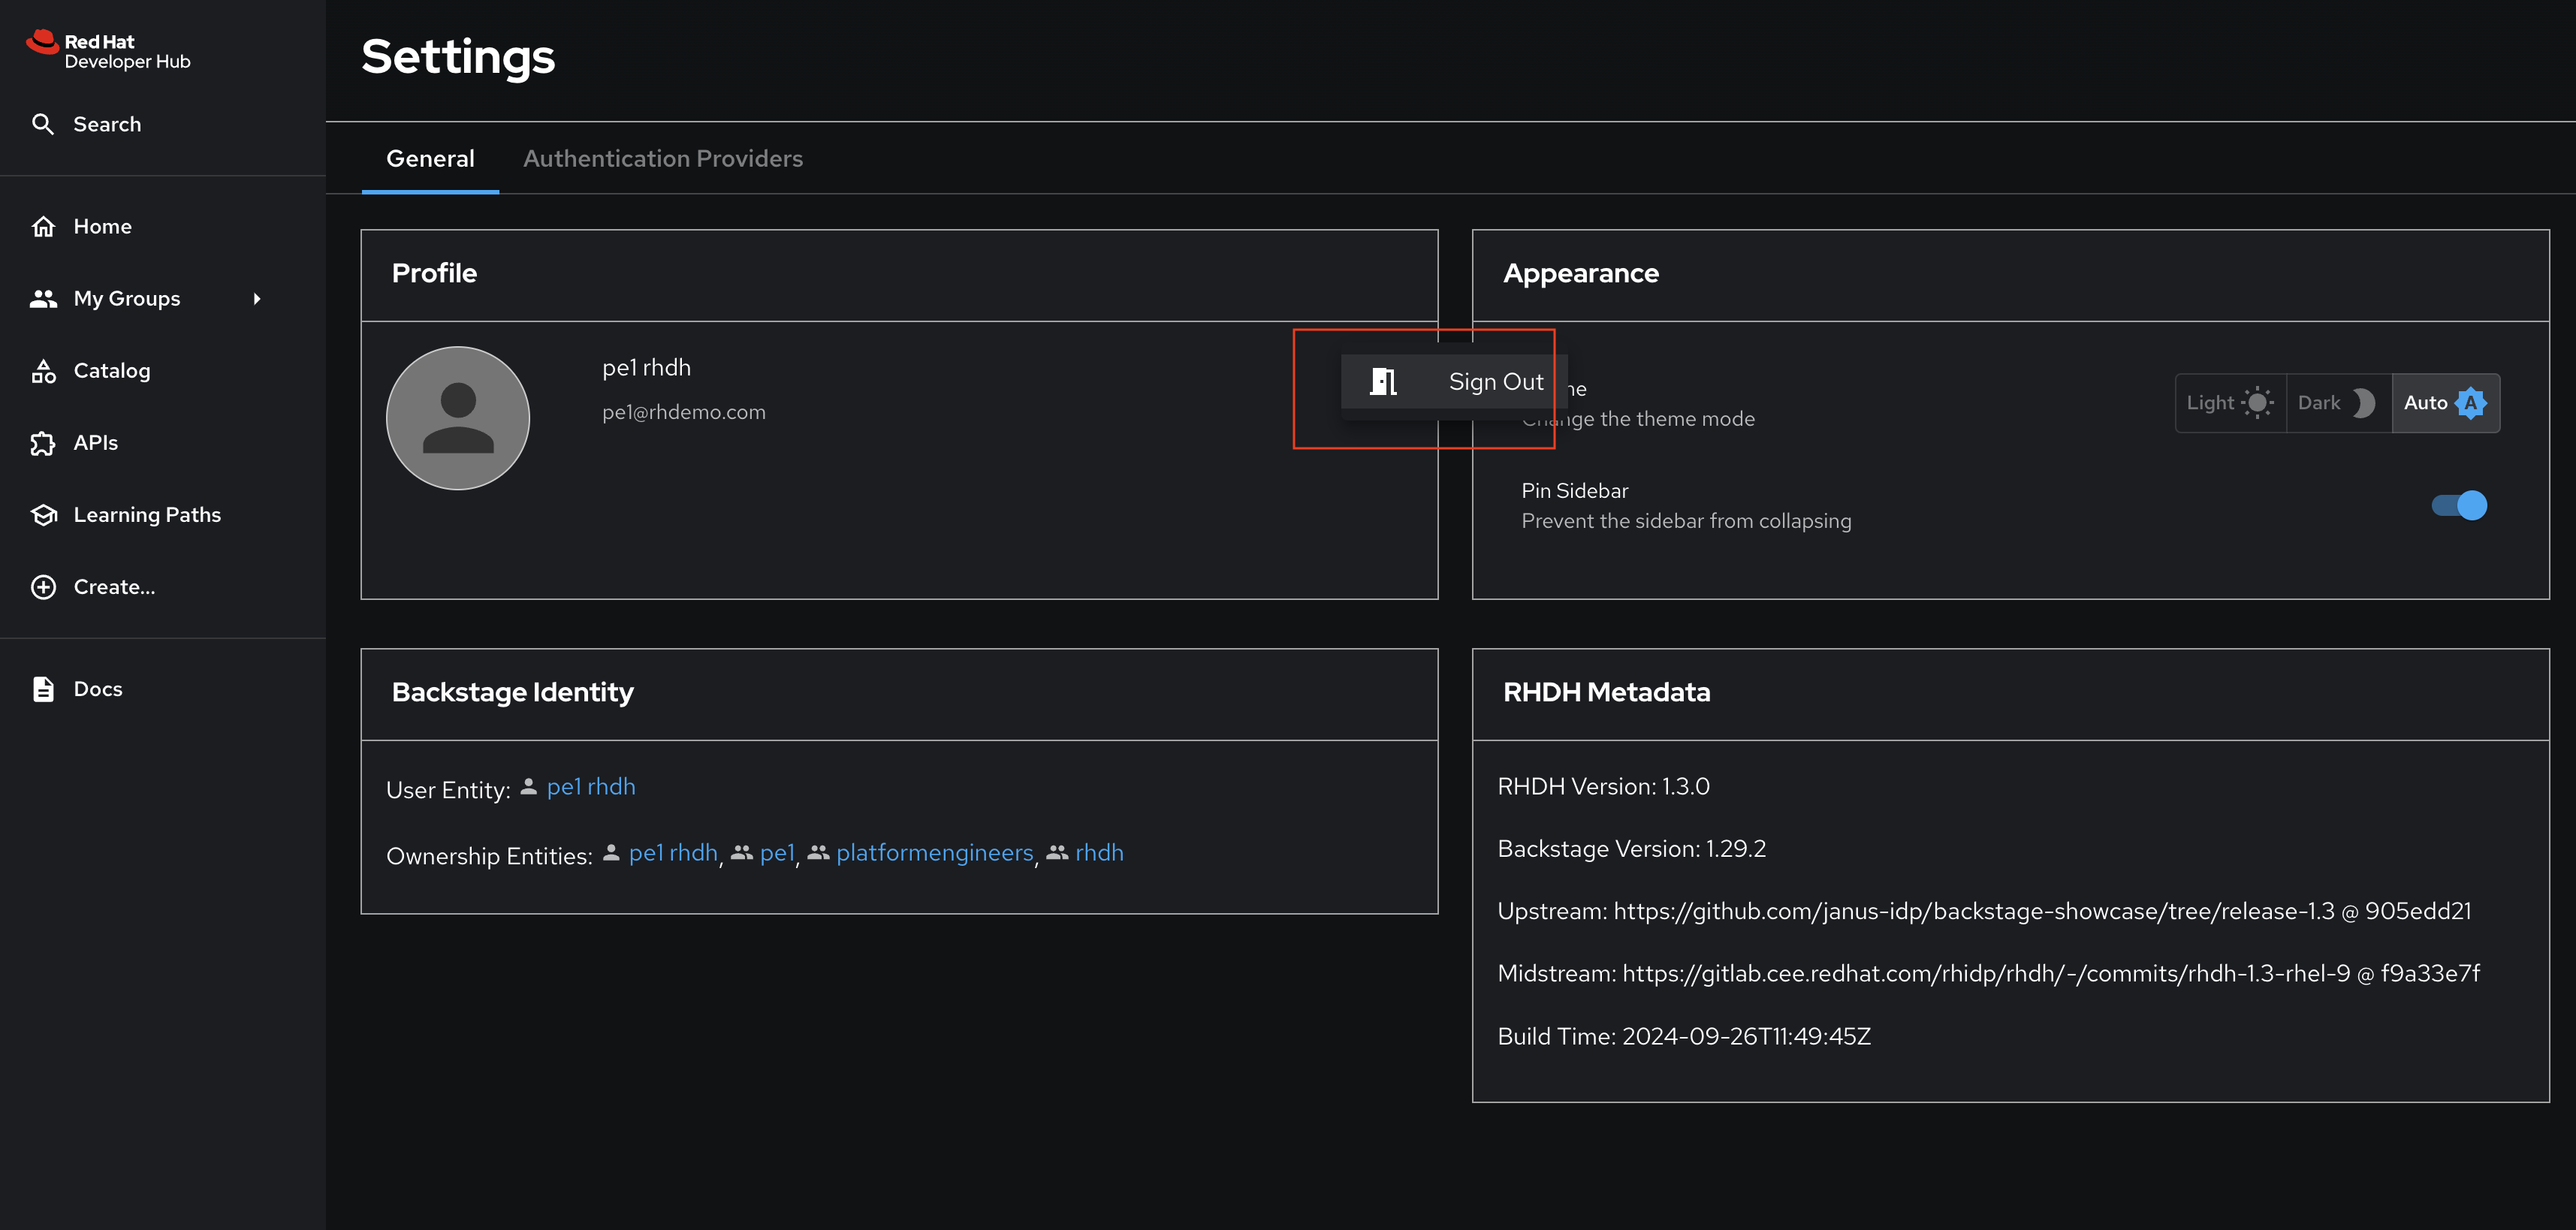
You will perform this activity as a Platform Engineer. Please follow the below steps to logout from Red Hat Developer Hub and GitLab, and login back as a Platform Engineer (pe1 / {common_password})
-
Logout from Red Hat Developer Hub
-
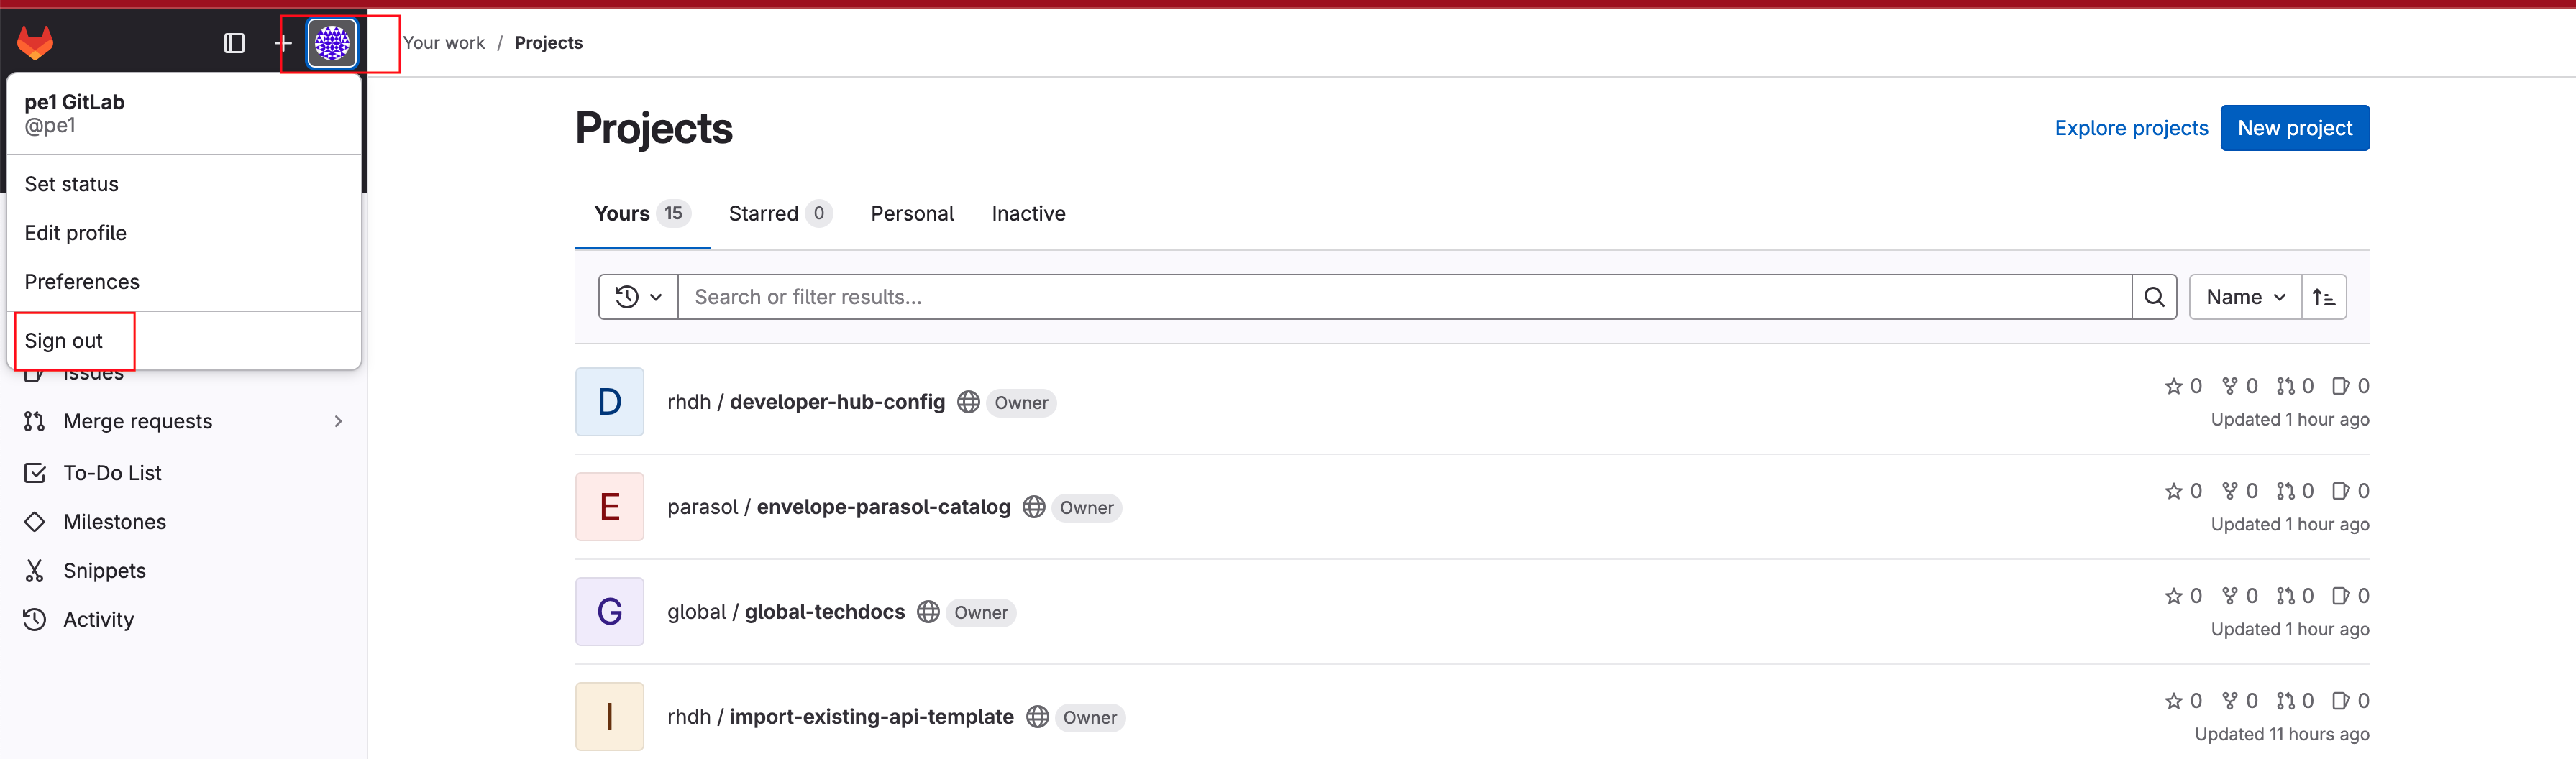
Sign out of Red Hat Developer Hub from the Profile dropdown as shown in the screenshot below.

-
-
Logout from GitLab
-
Click on the Profile icon, and Sign out from the dropdown as shown in the screenshot below.

-
-
Login back as a Platform Engineer to Red Hat Developer Hub and GitLab using the credentials
pe1/{common_password}
| As noted earlier in the workshop, we are using Tekton (OpenShift Pipelines) here - but that is just an implementation detail. You can use your CI of choice and adapt what we do here. |
1) PE: Adding the new template
-
We imported the "insecure" template earlier (remember the step "Register Existing Component" in Chapter 4.4?) - and we’ll do the same for the new template:
-
Access your Red Hat Developer Hub instance.
-
Click on the
 icon on the top navigation to access the Create menu, and choose Register Existing Component. (If you don’t see the Register Existing Component box, you’re not logged in as "pe1" or "pe2").
 -
Create a Software Template by pasting this template URL into the URL textbox
https://gitlab-gitlab.{openshift_cluster_ingress_domain}/rhdh/parasol-store-dev-template-secure/-/blob/main/template.yaml -
Click on the Analyze button followed by clicking the Import button to import the template.
-
The Template will appear on the Create screen.
2) DEV: Using the new template
We’ll follow the same steps we did in Chapter 4.5 (working on a feature branch) - but this time, our pipeline will have git commit verification built in!
Since we already created a parasol-store branch (new-feature-with-signed-commits) above via command-line - we’ll simply use that.
| For details what we’re doing and why - go back to Chapter 4.5 for a detailed explanation. We’re now setting up a developer environment, but with the new template. |
| Creating a new developer environment is a Developer activity, so please login as dev1 (see expandable section below) |
Click to learn how to login as a Developer
Login as Developer
-
You will perform this activity as a Developer.
-
Logout from Red Hat Developer Hub
-
Click the dropdown in the top-right of Red Hat Developer Hub, then click on the Logout link.
-
-
Logout from GitLab
-
Click on the Profile icon, and Sign out from the dropdown as shown in the screenshot below.
-
-
Login back as a Developer to to Red Hat Developer Hub and GitLab using the credentials
dev1/{common_password}
1) Go to the "Self-service" section of Red Hat Developer Hub here - or click the (+) icon in the Red Hat Developer Hub top navigation header.
2) Use the template:
-
Click "Choose" on the "Secure Parasol Store Development" template
-
enter the
new-feature-with-signed-commitsbranch name (since we used that above) and click "next" -
accept the database defaults on the next page and click "next"
-
review the changes and click "create"
3) Click "Open Component in Catalog" (or click here)
After a few moments, the ArgoCD job will kick off the first pipeline run (-init-) in your new environment. However, the first run after instantiating template will look exactly like the pipeline runs with the other template. Why is that?
At this point in time, we’re not using a trigger (like a trigger on a git push), but just doing the bare minimum, so a developer has a running deployment in his development environment. Good for quick tests.
However, once we actually push our commits, something different happens.
3) DEV: Sign & Push a commit
Ok, now let’s go back to our terminal and again sign a commit, then push it.
| If your terminal has shut down due to inactivity, below find the commands to quickly get back to where you left off: |
Open if your terminal isn’t available anymore
-
Open the {openshift_cluster_console_url}/terminal[Terminal^, window="terminal"] logging in as
adminand{common_password} -
Execute the following commands, that will setup the terminal, clone the repository and switch to the
new-feature-with-signed-commitsbranch
source <(curl -fsSL https://raw.githubusercontent.com/redhat-tssc-tmm/security-roadshow/main/ocp_terminal_setup.sh)git clone https://gitlab-gitlab.{openshift_cluster_ingress_domain}/parasol/parasol-store.git
cd parasol-store
git checkout new-feature-with-signed-commitsOk, now you’re good to go again to follow the next steps:
echo "this is a change" >> this-is-an-empty-file.txt
git add .
git commit -m "changed the empty file"
bash-5.1 ~/parasol-store $ git commit -m "changed the empty file"
error opening browser: exec: "xdg-open": executable file not found in $PATH
Go to the following link in a browser:
https://sso.apps.cluster-z4fpk.z4fpk.sandbox1501.opentlc.com/realms/backstage/protocol/openid-connect/auth?access_type=online&client_id=trusted-artifact-signer&code_challenge=P-4pgbRMtnvMxDqqQ7JnLHQz4ZYd58LH1E4cS81vmXg&code_challenge_method=S256&nonce=32nFywUdobBDLO8gVbfgFXJeav1&redirect_uri=urn%3Aietf%3Awg%3Aoauth%3A2.0%3Aoob&response_type=code&scope=openid+email&state=32nFz0I9b9r8XFDWK6FHgePqT3x
Enter verification code:
tlog entry created with index: 4
[new-feature-with-signed-commits 19f845d] changed the empty file
1 file changed, 1 insertion(+)git pushbash-5.1 ~/parasol-store $ git push
Username for 'https://gitlab-gitlab.apps.cluster-z4fpk.z4fpk.sandbox1501.opentlc.com': dev1
Password for 'https://dev1@gitlab-gitlab.apps.cluster-z4fpk.z4fpk.sandbox1501.opentlc.com':
Enumerating objects: 5, done.
Counting objects: 100% (5/5), done.
Delta compression using up to 32 threads
Compressing objects: 100% (2/2), done.
Writing objects: 100% (3/3), 1.41 KiB | 1.41 MiB/s, done.
Total 3 (delta 1), reused 0 (delta 0), pack-reused 0
remote:
remote: To create a merge request for new-feature-with-signed-commits, visit:
remote: https://gitlab-gitlab.apps.cluster-z4fpk.z4fpk.sandbox1501.opentlc.com/parasol/parasol-store/-/merge_requests/new?merge_request%5Bsource_branch%5D=new-feature-with-signed-commits
remote:
To https://gitlab-gitlab.apps.cluster-z4fpk.z4fpk.sandbox1501.opentlc.com/parasol/parasol-store.git
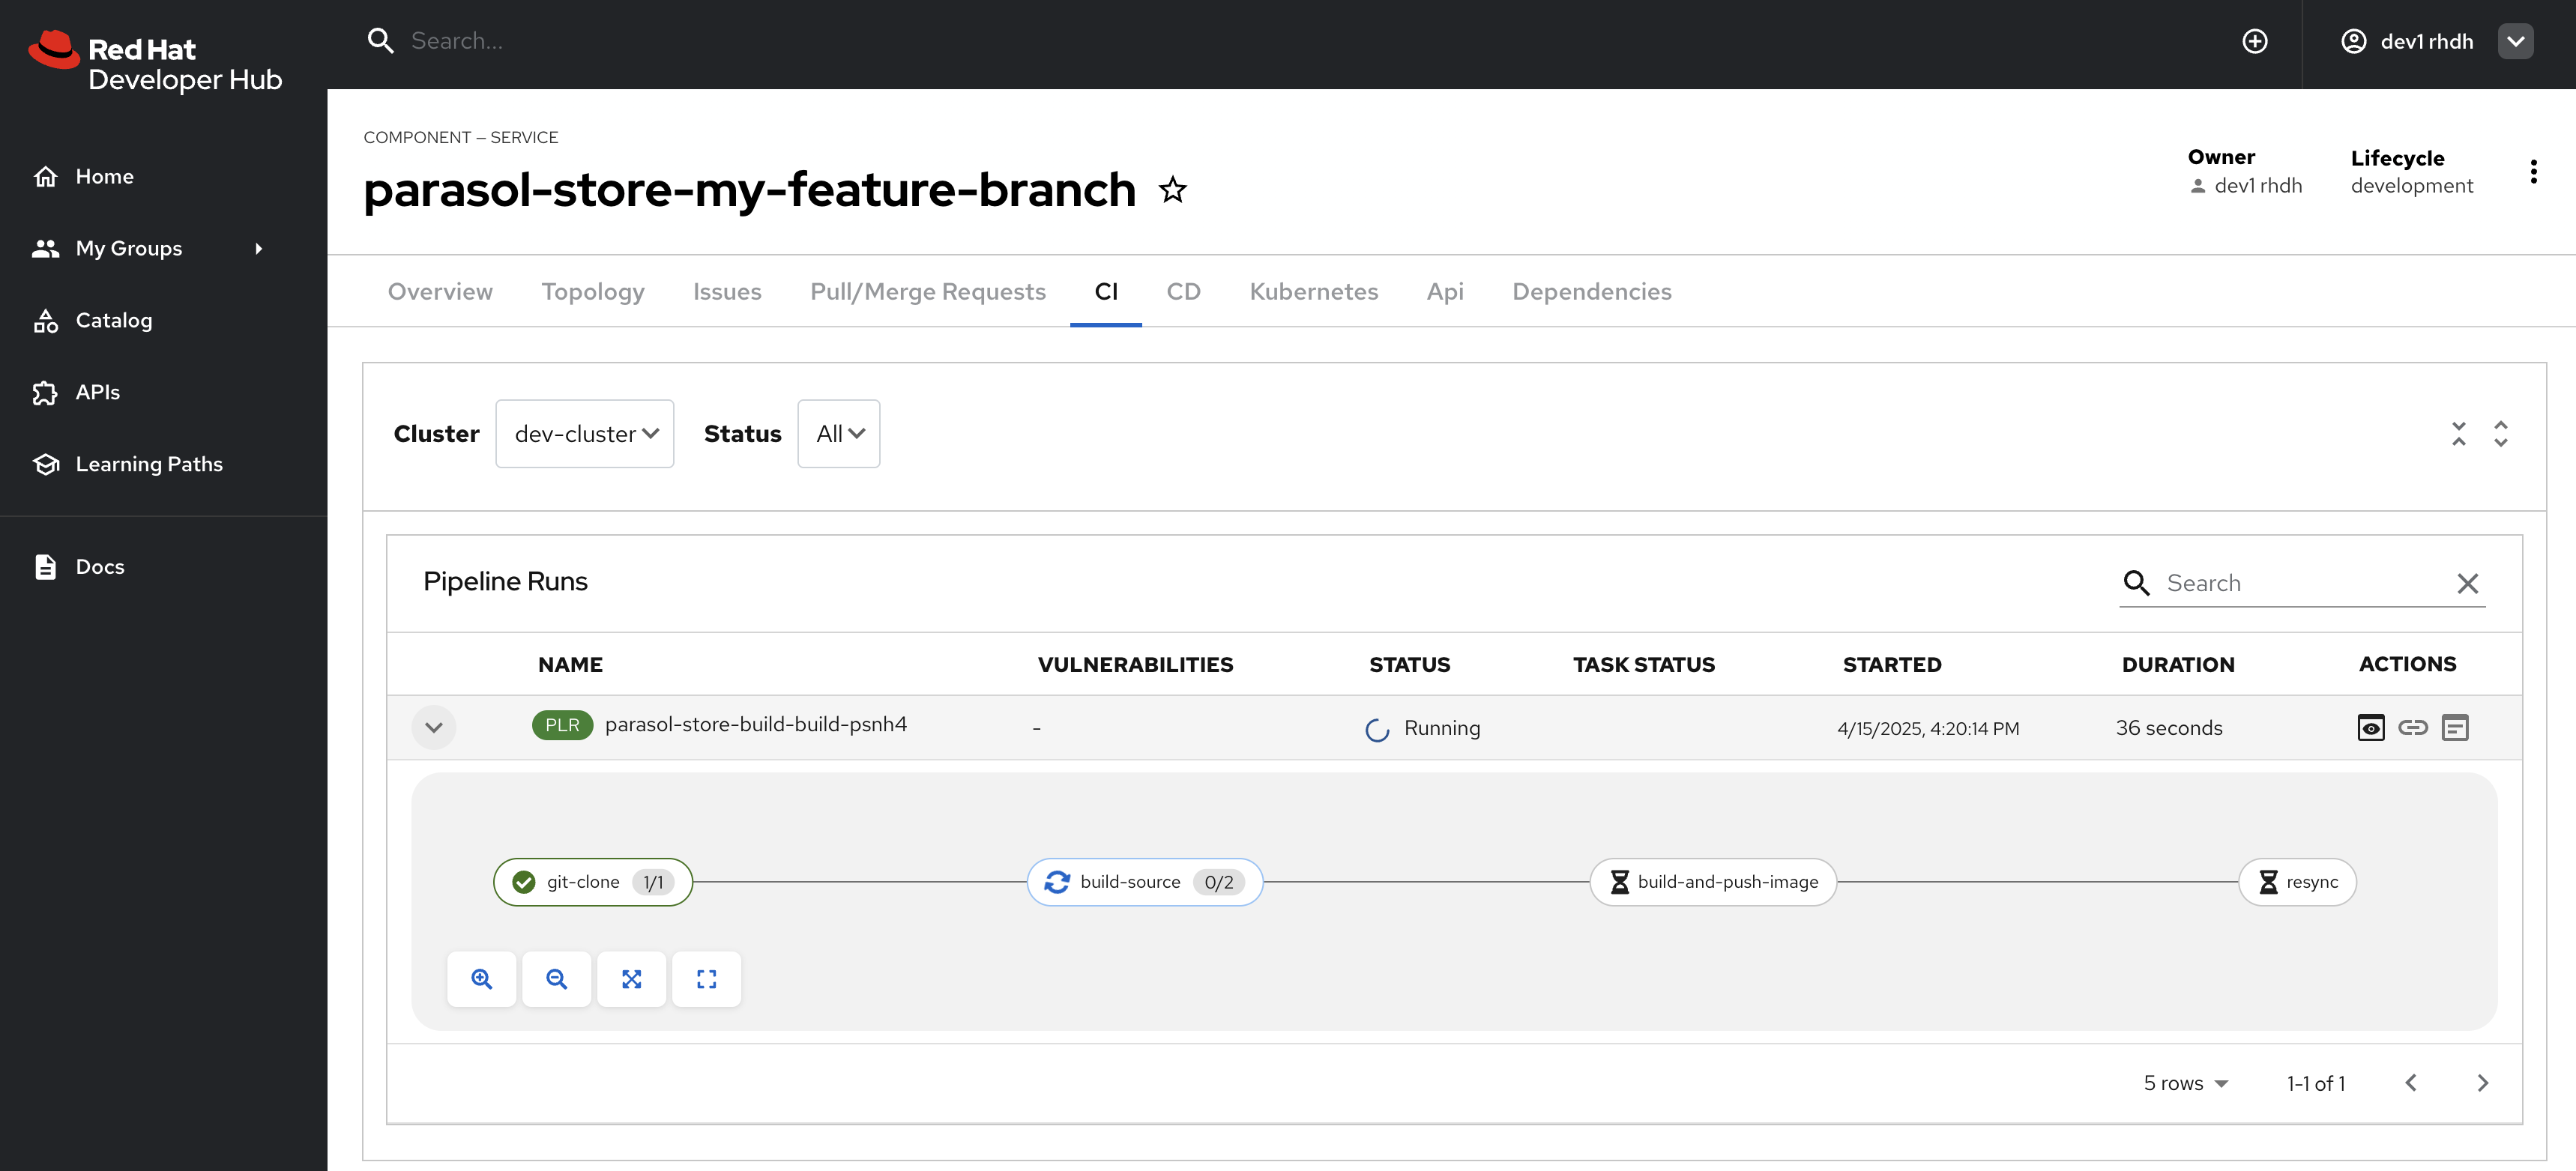
38b702b..19f845d new-feature-with-signed-commits -> new-feature-with-signed-commitsAs a result, we will now see our pipeline run and succeed:

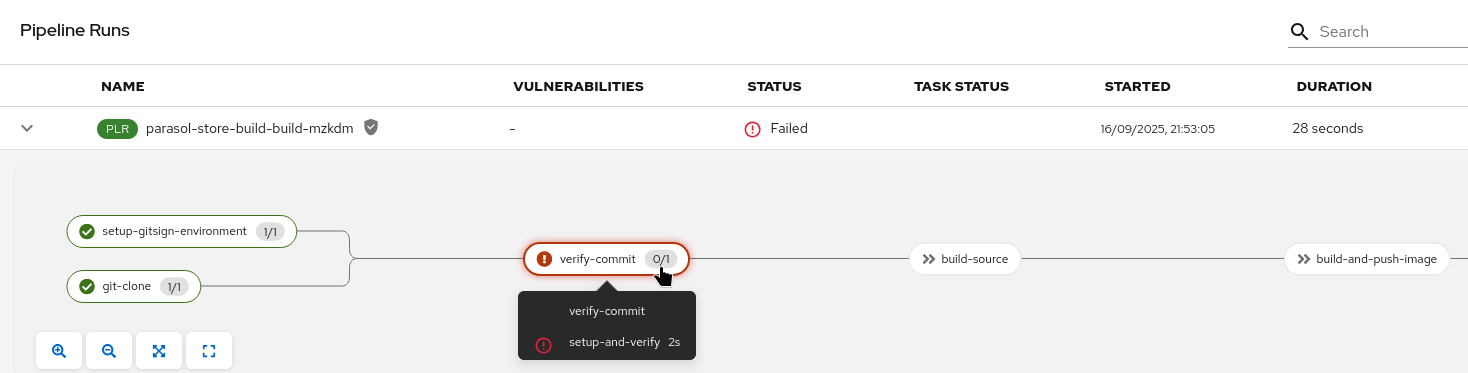
When you click on the verify-commit task to see its log, you can see that we checked if it had been signed by the person pushing it.

Remember, here we’re not checking if the git author signed the commit, but we’re checking if the person pushing signed it. However, that is completely up to you. We can also check the "claims" (user and OIDC issuer) of the signature with regular expressions, adding flexibility to your verification. If you want to inspect how this is done, take a look at the task-verify-commit.yaml task. It basically comes down to this one line: gitsign verify --certificate-identity $(params.email) --certificate-oidc-issuer $OIDC_ISSUER_URL HEAD where we can change to --certificate-identity-regexp and/or --certificate-oidc-issuer-regexp, respectively.
|
bash-5.1 ~/parasol-store $ git log -n 2
commit 19f845d64e4dc85334537852adc91b4c708b2bd0 (HEAD -> new-feature-with-signed-commits, origin/new-feature-with-signed-commits)
Author: Wile E. Coyote <boom@acme.com>
Date:   Tue Sep 16 18:51:27 2025 +0000

    changed the empty file

commit 38b702b5d8bb411cd6d84bb5c53e46e64503beae
Author: Wile E. Coyote <boom@acme.com>
Date:   Tue Sep 16 17:05:32 2025 +0000

    added an empty file to test commit signing
4) DEV: Testing unsigned commits
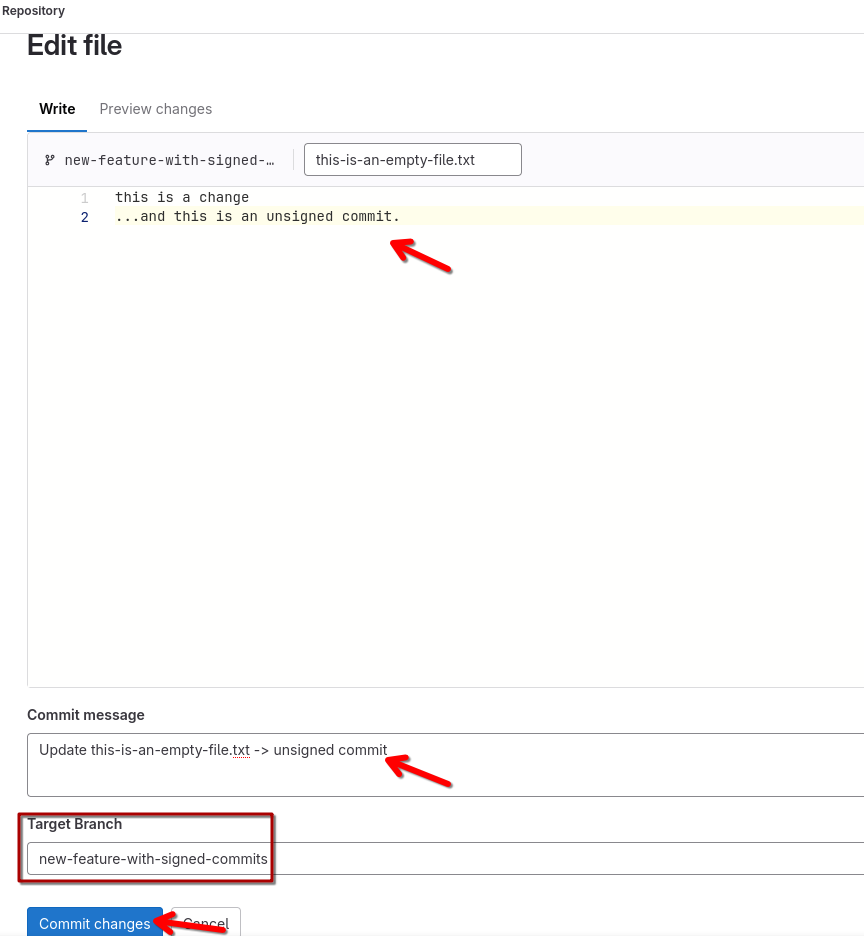
Lastly, let’s see what happens with an unsigned commit - for that, we’ll quickly edit the this-is-an-empty-file.txt in GitLab here and commit the change with a meaningful message, such as adding "unsigned commit" to the default message:
As expected, the pipeline has been triggered by the commit - and fails, as it should: